Crazy Fit Massage Energy Board Luxury series PP-9000 User manual

PP-9000
Energy Board
Luxury series
USER'S MANUAL

IMPORTANT PRECAUTIONS
To reduce the ri , fire, electric shock, or injury to persons, read the
fore operating the ENERGY BOARD.
1.
nd precautions.
3. l surface,
feet of clearance behind it.
face
penings.
4
ust. Do not put
here
n
6 the age of 12 and pets
7.
ore than 300 pounds.
d.
10 e surge suppressor
11. Never leave the ENERGY BOARD unattended
g the power
ARD is not in use.
12. Do not attempt to raise, lower, or move the
13. I
r y of
t is made to
sce.
14
15.
WARNING: sk of burns
following important precautions and information be
It is the responsibility of the owner to ensure
that all users of this ENERGY BOARD are while it is running. Always remove unplu
adequately informed of all warnings cord when the ENERGY BO
a
2. Use the ENERGY BOARD only as described
in this manual.
Place the ENERGY BOARD on a leve
with at least eight
Do not place the ENERGY BOARD on any sur
that blocks air o
To protect the floor or carpet from damage,
place a mat under the ENERGY BOARD.
. Keep the ENERGY BOARD indoors,
away from moisture and d
the ENERGY BOARD in a garage or covered
patio, or near water.
5. Do not operate the ENERGY BOARD w
Aerosol products are used or where oxyge
is being administered.
. Keep children under
away from the ENERGY BOARD at all times.
The ENERGY BOARD should not be used
by persons weighing m
8. Never allow more than one person on the
ENERGY BOARD at a time.
9. When connecting the power cord ,
plug the power cord into a surge suppressor
(not included). Do not use an extension cor
. Keep the power cord and th
away from heated surfaces.
ENERGY BOARD until it is properly assembled.
nspect and tighten all parts of the ENERGY BOARD
egularly. Wrong usage could influence the stabilit
the ENERGY BOARD. For Example, the pos
upport you during an exercise to keep you in balan
One should NOT PUSH the post for stretching or use
the post to create more tension.
.Inspect and tighten all parts of the ENERGY BOARD
regularly.
Never insert or drop any object into any
opening.
16.DANGER: Always unplug the power
ing
GY BOARD, and before performing the
djustment procedures described
zed service
17. T e use
any
WARNI any exercise prog ly
cord immediately after use, before clean
the ENER
maintenance and a
in this manual. Never remove the
motor hood unless instructed to do so by an
authorized service representative. Servicing
other than the procedures in this manual
should be performed by an authori
representative only.
his ENERGY BOARD is intended for in-hom
only. Do not use this ENERGY BOARD in
commercial,rental, or institutional setting.
NG: Before beginning this or ram, consult your physician. This is especial
important for persons over the age of 35 or persons with pre-exi tionssting health problems. Read all instruc
before using. SAVE THESE INSTRUCTIONS
2
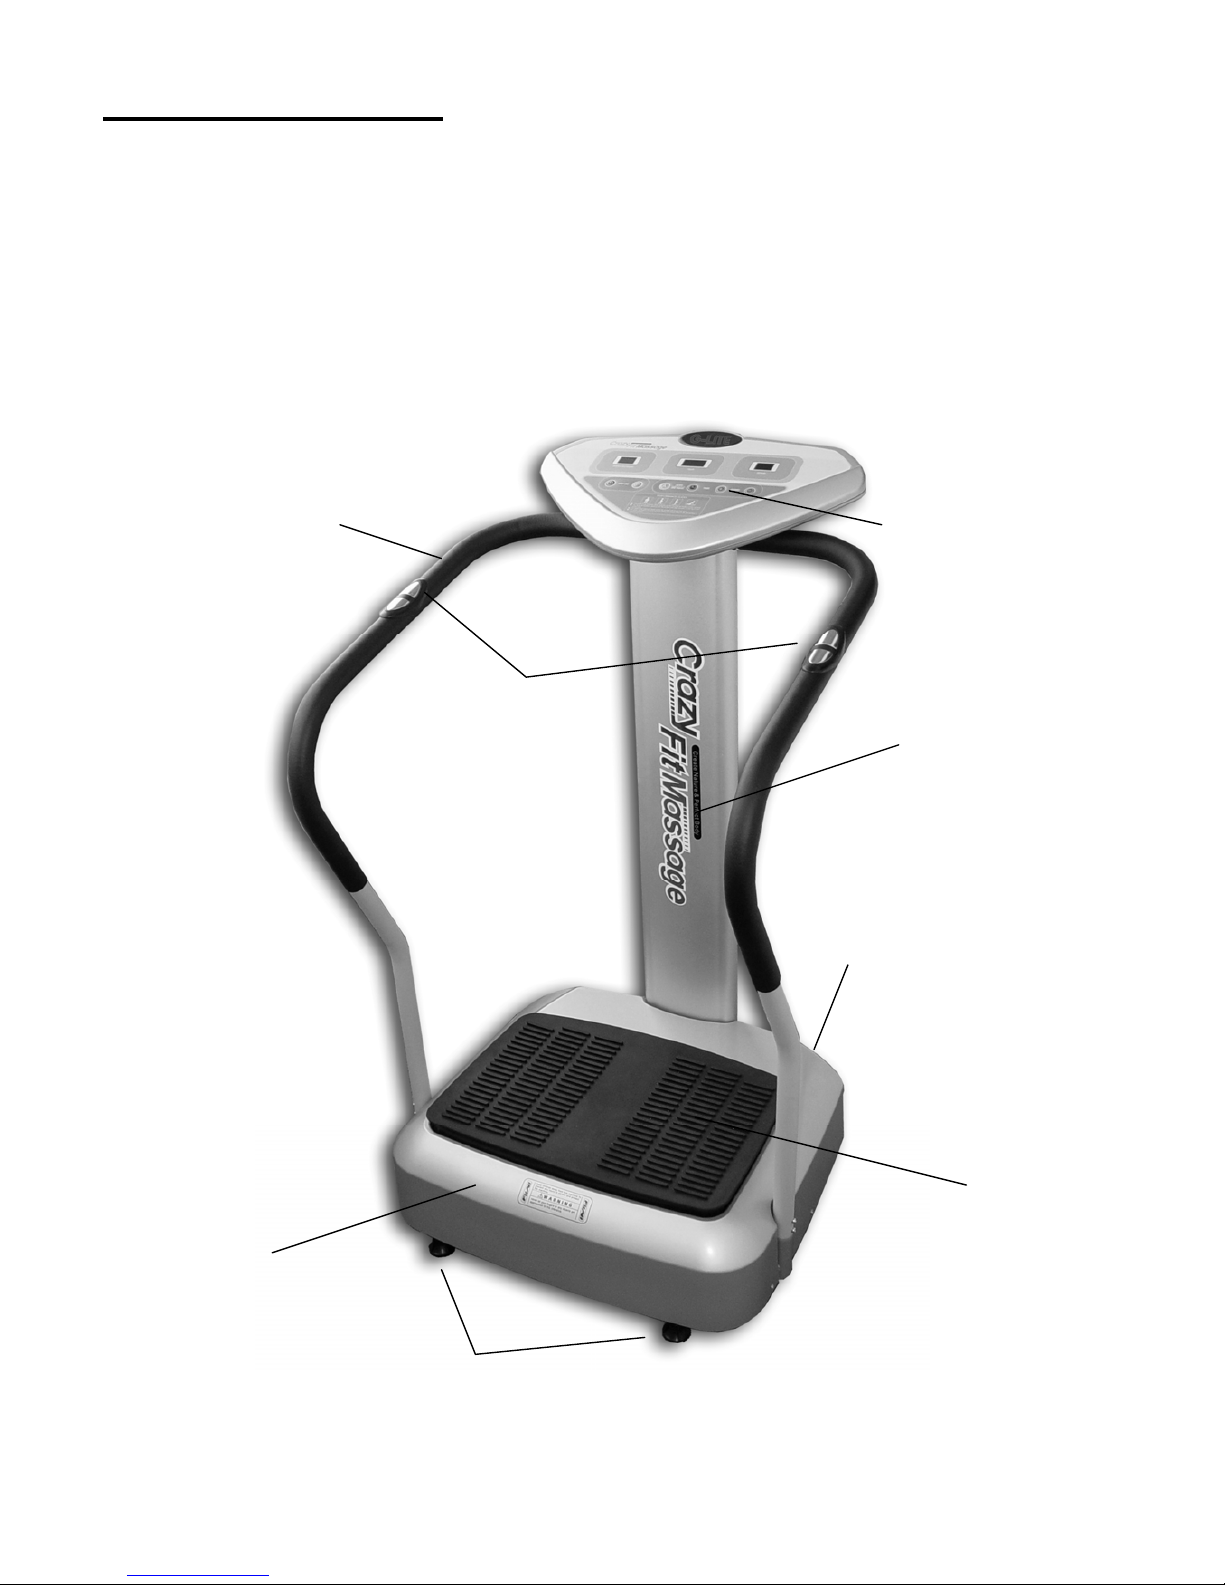
BEFORE YOU BEGIN
Handlebar
Display Panel
BodyFat sensor
Main support tube
Power cord
ENERGY BOAED plate
Motor case
Adju efootpadstabl
n impressive arra
ore enjoyable
e call our Customer Service Department To
se note the product model
number and serial number before calling. The model
number of the ENERGY BOARD is PP-9000. The serial
ERGY
rself
EF SIDE
RIGHT SIDE
3
Thank you for selecting the revolutionary PP-9000 help us assist you, plea
ENERGY BOARD. The PP-9000 offers a
of features to make your home workouts m
y
and effective.
For your benefit, read this manual carefully before
using the ENERGY BOARD. If you have additional
questions,pleas
number can be found on a decal attached to the EN
BOARD Before reading further, please familiarize you
with the parts that are labeled in the drawing below.
T
`
`
L
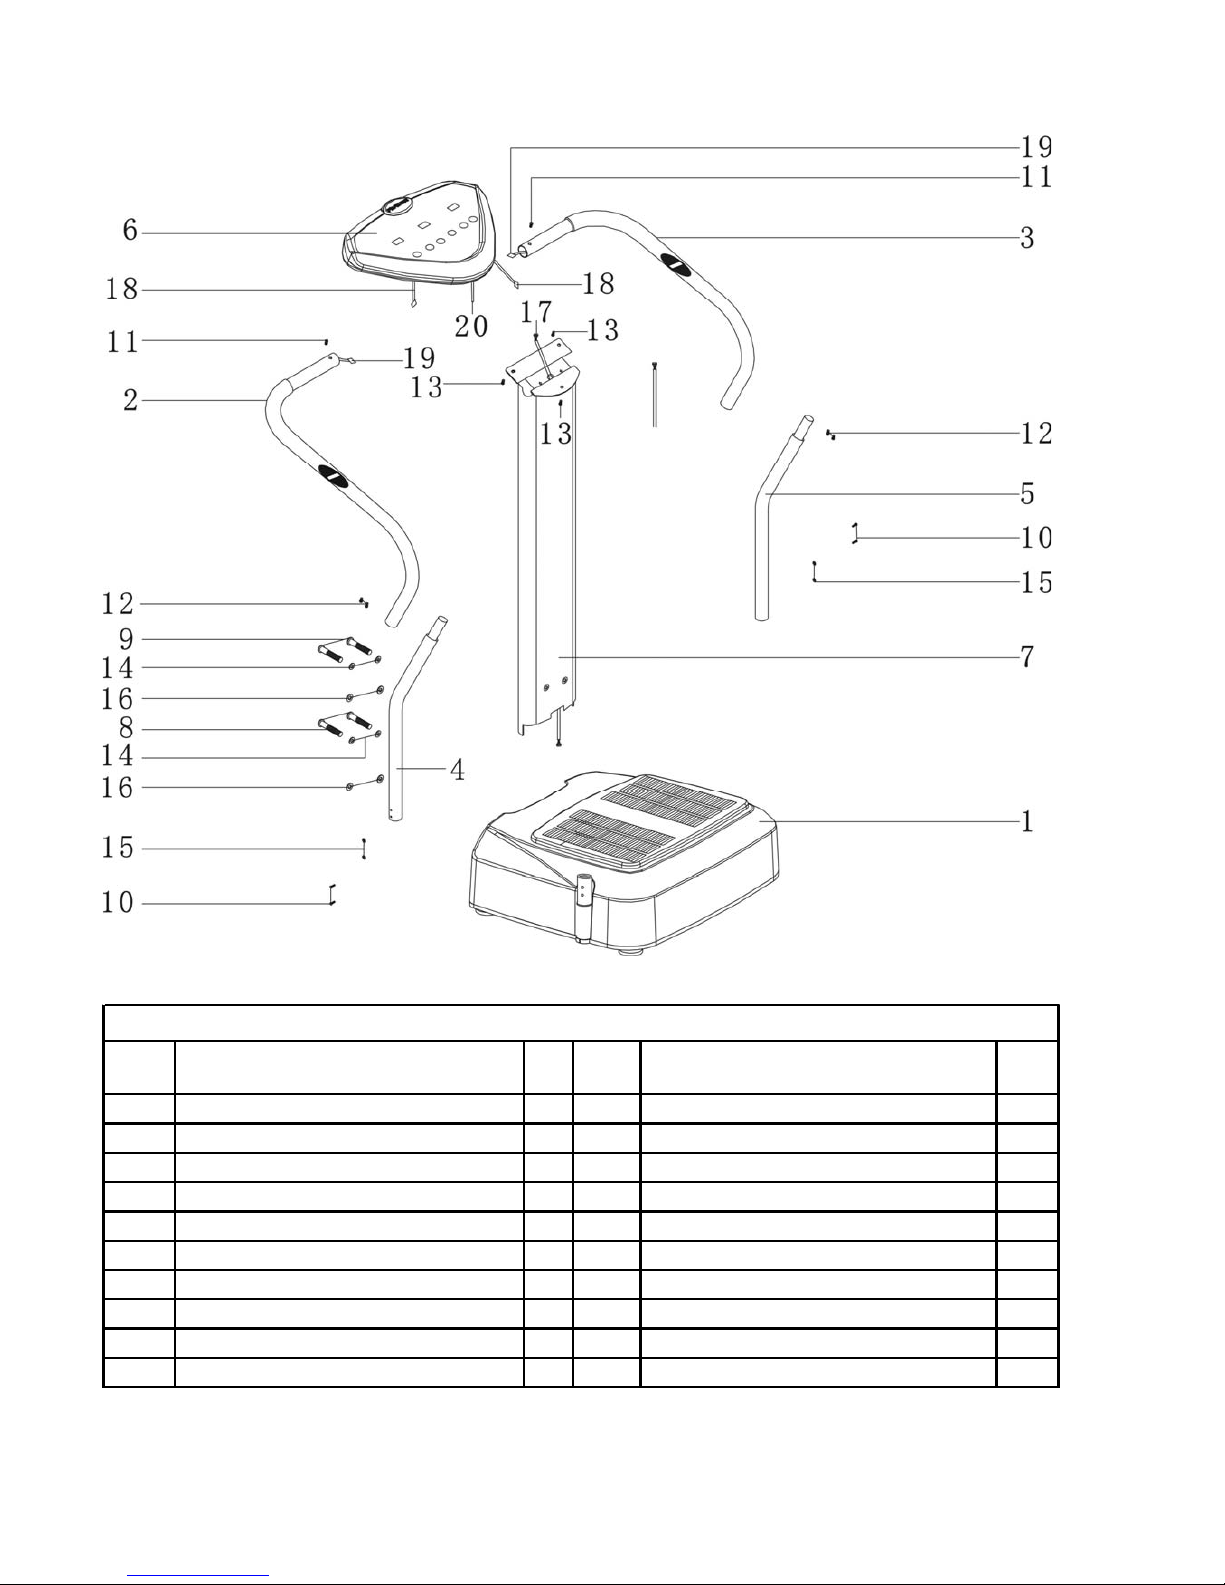
EXPLODED DRAWING Model No. PP-9000
PART
NO. Description Qty PART
NO. Description Qty
1 Lower part Frame 1 11
M8x40mm long socket button head bolt
2
2 Left Handlebar 1 12 M5 x 10mm Screw 4
3 Right Handlebar 1 13 M6 x 10mm Washer Screw 3
4 Left Handlebar support tube 1 14 M8 Spring Washer 4
5 Right Handlebar support tube 1 15 M5 Spring Washer 4
6 Panel case 1 16 M8 Washer 4
7 Main support tube 2 17 Lower Cable Connectors 1
8
M8x15mm long socket button head bolt
2 18 Body Fat sensor line A 1
9
M8x65mm long socket button head bolt
2 19 Body Fat sensor line B 1
10 M5 x 10mm Screw 4 20 Upper Cable Connectors 1
PP-9000 PARTS LIST
4

ASSEMBLY
ssembly requires two people. Set the treadmill in a cleared area and remove all packing materials. Do not
terials until assembly is completed. Assembly requires the included allen wrench
e your ENERGY BOARD on a level flat surface.
is recommended that you place a protective covering
A
dispose of the packing ma
Unpacking your ENERGY BOARD where will be using it. Being careful
Not to damage . Plac
It
on your floor.
STEP 1 Place Lower part frame(01) on a level flat surface.
AttachtheLeft and Right handlebar support tube (04,05) to Lower part frame .
Secure it with 4 pcs M5 x 10 Screw(10) and M5 Spring Washer(15) using Cross driver.
STEP 2 Attach the Main support tube(7) to Motor case.
Pull out the cable of the Motor case ,
Connect the cable connectors.
mm long socket button head bolt(8),
head bolt(9), 4 pcs M8 spring washer(14),
Wrench.
STEP 3
Secure the Main support tube with 2 pcs M8x15
And 2 pcs M8x65mm long socket button
4 Pcs M8 Washer(16)using Allen
Attach the Left Handlebar(2) to Left support tube(4)
S mm Screw(12) using Cross driver.ecure the Left Handlebar with 2 pcs M5x10
STEP 4 Attach the Right Handlebar(3) to Right support tube(5)
.
Secure the Right Handlebar with 2 pcs M5x10mm Screw(12) using Cross driver
STEP 5 Secure the Left Handlebar and Right Handlebar
with 2 pcs M8x40mm long socket button head bolt(11) to Main support tube using Allen Wrench.
STEP 6 Connect the cable connectors (17) and (20).
C
SecurethePanel case (6) to Main support tube with 3 pcs M6x10mm Washer Screw using Cross driver.
ergy Board.
onnect the Body Fat sensor line A and B (18,19)
Make sure that all parts are tightened before you use the En
To protect the floor or carpet from damage, place a mat under the Energy Board.
5

Tranings hints
ith buying this training item you have done the first step for healthy fitness. With the help of this item you can exercise your
uscles at home every time you feel like.
Further is the exercise good for your health as the training is also good for your endurance.
etter feeling
depending on the following points.
ing
hment
ress
y person, young or old, can start to exercise.
he body, especially the heard and the circulation, need time to adapt to the new circumstances.
n it is really important to start really slowly with the training and to make brakes between and after the
limit.
tart to exercise in a tempo that you feel comfortable with. After continuous training you can extend your training or adjust the
her level.
have a lot of time as you do your exercise at
d your training with a little expenditure or energy. After training you should also do some stretching.
e really helpful for your health if you follow the important rules. It is
some exercises in a short time, but in long-term and continuously.
Never exercise with a full stomach. Do not have a meal about one hour before and after the training.
l exhausted.
W
m
Goal of training :
Building of muscles
General fitness
Endurance
B
The training success is mainly
Continuous train
Good nouris
Control of training prog
Who can exercise?
Generally every health
Capacity:
T
Because of this reaso
training. Only exercise on a training level where you don’t reach your
S
item to a hig
Important:
Start your exercise slowly and increase intensity of exercises gradually. You
home. You have to do some warmong –up without item
before training.
Start and en
Tips for a successful and healthy training:
·Always remember that the training with your item can b
not helpful to do
·Please wear comfortable cloth, we propose to wear sporting cloth.
·
·Do not exercise if you are already tired or fee
·Always remember that your body needs enough liquid if you exercise.
You should follow this necessity.
6
Training:
Warming up should generally be done with every sportive activity. All physical and psychically components will be stimulated
jury will be decreased. With the following exercises you will warm up the muscle groups,
is succeed the best by moving.
un for about 5-10 minutes calmly on one place or through the room. You can jump in between a couple of times.
tretching:
and increased; further the risk or in
th
R
S
ses are light but appropriate movements, which will wake up your body,Following exerci
stimulate your circulation and make your ankles more flexible.
Please do these warming up exercises more than once before starting your training.
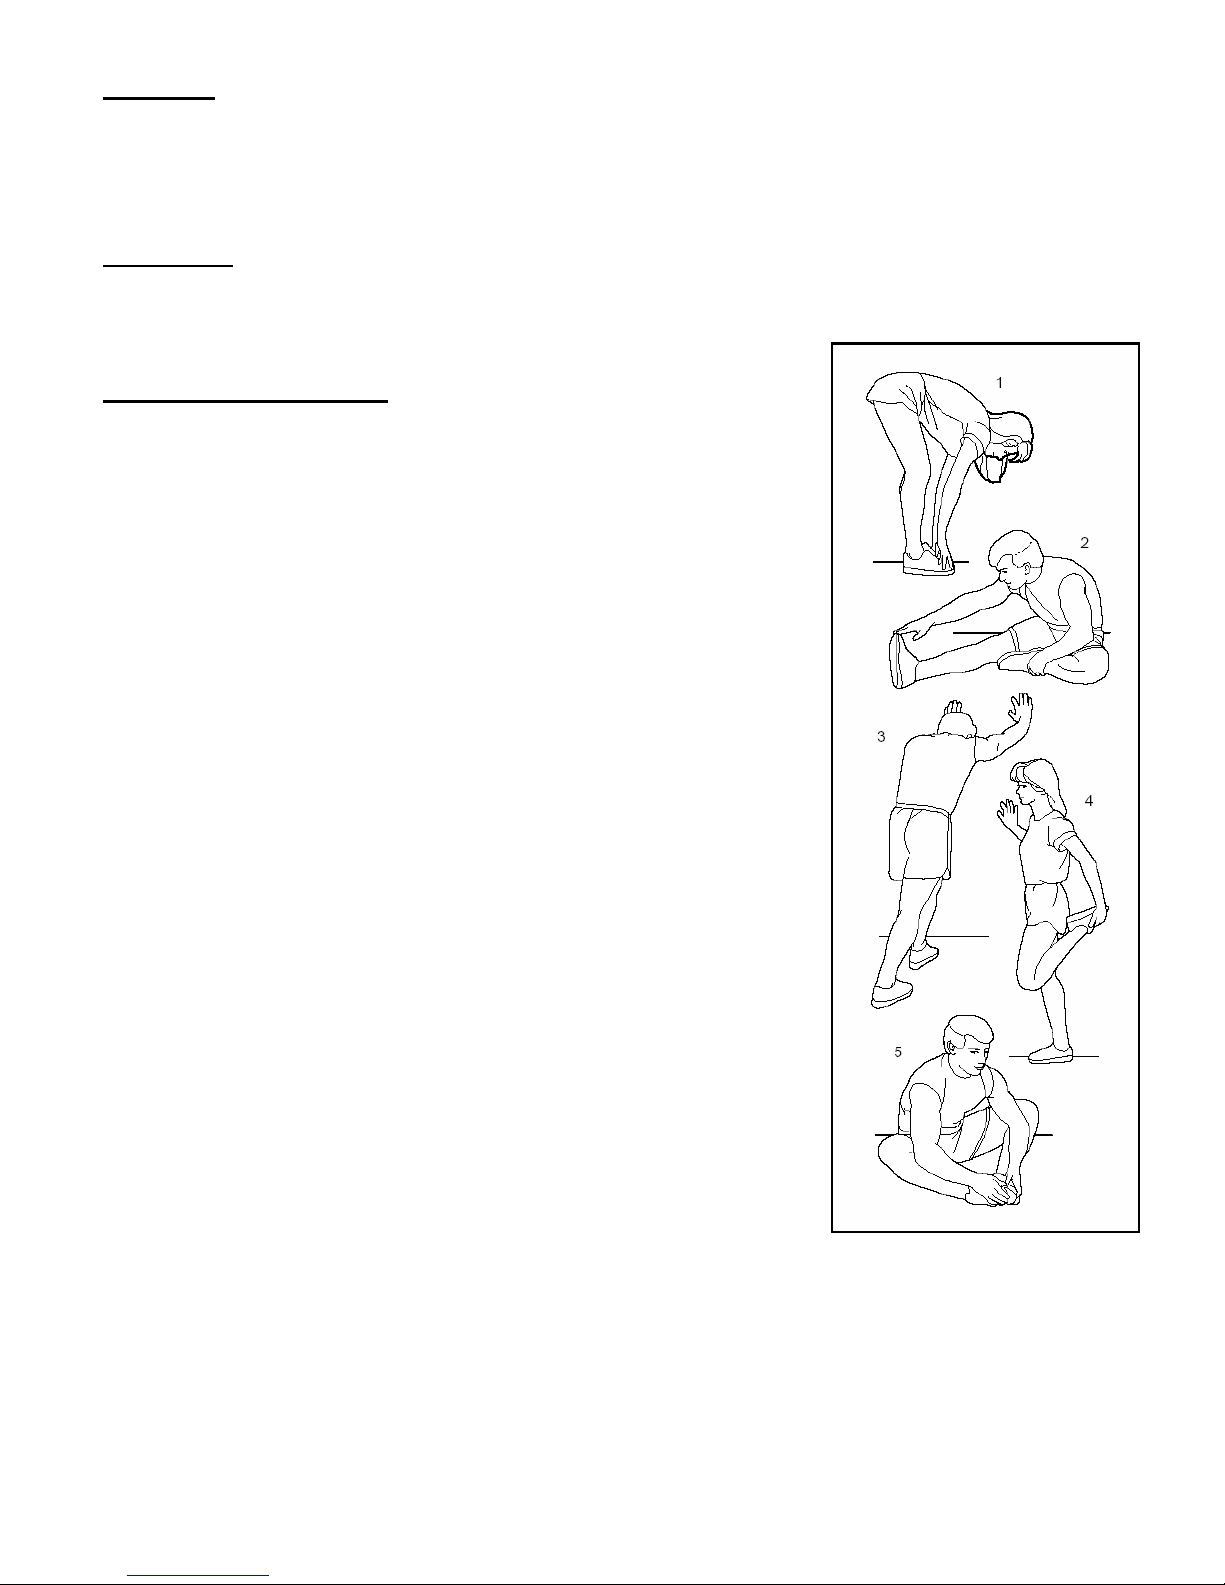
SUGGESTED STRETCHES
The correct form for several basic stretches is shown at the right. Move slowly as you
stretch—never bounce.
as possible. Hold for 15
nd groin.
h
r
nd
ax.
se further stretching of the
r back leg as well. Stretches:
ip
1. Toe Touch Stretch
Stand with your knees bent slightly and slowly bend forward
from your hips. Allow your back and shoulders to relax as you
reach down toward your toes as far
counts, then relax. Repeat 3 times. Stretches: Hamstrings,
back of knees and back.
2. Hamstring Stretch
Sit with one leg extended. Bring the sole of the opposite foot
toward you and rest it against the inner thigh of your extended
leg. Reach toward your toes as far as possible. Hold for 15
counts, then relax. Repeat 3 times for each leg. Stretches:
Hamstrings, lower back a
3. Calf/Achilles Stretc
With one leg in front of the other, reach forward and place you
hands against a wall. Keep your back leg straight and your
back foot flat on the floor. Bend your front leg, lean forward a
move your hips toward the wall. Hold for 15 counts, then rel
Repeat 3 times for each leg. To cau
achilles tendons, bend you
Calves, achilles tendons and ankles.
4. Quadriceps Stretch
With one hand against a wall for balance, reach back and
grasp one foot with your other hand. Bring your heel as close
to your buttocks as possible. Hold for 15 counts, then relax.
Repeat 3 times for each leg. Stretches: Quadriceps and h
muscles.
5. Inner Thigh Stretch
Sit with the soles of your feet together and your knees outward.
Pull your feet toward your groin area as far as possible. Hold
for 15 counts, then relax. Repeat 3 times. Stretches:
7
Quadriceps and hip muscles.

k les.
eep the “E place which children can not reach.
u
. Connect the electricity supply into the outlet with 230V.
. Now you have different possibilities to adjust item.
OLE
njoyable and effective. When the manual mode
f the console is selected, the vibrate of the
touch of a
utton. As you exercise, the console will provide
exercise feedback. You can even measure your
fat rate using the handgrip Bodyfat sensor.
The console also offers 20 vibrate speed and 3
ograms.
Each program automatically changes the speed
of the exercise cycle and prompts you to
Use Time
Display Window
AUTO/BodyFat
Scan display window
y
window
Powe
tton Speed Up
Adjust Use Time Button
Speed displa
r on/off Button Speed Down Button
Stop Bu
Auto/BodyFat Button
Button
Ta e care that nobody can stumble over any cab
K nergy Board” at
T rning on:
1
2. Turn the Power Button(ON) .LED lighted.
3
FEATURES OF THE CONS
body
The advanced console offers a selection of
features designed to make your workouts more pr
e
o
exercise can be changed with a
b
continuous
8
increase or decrease your pace as it guides you
through an effective workout.

Operation Manual
1. Feet on the plate, hands hold the handlebar
and being the state of knee-bend.
Mainly train the part of back, hips and legs.
2. Stay with one foot on the plate and another on
ground; hands hold on the handlebar,
Mainly train the part of waists, stomach
muscles and legs.
3. Feet in the one side, balance on your toes.
Knee only slightly bended.
Stomach muscles flexed.
4. Stay with one foot on the plate and another on
ground; hands put on waists.
Mainly train the part of waists, stomach muscles
and thigh.
9
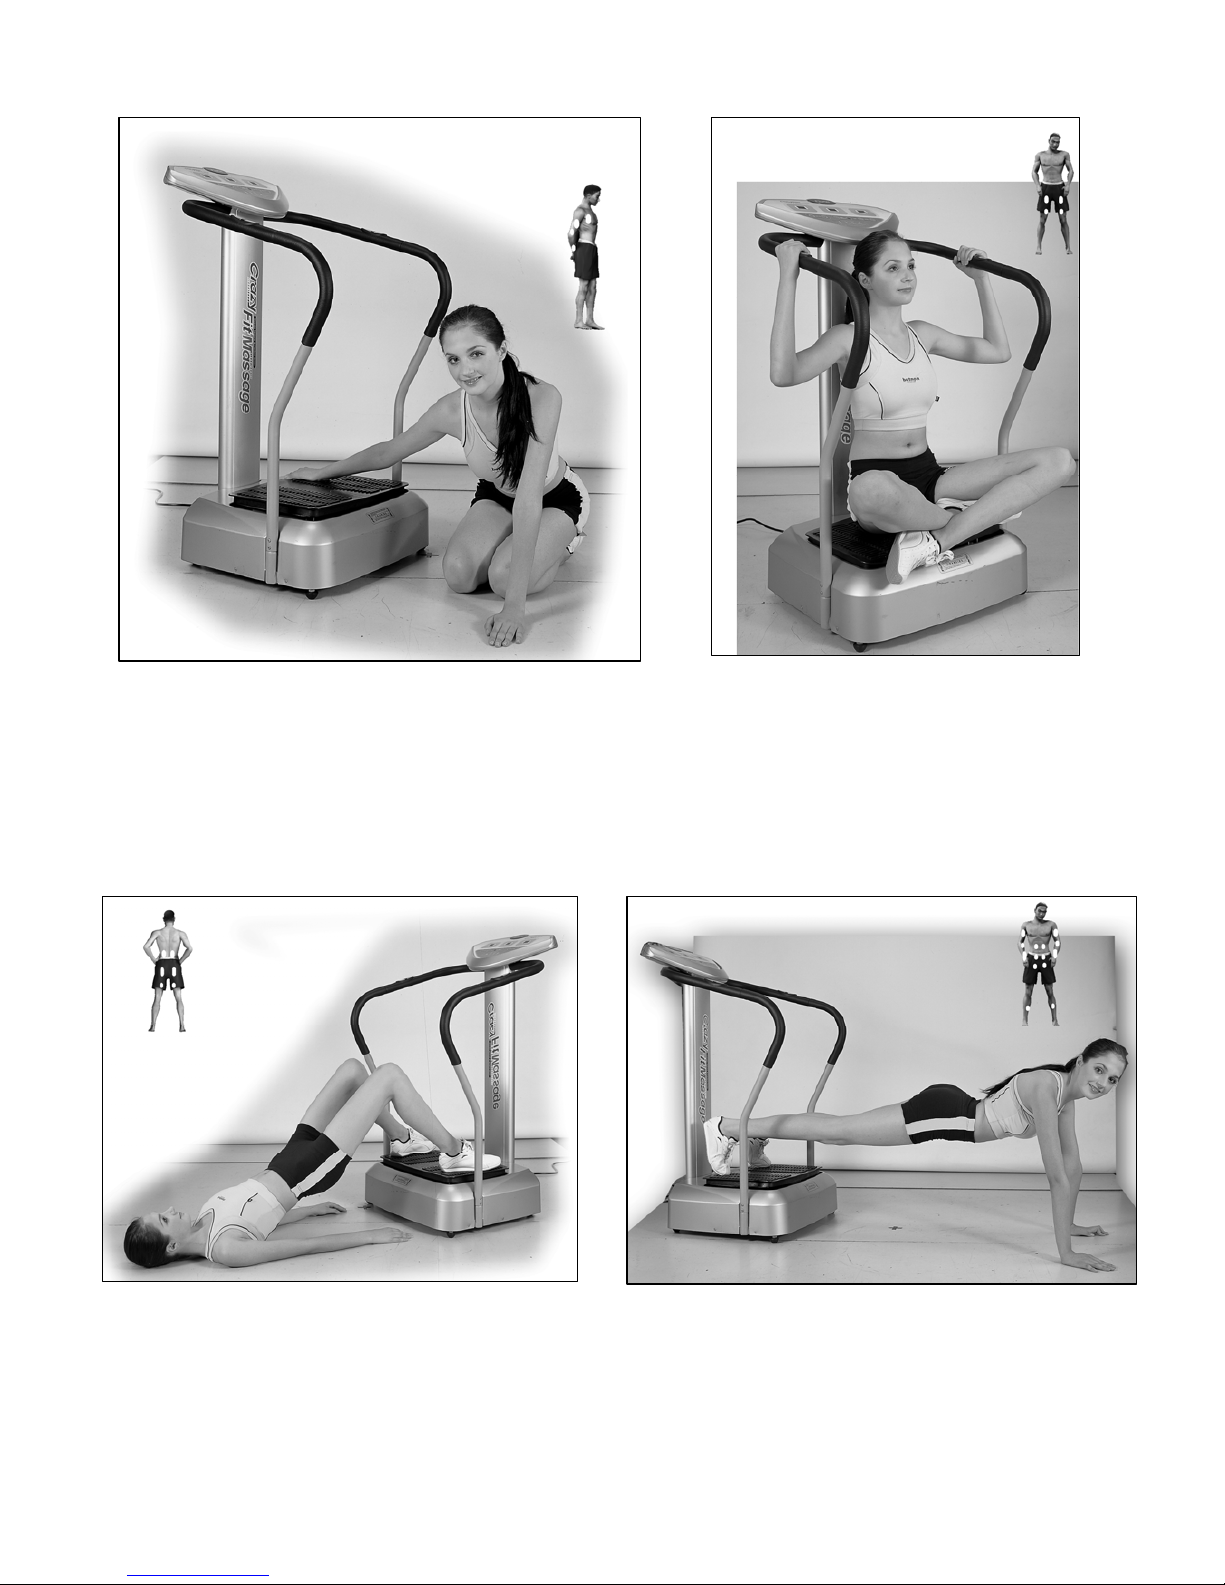
5. Stay one hand on the plate and squat next to the
item.
Mainly train the part of legs muscles, hands and
shoulder.
6. Sit on the plate, fold your legs, hands
hold on the handlebar.
Mainly train the part of legs muscles,
shoulder, waists muscles and stomach.
7. Feet on the plate, body lay on ground,
hands put on ground.
Mainly train the part of thigh and hips
muscles.
8. Feet on the plate, hands put on ground, body be
the state of lying prone and keep balance.
Mainly train the part of shoulder, chest, arms
and upper body muscles
10
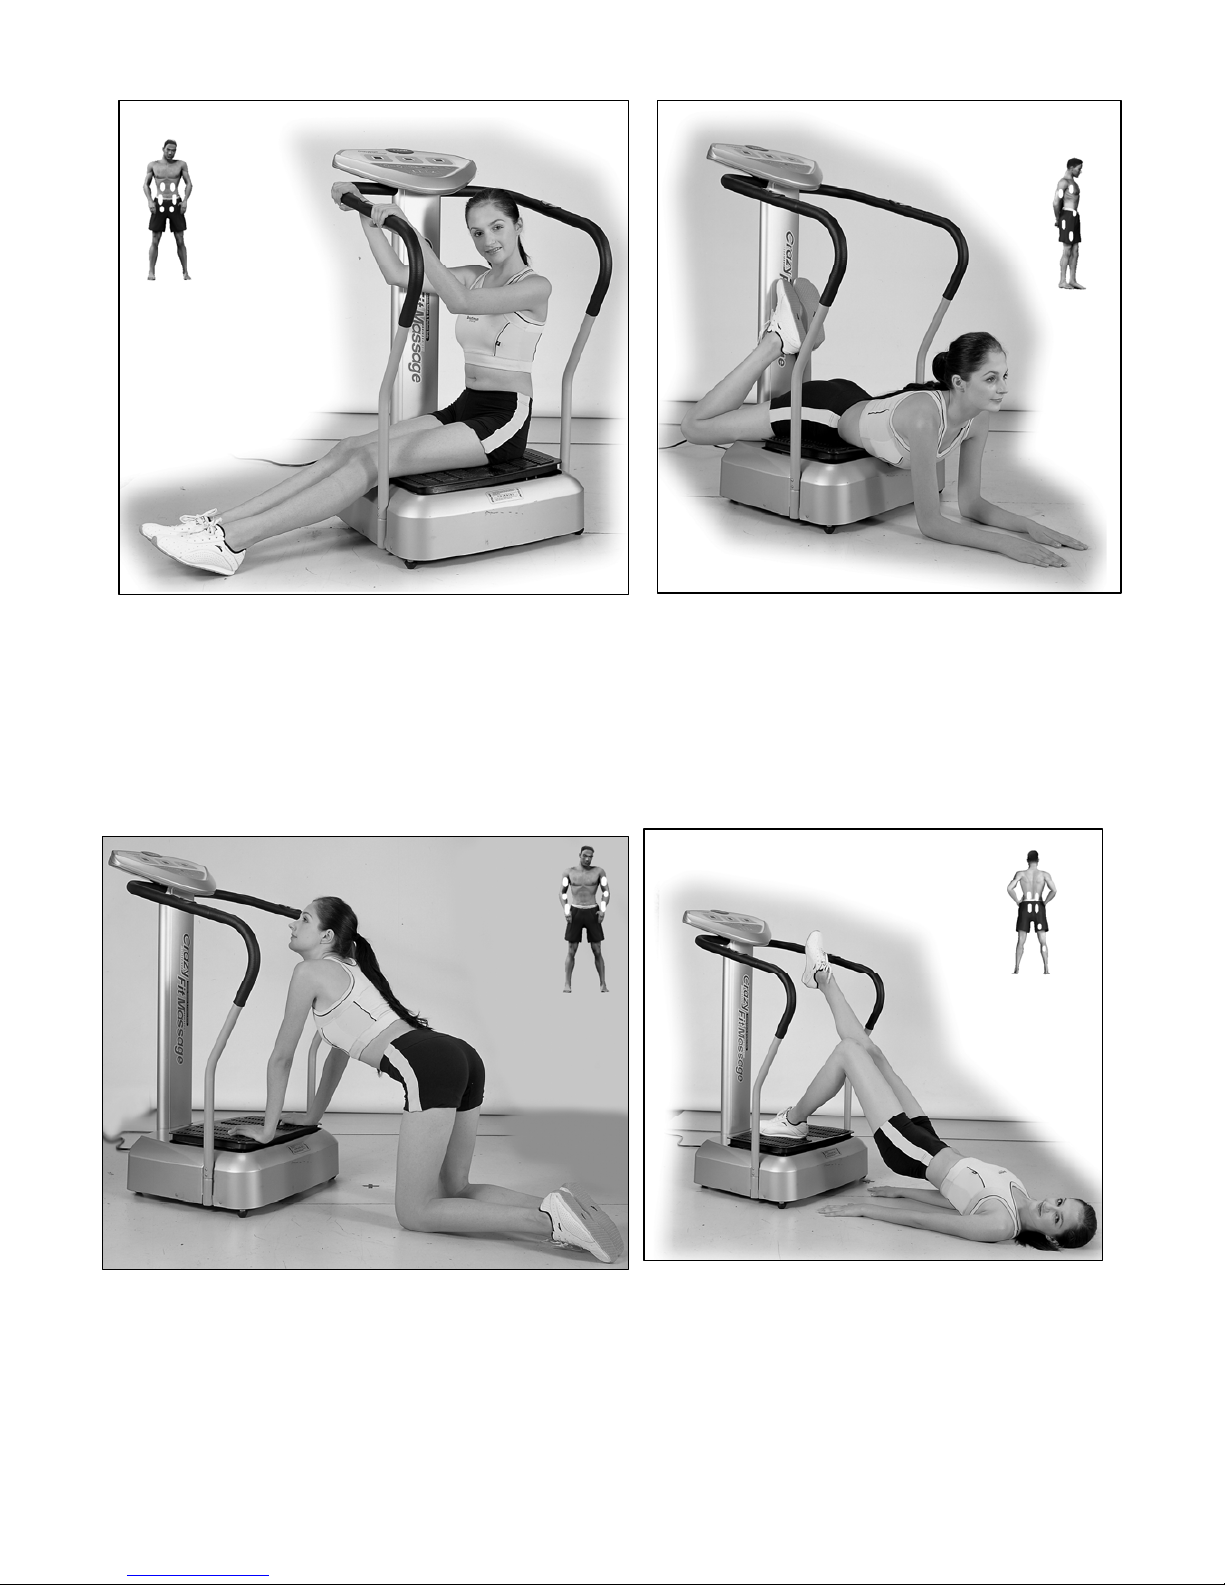
9. Sit on the plate, hands hold on the handlebar,
keep legs straight.
Mainly train the part of legs muscles and
waists.
10.Body lay prone on the plate, put legs on the
main support tube, hands put on ground.
Mainly train the part of thigh, chest, hips
and all body muscles.
11.Squat down on the ground, hands put on the
plate, body be the state of lying prone.
Mainly train the part of legs muscles, shoulder,
arms and upper body muscles.
12.Stay with one foot on the plate and
another keeps straight, lay down your
back on ground, hands put on the
ground and keep straight.
Mainly train the part of legs, thigh and
hips muscles.
11
Table of contents


