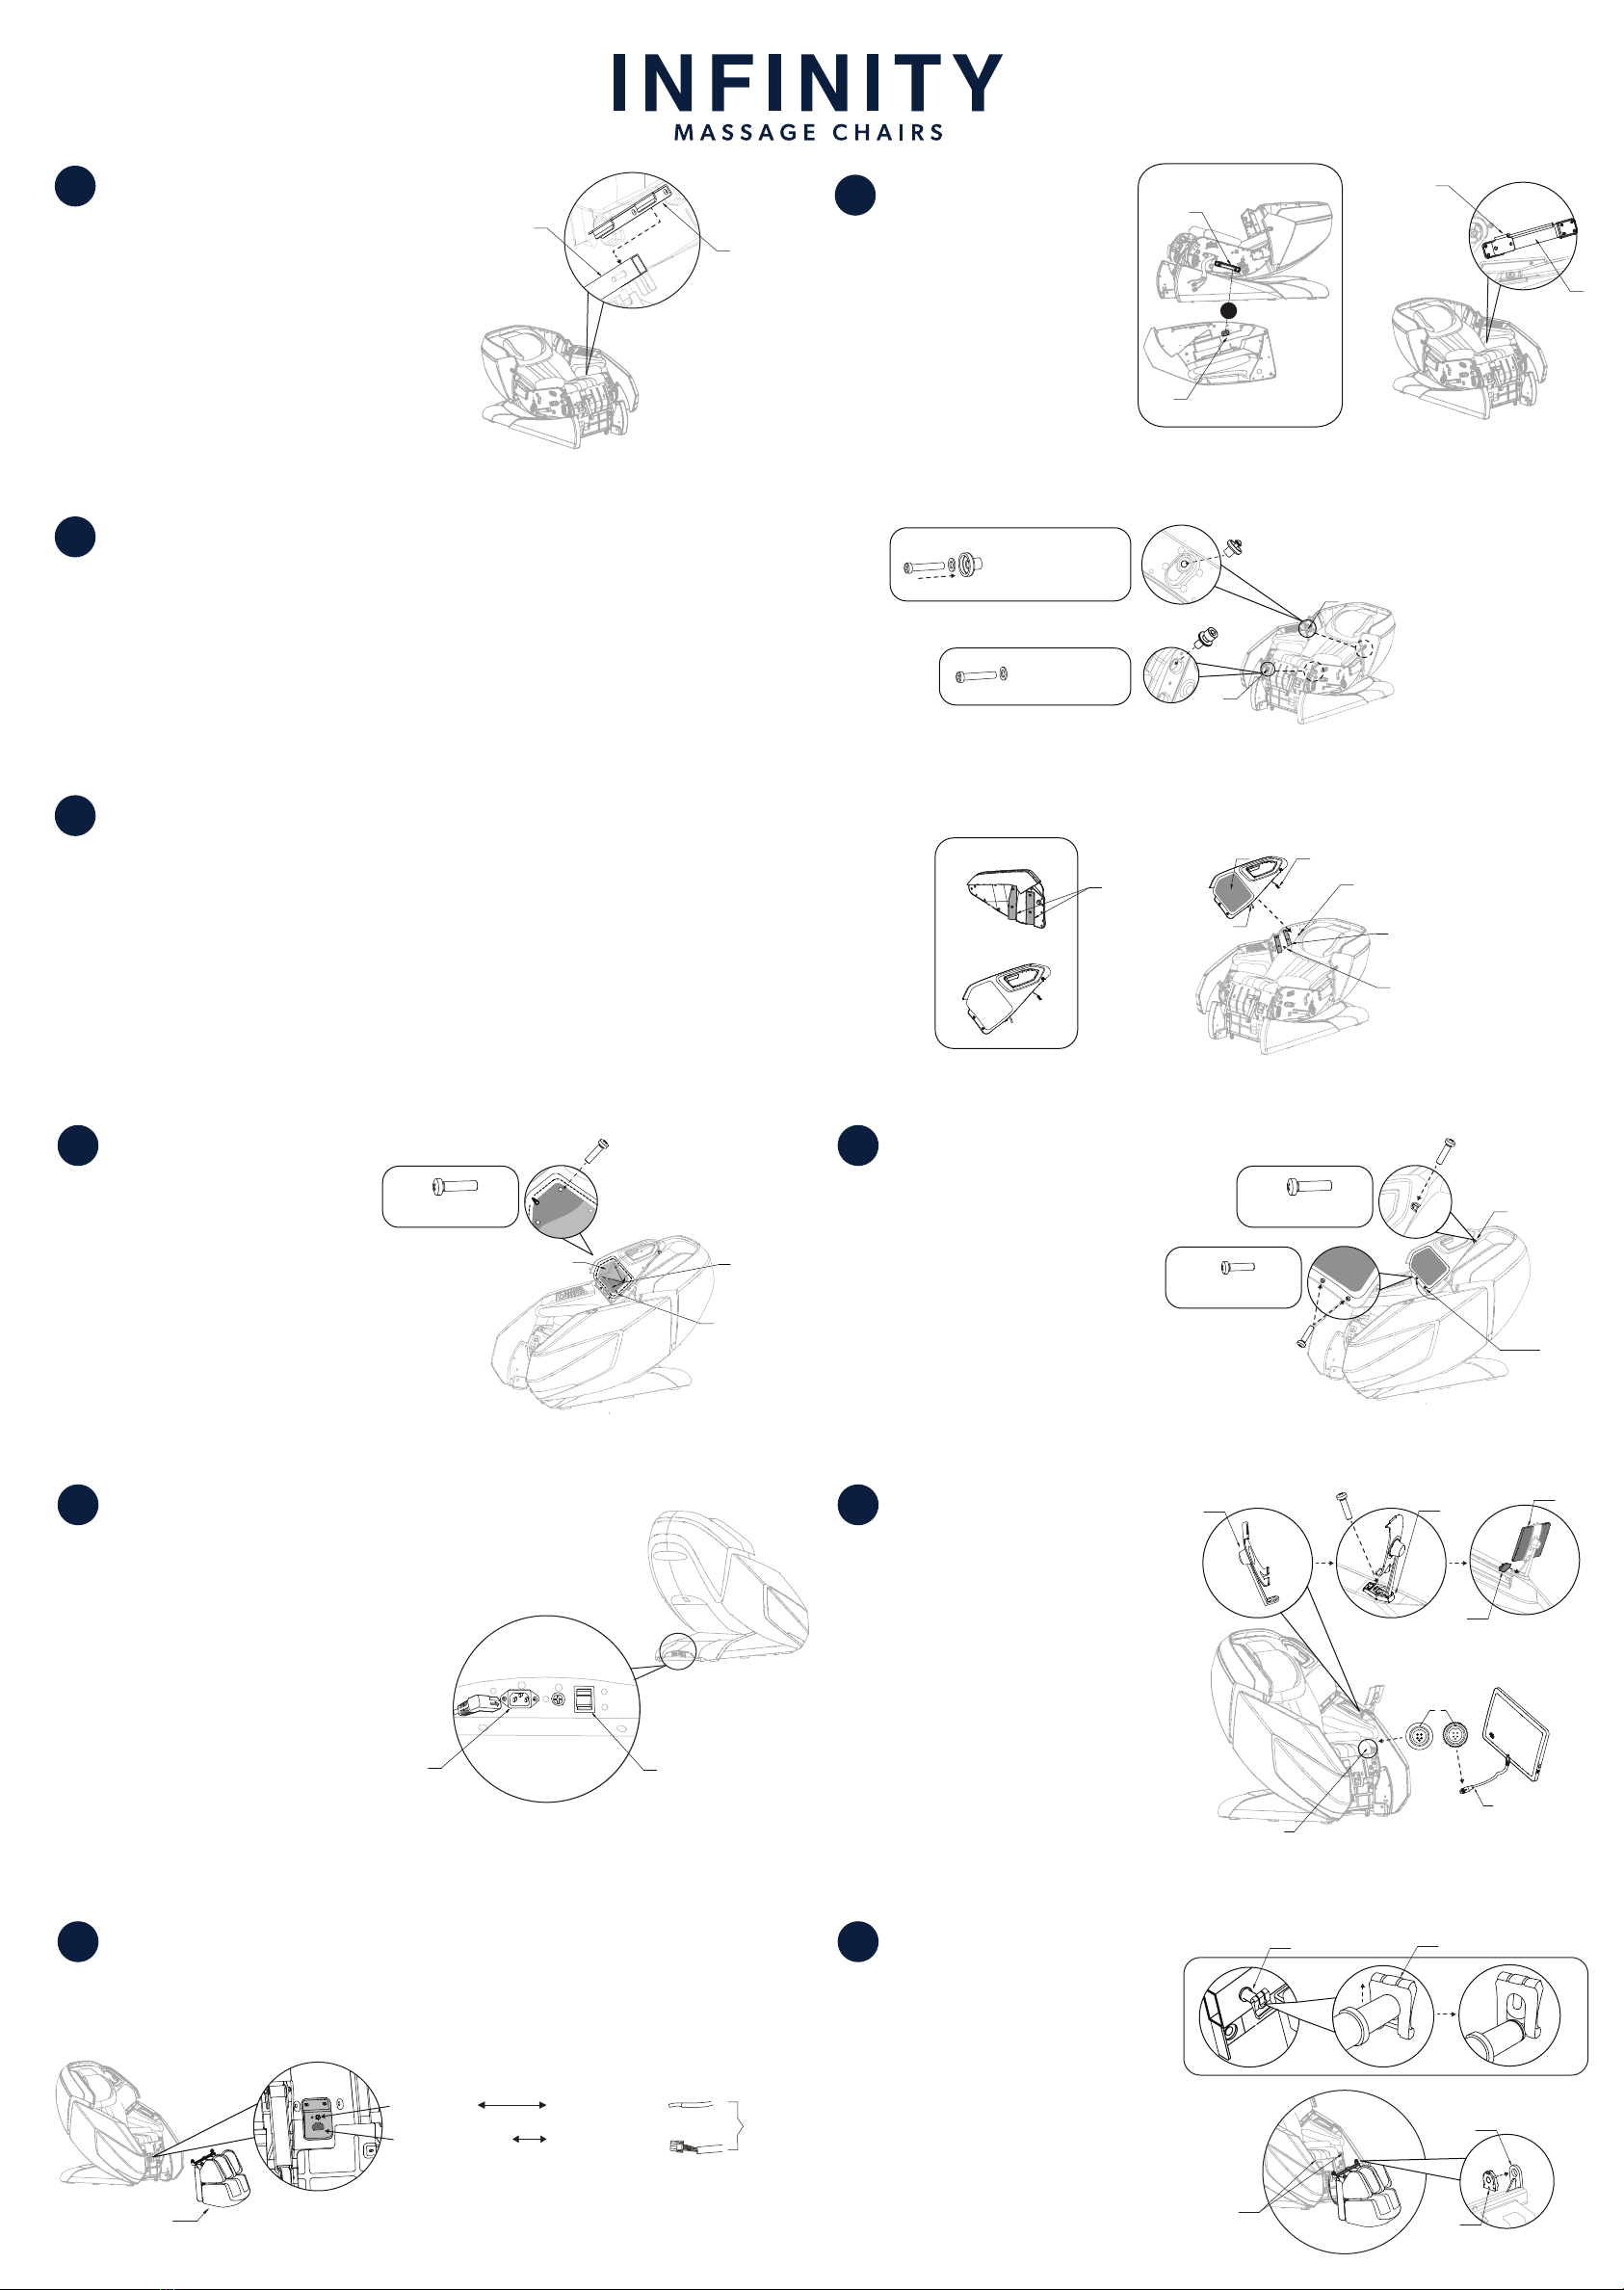
manuals.online logo
Brands
  1. Home
  2. •
  3. Brands
  4. •
  5. Infinity
  6. •
  7. Massager
  8. •
  9. Infinity Syner-D Circadian User manual

Infinity Syner-D Circadian User manual

Power on the
remote and
select AUTO
program to
start a session.
72 Stard Road, Seabrook, NH 03874 (603) 910-5000 www.infinitymassagechairs.com
Circadian
Massage Chair
Assembly
Guide
Syner-DTM
Version 1.2
Review chair for smooth operation. If things are not operating correctly,
review all assembly steps. Call Infinity support at 1-603-910-5000 if you
need live US-based support.
If you wish to use an APP to control the chair, download from the Apple
or Google app store and follow pairing instruction found within the APP.
You are done; time for a Massage!
SCAN CODE
Register your product at www.infinitymassagechairs.com/
warranty to ensure it is in our system. This will simplify the
warranty process should you ever need it.
Alternatively, scan the QR code to go directly to the URL above.
Before assembling your chair, watch an assembly video at:
1Step 1:
Prior to assembly, carefully unpack all box contents. Checkbox
contents to the detail below. Make sure all contents are accounted for.
If anything is missing, please contact INFINITY at
603-910-5000. Do not return to the place of purchase.
SCAN CODE
Before assembling your chair, watch an assembly video at:
www.infinitymassagechairs.com/assembly-tutorials
Alternatively, scan the QR code to go directly to the URL above.
15
Step 15:
Lift the footrest and slide one side
of the footrest mounting bracket
completely onto the chair body pin.
Fasten the clip over the pin to
secure. Carefully align the other
side of the mounting bracket with
the remaining pin and slide it on
too. Make sure to center the
footrest, then fasten the remaining
clip over the pin to secure both
sides of the footrest.
16
Step 16:
Flip the Main power switch
back ON. Your Circadian
Syner-DTM Massage Chair is
now complete and ready to
use. Either wake up the
touch screen by tapping on
it and then hit POWER or
simply press the POWER
button on the quick access
panel.
2Step 2:
Place the chair body on
a soft surface for
assembly. Determine
the left arm panel from
the right and place next
to the correct side of
the chair.
Step 3:
Note the 2 locations each
arm attaches to the chair
body; locations A, and B
3
Step 4:
Locate the Air Hoses off each side of chair body and note each hose has
a number. Locate the corresponding number on the Air Ports of each
Arm. Firmly connect the hoses to the ports by matching the numbers of
each. Locate the electrical plugs off the side of the chair body. Firmly clip
electrical plugs into the electrical ports on the arm panels by matching
corresponding colors.
4
AB
Electrical Ports
Air Hose Nozzle
Air Hoses
Electrical Plugs
1
1
Electrical Ports
Air Hose Nozzle
1
1
Chair BodyArm Panel Arm Panel
M8 Hex
Key
Spare
Fuse (2 pcs)
Box 1:
Chair Body, Shoulder
Panel & Accessory Box
Box 2:
Arm
Panels (2)
Box 3:
Footrest (1)
Foot Pads
(2 pcs)
Bolt: M6 x 20mm (2 pcs)
Bolt: M8 x 30mm (2 pcs)
Spare
Clips (2 pcs)
Accessory Box
Warranty
Card
Tablet
Holder
Tablet
Remote
Tablet Mount
Cover
Arm Panel
Connector
(2 pcs)
Screw: M5x20mm (10 pcs)
Screw: M4x16mm (4 pcs)
Spare Screw: M4x12mm (2 pcs)
Washer: M8x14mm (2 pcs)
Washer: M6x14mm (2 pcs)
Washer: M4x10mm (4 pcs)
Power
Cord
Quick Start
Guide
User ManualCIRCADIAN
MASSAGE CHAIR
Assembly
Guide
Philips
Screw
Driver
Footrest
Mounting Bracket
Chair
Body Pin
Clip
Step 5:
Carefully lift arm panel and
hook the arm panel clip on to
the chair body rail (connection
location B from step 3). Make
sure the air hoses and
electrical wires remain
connected and not pinched.
Slide the arm panel back
towards the chair body as far
as it will go.
5Step 6:
Next locate the arm panel
pin in position A (see step
3 insert) and secure it
into the chair body pin
retainer in position A.
Ensure the arm panel clip
remains on the chair
body rail as you lift up the
front of the arm panel
slightly. Make sure both
connections at point A
and B are firmly in place
before continuing.
6
Step 7:
To secure the arm panel to the chair body, locate the screw hole on the
inside of the arm panel by the foot well and insert an M6x20mm Bolt and
M6x14mm Washer. Hand Tighten. Next, locate the screw hole where the
top of the arm panel overlaps the bottom of the shoulder panel. Insert an
M8x30mm bolt and M8x14mm washer into the arm panel connector, and
then insert into the screw hole. Tighten both bolts with provided hex key.
Repeat steps 6-8 on other side of chair.
7
Step 8:
Before attaching, ensure the airbag on the inward facing side of the
shoulder panel is toward the front of the chair. Locate the shoulder panel
mounting brackets on the outward facing side of the shoulder panel. Slide
the mounting brackets into the chair body mounting channels. Before sliding
the shoulder panel all the way on, connect the electrical cord to the
electrical plug until it clips, then connect the air hose firmly onto the air hose
nozzle. Carefully guide the air hose inside the chair body as you slide the
assembly into place firmly down and against the chair body.
8
Step 9:
Once the shoulder panel is in
place on the chair body
mounting bars, un-zip the
zipper found underneath the
shoulder airbag for easy
access to screw holes. Look
under the airbags to expose
the screw holes on each side
and insert four M5x20mm
screws into the screw holes.
Tighten with screwdriver.
Close the shoulder airbag
zipper once complete.
Step 10:
To secure the shoulder
panel to the chair body,
insert one M5x20mm
screw into the top screw
hole, and two M4x16mm
screws into the bottom
screw holes. Tighten with
screwdriver.
10
9
Step 11:
Connect the chair power
cord to a grounded 110V
electrical outlet and plug it
into the respective port on
the back side of the base
of the chair. Flip the main
power switch to on. Press
the power button on the
quick access control panel,
located on the left arm
panel to bring the chair
into an upright position.
Once chair is in upright
position, and before
continuing, turn the main
power switch off.
11
Step 12:
Locate the tablet holder from the
accessory box. Use the screw
driver to remove the two M4x12mm
screws from the tablet holder
mount, making sure the mount
stays attached to the chair once
screws are removed. Place the
tablet holder into the tablet holder
mount and then re-insert the two
M4x12mm screws into the screw
holes to secure the holder in place.
Next, attach the tablet mount cover
to the tablet holder mount and push
into place to secure. Place the
tablet remote into the tablet holder.
Connect the tablet remote cord to
the tablet remote port, making sure
the notches on either end line up.
12
Step 14:
Remove the footrest from
its packaging and position it
in front of the main chair
body. Connect the footrest
electrical plug into the
footrest electrical port.
Ensure the thumb release is
facing up and push in until it
clips. Next, slide the air hose
firmly onto the air nozzle.
13 14
Step 13:
Before attaching the footrest to the chair body, remove the clips on the
chair body footrest pins by sliding up. (If Clips are missing, there are spare
clips in the Accessory Box). Next, attach the footrest sleeves to the
footrest mounting bracket as shown.
Arm Panel
Clip
Chair Body Rail
Chair Body
Pin Retainer
Arm Panel Pin
Step 3 Insert
A
Chair Body
Pin Retainer
Arm Panel Pin
Zipper
Shoulder Airbag Screw holes
4x (M5x20mm Screw)
Top
Screw hole
Bottom
Screw holes
2x (M4x16mm Screw)
1x (M5x20mm Screw)
Clip
Chair Body
Footrest Pin
Chair Body
Footrest Pins
Footrest
Mounting Bracket
M6x20mm Bolt
M6x14mm Washer
M8x30mm Bolt
M8x14mm Washer
Arm Panel Connector
Shoulder
Airbag
Air Hose
Nozzle
Air Hose
Electrical Plug
Electrical Cord
Chair Body
Mounting Channels
*outward facing*
Shoulder Panel
*inward facing*
Shoulder
Panel Mounting
Brackets
Screw
Hole
Screw
Hole
Footrest
Main power switch
Power cord
port
Air nozzle Air hose
Footrest
electrical plug
Footrest
electrical port
Leads
from the
Footrest
Footrest
Sleeve
Tablet
Holder
Tablet
Remote Port
Tablet
Remote Cord
Line up
Notches
Tablet Mount
Cover
Tablet Holder
Mount
Tablet
Remote

Other Infinity Massager manuals

Infinity RockerTech Sensation 4D User manual

Infinity

Infinity RockerTech Sensation 4D User manual

Infinity CORDLESS SHIATSU SPORT NECK & BACK MASSAGER User manual

Infinity

Infinity CORDLESS SHIATSU SPORT NECK & BACK MASSAGER User manual

Infinity Meridian User manual

Infinity

Infinity Meridian User manual

Infinity IT-8500 Plus User manual

Infinity

Infinity IT-8500 Plus User manual

Infinity IYASHI User manual

Infinity

Infinity IYASHI User manual

Infinity EVOLUTION 3D/4D User manual

Infinity

Infinity EVOLUTION 3D/4D User manual

Infinity Dynasty User manual

Infinity

Infinity Dynasty User manual

Infinity Prelude MTS Center User manual

Infinity

Infinity Prelude MTS Center User manual

Infinity IT- 8000 Series User manual

Infinity

Infinity IT- 8000 Series User manual

Infinity CORDLESS SHIATSU NECK & BODY MASSAGER User manual

Infinity

Infinity CORDLESS SHIATSU NECK & BODY MASSAGER User manual

Infinity PR Pro Advantage User manual

Infinity

Infinity PR Pro Advantage User manual

Infinity 8500 series User manual

Infinity

Infinity 8500 series User manual

Infinity Solstice 4D User manual

Infinity

Infinity Solstice 4D User manual

Infinity PALISADE 4D User manual

Infinity

Infinity PALISADE 4D User manual

Infinity IT-8500 X3 User manual

Infinity

Infinity IT-8500 X3 User manual

Infinity Riage User manual

Infinity

Infinity Riage User manual

Infinity Smart Chair User manual

Infinity

Infinity Smart Chair User manual

Infinity Evoke User manual

Infinity

Infinity Evoke User manual

Infinity IT- 8000 Series User manual

Infinity

Infinity IT- 8000 Series User manual

Infinity Evoke User manual

Infinity

Infinity Evoke User manual

Infinity RockerTech Bliss User manual

Infinity

Infinity RockerTech Bliss User manual

Infinity Riage User manual

Infinity

Infinity Riage User manual

Infinity IT-8500 User manual

Infinity

Infinity IT-8500 User manual

Infinity RT8800 User manual

Infinity

Infinity RT8800 User manual

Popular Massager manuals by other brands

HoMedics PAQ-30H-2EU instruction manual

HoMedics

HoMedics PAQ-30H-2EU instruction manual

Carepeutic KH381 instruction manual

Carepeutic

Carepeutic KH381 instruction manual

HoMedics SBM-520H-EU instruction manual

HoMedics

HoMedics SBM-520H-EU instruction manual

Cozzia EC-360D Maintenance service manual

Cozzia

Cozzia EC-360D Maintenance service manual

Human Touch PC-095 troubleshooting guide

Human Touch

Human Touch PC-095 troubleshooting guide

ARDES Medicura ARM240N manual

ARDES

ARDES Medicura ARM240N manual

Costway Giantex JL10002 user manual

Costway

Costway Giantex JL10002 user manual

Costway EP24916US user manual

Costway

Costway EP24916US user manual

Wellcare FE-5837BK user manual

Wellcare

Wellcare FE-5837BK user manual

AEG MM 5568 instruction manual

AEG

AEG MM 5568 instruction manual

Human Touch HT-Reflex 2 Use & care manual

Human Touch

Human Touch HT-Reflex 2 Use & care manual

Comfier CF-2309AH user manual

Comfier

Comfier CF-2309AH user manual

Snailax SL-6213 Use & care manual

Snailax

Snailax SL-6213 Use & care manual

AVILO H202199 Quick start quide

AVILO

AVILO H202199 Quick start quide

Snailax SL-363M Use & care manual

Snailax

Snailax SL-363M Use & care manual

Beurer MG 230 Instructions for use

Beurer

Beurer MG 230 Instructions for use

HoMedics Luxury Footspa instruction manual

HoMedics

HoMedics Luxury Footspa instruction manual

Urbanworx UX8SMC instruction manual

Urbanworx

Urbanworx UX8SMC instruction manual

manuals.online logo
manuals.online logoBrands
  • About & Mission
  • Contact us
  • Privacy Policy
  • Terms and Conditions

Copyright 2025 Manuals.Online. All Rights Reserved.