Crenova VS100S User manual

VS100S Vacuum Sealer
User Manual
Thank you for buying
the Crenova vacuum preservation system.

CONTENTS
Quick User Guide ..............................................................1~4
English ...............................................................................5~9
Français ..........................................................................10~14
Italiano ...........................................................................15~19
Español...........................................................................20~24
Deutsche.........................................................................25~29
日本語..............................................................................30~34
Contact Us
If you have any further enquiries or need any further assistance, you can
reach us via the following contact details:
Email: [email protected]
Call: 1-562-999-4260 (available for customers in the United States currently)
Homepage: www.crenova.net
Facebook: https://www.facebook.com/icrenova/

1
Quick User Guide
Crenova VS100S Vacuum Sealer
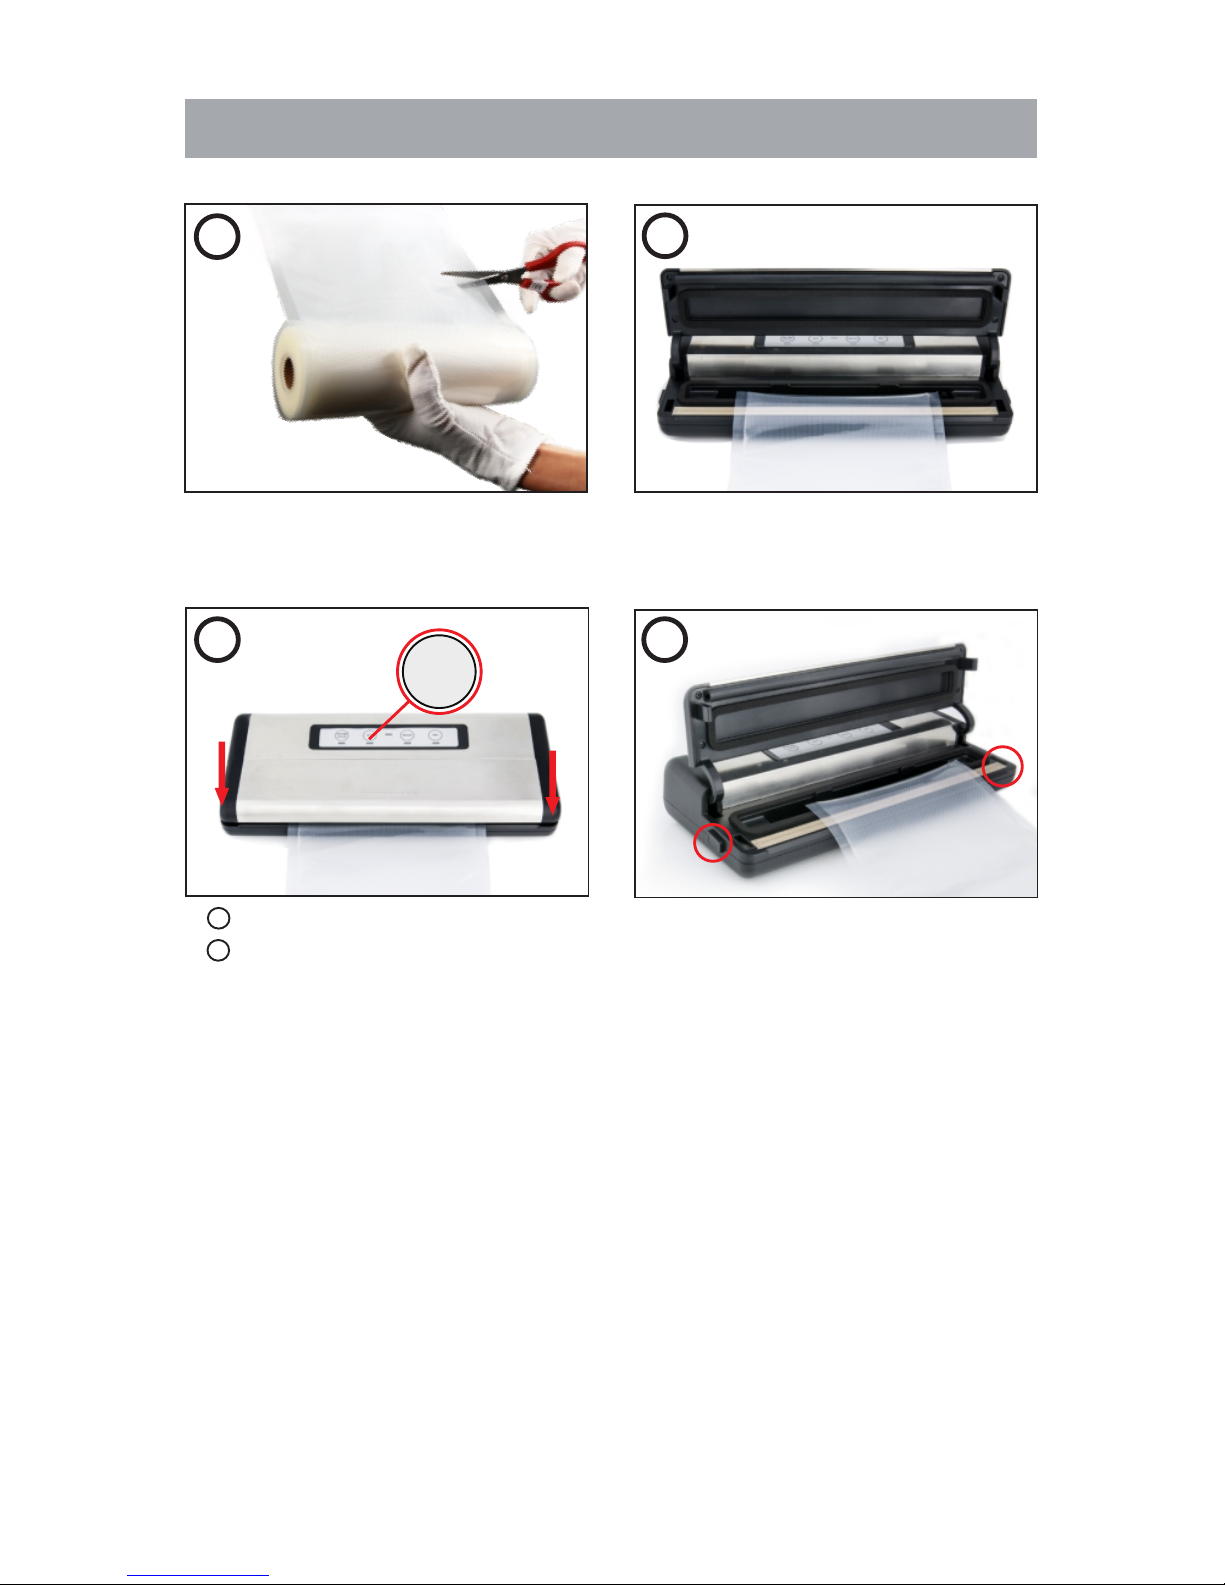
How to close the lid?
Press hard on two sides of the lid. How to open the lid?
Press the Lid Lock Release Button
on both sides to open the lid.

2
Make a Vacuum Bag
1.Cut the vacuum bag roll. 2.Place one end of bag material into
vacuum channel (across sealing
strip).
3. Close the lid; 4.After the “Beep”, open the lid.
Press the Seal Button to seal.
1
2
12
34
Seal

3
1
2
1
2
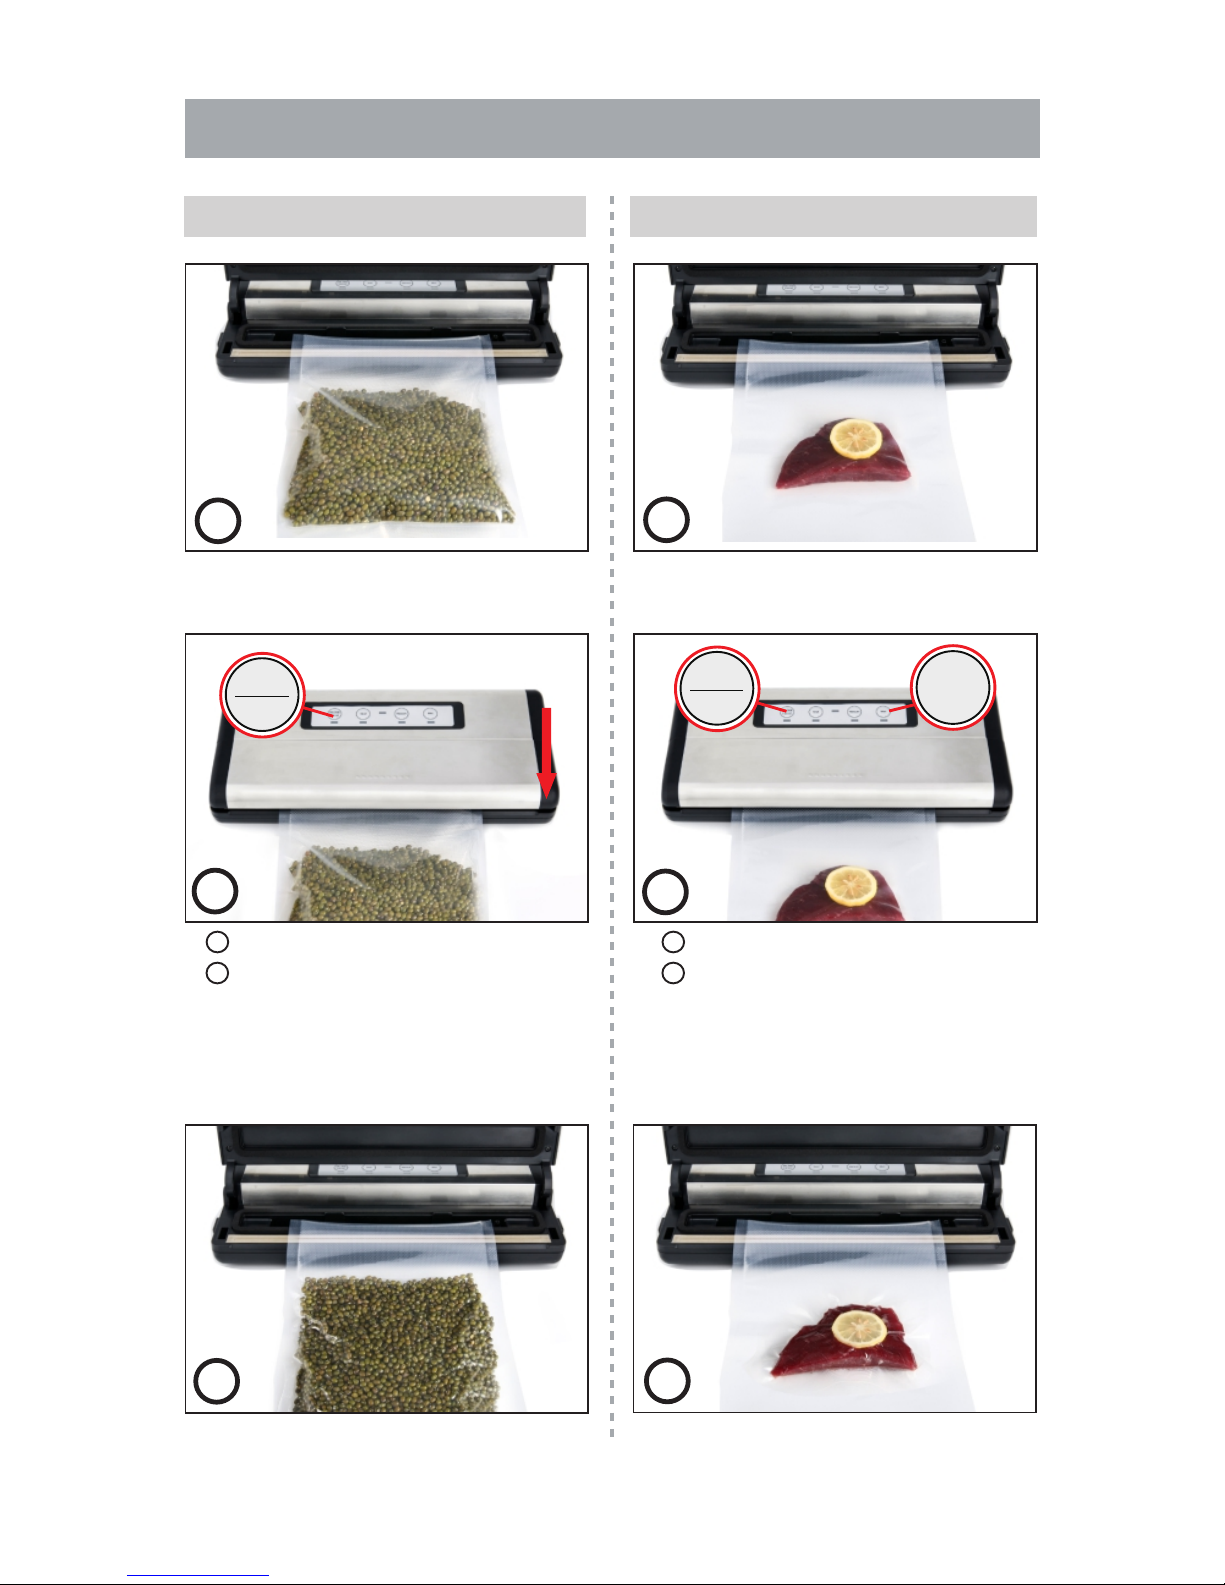
Vacuum Sealing Process
For Dry Food
2. Close the lid;
Press the Vac Seal & Cancel
Button to vacuum seal the food.
(Note: If you want to cancel the
vacuum sealing process, press the
button again.)
1.Place your food in bag, place open
end of bag into vacuum channel.
3. After the “Beep”, open the lid.
1. Place your food in bag, place open
end of bag into vacuum channel.
2. First press WET button
Then press Vac Seal & Cancel
button.
(Note: If you want to cancel the
vacuum sealing process, press
Vac Seal & Cancel button again.)
3. After the “Beep”, open the lid.
For Juicy Food
1
2
3
1
2
3
VacSeal
Cancel Wet
VacSeal
Cancel

4
Vacuum Seal with Accessories
1. Connect the vacuum container to
your vacuum sealer using a vacuum
hose.
2. Press Vacuum button to start
vacuuming process.
3. After the “Beep”, the vacuuming
process is finished. 4. First remove hose from vacuum
container.
Then remove the hose from
vacuum sealer .
12
34
Vacuum
1
2
1
2

5
Please read and follow the safety instruction carefully
before you use Crenova vacuum preservation system.
1.Please check if the local power supply voltage matches the
voltage indicated on this appliance before use.
2.Do not operate the appliance with a damaged power cord or
plug. Do not operate the appliance if there's any
malfunctions or damage of the product . if the cord or the
appliance is damaged ,it must be returned toan authorized
service center.
3.To disconnect the power, unplug the power cord from the
electrical outlet. Do not disconnect by pulling on the power
cord.
4.If the supply cord is damaged, it must be replaced by the
manufacturer,or it's service agent or similarly qualified
person in order to avoid a hazard.
5.Do not use an extension cord with the appliance.
6.When the appliance is not in use or need to be clean, please
unplug cord from the power outlet first.
7.Do not use the appliance on wet or hot surfaces, or near a
power source.
8.Do not immerse any part of the appliance, power cord or
plug in water or other liquid.
9.Use only accessories or attachments recommended by the
manufacture.
10.Use the appliance only for it's intended use. Don't use the
product outside the work area.
11.Close supervision is required when children use the
appliance. Do not play with the appliance as a toy.
USER INSTRUCTIONS
SAFEGUARDS & TIPS

6
Rated Voltage: AC 110-120V(US)/220-240V(UK)
Rated Power: 110W
Rated Frequency: 50~60Hz
Sealing Time:6~-10 Seconds
Vacuum Power: -0.8 bar
VAC/Sealing Time: 10~20 Seconds
Dimensions: 360mm*150mm*76mm
N.W.:1.28kg G.W.:1.80kg
Technical Details:
1.Vac Seal/Cancel
Press to vacuum seal the food airtight. Or press to pause
the current process at any point.
2. Seal
Press to seal the vacuum bag/pouch.
3. Vacuum
Press to vacuum the food in the vacuum bags, canisters, or
other containers.
4. Wet
Press the button to choose Moist mode when the food is
moist or juicy.
Button Details:

7
Function introduction:
ALocking Hook
Press the cover down until it clicks to lock the bag into
place.
Vacuum Chamber
The bag must be placed within the vacuum chamber for the
vacuum
Lower gasket
Airproof the vacuum area and prevent leaking for the
vacuum
Rubber Lip Make seal flat
Sealing Bar 3mm width sealing bar make good seal
Vacuum Nozzle
When pumping external vacuum canister, wine stopper
nozzle,etc, insert the hose tube into the nozzle.
Release button
Press the release buttons at two sides, then open the
appliance and take out the sealed food
B
C
D
F
G
E

8
Operation Instruction:
STEP 1
- Put the opening of the bag
in the vacuum chamber.
Ensure the bag does not cover
thevacuum nozzle.
STEP 2
- Press the cover down, click
sound indicate the locking
hooks locks correctly, then the
next step is the vacuum or seal
process.
STEP 3
- Press “Release Buttons”to
open the appliance and take
out the sealed food.
VacSeal
Cancel

9
3
Trouble shooting:
Nothing happens when you try to vacuum package
1.Check if the power cord is tightly plugged into electrical
outlet.
2.Make sure the latches is in the locked position.
3.Make sure bag is placed correctly inside Vacuum
Chamber.
Air is stillin in the bag after vacuum
1.Make sure the opening of the bag is placed entirely inside
Vacuum Chamber.
2.Examine seal of bag. A wrinkle along the seal may cause
leakage and allow air to enter, Simply cut bag and reseal.
Air was removed from the bag,but now air has
re-entered.
1.Sometimes moisture or food material (such as juices,
grease,crumbs, powders, etc.) along seal prevents bag
from sealing properly. Cut bag, wipe top inside of bag
and reseal.
2.If you vacuum package sharp food items ,bag may have
been punctured, use a new bag if there is a hole. Cover
sharp food items with a soft cushioning material, such as
a tissue paper, and reseal.
3.If there's air still in the bag, fermentation or the release of
natural gases from inside the foods may have occurred,
when this happens ,food may have begun to spoil and
should be discarded.
1
2

10
Veuillez lire et respecter les instructions de sécurité ci-
dessous avant d’utiliser le système d’emballage sous vide
Crenova
1. Veuillez vérifier que la Le produit doit être retourné à un
centre de service autorisé si l’appareil ou le câble sont
endommagés.
3. Pour déconnecter l’appareil, débranchez le câble
d’alimentation depuis la prise électrique. Ne déconnectez
pas l’appareil en tirant sur le câble d’alimentation.
4. Si le câble d’alimentation est endommagé, il doit être
remplacé par le fabricant, un agent de maintenance ou une
personne qualifiée afin d’éviter tout risque d’incident.
5. N’utilisez pas de prolongateur électrique avec l’appareil.
6. Débranchez le câble au niveau de la prise électrique lorsque
l’appareil n’est pas utilisé ou qu’il doit être nettoyé.
7. N’utilisez pas l’appareil sur une surface humide ou chaude
ou près d’une source d’alimentation électrique.
8. Ne plongez aucun composant de l’appareil, du câble
d’alimentation ou de la prise dans l’eau.
9. Utilisez uniquement des accessoires et pièces
recommandées par le fabriquant.
10. Utilisez uniquement l’appareil pour son utilisation prévue.
N’utilisez pas l’appareil en dehors de votre espace de travail
11. Une surveillance attentive est indispensable lorsque des
enfants utilisent l’appareil. Cet appareil n’est pas un jouet.
STRUCTURE ET FONCTIONS
SÉCURITÉ ET ASTUCES:

11
Tension nominale : 220V-240V AC
Puissance nominale : 110W
BOUCHON DE BOUTEILLE Crenova
Fréquence nominale : 50~60Hz
Durée de scellage :6~10 secondes
Pression sous vide : -0.8 bar
Durée de mise sous vide/scellage : 10~20 secondes
Dimensions : 360mm*150mm *76mm
Poids net : 1.28kg Poids brut : 1.80kg
DONNÉES TECHNIQUES:
1.Vac Seal/Cancel
Appuyez pour sceller hermétiquement la nourriture sous
vide, ou appuyez pour pauser l’action en cours à tout
moment.
2. Seal
Appuyez pour sceller le sachet/pochette sous vide.
3. Vacuum
Appuyez pour enlever l’air de la nourriture de vos sachets,
boîtes ou autres récipients.
4. Wet
Touches de fonction:

12
Introduction de fonction:
ACrochet de verrouillage
Fermez le couvercle jusqu’au clic pour que le sachet soit
bien en place.
Chambre Sous vide
Le sachet doit être placé au sein de la chambre sous vide
Joint inférieur
Assure l’étanchéité de l’espace sous vide et évite les fuites
Languette en caoutchouc pour aplatir le sachet
Barre d’étanchéité
De 3 mm de largeur pour assurer l’étanchéité
Tuyère à vide
Lorsque vous pompez une boîte externe,
un bouchon de vin ou tout autre accessoire, insérez le tuyau
dans la tuyère. Ne bloquez pas la tuyère durant l’utilisation.
Boutons de déverrouillage
Appuyez sur les boutons de déverrouillage situés des deux
côtés, ouvrez l’appareil et prenez les aliments scellés.
B
C
D
F
G
E
Appuyez sur ce bouton pour sélectionner le mode Humide
lorsque la nourriture est mouillée ou juteuse.

13
Instruction d'opération:
Étape 1
- Placez l’ouverture du sachet
dans la chambre à vide.
Assurez-vous que le sachet ne
recouvre pas la tuyère.
Étape 2
- Fermez le couvercle jusqu’à
ce que vous entendiez le clic
qui indique le bon verrouillage,
puis mettez sous vide ou
scellez le sachet.
Étape 3
- Appuyez sur les « Boutons
de déverrouillage » pour ouvrir
l’appareil et prenez les
aliments scellés
VacSeal
Cancel
RÉSOLUTION DES PROBLÈMES:
Rien ne se produit lorsque vous essayez d’emballer sous
vide
1. Vérifiez que l’alimentation est fermement branchée dans
la prise électrique.
2. Assurez-vous que les loquets sont en position
verrouillée.
3. Assurez-vous que le sachet est correctement placé à
l’intérieur de la chambre à vide.
1

14
3
2
Note : Pour éviter la surchauffe de l’appareil, laissez-le
refroidir 40 secondes avant de le réutiliser en laissant le
couvercle ouvert
IL RESTE DE L’AIR DANS LE SACHET
1. Assurez-vous que l’ouverture du sachet est entièrement
placée à l’intérieur de la chambre à vide.
2. Examinez le sachet pour vérifier s’il fuit. Scellez le
sachet avec de l’air, puis plongez-le dans l’eau et
appuyez dessus. S’il produit des bulles, cela signifie qu’il
fuit, utilisez alors un autre sachet.
L’AIR ÉTAIT BIEN ENLEVÉ DU SACHET, MAIS IL
EST REVENU
1. Parfois, l’humidité ou les aliments (comme les jus,
graisses, miettes, poudres, etc.) le long du sceau
empêchent le sachet de se sceller correctement. Coupez
le sac, essuyez l’intérieur du sachet dans sa partie
supérieure et scellez à nouveau
2. Si vous aspirez des aliments pointus, il est possible que
le sachet ait été perforé, utilisez un nouveau sachet s’il y
a un trou. Recouvrez les aliments pointus avec un
matériau pour amortir, par exemple du papier
alimentaire, et scellez à nouveau.
3. S’il y a toujours de l’air au sein du sac, il est possible
que la fermentation ou le relâchement naturel du gaz
contenu au sein des aliments en soit la cause. Dans ce
cas, il est probable que les aliments aient commencé à
pourrir et vous devriez les jeter.

15
Per cortesia leggete con attenzione e seguite attentamente
le istruzioni di sicurezza prima di use Crenova vacuum
preservation system
1.Per cortesia controllate se la tensione di alimentazione locale
si abbina col voltaggio indicato su questo apparecchio prima
dell’uso.
2.Non utilizzate l’apparecchio con la spina o un cavo di
alimentazione danneggiato. Non utilizzate l’apparecchio se
ci son dei malfunzionamenti o il prodotto è danneggiato. Se
la spina o l’apparecchio è danneggiato, deve esser restituito
ad un centro servizi autorizzato.
3.Per scollegare l’alimentazione, scollegate il cavo di
alimentazione dalla presa elettrica. Non disconnettere
tirando il cavo di alimentazione.
4.Se il cavo di alimentazione è danneggiato, deve essere
sostituito dal produttore, o dall’agente di servizio o
similarmente da persona qualificata allo scopo di evitare dei
rischi.
5.Non utilizzate una prolunga per l’apparecchio.
6.Quando il dispositivo non è in uso o necessita di esser pulito,
per cortesia scollegate prima il cavo dalla presa di corrente.
7.Non utilizzate l’apparecchio sul bagnato o su superfici calde,
o vicino ad una fonte di calore.
8.Non immergete alcuna parte dell’apparecchio, il cavo di
alimentazione o la presa in acqua o altri liquidi.
9 Usate solo accessori raccomandati dal produttore.
10.Usate solo accessori per la destinazione d’uso. Non
utilizzate il prodotto fuori dall’area di lavoro.
11.Una stretta supervisione è richiesta quando i bambini
utilizzano l’apparecchio. Non giocate col dispositivo come
se fosse un giocattolo.
Manuale Utente
PROTEZIONE E CONSIGLI:

16
12.Son raccomandati intervalli di 40 secondi ogni qualvolta
viene spento.
DATI TECNICI:
1.Vac Seal/Cancel
Premere per sigillare sottovuoto il cibo a tenuta stagna.
Oppure premere per mettere in pausa il processo corrente in
qualsiasi punto.
2. Seal Premere per sigillare il sacchetto/borsa sottovuoto.
3. Vacuum Premere per il sottovuoto del cibo nei sacchetti
sottovuoto, barattoli o altri contenitori.
Tasti funzione:
Tensione Nominale:220-240V AC
Potenza Nominale: 110W
BOTTLE STOPPER di Crenova
Frequenza Nominale: 50~60Hz
Tempo di Sigillatura:6~-10 sec
Potenza Sottovuoto: -0.8 bar
TempoVAC/Sigillatura: 10~20 secondi
Dimensioni: Lunghezza:360mm *150mm *76mm
N.W.:1.28kg G.W.:1.80kg

17
Introduzione alla funzione:
A Gancio di Chiusura
Abbassare il coperchio fino a che non schiocca e chiudere
il sacchetto in posizione.
Camera Sottovuo
Il sacchetto deve esser collocato all’interno della camera
sottovuoto.
Guarnizione inferiore
L’area sottovuoto è a prova d’aria ed evita perdite col
sottovuoto
Labbro di Gomma sigilla appiattendo
Barra Sigillante
3mm di larghezza sigillatura rende bene la chiusura
Ugello Sottovuoto
Quando si immette il contenitore del sigillo esterno, c’è un
blocco per gli altri accessori, inserite il pezzo sull’ugello.
Non bloccate l’ugello quando in uso
Pulsante di Rilascio
Premere i pulsanti di rilascio ai due lati, poi aprite
l’apparecchio ed estraete il cibo sigillato
B
C
D
F
G
E
4. Wet Premere il pulsante per scegliere la modalità su
bagnato quando il cibo è umido o succoso.

18
Istruzione di operazione:
Passo 1
- Inserire sull’apertura
il sacchetto sottovuoto nella
camera. Assicurarsi che il
sacchetto non copra l’ugello
Passo 2
- Abbassare il Coperchio,
lo schiocco indica che I
ganci di chiusura si bloccano
correttamente,poi il passo
successivo è il processo
sottovuoto o sigillatura.
Passo 3
- Premere i “Pulsanti di
Rilascio” per aprire il
dispositivo ed estrarre il
cibo sigillato
VacSeal
Cancel
Table of contents
Other Crenova Food Saver manuals
Popular Food Saver manuals by other brands

Weston
Weston SPORTSMAN'S ADVANTAGE 65-0501-RT user guide

METRO PROFESSIONAL
METRO PROFESSIONAL GVS1140 instruction manual

Peach
Peach PH311 operating instructions

Raychem
Raychem E-150 installation instructions

3M
3M 3M-Matic AccuGlide 3 200a Instructions and parts list

Interpack
Interpack IPG UA 262024 SB Operations manual & parts list