Cresta DTX390 User manual

DTX390
NL. WEERSTATION GEBRUIKSAANWIJZING
EN. WEATHER STATION USER MANUAL
FR. STATION MÉTÉO MODE D’EMPLOI
DE. WETTERSTATION BEDIENUNGSANLEITUNG

GEBRUIKSAANWIJZING
Wij feliciteren u met de aankoop van ons CRESTA digitale weerstation DTX390 en
bedanken u voor het in ons merk en onze producten gestelde vertrouwen.
Wij zijn ervan overtuigd dat u met deze aankoop een hoogwaardig kwaliteitsproduct
heeft aangeschaft waarvan u van het gebruik gedurende vele jaren plezier zult hebben.
Indien u na het lezen van deze gebruiksaanwijzing toch nog vragen heeft over dit
product en het juiste gebruik ervan stuurt u uw vraag dan naar onderstaand emailadres:
info@cresta.nl
Leest u deze gebruiksaanwijzing eerst zorgvuldig door voordat u het product in gebruik
neemt, ook wanneer u met het soort product al vertrouwd bent.
Het geeft u bruikbare tips om uw product optimaal te gebruiken. Bewaart u deze
gebruiksaanwijzing op een makkelijk te bereiken plaats voor mogelijke toekomstige
raadpleging, samen met uw aankoopbon, garantiekaart en verpakking.
VEILIGHEIDSVOORSCHRIFTEN
Dit product is uitsluitend bestemd voor gebruik waarvoor het ontworpen is en zoals in
deze gebruiksaanwijzing aangegeven. Gebruikt u dit product niet voor andere
doeleinden.
Controleer voor gebruik eerst of het product onbeschadigd is. In geval van twijfel neemt
u dan contact op met de serviceafdeling via bovenstaand e-mailadres.
Laat het product niet onbeheerd achter en houd het buiten bereik van kinderen.
Indien de batterijen vervangen dienen te worden vervang dan alle batterijen tegelijk
voor nieuwe. Mix geen oude en nieuwe batterijen en plaats batterijen van één soort bij
voorkeur alkaline batterijen.
SPECIFICATIES VAN UW WEERSTATION
• Uw weerstation is voorzien van 6 bedieningstoetsen voor: MODE, CH, ALERT,
˄·MEM ˅, ˅ ·HISTORY, SNOOZE·LIGHT.
• Zendergestuurde tijd
• Automatische ontvangst van het DCF77 tijdsignaal voor weergave van de juiste
tijd
• Automatische instelling van zomer – en wintertijd
• Tijd Weergave in 12 - of 24 uur formaat
• +/- 12 totaal 24 tijdzones instelbaar
• Kalender ingesteld tot 2099
• Weergave van Datum, Maand en dag van de week
• Dag van de week weergave instelbaar in 7 talen – Duits, Engels, Italiaans, Frans,
Nederlands, Spaans en Deens
• Weergave van weeknummer
• Tweevoudig alarm met repeteerfunctie – interval 5 minuten

• Weergave weervoorspelling door middel van 5 iconen: zonnig, half bewolkt,
bewolkt, regen, storm. U kunt het weericoon handmatig instellen
• Barometer en gegevens van de luchtdrukontwikkeling van de afgelopen 12 uur
• Hoogte instelling voor de berekening van de luchtdruk
• Weergave van de binnen – en buitentemperatuur en luchtvochtigheid met
trendindicatie
• Weergave Minimum - en Maximumtemperatuur en luchtvochtigheid
• Temperatuurbereik binnen °C tot +50 °, buiten -20 °C ~ +60 °C
• Temperatuurweergave instelbaar in ° Celsius of ° Fahrenheit
• Temperatuur alarm
• Weergave van de maanstand
• Weergave van lage batterij spanning
• Werking op 3 AAA-batterijen 1,5 V – niet inbegrepen
• Adapter 5.0V - meegeleverd
Buitensensor:
• Frequentie 433 MHz
• Werking op 2 AAA-batterijen 1,5 V – niet inbegrepen
OVERZICHT VAN UW WEERSTATION


VERKLARING SYMBOLEN BIJ DE TEKENINGEN
1. Buiten temperatuur. 2. Buiten temperatuur trend. 3. Binnen temperatuur trend. 4 Binnen
temperatuur. 5. Minimum/Maximum binnen temperatuur. 6. Teken voor lage
batterijspanning. 7. Binnen luchtvochtigheid trend. 8. Binnen luchtvochtigheid. 9.
Minimum/Maximum buiten temperatuur. 10. Luchtvochtigheid trend buiten. 11.
Weervoorspelling. 12 Buiten temperatuur. 13. Luchtvochtigheid buiten. 14. Maanstand. 15.
Geschiedenis van de luchtdruk. 16. Luchtdruk. 17. Luchtdruk trend. 18. Symbool voor
zendergestuurde tijd. 19. Tweevoudig alarm. 20. Symbool voor zomertijd. 21. Tijd. 22. Week.
23. Dag van de week. 24. Maand. 25. Datum. 26. Temperatuur alarm. 27. Kanaal loop 28.
Kanaal. 29. Ontvangstsymbool sensor. 30. Luchtvochtigheid comfort symbool.
A= MODE B=KANAAL C= ALARM D= ALARM REPETEERFUNCTIE·VERLICHTING
E= ˄·MEM F=˅·GESCHIEDENIS G= 5,0V OPENING VOOR JACKPLUG VOOR ADAPTER
H= TEMPERATUUR EN LUCHTVOCHTIGHEID I= LED VERLICHTING J= OPHANGOOG
K= KANAAL
IN GEBRUIKNAME
• Open het batterij vak aan de achterzijde van het basisstation en de buitensensor.
Plaats de batterijen in de batterijhouders. Let u erop dat u de batterijen in de juiste
poolrichting aanbrengt. De batterijen hebben de back-up functie.
• De hoogte instelling knippert. Gebruik de “
∧
•MEM
“, “
∨
•HISTORY
“ knop om de juiste
hoogte van uw positie in te stellen en druk vervolgens op de “SNOOZE
•
LIGHT”
knop. Het weerstation is op zeeniveau ingesteld. Indien u op dit niveau
woonachtig bent is een aanpassing niet nodig. Het weersymbool knippert.
Gebruik de “
∧
•MEM
“, “
∨
•HISTORY
“ knop om het weer te kiezen.
• Het basisstation maakt nu verbinding met de buitensensor. Dit proces duurt
meestal een 3-tal minuten. In het display verschijnen de weergave van de

buitentemperatuur en luchtvochtigheid. Mocht de verbinding niet tot stand
gekomen zijn drukt u dan de “CH“ knop langer dan 3 seconden in om opnieuw
een verbinding tot stand te brengen.
• De automatische ontvangst van het tijdsignaal start ongeveer 3 minuten na de
ontvangst van de buitensensor
• Tijdens de ontvangst van het tijdsignaal knippert het symbool in het display
• Zodra het tijdsignaal goed ontvangen is blijft het symbool continue in het
display zichtbaar
• Plaats de adapter als onderstaand aangegeven.
MONTAGE VAN DE BUITENSENSOR
Plaats de buitensensor als onderstaand aangegeven. Bevestig de sensor aan de muur,
plaats deze niet los ergens op. Probeer inval van direct zonlicht en regen zo veel mogelijk
te voorkomen. Bevestig de sensor bij voorkeur op een beschutte plaats.
TIJD HANDMATIG INSTELLEN
Mocht u onverhoopt door een slechte ontvangst geen tijdsignaal kunnen ontvangen
volgt u dan onderstaande stappen om de tijd handmatig in te stellen.
• Druk de “MODE“ knop in en houd deze gedurende 3 seconden ingedrukt
• De 12/24 uur indicatie knippert. Gebruik de “
∧
•MEM
“ en “
∨
•HISTORY
“ knop om het

gewenste formaat te selecteren.
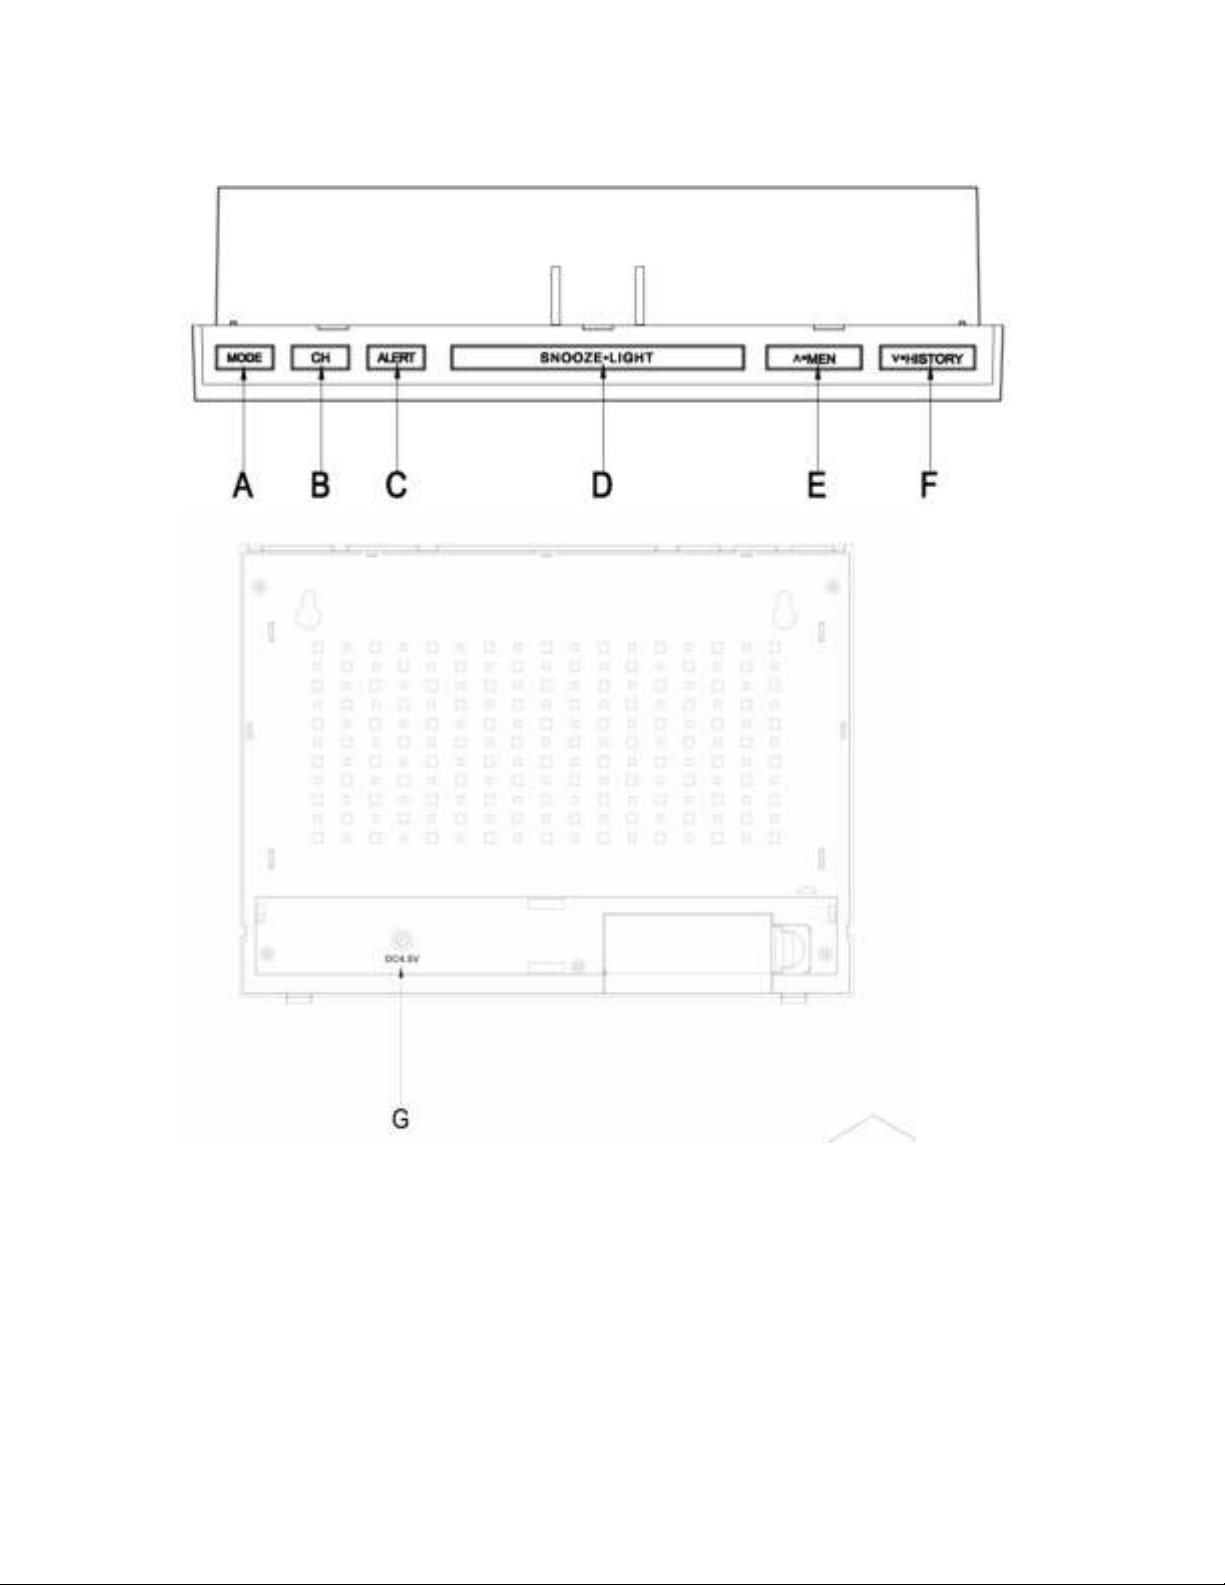
• De aanduiding voor de tijdzone gaat nu knipperen. Gebruik de “
∧
•MEM
“ en
“
∨
•HISTORY
“ knop om de juiste tijdzone te kiezen. Het ontvangen tijdsignaal is dat
van de Midden-Europese tijdzone. Alleen wanneer u zich buiten deze zone
bevindt is een aanpassing noodzakelijk. U kunt indien gewenst de tijdzone tot 12
uur vroeger of later aanpassen.
• Druk op de “MODE“ knop om te bevestigen
• In het display knipperen nu de Datum/Maand aanduiding. Gebruik de “
∧
•MEM
“ en
“
∨
•HISTORY
“ knop om de juiste volgorde te kiezen.
• Druk op de “MODE“ knop om te bevestigen
• Het jaartal knippert nu in het display. Gebruik de “
∧
•MEM
“ en “
∨
•HISTORY
“ knop om
het juiste jaartal te kiezen.
• Druk op de “MODE“ knop om te bevestigen
• In het display knippert nu de Maand aanduiding. Gebruik de “
∧
•MEM
“ en
“
∨
•HISTORY
“ knop om de juiste maand te kiezen.
• Druk op de “MODE“ knop om te bevestigen
• In het display knippert nu de Datum aanduiding. Gebruik de “
∧
•MEM
“ en “
∨
•HISTORY
“ knop om de juiste datum te kiezen.
• Druk op de “MODE“ knopom te bevestigen
• In het display knippert nu de Uur aanduiding. Gebruik de “
∧
•MEM
“ en “
∨
•HISTORY
“ knop om het juiste uur te kiezen.
• Druk op de “MODE“ knop om te bevestigen
• In het display knippert nu de Minuten aanduiding. Gebruik de “
∧
•MEM
“ en
“
∨
•HISTORY
“ knop om de juiste minuut te kiezen.
• Druk op de “MODE“ knop om te bevestigen
• In het display knippert nu de taalinstelling voor de Dag van de week. Gebruik de
“
∧
•MEM
“ en “
∨
•HISTORY
“ knop om de gewenste taal te kiezen.
• Druk op de “MODE“ knop om te bevestigen
• In het display knippert de hPa luchtdruk eenheid. Gebruik de “
∧
•MEM
“ en
“
∨
•HISTORY
“ knop om tussen hPa of inHG te kiezen.
• Druk op de “MODE“ knop om te bevestigen
• In het display knippert de temperatuur eenheid °C. Gebruik de “
∧
•MEM
“ en
“
∨
•HISTORY
“ knop om tussen °C of °F te kiezen.
• Druk op de “MODE“ knop om te bevestigen
Let op: Indien u tijdens het instellen gedurende 20 seconden geen van de knoppen
bedient gaat het instel display automatisch terug naar het tijddisplay.
• Uitleg bij de tijdzone instelling. U kunt de tijd handmatig veranderen naar de
tijdzone van een land met maximale afstand van circa 1.500 kilometer vanaf
Frankfurt, waar uw product wel het tijdsignaal kan ontvangen maar waar de
actuele tijd anders is dan die van het ontvangen signaal. Bijvoorbeeld: in een
bepaald land loopt de tijd 1 uur voor op die van de Duitse tijd. Stel de tijdzone 1
uur vooruit op 01. Het basisstation ontvangt nu nog altijd het zendergestuurde
tijdsignaal meer geeft 1 uur later aan.
UW DAGELIJKSE ALARM INSTELLEN
• Druk op de “MODE“ knop om te wisselen tussen het tijddisplay en het A(larm) 1
display.
• Druk op de “MODE“ knop en houd deze gedurende 3 seconden ingedrukt. De
alarmtijd wordt nu getoond.

• In het display knipperen nu de Uren van de alarmtijd. Gebruik de “
∧
•MEM
“ en
“
∨
•HISTORY
“ knop om het juiste uur te kiezen.
• Druk op de “MODE“ knop om te bevestigen
• In het display knipperen nu de Minuten van de alarmtijd. Gebruik de “
∧
•MEM
“ en
“
∨
•HISTORY
“ knop om de juiste minuut te kiezen.
• Druk op de “MODE“ knop om te bevestigen
• Druk op de “MODE“ knop om te wisselen tussen het A(alarm) 1display en het
A(larm) 2 display.
• Voor alarm 2 geldt dezelfde instelprocedure als voor Alarm 1 als hierboven
beschreven
UW DAGELIJKSE ALARM IN – OF UITSCHAKELEN
• Wanneer de alarmtijd van Alarm 1 in het display wordt getoond druk dan op de
“
∧
•MEM”
en “
∨
•HISTORY
“ knop om Alarm 1 in te schakelen. Het alarm symbool
verschijnt in het display
• Druk nogmaals op de “
∧
•MEM”
en “
∨
•HISTORY
“ knop om Alarm 1 uit te schakelen.
• Wanneer de alarmtijd van Alarm 2 in het display wordt getoond druk dan op de
“
∧
•MEM”
en “
∨
•HISTORY
“ knop om Alarm 2 in te schakelen. Het alarm symbool
verschijnt in het display
• Druk nogmaals op de “
∧
•MEM”
en “
∨
•HISTORY
“ knop om Alarm 2 uit te schakelen.
Let op: Indien u tijdens het instellen gedurende 20 seconden geen van de knoppen
bedient gaat het instel display automatisch terug naar het tijddisplay.
Het alarm klinkt gedurende 2 minuten indien u geen van de knoppen indrukt om het
alarm stil te zetten en schakelt vervolgens automatisch uit.
REPETEER FUNCTIE
Ga om de repeteer functie van het alarm in te stellen als volgt te werk.
• Druk, terwijl het alarm afgaat op de “SNOOZE
•
LIGHT“ knop om de repeteer
functie in te schakelen.
• Wanneer de repeteer functie is ingeschakeld knippert het alarm symbool in het
display.
• Het alarm gaat na 5 minuten opnieuw af totdat u deze functie uitschakelt.
• Wanneer u het alarm gedurende 2 minuten laat uitlopen stopt automatisch de
eventueel ingestelde repeteerfunctie
• U kunt de repeteer functie door op een willekeurige toets te drukken stoppen.
12 / 24 UUR MODUS
U kunt de tijd op 2 manieren in het display weergeven. Met het 12 uur formaat, bij de tijd
wordt nu AM – tijd tussen 12 uur ‘s nachts en 12 uur in de middag – of PM – tijd tussen 12
uur ‘s middags en middernacht – weergegeven. Bij het 24 uurs formaat tellen de uren van
0;00 tot 23:59 uur.
TEMPERATUUR EENHEID INSTELLEN
U kunt de temperatuur laten weergeven in ° Celsius of ° Fahrenheit,

MINIMUM/ MAXIMUM BINNEN – EN BUITEN TEMPERATUREN EN
LUCHTVOCHTIGHEID
• Druk op de “
∧
•MEM“
knop om de gemeten minimum en maximum binnen – en
buitentemperaturen en luchtvochtigheden weer te laten geven
INSTELLEN VAN EEN TEMPERATUUR ALARM
• Druk op de “CH” knop om indien u meer dan één buitensensoren binnen bereik
heeft het gewenste kanaal -1, 2 of 3 – te kiezen.
• Druk op de “ALERT” knop om het alarm symbool te laten verschijnen.
• Houd de “ALERT” knop ingedrukt. De maximum limiet temperatuur gaat
knipperen. Gebruik de “
∧
•MEM
“ en “
∨
•HISTORY
“ knop om de maximale temperatuur
voor het temperatuuralarm in te stellen.
• Druk op de “ALERT” knop. De minimum limiet temperatuur gaat knipperen.
Gebruik de “
∧
•MEM
“ en “
∨
•HISTORY
“ knop om de minimale temperatuur voor het
temperatuuralarm in te stellen.
• Wanneer het alarm is ingeschakeld wordt het alarm symbool in het display
getoond.
TEMPERATUUR ALARM IN – EN UITSCHAKELEN
• Houd de “ALERT” knop ingedrukt om het temperatuuralarm in - of uit te
schakelen.
• Alarm ingeschakeld: Het temperatuur alarm symbool wordt in het display
getoond
• Alarm uitgeschakeld: Het temperatuur alarm symbool verdwijnt uit het display.
Let op:
• Het temperatuur alarm kan voor elk kanaal individueel worden ingesteld.
• U kunt de maximum limiet temperatuur niet lager instellen dan de minimum limiet
temperatuur
• De minimum limiet temperatuur dient minstens 1 °C beneden de maximum limiet
temperatuur te worden ingesteld
WEERVOORSPELLING MET 5 ICONEN
ZONNIG HALFBEWOLKT BEWOLKT REGEN HEVIGE REGEN/
STORM
Let op:
Aangezien de weervoorspelling gebaseerd is op de luchtdruk zal het weer in het display
veelal afwijken van het actuele weer.

BAROMETER EN LUCHTDRUKONTWIKKELING LAATSTE 12 UUR
De luchtdrukeenheid kan in hPa of in inHG worden ingesteld. U kunt de ontwikkeling van
de luchtdruk van de afgelopen 12 uur nazien door de “
∨
•HISTORY
“ knop in te drukken.
VERLICHTING
Wanneer u de adapter niet in gebruik heeft en uw weerstation op de geplaatste
batterijen werkt druk dan op de “SNOOZE
•
LIGHT“ knop. De display verlichting brandt
gedurende 5 seconden.
Wanneer u de adapter in gebruik heeft zijn er door op de “SNOOZE
•
LIGHT“ knop te
drukken 3 verlichting niveaus: Normaal helder – Extra helder - Uit
MAANSTAND
In het display wordt de actuele maanstand weergegeven.
NIEUWE
MAAN
WASSENDE
HALVE MAAN
1E
KWARTIER
WASSENDE
MAAN
VOLLE
MAAN
AFNEMENDE
MAAN
LAATSTE
KWARTIER
AFNEMENDE
HALVE MAAN
LUCHTVOCHTIGHEID COMFORT SYMBOOL
Het weerstation gebruikt opgeslagen data om de luchtvochtigheid in de woonruimte te
bepalen en geeft hiervoor een symbool aan.
COMFORT DROOG VOCHTIG
WEERGAVE LAGE BATTERIJSPANNING
In het display van het weerstation wordt een symbool voor lage batterijspanning
weergegeven om u eraan te herinneren dat de batterijen van het basisstation of de
buitensensor vervangen dienen te worden.
• Symbool in het basisstation display: batterijen basisstation vervangen
• Symbool in het display van de buitensensor: batterijen sensor vervangen
Wij adviseren wanneer de batterijen van de buitensensor vervangen dienen te
worden ook de batterijen van het basisstation te vervangen ook al wordt dit nog
niet aangegeven.

DRAADLOZE VERBINDING MET DE BUITEN SENSOR
• Druk op de “CH” knop om het juiste kanaal te kiezen. U kunt de gegevens van
maximaal 3 sensoren in het weerstation uitlezen.
• Druk op de “CH” knop en houd deze gedurende 3 seconden ingedrukt om de
verbinding met de buitensensor op te bouwen.
ONTVANGST VAN HET ZENDERGESTUURDE SIGNAAL
• Het zoeken naar het zendergestuurde signaal start automatisch circa 3 minuten
nadat de batterijen zijn geplaatst of zijn vervangen. Het “” symbool knippert.
Plaats het basisstation op afstand van storingsbronnen als televisies, computers en
dergelijke, deze apparaten kunnen de goede ontvangst verstoren.
• Druk op de “
∧
•MEM
“ en “
∨
•HISTORY
“ knop gedurende 3 seconden om de ontvangst
van het zendergestuurde signaal te starten of te stoppen.
• De tijd wordt dagelijks tussen 1 en 3 uur ‘s nachts elk uur met het DCF-signaal
gesynchroniseerd om eventuele afwijkingen te corrigeren. Indien de
synchronisatie niet succesvol wordt voltooid vinden er 2 nieuwe synchronisatie
pogingen om 4 en 5 uur ‘s nachts plaats. Indien ook deze pogingen niet succesvol
zijn zal de synchronisatie de volgende dag op dezelfde uren opnieuw
plaatsvinden.
INFORMATIE
• Het knipperende “ ” betekent dat het zoeken naar het DCF zendergestuurde
signaal is begonnen
• Wanneer het “ ”continue in het display zichtbaar is betekent dit dat het signaal
succesvol is ontvangen
• De ontvangst van het signaal is zwakker in ruimten met betonnen muren of
bijvoorbeeld in de kelder en in kantoorgebouwen. Bij extreem slechte ontvangst
adviseren wij het basisstation dicht bij het raam te plaatsen.
• Gedurende de nacht zijn er minder atmosferische storingen. Gedurende de
nacht is de ontvangst veelal wel mogelijk. Één synchronisatie per dag is
voldoende om de nauwkeurigheid van 1 seconde te waarborgen.
TIP
Indien uw signaal ontvangst omstandigheden dusdanig gering zijn – bijvoorbeeld
veroorzaakt door de afstand tot de zender, dikke betonnen muren, staalconstructies en
dergelijke – kunt u de tijd handmatig aanpassen. Zodra het zendergestuurde tijdsignaal
wordt ontvangen wordt de handmatig ingestelde tijd automatisch aangepast. Het
signaal kan op een afstand van circa 1.500-kilometer rond Frankfurt worden ontvangen.
MILIEUVRIENDELIJKE VERWIJDERING
Volgens de Europese regelgeving 2002/96/EC met betrekking tot elektrisch - en
elektronisch afval mogen huishoudelijke apparaten niet bij het ongesorteerde huisvuil
worden weggegooid, maar dienen bij uw plaatselijke inzamelpunt te worden
ingeleverd, zodat diverse onderdelen weer kunnen worden hergebruikt en zo minder
milieubelastend zijn.

Het doorgestreepte afvalbak symbool bij dit product herinnert u aan
deze verplichting. Neemt u voor informatie over uw plaatselijke regelgeving contact
op met uw gemeente.
2018, DRUKFOUTEN EN TUSSENTIJDSE WIJZIGINGEN VOORBEHOUDEN

INSTRUCTION MANUAL
We thank you for buying one of our radio-controlled weather stations. It shows your
confidence in our brand and our products. Please be assured you have bought a
high-quality product which you will enjoy using for many years to come.
If you require technical support and or have questions about the functioning of the
product, please contact our After Sales Service via the email address mentioned
here under:
Read this manual thoroughly before first use, even if you are familiar with this type of
product.
It provides you several tips to make optimal use of your product. Keep this manual, your
receipt and packaging in a safe place for future reference.
SAFETY PRECAUTIONS
Please only use this product for its design purpose. Do not use for any other purpose.
Before the first use inspect the product to make sure it is not damaged. In case you have
a doubt please contact our After Sales Service via the above-mentioned email address.
If the batteries need to be renewed, please renew all batteries. Do not mix old - and new
batteries. Preferably replace the old batteries by new batteries of one type; we advise to
use alkaline batteries.
SPECIFICATIONS OF YOUR WEATHER STATION
• Your weather station is equipped with 6 operation buttons: MODE, CH, ALERT,
˄·MEM ˅, ˅ ·HISTORY, SNOOZE·LIGHT.
• Radio Controlled Clock
• Automatic receipt of the DCF 77-time signal to display the most accurate time
• Automatic switch from Summer - to Wintertime vice versa
• Time display selectable in 12 - or 24 hours format
• 24 adjustable time zones selectable (-12 / + 12)
• Continuous perpetual calendar up to 2099
• Display of Date, Month and Weekday
• Display of Weekday available in 7 languages, i.e. German, English, Italian, French,
Dutch, Spanish, Danish
• Week number display
• Dual alarm with snooze function (5 minutes alarm interruption)
• 5 weather forecasts: sunny, partly sunny, cloudy, rainy, storm, weather symbol can
be selected manually.
• Barometer and data of 12 hours history for air pressure
• Altitude-setting for calculation of air pressure
• Indoor /outdoor temperature and humidity with trend
• Minimum / Maximum of temperature and humidity

• Thermometer measuring range inside: °C to +50 °C, outside -20°C~60 °C
• Temperature display selective in °C or °F
• Temperature alert
• Moon phase
• Low battery indication
• White V.A display
• Battery: 3 x AAA, LR03, 1.5V – not included
• Adapter 5.0V - included
Outdoor sensor:
• Frequency: 433 MHz
• Battery: 2 x AAA, LR03, 1.5 – not included

EXPLANATION OF THE OPERATION BUTTONS AND DISPLAY ICONS
•


1.Outdoor temperature 2. Outdoor temperature trend 3. Indoor temperature trend 4.
Indoor temperature 5. Max/Min of indoor 6. Indoor low battery 7. Indoor humidity
trend 8. Indoor humidity 9. Max/Min of outdoor 10. Outdoor humidity trend 11.
Weather 12. Outdoor temperature 13. Outdoor humidity 14. Moonphase 15. History
hour of air pressure 16. Air pressure 17. Air pressure trend
18. Radio controlled Signal symbol 19. Dual alarm 20. DST symbol 21. Time
22. Week 23. Day of the week 24. Month 25. Date 26. Temperature alert 27. Recycling
symbol for channel 28. Channel 29. RF symbol 30. Living space humidity icon
A=MODE B=CH C=ALERT D= SNOOZE
•
LIGHT E=
∧
•MEM F=
∨
•HISTORY G= 5.0V JACK HOLE
H=
TEMPERATURE AND HUMIDITY I= LED LIGHT J=HANGING HOLE K= CHANNEL
INITIAL OPERATION
• Open the battery compartments located on the rear side of the devices. Place the
batteries in the battery compartments. Observe the shown polarity. The batteries are
backup batteries.
• The altitude icon is flashing, please use the “
∧
•MEM
“, “
∨
•HISTORY
“ button to set the
altitude of your position, then press the “SNOOZE
•
LIGHT“ button. The weather station
is set to sea level, so if you live on this level there is no need for adjustment. The
weather symbol is now flashing, please use the “
∧
•MEM
“, “
∨
•HISTORY
“ button to choose
the weather.
• The station is now connecting to the outdoor sensor. This process takes about 3
minutes. Then the display shows the outdoor temperature and humidity, in case of
failure of the reception, please press “CH“ for more than 3 seconds to receive again.
• The automatic receiving of the DCF radio signal begins after 3 minutes of the outdoor
reception.
• This RCC reception process is going on, the flashing symbol “ ”appears in the time
display area at the same time.
• Once the radio signal is received successfully, the display shows the symbol “ ”
continuously and stops flashing.
• Please follow the instructions below for the DC 5.0V adapter to the device.

MOUNTING THE OUTDOOR SENSOR
We suggest you to hang the outdoor sensor as indicated here under, better not stand it at
an outside place. Try to avoid direct sun shine or rain as much as possible.
If there is no reception due to a bad reception, or failure of a the RCC automatic time
signal it is possible to set the time manually, please follow the steps here under:
MANUAL TIME SET-UP
• Press and hold key the “MODE“ button for 3 seconds.
• The 12/24 hour icon is flashing. Use the “
∧
•MEM
“ and “
∨
•HISTORY
“ button to select.
• Press the “MODE“ button to confirm.
• The display for the time zone is flashing. Use the “
∧
•MEM
“ and “
∨
•HISTORY
“ button to
select the time zone(-12 to +12).
• Press the “MODE“ button to confirm.
• The display for the D and M format is flashing , Use the “
∧
•MEM
“ and “
∨
•HISTOR
“ button
to select
• Press the “MODE“ button to confirm.
• The display for the year is flashing. Use the “
∧
•MEM
“ and “
∨
•HISTORY
“ button to select the
year.
• Press the “MODE“ button to confirm.
• The display for the month is flashing. Use the “
∧
•MEM
“ and “
∨
•HISTORY
“ button to select
the month.
• Press the “MODE“ button to confirm.
• The display for the date is flashing. Use the “
∧
•MEM
“ and “
∨
•HISTORY
“ button to select the
date.
• Press the “MODE“ button to confirm.
• The display for the hour is flashing. Use the “
∧
•MEM
“ and “
∨
•HISTORY
“ button to select the
hour.
• Press the “MODE“ button to confirm.
• The display for the minutes is flashing. Use the “
∧
•MEM
“ and “
∨
•HISTORY
“ button to select
the minutes.
• Press the “MODE“ button to confirm.

• The language selection for the display of the weekdays is flashing. Use the “
∧
•MEM
“ and “
∨
•HISTORY
“ button to select the language.
• Press the “MODE“ button to confirm
• The hPa unit of air pressure is flashing. Use “
∧
•MEM
“ and “
∨
•HISTORY
“ button to select
hPa/ inHg.
• Press the “MODE“ button to confirm
• The temperature °C is flashing. Use the “
∧
•MEM
“ and “
∨
•HISTORY
“button to select °C and
°F
• Press the “MODE“ button to confirm
INFORMATION
• The clock automatically changes from the set-up mode to the time display mode if no
keys are pressed for 20 seconds.
• Explanation for the time zone display:
You can manually adjust the clock to the time zone of a country (up to 1500km
distance to Frankfurt/Main) where the clock receives the DCF signal but where the
actual time differs from the time received.
If, e.g. the time in a given country is 1 hour ahead of the German time, set the time
zone display to 01. The clock is now DCF controlled but the time is one hour ahead.
DAILY ALARM SET-UP
• Press the “MODE” button to switch from the time display to the A1 display
• Press and hold the “MODE” button for 3 seconds , the flashing alarm time is shown
• The hour display of the alarm time is flashing. Use the “
∧
•ME
“ and “
∨
•HISTORY
“ button to
select the hour.
• Press the “MODE” button to confirm.
• Then follow the minutes. Use the “
∧
•MEM
“ and “
∨
•HISTORY
“ button to select the minutes
• Press the “MODE” button to confirm.
• Then press the “MODE” button to switch from the A1 display to the A2 display
• The same setting procedure is to follow for Alarm 2 as for A1.
DAILY ALARM ON/OFF
• When the A1 alarm time is showing, press the “
∧
•MEM
“ or “
∨
•HISTORY
“ button to activate
the alarm 1 with the alarm symbol showing in the display.
• Press the “
∧
•MEM
“ or “
∨
•HISTORY
“ button again to deactivate the alarm
• When the A2 alarm time is showing, press the “
∧
•MEM
“ or “
∨
•HISTORY
“ button to activate
the alarm 2 with alarm symbol showing.
• Press the “
∧
•MEM
“ or “
∨
•HISTORY
“ button again to deactivate the alarm
INFORMATION:
• The clock automatically changes from the set-up mode to the time mode if no keys
are pressed for 20 seconds.
• The alarm sounds for 2 minutes if no key is pressed to stop it and will then switch off
automatically.

SNOOZE FUNCTION
To activate the snooze function, follow the steps below
• Press the key “SNOOZE
•
LIGHT“while the alarm sounds, to activate the snooze
function.
• If the snooze function is activated, the alarm symbol is flashing.
• The alarm repeats after 5 minutes.
• The snooze function can be stopped by pressing any key.
• The snooze function will last until you switch it off.
• If you do not switch off the alarm it will last for 2 minutes and stop. In this case the
snooze function will also stop automatically.
12/24 HOURS MODE
The time display can be in 12 (AM/PM)or 24 hours mode.
°C/°F TEMPERATURE DISPLAY
The temperature display can be in °C or °F.
MAX/ MIN FOR THE INDOOR/OUTDOOR TEMPERATURE AND HUMIDITY
Press the “
∧
•MEM
“ button for displaying the indoor/outdoor max./min. temperatures and
humidity’s.
TEMPERATURE ALERT SET-UP
• Press the “CH” button to select the channel (1, 2, 3) if more than one outdoor sensors
are within reach.
• Press the “ALERT” button to show the alert symbol
• Hold the “ALERT” button, the upper limit temperature is flashing, use the “
∧
•MEM
“ and
“
∨
•HISTORY
“ button to set the maximum alert temperature.
• Press the “ALERT” button, the lower limit temperature is flashing, use the “
∧
•MEM
“ and
“
∨
•HISTORY
“ button to set the minimum alert temperature.
• When the alert is activated, the alert symbol will be shown.
.
TEMPERATURE ALERT ON/OFF
• Press and hold the key “ALERT” to set the temperature alert ON or OFF.
• Alert ON: Temperature alert symbol shown in display
• Alert OFF: Temperature alert symbol goes out.
INFORMATION
• A temperature alert can be set-up for each channel.
• The set-up process cannot be completed if the maximum temperature selected is
lower than the minimum selected temperature.
• The minimum temperature selected must be at least 1°C below the maximum
selected temperature.
Table of contents
Languages:
Other Cresta Weather Station manuals