Crolla NEXUS DUALFIX User manual

Group: 0+, I, II, III Weight: 0-36kg
Approval according to ECE R44/04
For Installation with 3-point-belt or with ISOFIX (ISOFIX attachments and top tether)
1. This is a ‘Universal’ child restraint. It is approved to UN ECE regulation 44, 04 series of amendments, for general use in vehicles and it will
fit most, but not all, car seats.
2. A correct fit is likely if the vehicle manufacturer has declared in the vehicle handbook that the vehicle is capable of accepting a ‘Universal’
child restraint for this age group.
3. This child restraint has been classified as ‘Universal’ under more stringent conditions than those which applied to earlier designs which do
not carry this notice.
4. If in doubt, please consult the child restraint manufacturer or the retailer.
For Installation with ISOFIX (ISOFIX attachments and top tether)
1. This is an ISOFIX CHILD RESTRAINT SYSTEM. It is approved to Regulation No. 44, 04 series of amendments for general use in vehicles
fitted with ISOFIX anchorages systems. It is suitable for fixing into the seat positions of most cars.
2. It will fit vehicles with positions approved as ISOFIX positions (as detailed in the vehicle handbook), depending on the category of the child
restraint and of the fixture.
3. Seat positions in other cars may also be suitable to accept the child restraint. If in doubt, consult either the child restraint manufacturer or
vehicle manufacturer.
4. The ISOFIX size class for which this device is intended is B1.
For Installation with ISOFIX attachments and 3-point-belt
1. The child restraint is classified for “Semi-Universal” use.
2. Seat positions in other cars may also be suitable to accept the child restraint. If in doubt, consult either the child restraint manufacturer or
vehicle manufacturer.
Product Child Restraint
Suitable for Child weighing 0 - 36kg (approximately 0 - 12 years)
Mass Group 0+/1/2/3
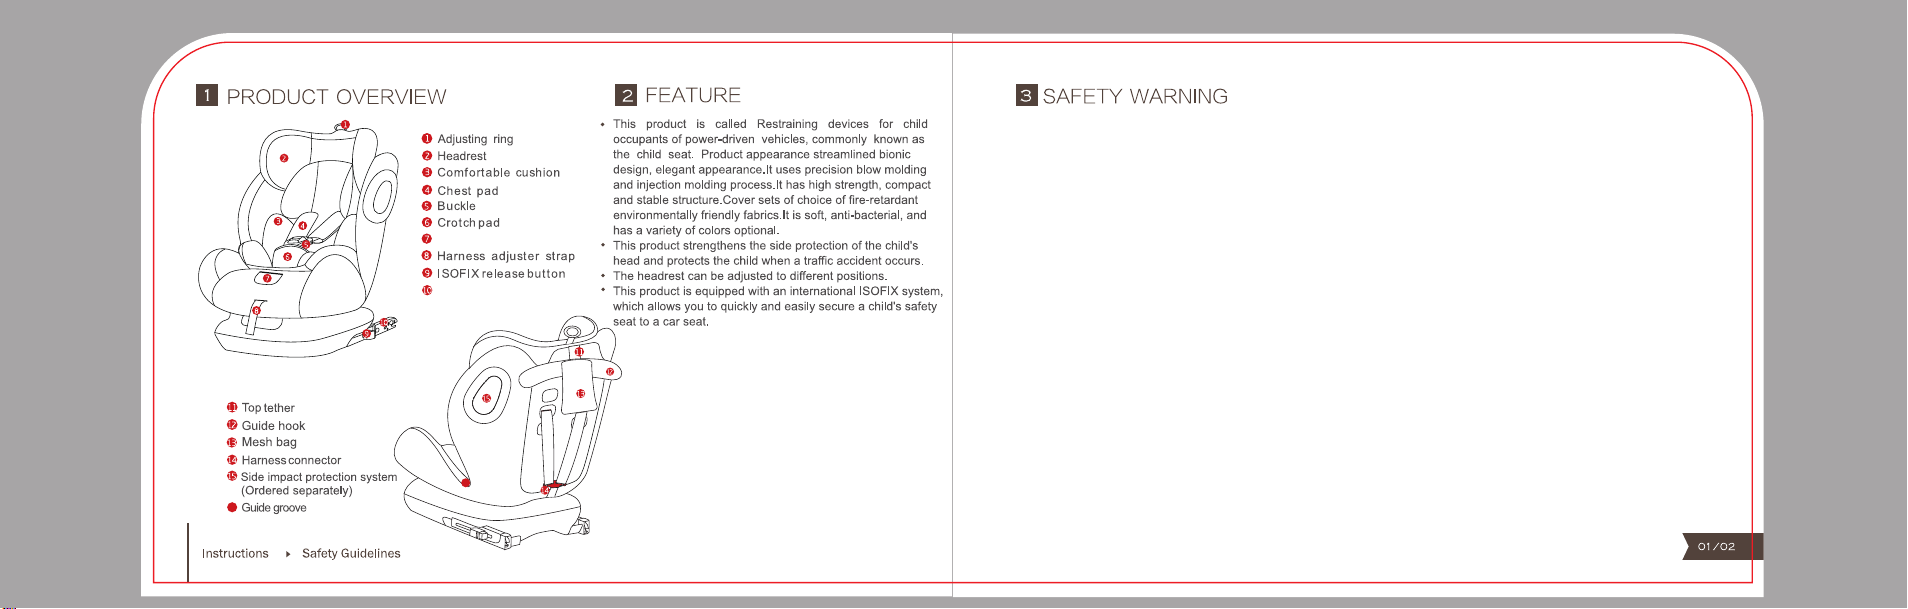
16
16
Recline adjustable handle
ISOFIX attachment connector
For your child’s safety, please read these instructions carefully before use and keep
them for future reference. Failure to follow the instructions contained in this manual
could result in serious injury to your child.
• NO child restraint can guarantee full protection from injury in an accident. However,
proper use of this child restraint will reduce the risk of serious injury or death to your
child.
• This child restraint is designed ONLY for child weighing under 36kg
(approximately 12 years old or under).
• Make sure that the straps holding the restraint to the vehicle should be tight and any
straps retraining the child should be adjusted to the child’s body. Check to make
sure that the straps are not twisted.
• DO NOT use forward facing mode before the child’s weight exceeds 9kg.
• DO NOT install or use this child restraint without following the instructions and
warning in this manual.
• DO NOT make any modification to this child restraint or use it along with component
parts from other manufacturers.
• DO NOT use this child restraint if it has damaged or missing parts.
• DO NOT have your child in unfitted clothes when use this child restraint in baby or
toddler mode, because this may prevent your child from being properly and securely
fastened by the shoulder harnesses and the harnesses between thighs.
• When use this child restraint in baby or toddler mode, the safety belt must be used
correctly, and ensure that any lap strap is worn low down, so that the pelvis is firmly
engaged.
• DO NOT leave this child restraint unbelted or unsecured in your vehicle because
unsecured child restraint can be thrown around and may injure occupants in a sharp
turn, sudden stop, or collision. Remove it if not in regular use.
• NEVER place the child restraint in seating positions where an active frontal airbag
is installed when used in rear facing mode.
• NEVER use a second-hand child restraint or a child restraint whose history you do
not know because they may have structural damage that endangers your child's
safety.
• Please keep this child restraint away from sunlight, otherwise it may be too hot for
the child's skin.
• DO NOT use this child restraint as a regular chair as it tends to fall down and injure
the child.
• DO NOT use this child restraint without the soft goods.
• DO NOT place anything on top of the child restraint if it is in the car boot to prevent
damage.
• DO NOT carry this child restraint with a child in it.
• DO NOT put anything other than the recommended soft goods in this child restraint
• Any luggage or other objects liable to cause injuries in the event of a collision shall
be properly secured.
• Do not allow the child restraint harness or buckles to become trapped or caught in
the vehicle seat or door.
• DO NOT continue to use this child restraint when it has been subject to violent
stresses in an accident.
• Remove this child restraint from the vehicle seat when it is not in use for a long
period of time.
• To avoid suffocation, remove plastic bag and packaging materials before using this
product. The plastic bag and packaging materials should then be kept away from
babies and children.
• Consult the distributor for issues concerning maintenance, repair and part
replacement.
• Frequently check the ISOFIX attachments guides for dirt and clean them if
necessary. Reliability can be effected by ingress of dirt, dust, food particles etc.
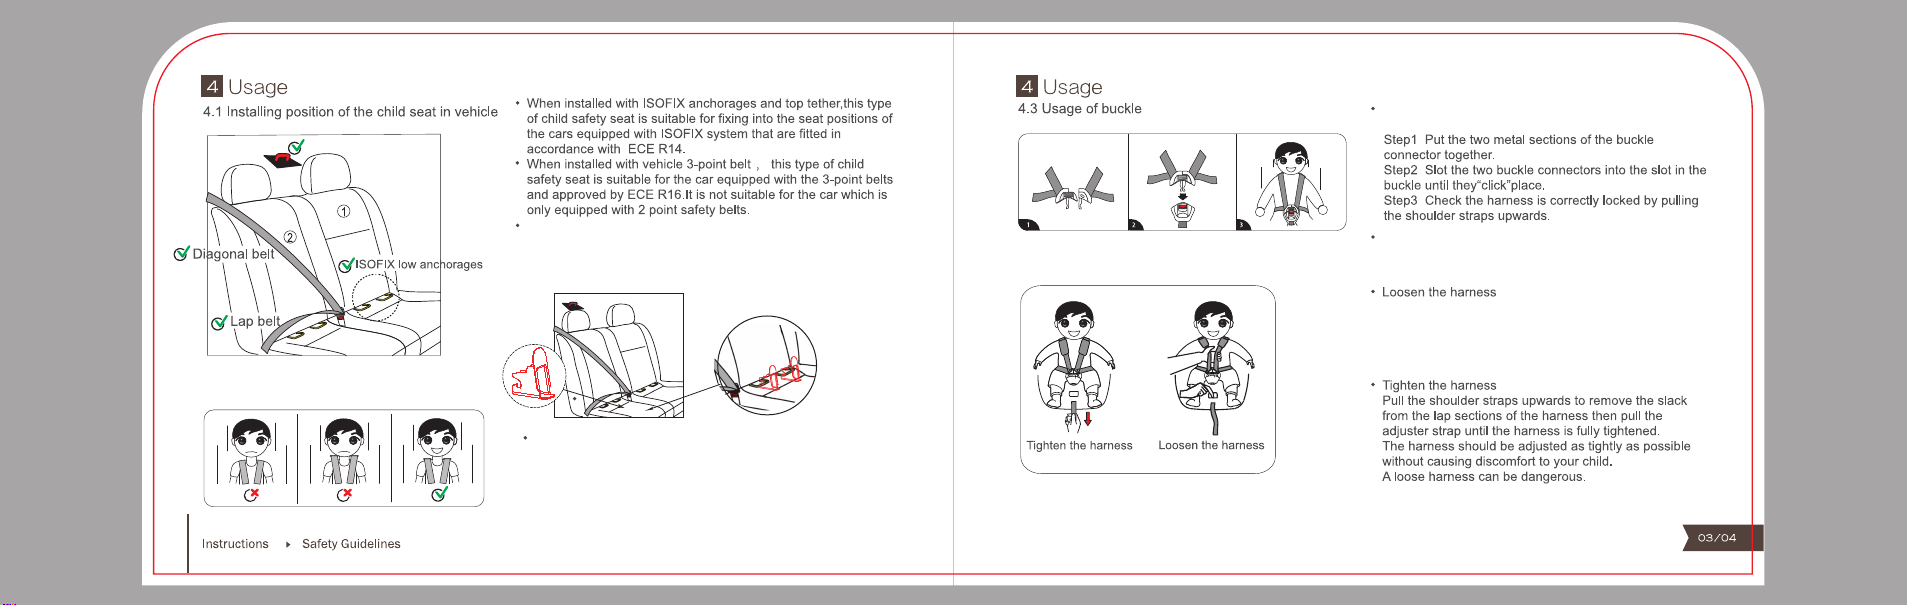
4.2 Height adjustment for shoulder harnesses
Note: Fit the ISOFIX attachments guides with the ISOFIX
attachments anchor points. The ISOFIX attachments guides
can protect the surface of the vehicle seat from being torn.
They can also guide the ISOFIX attachments connectors.
Always adjust the shoulder harnesses to proper height according
to the child’s heights. The child’s shoulder straps should always be
threaded through the slots in the cover and seat shell that are
closest to the top of your child’s shoulders.
Please follow the steps below for height
adjustment of shoulder straps:
To release the harness, press the red button
to disengage the buckle.
The harness is slackened by pressing the adjuster
on the front of the seat. While pressing the harness
adjustment button, pull completely the two shoulder
harnesses of the child restraint.
After the child is seated, check the harness adjuster and adjust it to
the proper length to make sure your child is snugly secured.
4.4 Adjustment of harness length
:
:
:
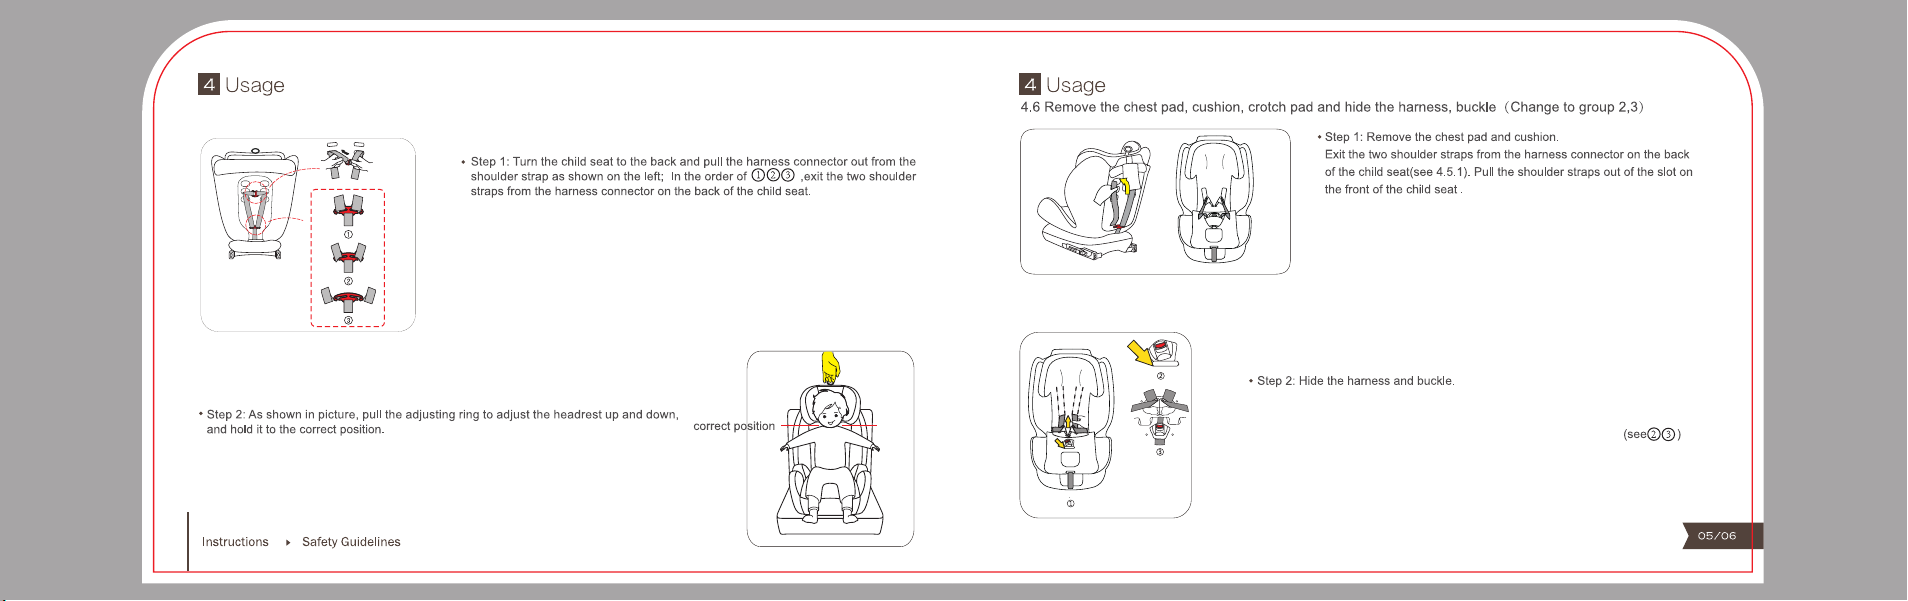
4.5 Height Adjustment for Headrest and shoulder harnesses
4.5.1 Adjust the height of shoulder harnesses
4.5.2 Adjust the height of headrest Detach the snaps and remove the both two shoulder pads,
take off the two metal sections of buckle from the shoulder straps.
Stored the shoulder straps and buckle in their storage compartments
Other Crolla Car Seat manuals


