CrossCore War Machine Installation guide

®
®
Basic Training Manual
19 War Machine® Basic Training Exercises
Exercise Instructions for all levels:
Beginner, Intermediate, Advanced
This Basic Training Course Manual includes:
crosscore-usa.com

War Machine® PTS SAFETY PROCEDURES & INSTRUCTIONS
There is risk assumed by individuals who use this type of fitness equipment. Before
using your new War Machine®, review Set Up, Use and Maintenance info on the Cross-
Core® Training Manual, DVD and www.crosscore-usa.com website. User assumes the
risk of injury and all liability resulting from the use of the War Machine® PTS.
As this equipment involves advanced exercise routines, consult your physician
before beginning this or any type of exercise program.
Inspect the War Machine® daily AND before each and every time you use the
War Machine®. Tighten all loose connections/ropes/belts/carabiners/handles/
accessories and replace worn parts immediately. Failure to do so may result in
serious injury.
Always attach the War Machine® to a secure, strong and stable anchor point that
is able to easily support your body weight. When using the War Machine® on any
piece of fitness equipment (or any object not already permanently attached to
the ground, wall, ceiling, etc.), make sure that piece is bolted to the floor or similar
permanent anchor point so that it cannot tip. Always perform a weight test to
determine the strength/integrity of your chosen anchor point BEFORE using the
War Machine®.
Always begin in Locked-N-Loaded mode for added stability and perform exercises in
a slow, controlled manner at all times. Always begin with little or no body angle.
It is suggested that MINORS do not use this equipment without adult supervision.
The War Machine® is not a toy and should not be treated as such.
Make sure when adjusting the length of the rope, or when clipping the handles
into
the openings in the top of the pulley housing, that all excess rope is completely
out
of the way of the users body at all times during exercising. The excess rope can
usually be restrained using the Velcro tabs of the support strap.
When attaching the adjustable pulley strap, make sure to feed end of strap
through the back of the buckle ONLY. This is the side opposite of where the cleat
opens. Feeding strap through the front (where the cleat opens and is visible) will
not allow the cleat to lock in place and WILL NOT hold the user’s weight and may
cause the pulley to fall from the point of attachment.
DO NOT use on or near a wet or slippery surface. Be sure of your footing before
you begin exercising.
Safeguard the War Machine® from them elements when not in use. Prolonged
exposure to sunlight, dampness, inclement or severe weather conditions, extremely
cold or hot temperatures and extreme shifts in temperature, can weaken the
components of the War Machine®.
If using a counter weight, make sure the pulley housing is secured as close to the
anchor point as possible. A few inches is preferred. Also, make sure the user or any
bystanders are a minimum of four feet away from the resting point of the counter
weight at all times while War Machine® is in use. Always exercise in a slow and con-
trolled manner with or without a counter weight. When using a counter weight, do
not exceed a 50 lb. maximum. When finished, remove counter weight from
War Machine®.
1.
2.
3.
4.
5.
6.
7.
8.
9.
10.

11. War Machine Wall/Ceiling Anchor Mount
a. PROFESSIONAL INSTALLATION STRONGLY RECOMMENDED
b. Wood Lag Bolts are NOT meant for installation into Concrete or Steel.
c. Use a stud finder at several points along stud to be certain of its center.
d. Only mount to strong wall or ceiling beams able to bear a minimum
weight load of at least 300 lbs. If more than one Wall/Ceiling Anchor
Mount will be attached to a single beam for multiple users,
CrossCore, Inc. STRONGLY RECOMMENDS using a licensed contractor
for installation that will confirm the combined user weight will not
compromise the structural integrity of the beam or attachment points
at any time.
e. Maximum weight load for all War Machines using the War Machine Wall/
Ceiling Anchor Mount not to exceed: 300 lbs.
f. Installed War Machine® Wall/Ceiling Anchor Mount should be secured
completely flush to wall/ceiling with no movement. Perform a weight test
prior to using installed Wall/Ceiling Anchor Mount.
g. Routinely check installed War Machine® Wall/Ceiling Anchor Mount to
ensure maximum safety. Do not use War Machine® on a loose or improperly
installed War Machine® Wall/Ceiling Anchor Mount.
12. Door Anchor Use and Installation - Warning!: Do not use the door anchor on
sliding doors, glass doors, lightweight closet doors, double doors or doors
that have a large gap between door and frame. Make sure that the door cannot
be opened without completely turning the door handle. Door anchor can ONLY
be used on a strong and solidly constructed door that can support the users
total body weight. Make sure not to slam or drop pulley on the door after per
forming each exercise as this can damage the door.
a. Attaching the Anchor with door opening AWAY from you. This is the
most secure setup as your bodyweight will pull the door closed.
1. Put door anchor and strap over the top of the door and centered, close
door securely making sure the door handle lock engages.
2. Perform weight test by pulling the strap to make sure door is securely
closed and that anchor is secure prior to performing any exercise.
b. Attaching the Anchor with door opening TOWARD you.
1. Put door anchor and strap over the top of the and slide the strap and
anchor all the way above the upper door hinge, this is the most secure
and stable point of the door and will not put force on the door to
help prevent door from accidentally opening. Close door securely making
sure the door handle lock engages.
2. Perform weight test by pulling the strap to make sure door is securely
closed and that anchor is secure prior to performing any exercise.
13. If unsure of proper use of equipment please visit the following website:
www.crosscore-usa.com

4
Basic Training Course Instructions
Prior to beginning any workout on your
War Machine®
always read the following instructions carefully and
adhere to their words.
PREPARATION for war
• PrepareyourbodyfortheWar Machine®
Basic Training course with a proper warm-up
• Yourwarm-upshouldbeperformedforatleast
5 minutes and should be followed by light
stretching of major muscle groups.
• Examples:jogging/running/fast-walking,
stationary bike, elliptical, calisthenics, jump rope.
EXECUTION of battle plan
• Alwaysstandatacomfortableanglesuitable
to your own level of strength and ability. To start,
only a very slight body angle is recommended.
• Carefullyfollowexerciseinstructionsandrefer
to images provided.
• ExecuteeachWar Machine® Exercise in a slow,
controlled manner.
• Time intervals for training are as follows:
Sets of 3 for each exercise
Beginners: 15-20 seconds per exercise
Intermediate: 25-35 seconds per exercise
Advanced:
40-60 seconds per exercise
• Besuretorestfor30secondsbetweeneach
set and 45 seconds between each exercise.
•
If you are unable to complete any
War Machine®
exercise for the time interval specified, simply
decrease the time interval and perform the
exercise for an amount of time that is
comfortable for you. For example, if you
cannot perform an exercise for the full
30-second time interval, try doing the
exercise for 10 seconds at a time.

5
• Positions:
nNeutral: Basic position where the height of
the War Machine® Pulley is comfortably
reachable at overhead arm’s length; Most
War Machine® exercises can be performed
from Neutral Position.
nLong Position: The height of the Pulley is
lowered from Neutral Position so that the
Handles are 1” from the ground
n
Short Position: T
he rope on the War Machine®
is shortened so that the handles are
approximately 2 feet from the Pulley
nLocked Handle Mode:
•
Begin with
War Machine®
in Neutral Position.
•
Lock Both Carabiners to both Handle D Rings
nStatic Position:
•BegininNeutralPosition
•AttachHandleCarabinersontothe
War Machine®
Pulley Static Holes at the top
of the pulley housing by inserting the
carabiners from the bottom up.
• Ifyouexperienceanypain,discomfort,light-
headedness or extreme fatigue, STOP what you
are doing in a safe manner immediately. If
symptoms persist after you have stopped seek
the help of a physician right away.
TERMINATION of the battle
• StretchandCoolDown

6
Adjusting the length of the rope
Positioning your feet inside handles
Step 1 Select the location of the rope where the
carabiner and handle will be attached.
Step 2 Pinch rope together with one hand making a
loop in the rope and insert index finger and
thumb from other hand.
Step 3 With the index finger and thumb pointing
up, roll that hand toward the other hand so
that the index finger and thumb are now
pointing down.
Step 4 Pinch index finger and thumb together and
pull the doubled portion of rope through
making a loop.
Step 5 Open carabiner and place through loop and
pull tight.
You’ve just made what is referred to as
a “Prusik” knot.
Position A
Position B

7
War Machine® Chest Press
Muscles Targeted:
Chest, Shoulders, Triceps, Upper Back, Core
Preparation
•PositionHandlesinNeutralPositionso
that Heel Strap is 12”-14” o the ground.
•
Stand at an 80 degree angle from
the
ground (standing straight up will put
you at a 90 degree angle) and grasp
both handles. (A)
•Keepbodyalignedandcoretightened
to ensure proper posture
•Placefeetshoulderwidthapart
Execution
•
Slowly lower chest towards hands, similar
to doing a push up, keeping core tight
and body aligned (B)
•Returntobeginningposition
•Progression
nSingle Arm Press:Keeponearm
extended and static, with a slight
bend in the elbow, while other arm
executes a chest press (C)
nFull Rotation Press:Keeponearm
extended and static, with a slight
bend in the elbow, while other arm
presses elbow to shoulder, then
rotate body and look over your
shoulder while arm slowly opens
up to full extension (D)
A
B
C
D
8
Muscles Targeted:
Quads, Hamstrings, Glutes, Hips, Calves, Core
Preparation:
•Position: Neutral
•PutyourWar Machine® in Locked
Handle Mode
•GrabtheWar Machine® handles and
place one foot inside one or both
handles. Hop forward until your
suspended foot is resting in the handles
6 inches in front of the Pulley
Execution:
•Slowlybendfrontlegdownintoalunge
while driving the suspended leg straight
back making sure not to allow your knee
to surpass the position of your toes
•Returntostartingposition
•Progression
War Machine® Single Leg Suspended Lunge
nSuspended Lunge Knee Raise: Perform
suspended lunge. When you return to
starting position, raise the knee of your
suspended leg (A)
nSuspended Lunge to Trunk Rotation:
Perform suspended lunge. When you
return to starting position, raise the
knee of your suspended leg and touch
it to the elbow of the opposite arm (B)
A
B
C

9
War Machine® Single Leg Squat
Muscles Targeted:
Quads, Hamstrings, Glutes, Hips, Calves, Core
Preparation
•Position: Neutral
•Standfacingthepulleyholding
both handles
•Raiseonelegslightlyotheground,
engage your core and find your balance
Execution
•Squatdownonstandinglegmakingsure
not to allow your knee to surpass the
position of your toes. Point handles to
the Pulley (B)
•Keepraisedlegothegroundthe
entire time
•Raiseuponthestandinglegandreturn
to starting position (A)
A
B
10
Muscles targeted:
Hamstrings, Hips, Glutes, Calves,
Lower Back, Core
Preparation
•Layfaceupontheoorandplaceboth
heels, feet flexed, in the War Machine®
foot cradles, engage core and press hips
up and o the floor (A)
•Maintainyouralignmentbykeepingyour
body in the raised plank position
Execution
•Single Leg Curls
nKeeponelegstraightandmaintain
pressure in the foot cradle
nBring the heel of the other leg in
and curl towards your glutes, lifting
your torso as you curl (B)
•Double Leg Curls
n
Bring both heels in and curl towards your
glutes, lifting your torso as you curl
(C)
nKeepatleast2-4inchesbetween
the handles so as to get the most
eective movement
War Machine® Hamstring Curls—Single Leg
and Double Leg
A
B
C

11
War Machine® Bicycle
Muscles targeted:
Hamstrings, Quads, Glutes, Calves, Hips,
Lower Back, Core
Preparation
•Position: Neutral
•Layfaceupontheoorandplaceboth
heels, feet flexed, in the War Machine®
foot cradles, engage core and press hips
up and o the floor (A)
•Maintainyouralignmentbykeepingyour
body in the raised plank position
Execution
•Keepinghipsraised,moveyourfeetina
circular motion as if riding a bicycle (B-C)
A
B
C
12
Muscles targeted:
Chest, Shoulders, Triceps, Lower Back, Core
Preparation
•Position: Neutral
Refer to page 6 “POSITIONING YOUR
FEET IN HANDLES” (B)
•Walkhandsbackwards,awayfromthe
pulley, until feet are in a challenging
incline position and there is a 2-4 inch
gap between feet (A)
Execution
•Lowerbodytowardthegroundinachest
press motion while keeping aligned (B)
•Pressbackuptofullarmextensionto
complete the exercise
•Keepcoreengagedandresistlettinglegs
swing back and forth or up and down
•WhennishingChestpressandremoving
feet from handles, walk hands forward
back to neutral position lowering your
body to the ground and remove feet from
Handles. Do not try to remove feet while
engaged in Press Position
War Machine®
Inverted Chest Press
A
B
13
Muscles targeted:
Shoulders, Upper Back, Triceps, Forearms, Core
Preparation
•Position: Neutral
•Standshoulderwidthapartfacingthe
War Machine® holding both handles
•Extendarmswithbothhandlespointing
to the Pulley (A)
Execution
•Keeponearmstatic;raiseworkingarm
straight up until it is directly perpendicular
to the ground (B)
•Lowerarmandreturntostartingposition
•Progression
nPerform Power Shoulder move;
when arm is perpendicular to ground,
continue arm rotation backwards,
opening up the shoulder to allow for
smooth rotation, in a circular motion
and end at starting position with both
handles pointing to the Pulley (A-B-C-D)
War Machine® Power Shoulder and Rotation
A
B
C
D
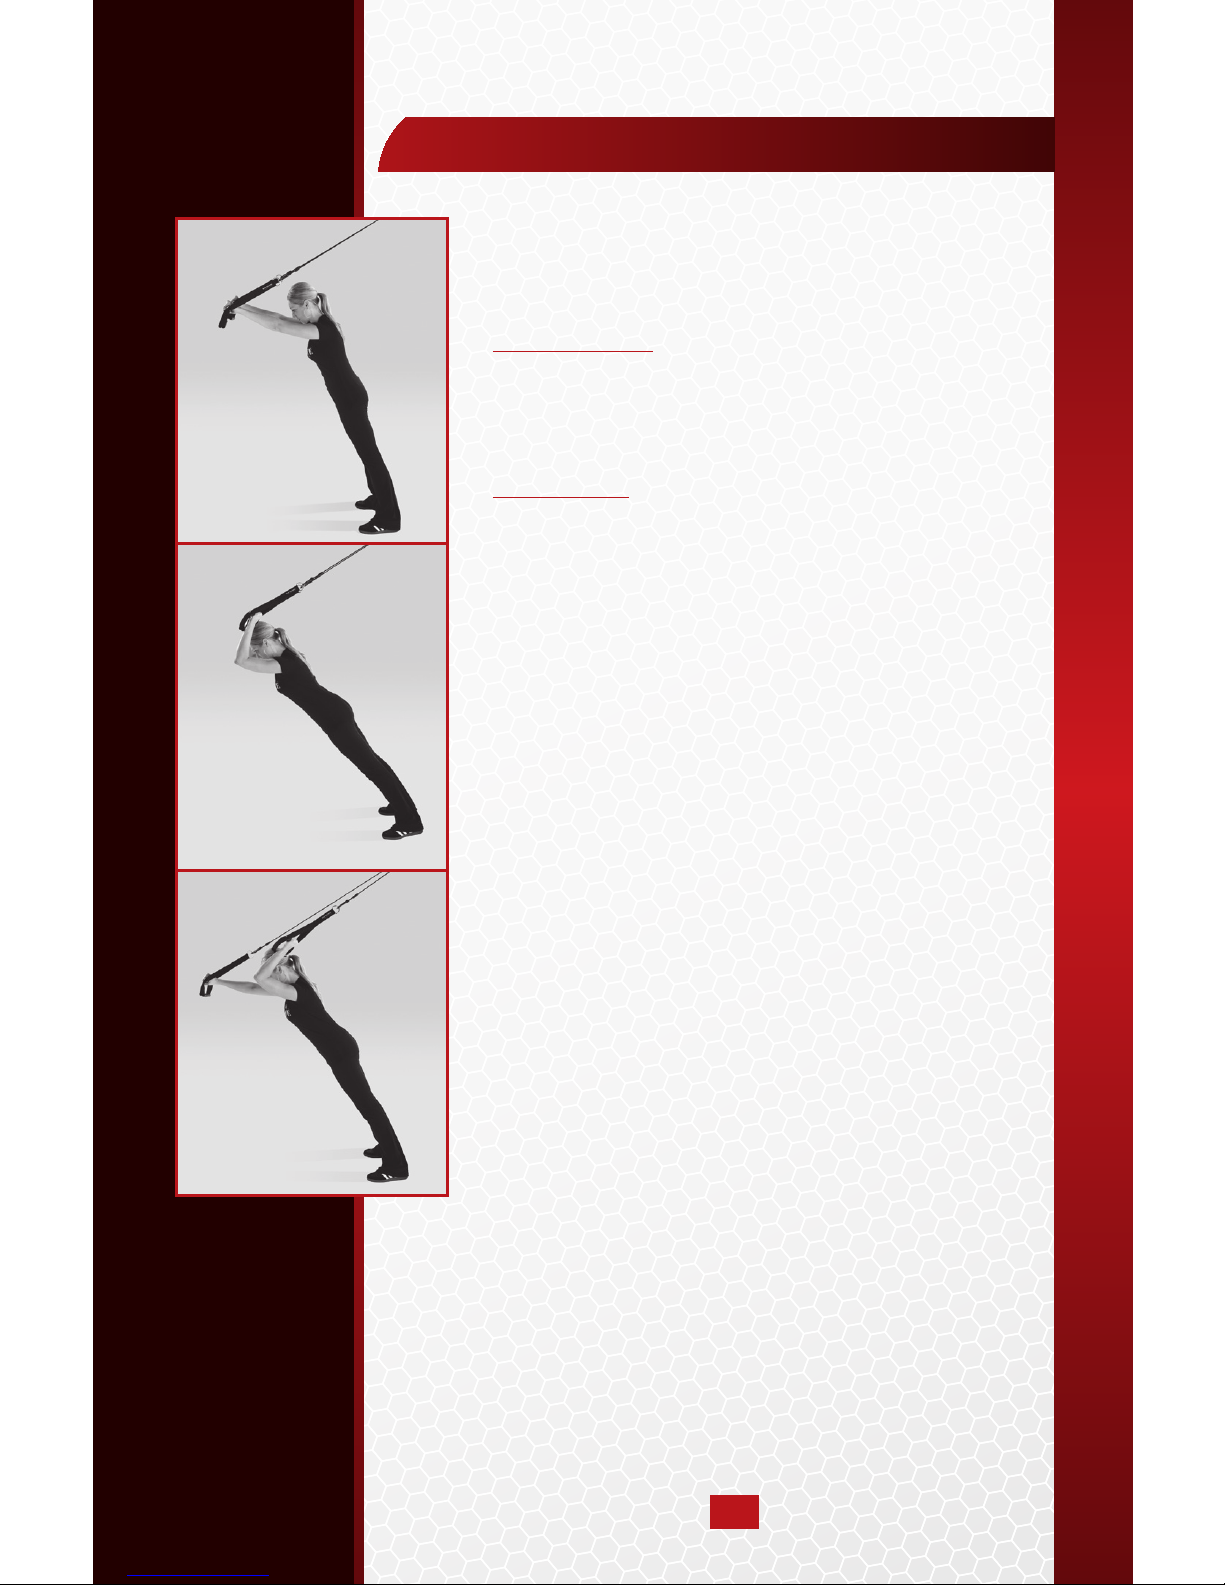
14
Muscles targeted:
Triceps, Shoulders, Forearms, Core
Preparation
•Position: Neutral
•StandwithfeetandhandsShoulder
width apart
Execution
•Double
nKeepingtensionontheropeand
elbows raised and in, lean forward and
bend at the elbows (B)
nPress forward and return to starting
position
•Single
nWith arms still raised and elbows in,
keep one arm static and lean forward
bending opposite arm (C)
nPress forward with working arm and
return to starting position
War Machine®
Tricep Press
A
B
C

15
Muscles targeted:
Quads, Hamstrings, Glutes, Hips, Shoulders,
Lower Back, Core
Preparation
•Position: Neutral
•Standwithfeetshoulderwidthapart
facing the War Machine® and holding
both handles
•
Keeptensionontheropeandlowerdown
into a squat position
Execution
•Inonemovement,raiseupfromsquat
position and thrust hips forward as you
maintain tension on the rope and keep
hands pointed to the pulley (B)
War Machine®
Power Thrust
A
B

16
Muscles targeted:
Quads, Hamstrings, Glutes, Hips, Shoulders,
Lower Back, Triceps, Forearms, Core
Preparation
•Position: Neutral
•Standwithfeetshoulderwidthapart
facing the War Machine® and holding
both handles
•Keeptensionontheropeandlowerdown
into a squat position (A)
Execution
•Raiseupfromsquatpositionandthrust
hips forward (B)
•Asyouriseup,extendonearmdownwith
palm facing up. (C)
•Progression
nRotate from your core and look back at
the hand of the extended arm (C)
War Machine®
Power Thrust Progression
A
B
C

17
Muscles targeted:
Biceps, Forearms, Shoulders, Core
Preparation
•Position: Neutral
•Standshoulderwidthapartfacingthe
War Machine® holding both handles
•
Raise hands above head, palms facing up
,
and lean back to a comfortable angle
Execution
•Double
n
Keepingelbowsraisedandin,curlboth
handles back to shoulders and slowly
return to starting position (B)
•Single
nKeeponearmstaticandpointingto
the pulley
nCurl working arm back to shoulder and
return to starting position (C)
nProgression
•
Curl working arm back across face to
opposite shoulder
•
Curl working arm back and across
stomach
War Machine®
Bicep Curl
A
B
C

18
Muscles Targeted:
Core, Triceps, Shoulders, Lower Back
Preparation
•
Sit on the ground and put both feet in the
War Machine® foot cradles, with cradle
strap underneath the ball of the foot, and
turn on your side with top foot crossed in
front of the bottom foot
•Placeforearmofbottomarmonthe
ground directly beneath the shoulder (A)
Execution
•Raiseuponforearmandlifthipsothe
ground and keep a 2-4 inch gap between
suspended feet (B)
•Progression
nWhile in Side Plank position, slowly
rotate toward the ground and touch the
ground below your raised hip with your
free arm
War Machine®
Side Plank
A
B
C
D
19
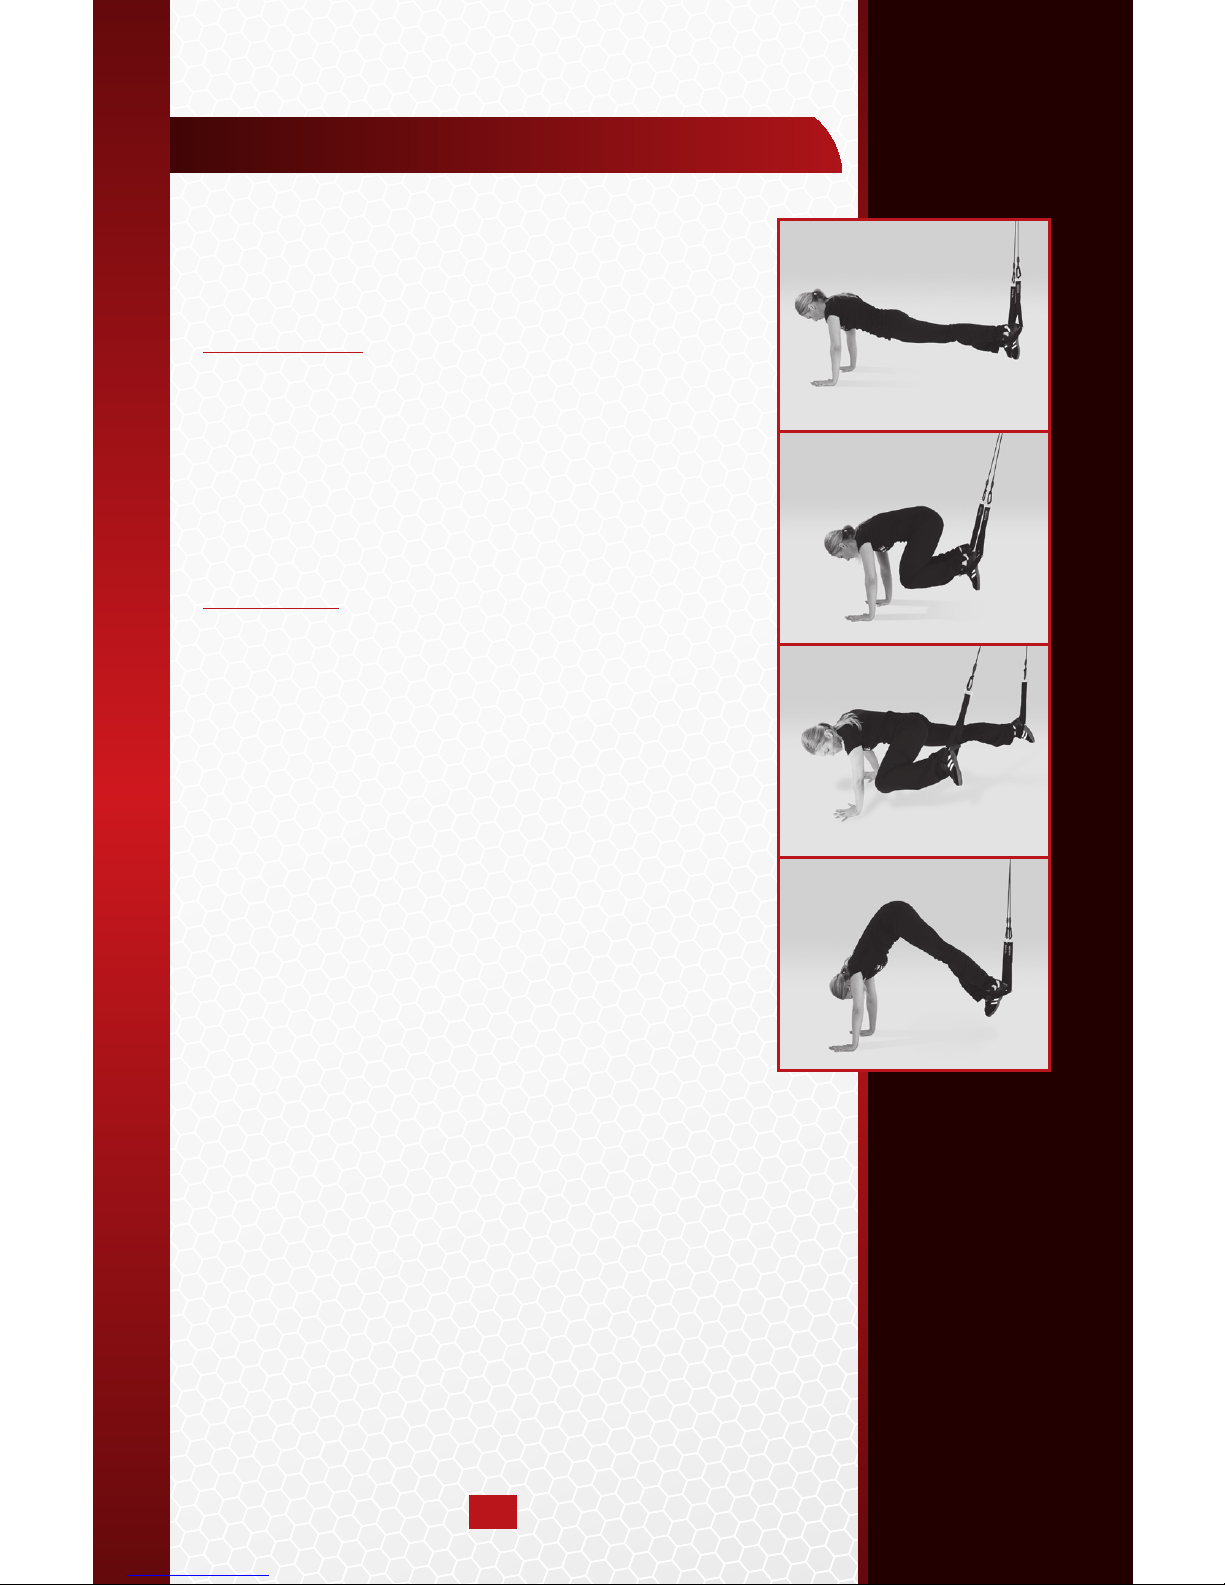
Muscles targeted:
Core, Chest, Triceps, Shoulders, Hip Flexors
Preparation
•Position: Neutral
Refer to page 6 POSITIONING YOUR
FEET IN HANDLES (B)
•
Walk hands forward, away from the pulley,
until you are in a basic plank position (A)
Execution
•Bringkneestochestwhileliftinghipsup
toward the ceiling or sky, keeping a gap
of 2-4 inches between both feet, and
return to starting position
•Progression
n
Get in starting position but place hands
in oset position (A)
nSwing knees forward and to the side
of the hand that is placed in front, then
return to starting position (A-C)
nThe Pike progression. Start in a basic
plank position Raise your Bottom
straight up and bring feet forward
slightly keeping legs straight until
you are in an inverted V. Then release
and straighten back to the basic plank
position (A-D)
War Machine®
Suspended Crunch
A
B
C
D

20
Muscles targeted:
Full Core and Upper Body Engagement,
Hip Flexors
Preparation
•Position: Short
•SitongroundbelowtheWar Machine®
with knees bent and feet on the ground
and grab both handles
Execution
•
Beginners/Intermediate:Keepkneesbent
and place feet on a bench or stable object
that is between 1-3 feet high (A)
•Advanced:
With knees bent, cross feet at
the ankles and raise lower body up and
o the ground (C)
•Movethepulleyupanddownwitheach
arm in a climbing action (D)
War Machine®
Hanging Climber
A
C
B
D
Popular Fitness Equipment manuals by other brands


G-FITNESS
G-FITNESS AIR ROWER user manual

CAPITAL SPORTS
CAPITAL SPORTS Dominate Edition 10028796 manual

Martin System
Martin System TT4FK user guide

CIRCLE FITNESS
CIRCLE FITNESS E7 owner's manual

G-FITNESS
G-FITNESS TZ-6017 user manual

Accelerated Care Plus
Accelerated Care Plus OMNISTIM FX2 CYCLE/WALK user manual


