Crystal Quest CQE-SP-00806 Operating instructions

4
CRYSTAL QUEST®warrants your CRYSTAL QUEST®Dual Luxury Shower Power System for one
year from the date of purchase against all defects in materials and workmanship when used in
compliance with the manual. CRYSTAL QUEST®disclaims all implied warranties including, without
limitation, warranties of merchantability and fitness for a particular purpose. If for any reason the
product proves to be defective within one year from the date of purchase, please call for assistance.
This warranty gives you specific legal rights and you may have other legal rights, which vary from
state to state. CRYSTAL QUEST®assumes no responsibility for incidental or consequential damages;
for damages arising out of misuse of the product or the use of any unauthorized attachment. Some
states do not allow the exclusion or limitation of implied warranties or incidental or consequential
damages, so the above limitations or exclusions may not apply to you. Should service be required
during or after the warranty period or should you have any questions regarding how to use your
CRYSTAL QUEST®Dual Luxury Shower Power System, contact our Technical Support department at
KEEP THIS MANUAL FOR FUTURE REFERENCE AND UNIT MAINTENANCE
Online warranty information
http://crystalquest.com/warranty.htm
Product design is subject to change without notice.
For further assistance, contact your Crystal Quest dealer
or visit us at www.crystalquest.com
To view the latest edition of the Dual Luxury Power Shower Guide, visit CrystalQuest.com
Please note all drawings, pictures, colors and sizes are approximate for illustrative purposes only and
may not exactly resemble the end product.
ONE-YEAR LIMITED WARRANTY
CQE-SP-00807CQE-SP-00806
CQE-RC-04045
Crystal Quest®Dual Luxury Shower Power
INSTALLATION AND OPERATION
GUIDE
ONLINE WARRANTY INFORMATION
CrystalQuest.com/warranty.html
Copyright 2024
Crystal Quest®
All rights reserved
MADE IN THE USA
2
INSTALLATION INSTRUCTIONS
BEFORE ENTERING THE SHOWER
1. Remove existing shower head from shower arm (pipe) by unscrewing it
counterclockwise (do not unscrew shower arm).
2. Install shower filter by turning clockwise onto the shower arm.*
3. Attach diverter valve by turning clockwise onto the front of the shower filter.*
4. Install the shower head by turning clockwise onto other side of the diverter valve.*
5. Attach the bracket by turning clockwise onto the other side of the diverter valve.*
6. Attach one side of the hose by turning clockwise onto the other side of the
bracket.*
7. Attach the other side of the hose by turning clockwise onto the handheld
shower head.*
8. Attach shower head by turning clockwise.
9. If leaks appear, tighten or reinstall.
1. Activate filter by turning the shower water to “full-hot” for 3-5 minutes to flush
media fines from shower filter. Loose media fines in a new cartridge are normal
and will be flushed. This could require additional flushings.
2. Cool to the desired temperature before entering shower.
*DO NOT OVER TIGHTEN OR
CROSS THREAD
*Thread seal tape may be required.
OPERATING SPECIFICATIONS:
Pressure Range: 30-60 psi (2.1-4.1 bar)
Temperate Range: 40-110°F (4.4-43.3°C)
Optimum Service Flow: 2-4 gpm
3
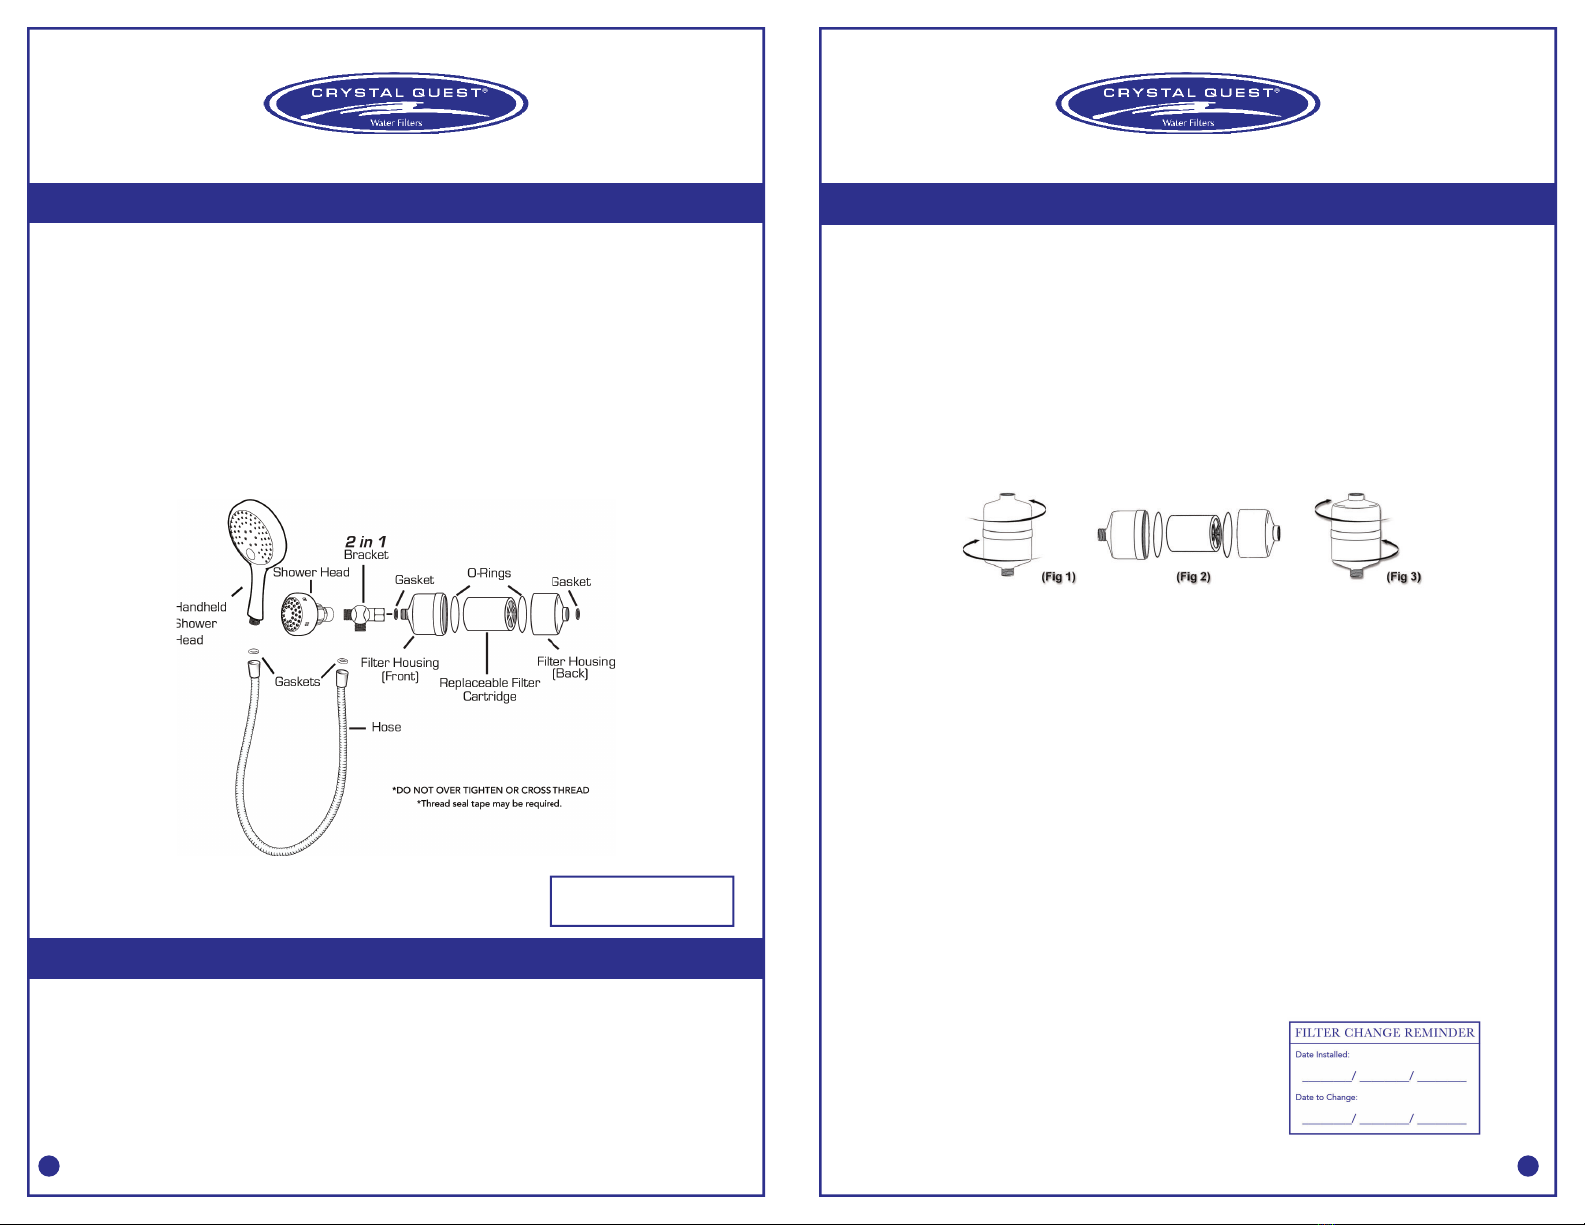
WHEN AND HOW TO CHANGE YOUR CARTRIDGE
CARTRIDGE REPLACEMENT
1. Unscrew the shower filter from the shower arm. It may not be necessary to
unscrew the complete assembly from the shower arm (Fig 1).
2. Remove the old cartridge and replace with a new cartridge.
3. Make sure both O-rings are properly seated in the O-ring grooves. Apply a small
amount of lubricant, such as any non-petroleum oil (do not use coconut oil), to
each O-ring (Fig 2).
4. Screw the housing back together (Fig 3).
5. Run hot water for 2-3 minutes to flush media fines from shower filter. Loose media
fines in a new cartridge are normal will be flushed out when in use.
MAINTENANCE / CAUTION
Caution: Protect disc from freezing temperatures. If freezing temperatures exist, drain unit
and set wet replacement disk aside to dry. Protect disk from direct sunlight. Not intended for
outdoor use.
• Do not use non-Crystal Quest®replacement cartridges.
• Do not use non-Crystal Quest®parts or modify/tamper with unit.
Note: O-rings may need to be cleaned and lubricated periodically with any non-petroleum oil
(do not use coconut oil).
PROBLEMS / SOLUTIONS
1. Leaking around threaded connections: Apply thread seal tape to threads
2. Leaking between two housing halves: Check that O-rings are properly seated in
grooves and that housing halves are snuggly threaded together. Clean any media fines.
3. Poor water flow or chlorine odor returns: Replace filter cartridge
BACK FLUSHING
1. Unscrew the filter housing.
2. The cartridge can be used inversely. Simply remove the cartridge and reverse it by
turning it around.
3. Reassemble the housing as per the instructions.
4. Use as normal.
WHEN TO CHANGE FILTER
Cartridge life (approximate) is 6-12 months.
Cartridge life is directly related to your water
conditions and volume of water filtered. Local
water conditions may require more frequent
replacement.
This manual suits for next models
2
Other Crystal Quest Bathroom Fixture manuals


Popular Bathroom Fixture manuals by other brands

Fienza
Fienza Tono 455116 installation guide

Kaldewei
Kaldewei 5030 Installation instruction

Triton
Triton XEROPHYTE installation guide

Glacier bay
Glacier bay SIMARD 15606 Use and care guide

Hewi
Hewi 815 Series Installation and operating instructions

Mountfield
Mountfield De LUXE Instructions for use and installation


