CSA KITO ED Series User manual

OM-ED3ZZZ-CSE-04
OWNER’S (OPERATOR’S) MANUAL AND
SAFETY INSTRUCTIONS FOR ED SERIES
ELECTRIC CHAIN HOIST (MODEL EDⅢ)
Approved by CSA
BEFORE USING THIS PRODUCT:
ALWAYS SAVE THIS BOOK FOR FUTURE REFERENCE
ALWAYS READ OWNER’S (OPERATOR’S) MANUAL AND SAFETY INSTRUCTIONS
: IMPROPER electric chain hoist use could result in death or serious injury. To
avoid these hazards:
: NEVER hoist loads over or near people.
: NEVER work under or near hoisted loads.
: ALWAYS operate, inspect, and maintain this hoist in accordance with
applicable safety codes and regulations.
These safety instructions contain important information to help you use the chain
hoist in a safe manner. Please refer to this Owner’s (Operator’s) Manual for
additional safety information.
WARNING

CONTENTS
DEFINITIONS............................................................................................................................................ 1
1. SAFETY..................................................................................................................................................... 1
1-1. Safety Summary......................................................................................................................................... 1
1-2. Safety Instructions...................................................................................................................................... 2
2. MAIN SPECIFICATIONS......................................................................................................................... 6
3. PREPARATION AND CHEKING BEFORE USE................................................................................... 8
3-1. Packed Contents......................................................................................................................................... 8
3-2. Preparation and Checking Before Use ....................................................................................................... 8
3-3. Installing Trolley...................................................................................................................................... 12
4. OPERATION ........................................................................................................................................... 14
4-1. Single-speed Type.................................................................................................................................... 14
4-2. Dual-speed Type ...................................................................................................................................... 15
4-3. Dual speed Cylinder Type........................................................................................................................ 15
4-4. Electric Chain Hoist with Trolley ............................................................................................................ 16
5. INSPECTION........................................................................................................................................... 17
5-1. Inspection Classification .......................................................................................................................... 17
5-2. Frequent Inspection ................................................................................................................................ 17
5-3. Periodic Inspection ................................................................................................................................. 18
5-4. Occasionally Used Hoists......................................................................................................................... 20
5-5. Inspection Record..................................................................................................................................... 20
5-6. Inspection Methods and Judgment Criteria.............................................................................................. 21
6. MAINTENANCE..................................................................................................................................... 25
6-1. Gear Lubrication ...................................................................................................................................... 25
6-2. Load Chain Lubrication............................................................................................................................ 25
6-3. Mechanical Brake with Friction Clutch ................................................................................................... 26
7. CONNECTION DIAGRAM.................................................................................................................... 26
7-1. Single-speed Type.................................................................................................................................... 27
7-2. Dual-speed Type and Dual-speed Cylinder Type..................................................................................... 28
8. TROUBLE SHOOTING AND SOLUTIONS ......................................................................................... 29
9. WARRANTY........................................................................................................................................... 31
10. PARTS LIST............................................................................................................................................ 32

—1 —
DEFINITIONS
:indicates an imminently hazardous situation which, if not avoided, WILL
result in death or serious injury.
:indicates a potentially hazardous situation which, if not avoided, COULD
result in death or serious injury.
: indicates a potentially hazardous situation and/or unsafe practice which,
if not avoided, MAY result in MINOR or MODERATE injury and/or property
damage.
1. SAFETY
1-1. Safety Summary
Danger exists when heavy loads are transported, particularly when the equipment is
not being used properly or is poorly maintained. Because accidents and serious
injury could result, special safety precautions apply to the operation, maintenance
and inspection of the Electric Chain Hoist.
Following these simple rules can help to avoid hoisting accidents;
: IMPROPER electric chain hoist use could result in
death or serious injury. To avoid these hazards:
NEVER use a hoist for lifting, supporting or transporting people.
NEVER lift or transport loads over or near people.
NEVER work near or under hoisted loads.
NEVER lift more than rated load capacity.
ALWAYS let people around you know when a lift is about to begin.
ALWAYS make sure that the supporting structures and load-attaching device are
strong enough to hold the weight of the load and hoist.
ALWAYS read Owner’s (Operator’s) Manual and safety instructions.
Remember, proper rigging and lifting techniques are the responsibility of the operator. Be
sure you read and understand the instructions contained in this manual before using your
hoist. Check all applicable safety codes, regulations and other applicable laws for further
information about the safe use of your hoist.
DANGER
CAUTION
WARNING
WARNING
—2 —
More detailed safety information is contained in the following pages. For additional information, please
contact Kito Corporation or your authorized Kito dealer.
1-2. Safety Instructions
Serious injury could result if the following safety instructions are not followed.
: IMPROPER electric chain hoist use could result in death or
serious injury.
To avoid these hazards:
“ALWAYSs”
ALWAYS allow only qualified (trained in safety and operation) people to operate
the hoist.
ALWAYS operate a hoist only if you are physically fit.
ALWAYS check the hoist daily, before use, according to the Recommended Daily
Inspection (Refer to Sec. 5).
ALWAYS let the authorized personnel inspect the hoist periodically (Refer to Sec.
5-1 to 5-6.).
ALWAYS make sure that the chain length is long enough for the intended job.
ALWAYS check that the hook latches are in proper working order before use (Refer
to Sec. 5.6).
ALWAYS replace all missing or broken hook latches.
ALWAYS be sure that the hoist’s rated capacity, which is found on the hoist’s label,
is well in excess of the weight of the load.
ALWAYS make sure that you and others are clear of the load before lifting begins.
ALWAYS be sure that the load is properly seated in the saddle of the hook.
ALWAYS keep the load from hitting the chain.
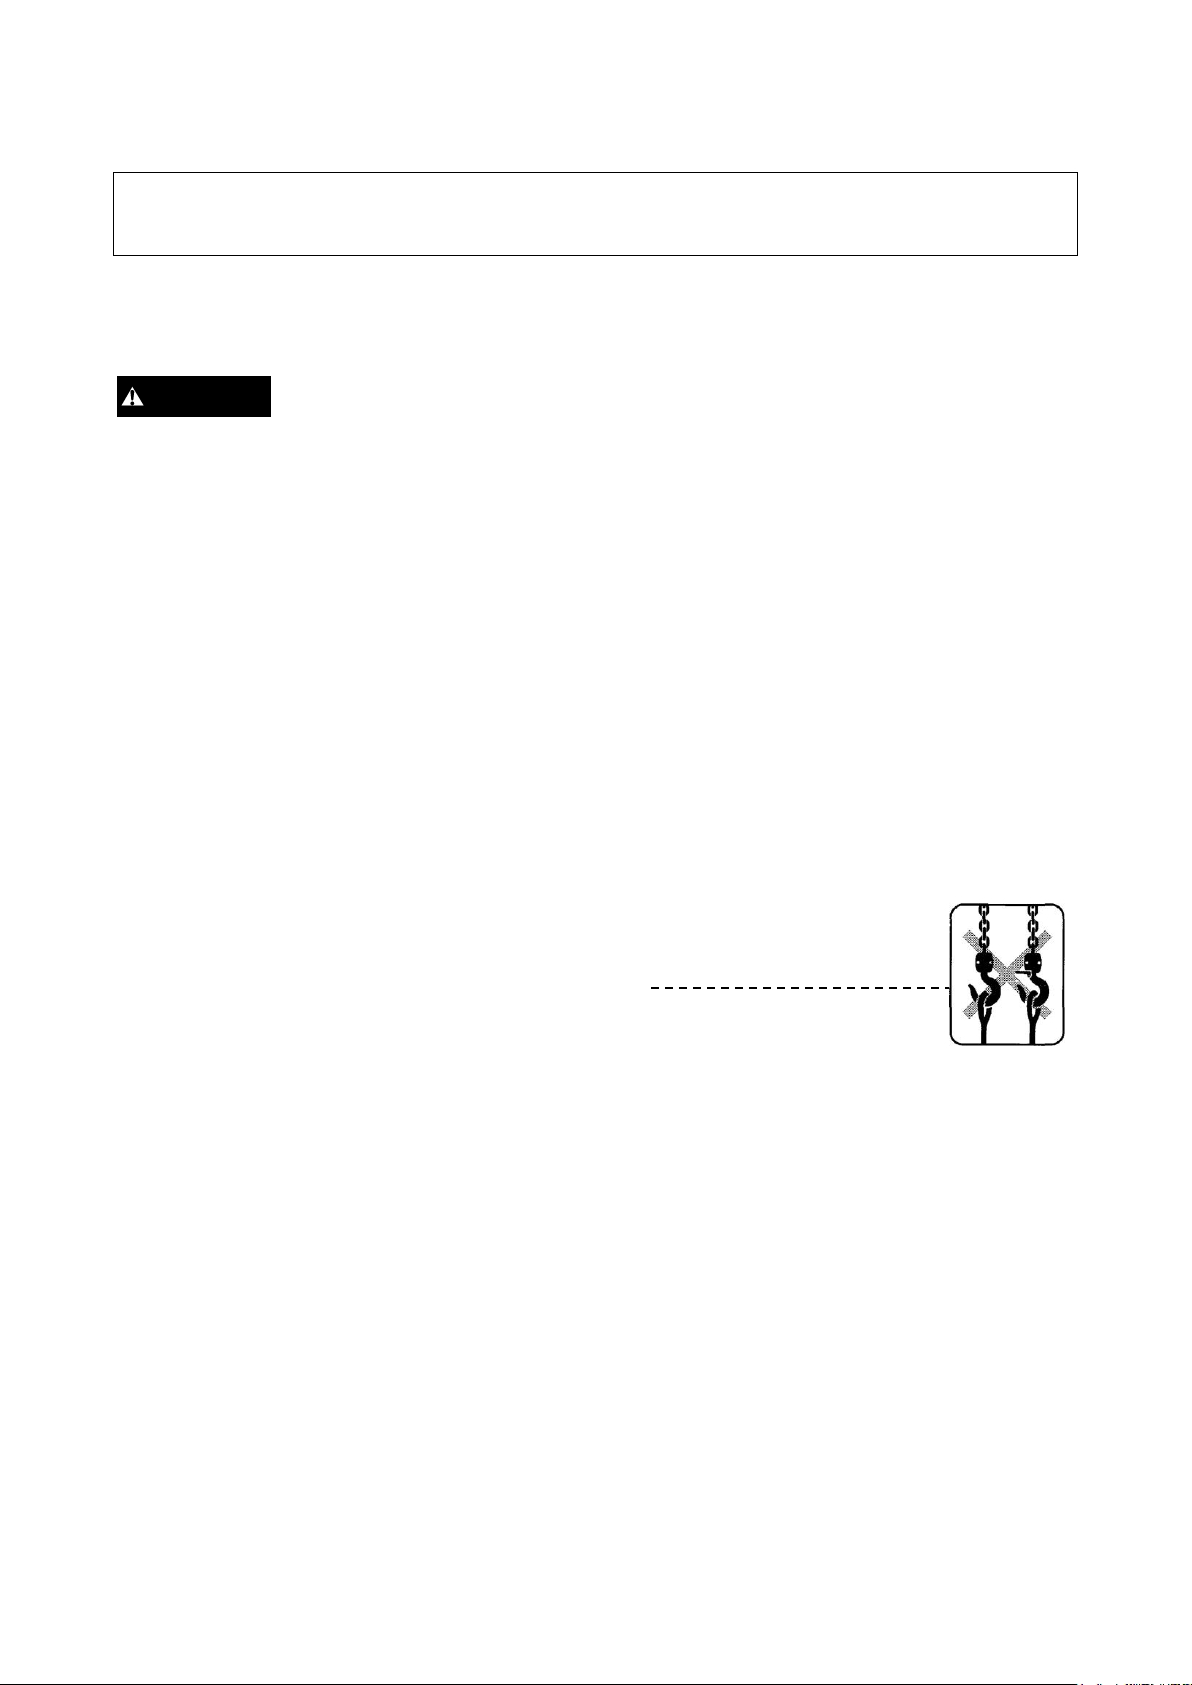
ALWAYS use two hoists which each has rated capacities equal to or more than the
load to be lifted whenever you must use two hoists to lift a load. This will
provide adequate protection in the event that a sudden load shift or failure
of one hoist occurs.
WARNING

—3 —
ALWAYS check the brake before use (Refer to 5-1 to 5-6.)
ALWAYS check for loose or missing parts before use.
ALWAYS lubricate the hoist regularly (Refer to Sec. 6).
ALWAYS use the specified gear oil.
ALWAYS pay attention to the load at all times when operating the hoist.
ALWAYS ease the slack out of the chain and sling when starting a lift to prevent a
sudden loading.
ALWAYS use a hoist only between the allowable ambient temperature from -20°C
(-4°F) and to + 40°C (+104°F).
ALWAYS secure a hoist and loads properly after use.
ALWAYS consult the manufacturer or your dealer if you plan to use a hoist in a
dusty, moist or greasy environment.
ALWAYS consult the manufacturer or your dealer if you plan to use a hoist in an
excessively corrosive environment. (Saltwater, sea air and/or acid or
other corrosive compounds)
ALWAYS make sure that all persons stay clear of the suspended load.
ALWAYS maintain firm footing when operating hoist.
ALWAYS avoid unnecessary inching (starts and stops) of hoist control.
ALWAYS make sure the hoist motor completely stop before reversing.
ALWAYS ground the electric chain hoist before using.
ALWAYS use a hoist within the "Duty Rating", ED% or Time Rating Limits of
the electrical motor.
ALWAYS be familiar with hoist operating controls, procedures and warnings.
ALWAYS make sure the brake functions properly before use.
ALWAYS use the hoist manufacture’s recommended parts when repairing a hoist.
ALWAYS use only the side ends of the trolley to contact rail-stops.
ALWAYS shut power off from its source and lock out before servicing is
performed.

—4 —
: IMPROPER electric chain hoist use could result in death or
serious injury. To avoid these hazards:
“NEVERs”
NEVER use the hoist to transport people.
NEVER lift a load over people.
NEVER work near or under hoisted loads.
NEVER operate a hoist if damaged or malfunctioning.
NEVER use a hoist which has been taken out of service until the
hoist has been properly repaired or replaced.
NEVER use a hoist if the hook latch is missing or broken.
NEVER operate unless the load is centered under the hoist.
NEVER splice a hoist chain.
NEVER use the hoist chain as a sling.
NEVER force a chain or hook into place by hammering.
NEVER jerk a load to prevent a sudden loading.
NEVER use a twisted, kinked, damaged or stretched load chain.
NEVER swing a suspended load.
NEVER support a load on the tip of the hook.
NEVER suspend a load for an extended period of time.
NEVER leave a suspended load unattended.
NEVER run the load chain over a sharp edge.
NEVER weld or cut a load suspended by a hoist.
NEVER use the hoist chain as a welding electrode.
NEVER wind so far that the hook touches the hoist body.
NEVER unwind so far that no unloaded chain is left.
NEVER operate a hoist if chain jumping, excessive noise,
jamming, overloading or binding occurs.
NEVER allow your attention to be diverted from operating the
hoist.
WARNING

—5 —
NEVER dropping or releasing a load could result in death or serious
injury. To avoid this hazard, do not operate the bottom hook
release mechanism (hook cam) when the hoist with
cylinder-controlled or optional detachable hook is under load.
NEVER use a hoist in flammable atmosphere where explosion is
possible.
NEVER use the limit switch or friction clutch on a regular basis. These
devices are for emergency use only.
NEVER allow anyone to adjust or repair a hoist unless the one is
qualified to perform hoist maintenance.
NEVER use the railstops as an impact bumper for the hoist or the
trolley.
NEVER use a hoist without a chain stopper on the no load end of the
chain.
NEVER attempt to lengthen the load chain or repair damaged load
chain.
NEVER adjust or repair the mechanical brake with friction clutch
unless qualified people to perform hoist maintenance.
NEVER pull the push button cord.
NEVER use a hoist beyond 10% higher than the actual power source
voltage. (Refer to Sec. 3-2, (5))
NEVER throw a hoist.
NEVER use a hoist without a name plate or warning labels or with
illegible name plate, warning tag and label.
NEVER remove or obscure the warning tags.
NEVER use modified or deformed hooks.
NEVER use a hoist near fire or where hot objects may touch it.
NEVER touch live electrical parts.
NEVER use the electric chain hoist without grounding it.
NEVER ground the electric chain hoist to a gas pipe as this can create
a possible explosion.
NEVER handle the arm-fitting during the hoist operation.
NEVER throw or drop the hoist when carrying it.
Be sure the WARNING TAG is installed on the push button cord.

—6 —
2. MAIN SPECIFICATIONS
Specifications and dimensions of AC115V type
Rated power source
AC115V single phase, 50/60Hz
Type
Single-speed type
Dual-speed type
Dual-speed cylinder type
Model
ED06S
ED10S
ED18S
ED16S
ED24S
ED48S
ED06ST
ED10ST
ED18ST
ED16ST
ED24ST
ED48ST
EDC06SD
EDC10SD
EDC18SD
EDC16SD
EDC24SD
Rated load (kg)
60
100
180
160
240
480
60
100
180
160
240
480
60
100
180
160
240
Motor output (W)
300
600
300
600
300
600
Time rating (min)
20
15
20
15
20
15
20
15
20
10
20
Intermittent
duty
Duty rating (%ED)
30
20
30
30
20
30
30
20
30
Max. starting
frequency (times/h)
180
120
180
180
120
180
180
120
180
Rated current (A)
5
6
10
5
6
10
5
6
10
Lifting speed (m/min)
21
13
8
20
13.5
6.7
High
speed: 21
Low
speed: 4
High
speed: 13
Low
speed: 3
High
speed: 8
Low
speed: 3
High
speed: 20
Low
speed: 4
High
speed: 13.5
Low
speed: 3
High
speed: 6.4
Low
speed: 2
High
speed: 21
Low
speed: 4
High
speed: 13
Low
speed: 3
High
speed: 8
Low
speed: 3
High
speed: 20
Low
speed: 4
High
speed: 13.5
Low
speed: 3
Standard lift (m)
3
3
1.8
Push-button cord length: L (m)
2.5
2.5
-
Load chain diameter (mm)
4
4
4
Net weight (kg)
12.0
16.0
21
(21.5)*1
12.5
16.5
21
(21.5)*1
15.0
19.0
Min. headroom: C (mm)
315
330
520
315
330
520
945
960
Dimensions
(mm)
a
371
428
428
371
428
428
371
428
d
187
205
205
187
205
205
187
205
e
184
223
223
184
223
223
184
223
f
205
219
229
205
219
229
205
219
h
125
135
155
125
135
155
125
135
i
80
84
74
80
84
74
80
84
g
25
24
25
24
25
j
25
24
25
24
25
k
340
362
454
340
362
454
340
362
m
92
149
92
149
92
*1: these net weight at control voltage of 27V
Single-speed type
Dual speed-type
Dual-speed cylinder type

—7 —
Notes: (1) The power supply cable is 2mm² × 5m (3 conductors).
(2) Hoisting speed is the average value of wind-up and -down speed under related voltage, rated frequency, and rated load conditions. Speed
may differ by voltage and load conditions.
(3) Non-standard lengths of lift (load chain) and push-button cord of the single- and dual-speed types are also available upon request.
: NEVER use the hoist with power source voltage exceeds rated voltage by more
than 10%.
Additionally, these 3 types of electric chain hoists are available for normal voltage operation and low-voltage
(30V) operation. Further, these chain hoists can be used under the different voltages as shown below.
The lifting speed varies according to the actual power source voltage as shown in next page.
Relationship between power source voltage and lifting speed
Rated voltage
(V)
Actual power source voltage/
Operation voltage (V)
Lifting speed (m/min)
300w
600w
60kg
100kg
180kg
160kg
240kg
480kg
115
110/110
19.3
11.9
7.3
18.3
12.4
6.1
110/ 27.5
115/115
20.1
12.5
7.7
19.2
12.9
6.4
115/ 29
120/120
21
13
8
20
13.5
6.7
120/ 30
CAUTION

—8 —
3. PREPARATION AND CHECKING BEFORE USE
3-1. Packed Contents
Before using, make sure the following contents are packed:
Hoist unit (containing oil)
Chain container (including bolt, nut, and split pin for attaching to hoist unit)
Push-button cord (the dual-speed cylinder type is equipped with a curled cord and fastening belt.)
Load chain
Power supply cable
3-2. Preparation and Checking Before Use
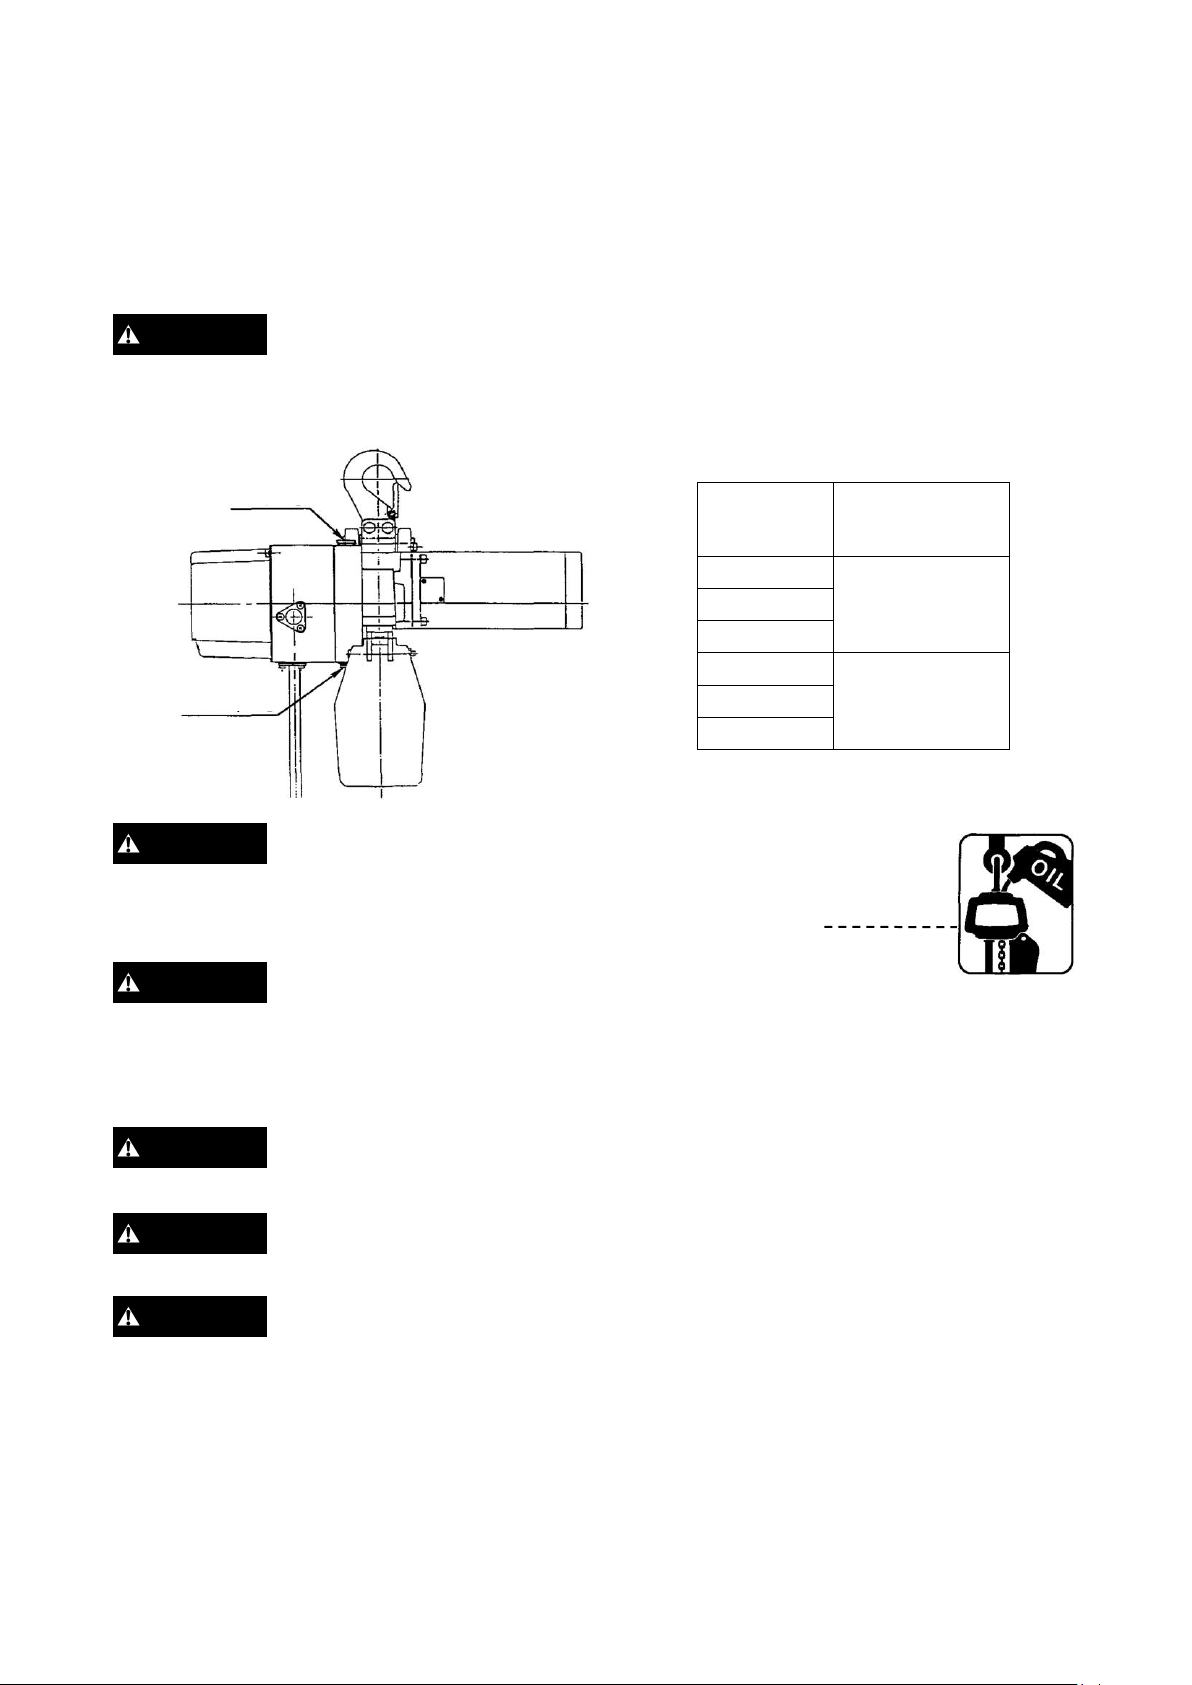
The appearance and profile are as shown in the next;
Single-speed type
Hook latch
Top hook
Gear case
Controller cover
Power supply cable
(motor frame)
Drain plug
Push-button cord
Chain container
Load chain
Push-button switch
Cushion rubber
Hook latch
Bottom hook
Motor
—9 —
BEFORE USING, PREPARE AND CHECK THE FOLLOWING FIVE ITEMS.
(1) GEAR OIL SUPPLY
Gear oil is pre-supplied in the gear box.
To change gear oil: Remove oil plug and drain plug from gear box. Drain contaminated oil completely, fasten
drain plug, supply the specified gear oil sufficiently from the oil plug hole, then firmly fasten the oil plug.
: Use of the hoist without sufficient oil can cause immediate and severe
damage to the hoist’s gear and clutch mechanisms, which can result in hoist
malfunctioning and possible death or serious injury. To avoid these hazards,
never use the chain hoist without sufficient oil. Refer to the following table.
: Use of oils other than the specified Kito’s exclusive gear oil
might not allow full exertion of the built-in friction clutch,
which can cause load to drop. To avoid these hazards:
ALWAYS use the specified Kito’s exclusive gear oil.
: To avoid oil leak, make sure to firmly fasten drain plug.
(2) CHAIN CNTAINER FITTING
The chain container stores the load chain of the no-load side. In connecting it to the hoist body, fasten it
completely and pay attention to the following points:
: Firmly fasten bolt and nut as shown in the following figure appearing on the
next page.
: ALWAYS be sure that the load chain of the no-load side is properly stored in
the chain container and folded correctly from the end.
: NEVER store chain in the chain container which exceed the specified length
of the chain container.
WARNING
Gear oil quantity
Rated load
(kg)
Optimal oil
quantity
(ℓ)
60
100
0.27
180
160
240
0.35
480
Oil plug
Drain plug
WARNING
WARNING
WARNING
WARNING
WARNING
—10 —
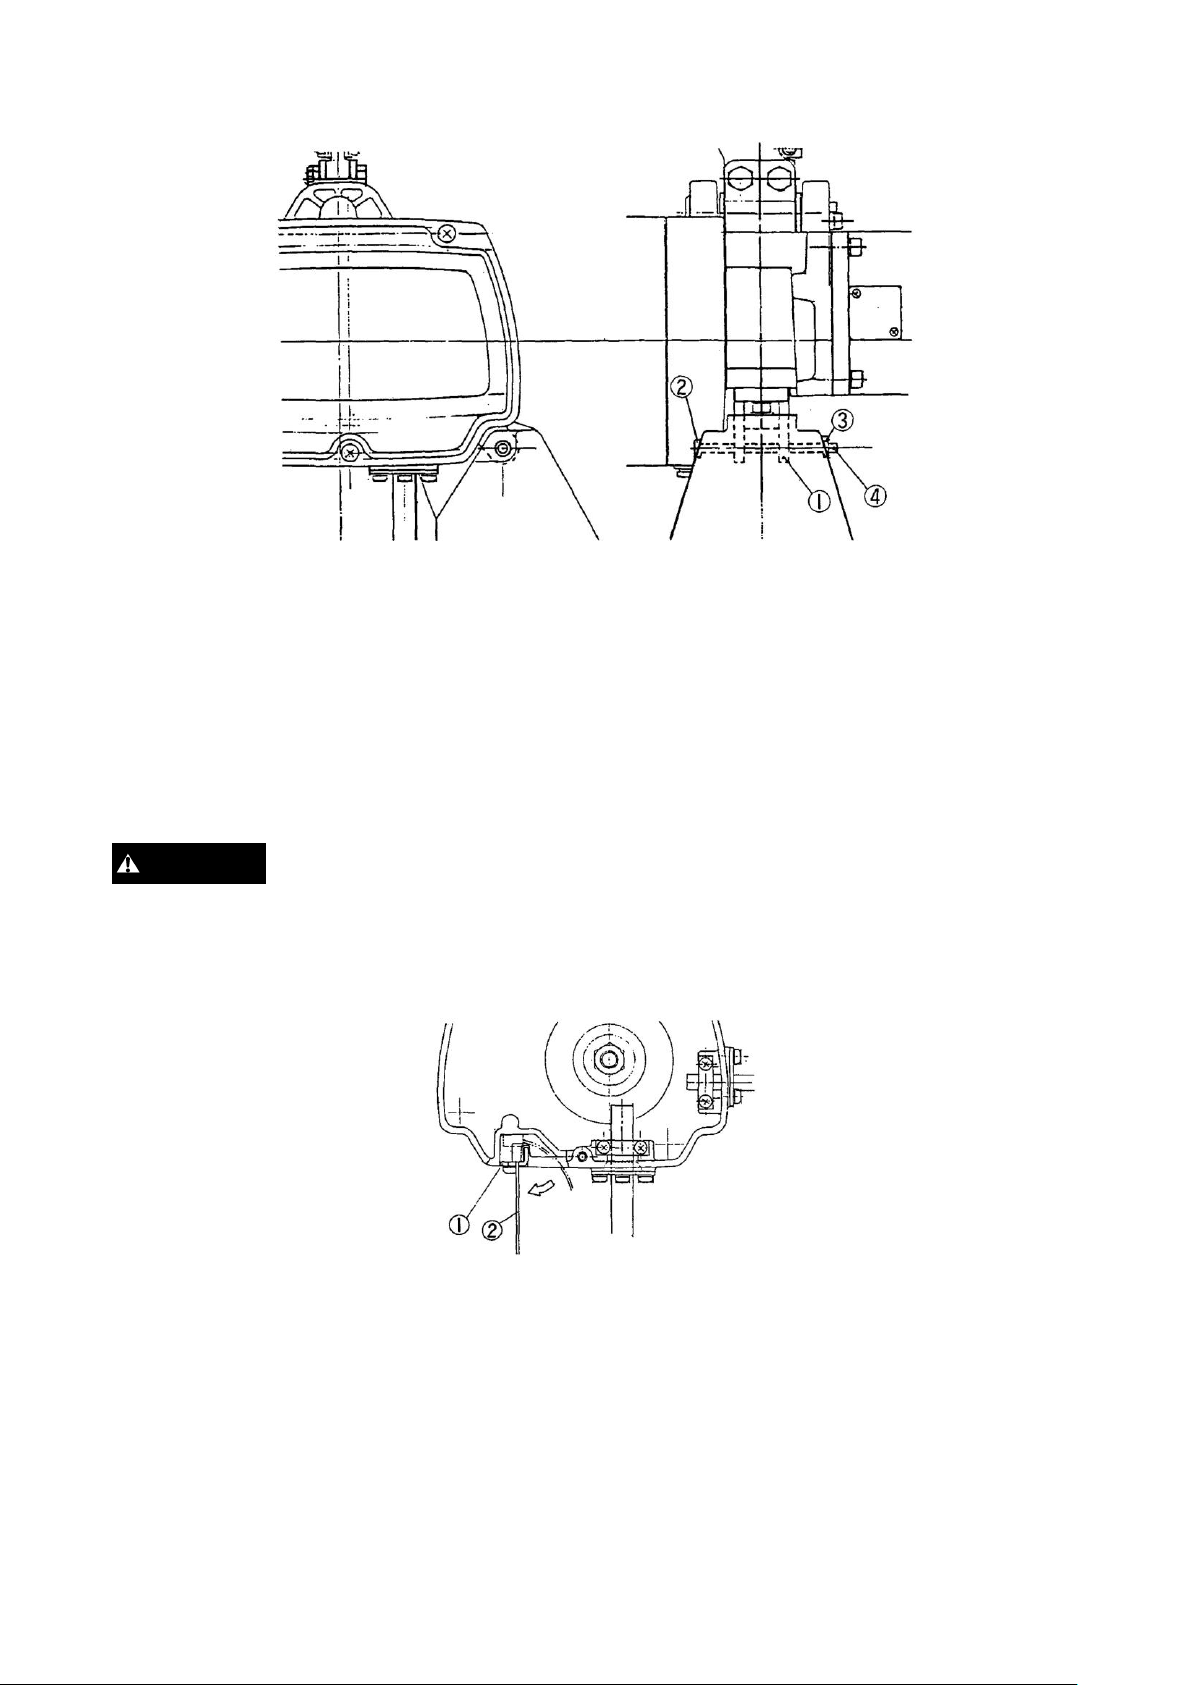
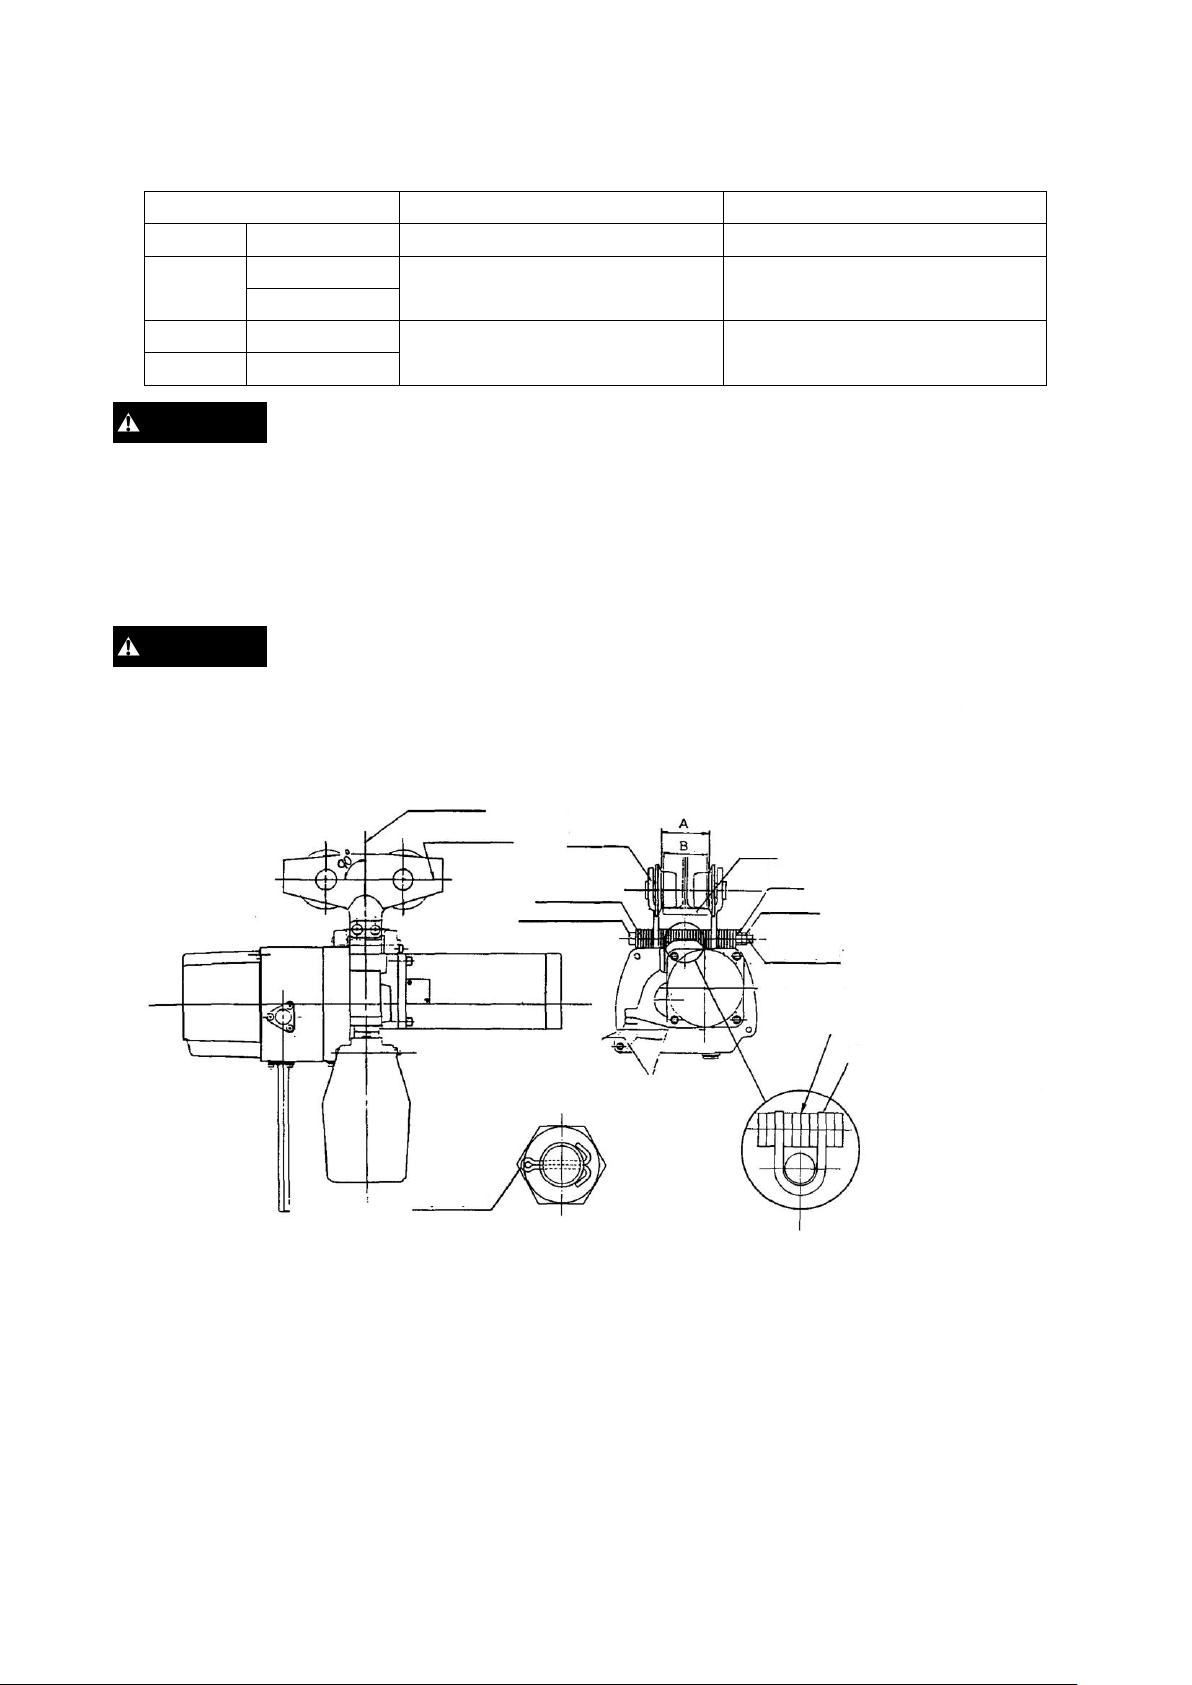
Fitting Procedure:
* Attach the chain container to the chain guide ①with socket bolt ②and U-nut ③.
* Attach the split pin ④to prevent the U-nut ③from dropping. Bend pin ends 90° or more.
(3) ATTACHING PUSH-BUTTON AND CURLED CORDS
a. Single- and dual-speed types
While the push-button cord is being connected to the hoist body, the strain relief wire may not be connected
yet. After the push button cord connecting, be sure to attach the end of the strain relief wire to the hoist body.
: Short-circuit and electric shock may result if the push-button cord is pulled
when the strain relief wire is not connected to the hoist body.
ALWAYS make sure that the strain relief wire is properly attached to the hoist
body as depicted and described below.
WARNING
—11 —
Fitting procedure:
* As illustrated, hook the strain relief wire ②to the cable support L ①of the hoist body.
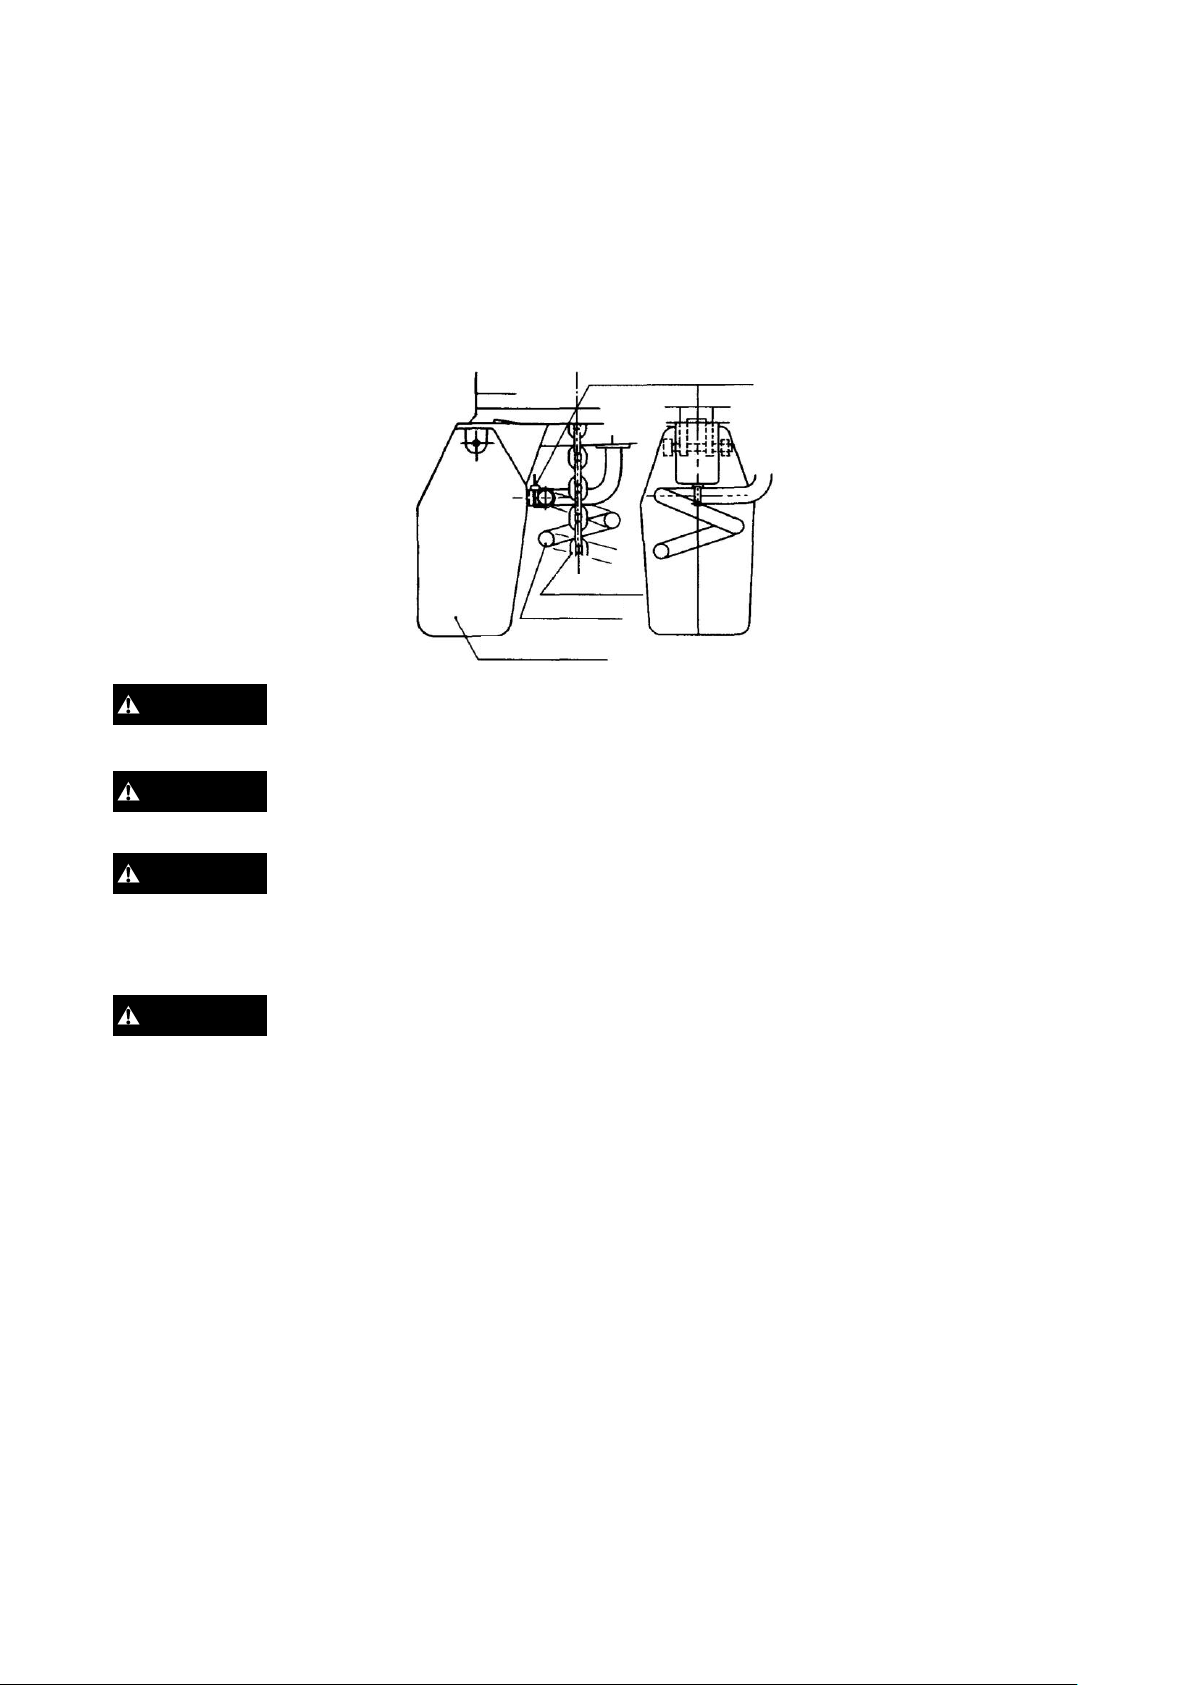
b. Dual-speed cylinder type
While the curled cord is being connected to the hoist body, it may not fixed to the chain container yet. As
illustrated, attach the cord to the chain container so that the clamp of the fastening belt faces upward the
way it does in the figure. Also, the load chain must come to the center of the curled cord.
: To avoid damage on the curled cord, fix the curled cord to the chain container
with the fixing band.
: To avoid wearing between load chain and chain guide, straighten up load
chain before fitting the curled cord to the chain container.
: To avoid damaging the curled cord, attach the chain container so that the
fastening belt clamp faces up.
(4) LOAD CHAIN LUBRICATION
: ALWAYS make sure to apply machine oil ISO VG 46 or 68, or the equivalent.
Insufficient oil lubrication will accelerate wear.
ALWAYS lubricate load chain weekly, or more frequently, depending on
severity of service.(Refer to Sec. 6-2)
Fastening belt clamp
WARNING
Load chain
Curled cord
Chain container
WARNING
WARNING
WARNING

—12 —
(5) POWER SUPPLY CABLE ATTACHMENT
A 2 mm2×5 m (3-conductors) power supply cable is normally supplied.
When power source is far away and an extension supply cable is required, use a cable of sufficient diameter as
illustrated in the following table.
Extension cable diameter
(nominal cross-section
area of conductor)
Max. length of
extension cable
(m)
2.0 mm2
30
1.25 mm2
15
: The extension cable should be a 3-conductors cable with the specified
cross-section area of the conductor.
[Connection to power supply source]
: ALWAYS ground the electric chain hoist before using.
: NEVER ground the electric chain hoist to a gas pipe as this can create the
possible explosion.
: In addition to grounding, ALWAYS connect to a power source equipped with
an earth leakage breaker.
: Actual power source voltage should not exceed maximum. allowable voltage
in the following table.
Actual power
source voltage (V)
Max. allowable voltage (V)
110
121
115
126
120
132
Notes: Suitable for use on a circuit capable of delivering not more than 5kA RMS symmetrical amperes,120V
maximum.
3-3. Installing Trolley
(1) MINI TROLLEY
* Attachment of adjusting spacers
Remove the top hook of the electric chain hoist and connect the adjusting spacers to the trolley, utilizing the
top yoke.
A total of 32 adjusting spacers have been packed. The different number of spacers are used for each rail
width. The dimension A always should be 3mm larger than the dimension B. (Dimension A= dimension
B(rail width)+3mm(approximately.)) As illustrated on page 14, attaching adjusting spacers correctly.
CAUTION
WARNING
DANGER
DANGER
CAUTION
—13 —
(Reference) Spacer arrangement
Rail width (mm)
Inside trolley frame
Outside trolley frame
50
H-steel
Right/left, 8 pcs. each
Right/left, 8 pcs. each
68
H-steel
Right/left, 11 pcs. each
Right/left, 5 pcs. each
I-steel
98
H-steel
Right/left, 16 pcs. each
Right/left, 0 pcs. each
100
I-steel
: Incorrect number of adjusting spacers may cause the trolley not to move or to
drop. To avoid these hazards:
ALWAYS make sure to use all 32 pieces and confirm that A-B ≒3 mm.
* Fitting of socket bolt
Set the trolley so that the wheel axis is right angle to the load line. Attach the socket bolt, nut
and U nut (double nut system), Then attach the split pin to the socket bolt for safety.
: To avoid the trolley from dropping, firmly fasten the socket bolt, nut and U
nut. Insert split pin and bend its ends 90or more.
WARNING
WARNING
Load line
Wheel axis
Trolley
frame
Rail
Adjusting
spacers
Socket bolt
Nut
U-nut
Split pin
Insert 4 adjusting spacers inside
the top yoke.
Top yoke
(of electric chain hoist)
Split pin

—14 —
(2) INSTALLING TROLLEY TO RAIL
: For all trolley suspended electric chain hoists, rail stops must be installed at
each end of the rail. Failure to install rail stops will allow the hoist and trolley
to fall off the end of the rail and thus cause an accident that could result in
injury and/or property damage. The stops must be positioned so as to not
exert impact force on the electric chain hoist frame or trolley wheels. They
must contact the ends of the trolley side frames.
: Rail stops should be attached with buffers to alleviate trolley impact force.
(3) TS series trolley (480kg only)
* For more details of connection with TS series trolley, refer to the manual of TS series
trolley.
4. OPERATION
As soon as pre-usage preparation and checks have been completed, the hoist will be ready for operation.
: In shifting operation between lifting up and lowering down under the loaded
condition, ensure to avoid the immediate reverse operation before the hoist
motor completely stops. If not avoided, it could result in the hoist’s damage.
Ensure to avoid the excessive inching operation. (Inching operation: very
frequent lifting or lowering operations in a very short time for positioning the
hook with very small repeated hook movements.) If not avoided, it could
result in the hoist’s damage.
4-1. Single-speed Type
The push-button switch is single-step push-in type.
Push to lift and to lower.
WARNING
ED 480kg
ED 480kg
Top hook
WARNING
Single-speed type
Suspender
Slotted nut
Split pin
Yoke bolt
WARNING
Dual-speed type

—15 —
4-2. Dual-speed Type
The push-button switch is dual-step push-in type. The first step is for low-speed operation and the second
step for high-speed. Push to lift and to lower.
[Low-speed adjustment procedure]
The push-button can be adjusted by setting the low-speed side for the operating voltage of each country. However,
if the low speed does not work or is too fast or slow (owing to voltage and frequency fluctuation), adjust the
switch in the following way:
: NEVER touch live portions of cables, terminals, and terminal screws during
adjustment so as not to incur electric shock.
ALWAYS make sure to turn power off before servicing.
* Open the back lid of the push-button switch (as depicted in the next illustration).
* Turn the volume clockwise to increase speed or counterclockwise to lower it.
* Close the back lid of the push-button switch.
4-3. Dual speed Cylinder Type
(1) This is a handling switch type hoist. The switch is directly attached to the bottom hook.
As illustrated, the switch is cylinder shaped. Load is lifted when the switch is flipped up and lowered when
flipped down.
* The operation box has an alternate lighting switch.
* High or low lifting speed is selected by the alternate switch.
* “H” on the left side for high speed, “L” on the right side for low speed.
[Speed adjustment procedure]
If the hoist does not operate or have the proper speed, adjust the speed volume as follows:
* For increasing the lifting speed, turn the volume clockwise.
* For decreasing the lifting speed, turn the volume counterclockwise.
DANGER
Volume
High-speed
adjustment volume
Speed selector
Cylinder
grip
Low-speed
adjustment volume
Cylinder control
Cylinder grip
Body nut
Hook cam
Detachable hook
Cylinder control
Operation (example)
Hold the cylinder grip and operate the cylinder control with
either the thumb or thumb and index finger.

—16 —
(2) The bottom hook is detachable. Detachment and setting are described below.
* To detach bottom hook:
Holding the body nut, turn the hook cam to the left (counterclockwise).
* To set the bottom hook:
The bottom hook can be set by simply pushing it in from underneath.
: ALWAYS make sure the hook cam is completely locked.
: NEVER dropping or releasing a load could result in death or serious injury.
To avoid this hazard, do not operate the bottom hook release mechanism
(hook cam) when the hoist with cylinder-controlled or optional detachable
hook is under load.
4-4. Electric Chain Hoist with Trolley
To operate the electric chain hoist with trolley, move it horizontally by either pushing the lifted load or the
load chain.
: NEVER pull the curled cord, push-button switch or push-button cord. Pulling
the curled cord, push-button switch or push-button cord may disconnect cord
wires. Disconnected wire(s) may cause a short-circuit in the hoist body or any
surrounding conductor, giving the operator electric shock.
: ALWAYS move the horizontally by grasping the cylinder grip or pushing the
load.
: ALWAYS pay your attention on your back when you attempt to push a lifted
load or the load chain.
WARNING
WARNING
WARNING
WARNING
WARNING

—17 —
5. INSPECTION
5-1. Inspection Classification
(a) INITIAL inspection - prior to initial use, all new, altered, or modified hoists shall be inspected by a designated
person to ensure compliance with the applicable provisions of this Manual.
(b) Inspection procedure for hoists in regular service is divided into two general classifications based upon the
intervals at which inspection should be performed. The intervals in turn are dependent upon the nature of the
critical components of the hoist and the degree of their exposure to wear, deterioration, or malfunction. The
two general classifications are herein designated, as FREQUENT and PERIODIC, with respective intervals
between inspections as defined below.
(1) FREQUENT inspection - visual examinations by the operator or other designated personnel.
(a) normal service - monthly
(b) heavy service - weekly to monthly
(c) severe service - daily to weekly
(d) special or infrequent service –as recommended by a qualified person before and after each occurrence.
(2) PERIODIC inspection - visual inspection by a designated person.
(a) normal service - yearly
(b) heavy service - semiannually
(c) severe service - quarterly
(d) special or infrequent service - as recommended by a qualified person before the first such occurrence
and as directed by the qualified person for any subsequent occurrences.
5-2. Frequent Inspection (see table)
Items such as those listed below shall be inspected for defects and damage at intervals as defined in Sec.
5-1 (b) (1). This includes observations during operation for any defects or damage that might appear
between PERIODIC inspections. A designated person shall determine whether any defects or damage
constitute a hazard or will require more detailed inspection.
a. Brake slippage.
b. Control functions for optimal operation.
c. Damage, cracks, and bends in hooks or noticeable opening.
d. Misalignment or improper hook latch.
e. Optimal lubrication, signs of wear, link damage, or adhesion of foreign matter to the load chain.
f. Load sheave engagement with load chain; load chain twisting.

—18 —
g. Idle sheave engagement with load chain; load chain twisting.
h. Proper limit switch actuation and motor stopping when the hook rises at upper limit under no load.
i. No deformed, peeled and cracked cushion rubber.
j. No damaged chain spring (option), and minimum free length, 75mm (130mm), of the chain spring.
Note: Initial free length of the spring 85mm (150mm).
* ( ):60~240kg
5-3. Periodic Inspection (see table)
Complete inspections of the hoist shall be performed at intervals as defined in Sec. 5-1 (b) (2). These
inspections may be performed with the hoist in its normal location and do not require that the entire hoist
be dismantled. Covers and other items normally supplied to allow inspection of components should be
opened or removed for, these inspections. Any deficiencies such as those listed below shall be examined by
a designated person to determine whether they constitute a hazard, or whether complete disassembly is
necessary. These inspections shall include the requirements of Sec.5-2.
a. Inspection to all items included in FREQUENT inspection.
b. Fastening of screws, bolts, and nuts.
c. Wear, corrosion, cracks, distortion, etc., of the gear, bearings and chain pins.
d. Damage to the hook or fittings that attach the hook to the chain.
e. Damage to or excessive wear of the load sheave chain pocket:
If the chain pocket is too wide or deep, the chain may be lifted up over the pocket or may get caught
between the chain guide and load sheave.
Also check the chain guide for wear around the opening through which the chain enters the hoist.
* Extremely worn or damaged parts should be changed.
f. For the friction clutch, see Sec. 6-3.
g. Pitching of contactor contact point deterioration:
Operate the push buttons and check if it sticks at any point.
h. Imperfect insulation of cables, cords, and the control station.
This manual suits for next models
18
Table of contents
Popular Chain Hoist manuals by other brands


CMCO
CMCO Yale PT 800 operating instructions

HSS Hire
HSS Hire 68931 Operating & safety guide

HADEF
HADEF 70/06AP-EX Installation, Operating and Maintenance Instruction

HADEF
HADEF 70/06AP Installation, operating and maintenance instructions

Verlinde
Verlinde EUROBLOC VT4 instructions

CM
CM Lodestar A Operating, Maintenance & Parts Manual