CTI ecotrash PTC User manual

Paper Towel Compactors
CTI PTC Technical Support and Field Service Manual V3 08 03 21
User Instructions and Field Service Manual
Ver. 3 8/3/21
(For Serial Number’s 51500001-Beyond)

CTI PTC Technical Support and
Field Service Manual V3 08 03 21 2
Aer receiving your PTC and remove it from the packaging.
Move compactor to the location you will be using it, and plug it in. (During cold/winter months, please wait
until the compactor has reached room temperature before plugging in.)
With your hand, push the door latch to expose a pull tab.
Gently pull the pull tab until the compactor tray assembly is out fully. (The trash bin will be accessible like
in the picture above) Line the trash bin with a bag or remove the trash bin and replace with an ecotrash
ZeroWaste® bin. The tray assembly is on slides and should move smoothly in and out like a drawer.
Slide assembly back in and push the tab closed until it locks. When the green “ecotrash” light is lit and
steady, the unit is ready to use. (If you want to lock the door, use the key provided to lock it. This is not
necessary, just an option.)
When the green “ecotrash” logo is flashing, the compactor is approximately 80% full. When the logo is
unlit, the compactor is full and needs to be changed.
To change, follow #2 & #3 above removing the trash bin and change the bag (or ZeroWaste bin), and
replace with a fresh one.
If you feel resistance when opening the compactor tray assembly STOP. This means the machine is in
mid-cycle. If in mid-cycle, just close it the tray assembly door and wait 30 seconds for the compactor head
to return to the home position, and another 15 seconds for the slide tray to slide back to the home position.
The “ecotrash” light will turn on again, then open the slide tray assembly door and remove the trash.
1)
2)
3)
4)
5)
6)
7)
Should you have any questions regarding use or set up, please reach out to our service team at
612-230-2209 or your salesperson.
ecotrash®PTC®- User Instructions

Technical Support and Field Service
Compaction Technologies, Inc. (CTI) Technical Support
612-230-2209
Post Warranty – Troubleshooting Guide
Post Warranty Service Costs for CTI to repair units aer warranty
Electrical Specifications
• 120 Volts, 1 phase, 50/60 Hz, 3A
• Max. Ram Force: 224 LBS.
• Service Provider trip charge, hourly rate, mileage
• Parts cost plus freight/shipping
• CTI Technical Support
• CTI cost + 25%
• See aached parts list
• $85/hr billed in ¼ hour increments*
Before calling CTI Tech Support or an authorized service provider, first try the solutions in the
Troubleshooting guide section of this document, this may help you avoid a service call.
If further assistance is needed, call CTI Technical Support or an authorized service provider for a brief
troubleshooting session.
When calling CTI for technical support, please have credit card or Purchase Order number available, as
well as the compactor serial number (located in the upper right corner on the back of the compactor) in
the event a service call is required.
*For any one case, the first 15 minutes of time with CTI Technical Support is complimentary. The large
majority of cases are accurately diagnosed in less than 15 minutes. To quickly diagnose cases with the
help of CTI Technical Support, callers should review this Troubleshooting guide beforehand and become
familiar with the compactors. Callers should be standing in close proximity to the compactor and be able
to communicate clearly in English answers to questions such as, “…is the deposit door open?” or “…is
the green light on?”
CTI PTC Technical Support and
Field Service Manual V3 08 03 21 3

CTI PTC Technical Support and
Field Service Manual V3 08 03 21 4
Technical Support and Field Service
Monthly Maintenance
The most important preventative maintenance that can be done to this machine is to keep it clean,
particularly in and around the chute and tray slide. Anything inside the boom not in the trash bin, around
the door, or blocking of the trash sensor may keep the chute from opening or preventing the tray from
sliding the bin back properly may cause the compactor to not function. Cleaning these areas on a monthly
basis will help ensure they stay clear of debris, allowing the compactor to continue to function correctly.
When performing exterior or interior cleaning, wipe down with a damp cloth using non-chlorinated,
general purpose cleaner. Clean this device similar to how a microwave oven is cleaned on the exterior
and interior. Avoid using pressurized water, sprays, or high volumes of water.

Troubleshooting Guide
1. Light is off, Chute is closed.
a. Step 1
(For Serial Number’s 51500001-Beyond)
i. Is the machine plugged in?
ii. If yes, continue. If no, go to Step 2.
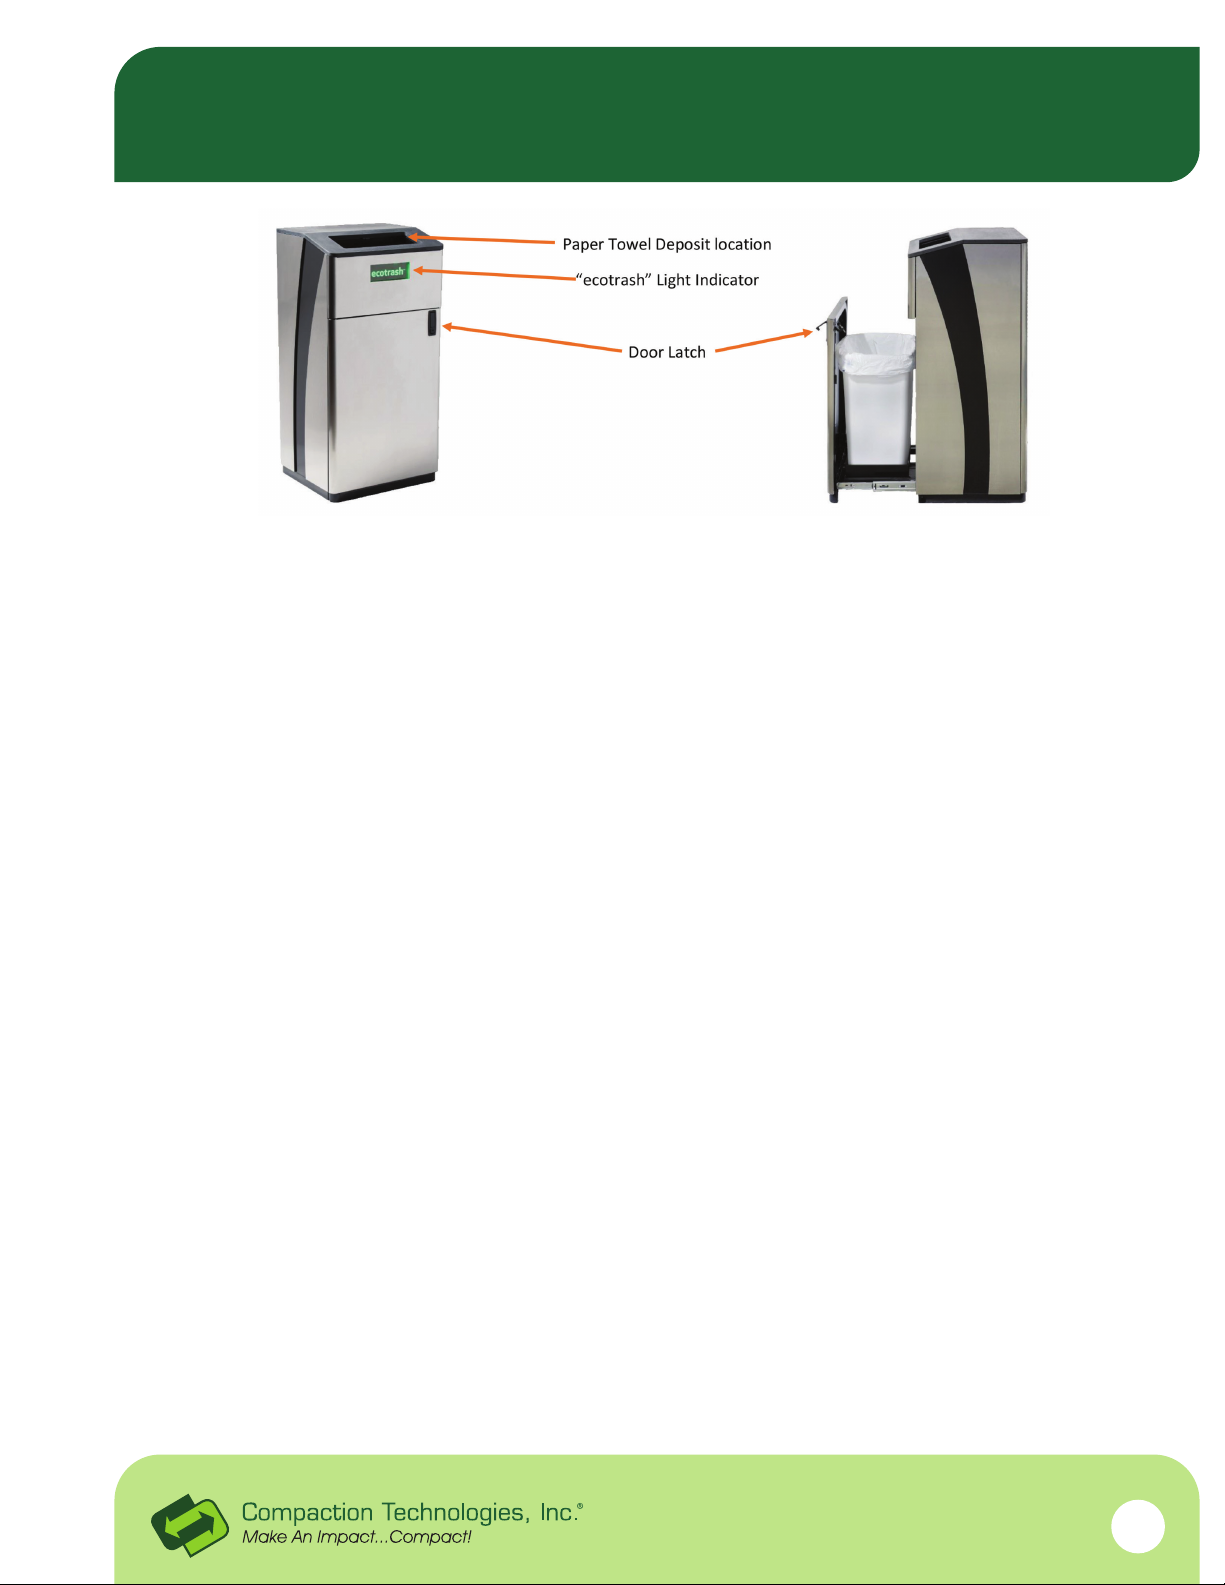
iii. Is the machine full? Open the front door
using the latch and check the bin.
iv. If yes, continue, if no go to Step 2.
v. Empty the bin, close the door and latch. Did
the light turn on and the chute open?
vi. If yes, troubleshoot complete. If no, go to
Step 2.
b. Step 2
i. Plug the machine in. Did the light turn on
and the chute open?
ii. If yes, troubleshoot complete. If no, we
recommend calling an authorized service
provider.
2. Light is off, Chute is open
a. Step 1
i.
ii.
iii.
iv.
v.
vi.
Is the machine plugged in?
If yes, continue. If no, go to Step 2.
Is the door latch open?
If yes, continue, if no, go to Step 3.
Close the door and latch. Did the light turn
on and the chute close and then open?
If yes, troubleshoot complete. If no, go to
Step 3.
i.
ii.
Plug the machine in, close the door and
latch. Did the light turn on and the chute
close, then open?
If yes, troubleshoot complete. If no, go to
step 3.
b. Step 2
c. Step 3
i.
ii.
Open and close the door latch. Did the light
turn on and the chute close, then open?
If yes, troubleshoot complete. If no, we
recommend calling an authorized service
provider.
CTI PTC Technical Support and
Field Service Manual V3 08 03 21 5

CTI PTC Technical Support and
Field Service Manual V3 08 03 21 6
b. Step 2
3. Machine is running constantly.
a. Step 1
i.
ii.
iii.
iv.
v.
Is there something in the chute under the
trash sensor?
If yes, continue. If no, go to Step 2.
Remove the obstruction. Did it stop
running?
If yes, continue troubleshoot complete.
If no continue.
Clean the motion sensor with a damp cloth
and dry. Did it stop running? If yes,
troubleshoot complete. If no, go to step 2.
i.
ii.
iii.
iv.
Is the bag inside the bin puffed-up
with air?
If yes, continue. If no, we recommend you
call an authorized service provider.
Push all the air out of the bag and push the
bag down into the corners of the trash bin.
Did the machine stop running?
If yes, troubleshoot complete. If no, we
recommend calling an authorized service
provider.
Troubleshooting Guide
(For Serial Number’s 51500001-Beyond)

CTI PTC Technical Support and
Field Service Manual V3 08 03 21 7
Circuit Board
Part # CTE00008
Chute Actuator
Part # P50033
Tray Slide Actuator
Part # P50032
Power Cord
Part # P50045
Replacement Top
Part # 5-0037
Black Exterior Screws (set of 10)
Part # P00059
Replacement Trash Bin
Part # P50018
Bow-Tie Clips & Pins (Set of 2)
Part #P5007/P50012
Main Actuator
Part # P50035
Spare Parts List

CTI PTC Technical Support and
Field Service Manual V3 08 03 21 8
Door Latch
Part # P50022
Power Supply
Part # P50034
Magnetic Door Switch
Part # P50036-S
Door Switch Magnet w/ Spacer
Part # P50052/5-0040
Head Cover Assembly
Part # 5-0038
Drawer Slides (Sold as a Pair)
Part # P50024
Drawer Front (In Wall)
Part # 5-W-0003
Right Side Skin (In-Wall)
Part # 5-W-001 *Specify Depth*
Le Side Skin (In-Wall)
Part # 5-W-0002 *Specify Depth*
Spare Parts List

CTI PTC Technical Support and
Field Service Manual V3 08 03 21 9
In Wall Bezel
Part # 5-W-0003
Dog House
Part # 5-W-0004 *Specify Depth*
Drawer Slides (Sold as a Pair)
Part # P50024
Back (Stand Alone)
Part # 5-0030
Drawer Front (Stand Alone)
Part # 5-0025
Right Side Skin (Stand Alone)
Part # 5-0029
Le Side Skin (Stand Alone)
Part # 5-0031
Replacement Key
Part # P50061
Spare Parts List

CTI PTC Technical Support and
Field Service Manual V3 08 03 21 10
Circuit Board
Chute Actuator
Tray Slide Actuator
Power Cord
Replacement Top
Black Exterior Screws (Set of 10)
Replacement Trash Bin
Bow Tie Clips & Pins (Set of 2)
Main Actuator
Door Latch
Power Supply
Magnetic Door Switch
Door Switch Magnet W/ Spacer
Head Cover Assembly
Drawer Front (In Wall)
Right Side Skin (In-Wall) 4"
Le Side Skin (In Wall) 4"
Right Side Skin (In-Wall) 6"
Le Side Skin (In Wall) 6"
Right Side Skin (In-Wall) 8"
Le Side Skin (In Wall) 8"
ecotrash® PTC® 4” in-wall installation kit
ecotrash® PTC® 6” in-wall installation kit
ecotrash® PTC® 8” in-wall installation kit
Drawer Slides (Sold as a Pair)
Back (Stand Alone)
Drawer Front (Stand Alone)
Right Side Skin w/Swoosh (Stand Alone)
Le Side Skin w/Swoosh (Stand Alone)
Replacement Key
CTE00008
P50033
P50032
P50045
5-0037
P00059
P50018
P50007/P50012
P50035
P50022
P50034
P50036-S
P50052/5-0040
5-0038
5-W-0025
5-W-0001
5-W-0002
5-W-0001-002
5-W-0002-002
5-W-0001-003
5-W-0002-002
5-W-0004
5-W-0004-002
5-W-0004-003
P50024
5-0030
5-0025
5-0029
5-0031
P50061
$588.00
$216.00
$210.00
$24.00
$406.00
$8.00
$36.00
$2.00
$417.00
$33.00
$67.50
$26.00
$23.00
$22.00
$73.00
$60.00
$60.00
$97.00
$97.00
$83.00
$83.00
$564.30
$564.30
$564.30
$30.00
$62.00
$37.00
$147.00
$147.00
$9.00
<1
1
1
2
5
<1
5
<1
25
<1
2
<1
<1
2
5
5
5
5
5
5
5
10
10
10
5
5
5
5
5
<1
Description: Product # Est. Weight
(lbs)
Spare Parts List Pricing as of 1/1/2021
Table of contents