Cubetek CB-HD01 User manual

CB-HD01 CUBETEK HD MEDIA PLAYER
FOR SUPPORT CONTACT US ON:
www.melodymedia.in
Email: support@melodymedia.in
WhatsApp: +91 6363772699
Tel: 080-23492250
User Manual

First Things First - Connect It All Up!
In the package are your new media player, an AC power adapter, remote control, AV cable, and
this user’s manual. To get your media player connected for use:
Connect the media player to your TV using an HDMI 2.0 cable (not included) or using the
included analog AV cable. The Audio Output setting in the settings menu can be used to
configure the audio format over HDMI.
Turn on your TV and set it to the input source where the media player is connected.
Connect the AC adapter for the media player – it will turn on automatically.
Install CR2032 (not included) into the remote control.
That’s it! Now all you need to do is load some videos onto an SD card or USB drive (not included)
and begin enjoying your new media player.
Package contents
AV Cable Adaptor Remote control Gift Box Manual
User Advice: By default, the media player will detect and use the highest resolution supported by

the TV and HDMI cable it is connected to. The Display Resolution setting in the settings menu can
be used to check and adjust the output resolution. If the media player is not sending a 4K video
signal, make sure the TV’s HDMI input supports 4K and the HDMI cable is version 2.0 or higher.
Some TVs support 3840x2160 at 60Hz but 4096x2160 at only 30Hz – if your TV behaves this way,
manually set the media player’s Display Resolution to 3840x1060 60Hz for the best video quality.
Remote Control Guide

How Do I Play Videos? How Do I...
How do I load videos, photos, or music onto the media player?
Use a computer to copy videos, photos, or music onto an SD card or USB drive (not included).
Organize the files in folders to make them easier to manage. The player supports up to 1000 files per folder. If there are more
than 1000 files in a folder, the additional files may not be read by the player.
After copying your media files, insert the SD card or USB drive into the media player to play the videos, photos, or music.
User Advice: The media player does not have any internal memory. It must be used with an SD card or a USB drive. If your SD
card or USB drive is not recognized, make sure it is using FAT32, exFAT, or NTFS file system format.

How do I play a video?
After powering on, the media player will display the main menu. Select the Video icon from the
main menu, then select the USB drive or SD Card to browse for video files to play. Find the video
you would like to play, press the OK button on the remote and it will begin playing. The media
player can also be configured to automatically start playing videos whenever it is turned on –
please refer to the settings section for how to configure and use this automatic playback feature.
During video playback, you can...
Pause or resume playback using the Enter button. Press the Return button to stop.
Press the Left/Right buttons to quickly skip backward or forward. Press and hold the
Left/Right buttons to use the time line slider to quickly get to a point in the video.
Additional photo display options are available by pressing the OSD button:
Ratio – Choose between stretched full screen or original aspect ratio.
Sequence – Set the video playback repeat mode for one or all videos in the folder.
Audio – Select which audio track to play.Subtitle –
Select the subtitle track to display Encoding –
Select the subtitle text encoding.
User Advice: Subtitle text encoding uses the UTF-8 code page by default. Due to the many ways
in which text can be encoded, the only officially supported subtitle languages are English, Spanish,
and Chinese even though other languages may be supported by the available encoding settings.
How do I display subtitles for a video?

This devices also supports internal and external subtitles, including SRT, SUB+IDX, and PGS
formats. If both internal and external subtitles are detected, they are listed together. To use an
external subtitle file, name it the same as the video, but with a language and “SRT” file extension,
and place it in the same folder as the video. For example:
To display subtitles, make sure Subtitle Display is turned on in the settings menu. Then, while
playing the video, press the Menu button on the remote control to bring up the playback menu,
select the subtitle track you want to display, and press the OK button to confirm.
How do I play photos?
From the main menu, select the Photos icon, then select the USB drive or SD Card to browse for
photos to play. Find the photo you would like to play, press the OK button on the remote and it will
be displayed. The media player recognizes up to 1000 photos in a folder and can play a slide show
of photos within the same folder. The media player can also be configured to automatically start
playing photos in a slide show whenever it is turned on – please refer to the settings section for
howto configure and use this automatic playback feature.
During photo playback, you can...
Pause or resume photo slide show using the OK button. Press the Return button to stop.
Use the Left/Right buttons on the remote to go to the previous or next photo.
Additional photo display options are available by pressing the Menu button:

Effect – Sets the slide show transition effect.
Delay – Set the delay time between photos in a slide show.
Music – Play background music from the same folder as the photos.
Ratio – Choose between stretched full screen or original aspect ratio.
How do I play music?
From the main menu, select the Music icon, then select the USB drive or SD Card to browse for
music files to play. Find the file you would like to play, press the OK button on the remote and it will
begin playing. The media player can also be configured to automatically start playing music
whenever it is turned on – please refer to the settings section for how to configure and use this
automatic playback feature.
During music playback, you can...
Pause or resume the song using the OK button. Press the Return button to stop.
Press the Left/Right buttons to quickly skip backward or forward. Press and hold the Left/Right
buttons to use the time line slider to quickly get to a point in the song.
Use the Up/Down buttons on the remote to go to the previous or next song.
Use the Menu button to access the playback controls on the bottom of the screen, including
playback order: Sequential, Sequential Loop, Single Loop, Random Loop.

How do I play videos, photos, or music automatically?
This 4K player can be configured to automatically play videos, photos, or music when:Power is
plugged in, including when power is restored after an outage
Turned on using the remote control
An SD card or USB drive is inserted
To enable this feature, go to the Settings menu and set the Auto Play setting to the media file type
you want to automatically play, such as Movies,Music, or Photos. The Videos+Photos setting will
first play videos followed by photos. The Photos+Music setting will play photos with background
music. Set the Sensor Setting to Off.

Make sure the videos, photos, and music files that you want to automatically play are in the root
folder and not in any sub folders. To control the sequence of playback, name the files using a
common format and in alphabetical order:
RIGHT!
WRONG!
VIDEO0001.MKV
1.MKV
VIDEO0002.MP4
02.MP4
VIDEO0003.MKV
3.MKV
…
…
VIDEO0010.MKV
10-Video.MKV
VIDEO0011.MKV
11(1).MKV
…
…
VIDEO0100.MP4
100.MP4
Expert Feature: The Video Resume feature in the Settings can be used with the automatic
playback feature to resume video playback where the video was stopped when the device lost
power or was turned off using the remote control. To always automatically start playing from the
beginning of the first video, set Video Resume to off.

I Now Have Additional Questions...
Video does not play or plays with problems
The media player supports video, music, and photo files that meet the following requirements:
Video File Support
Container files: MKV, MP4, MOV, VOB, AVI, TS, M2TS, WMV
MPEG1, MPEG2, MPEG4/ASP, VP8 – maximum 1920x1080@60fps, 50mbps
H.264/AVC, H.265/HEVC – maximum 4096x2304@30fps, 200mbps
Music File Support
Formats: MP3, FLAC, OGG, APE, AAC
Bitrate: 32kbps to 320kbps
Photo File Support
Formats: JPG, PNG, GIF (non-animated), BMP
The most common cause for videos not playing is an unsupported video codec or a resolution that
is higher than the maximum supported. You can use the free MediaInfo tool at
https://mediaarea.net/MediaInfoOnline to check if your video satisfies these requirements.
The USB drive or SD card cannot be read
For USB drives and SD cards, check that the drive is using FAT32, exFAT, or NTFS file system.
Some drives come with hidden files from the factory that may cause error messages. Please try
copying all files off of the drive, reformatting the drive, and then copying the files back onto the
drive.
Photos are displayed sideways or upside down
The media player is designed to display photos as-is without making any changes to them. This
ensures that your photos are never accidentally damaged or overwritten. The rotation function
provided by the media player only changes how the current photo is shown on screen – the rotation
change is not saved to the photo file. Therefore, the next time the photo is shown, it isagain
displayed without any rotation applied.
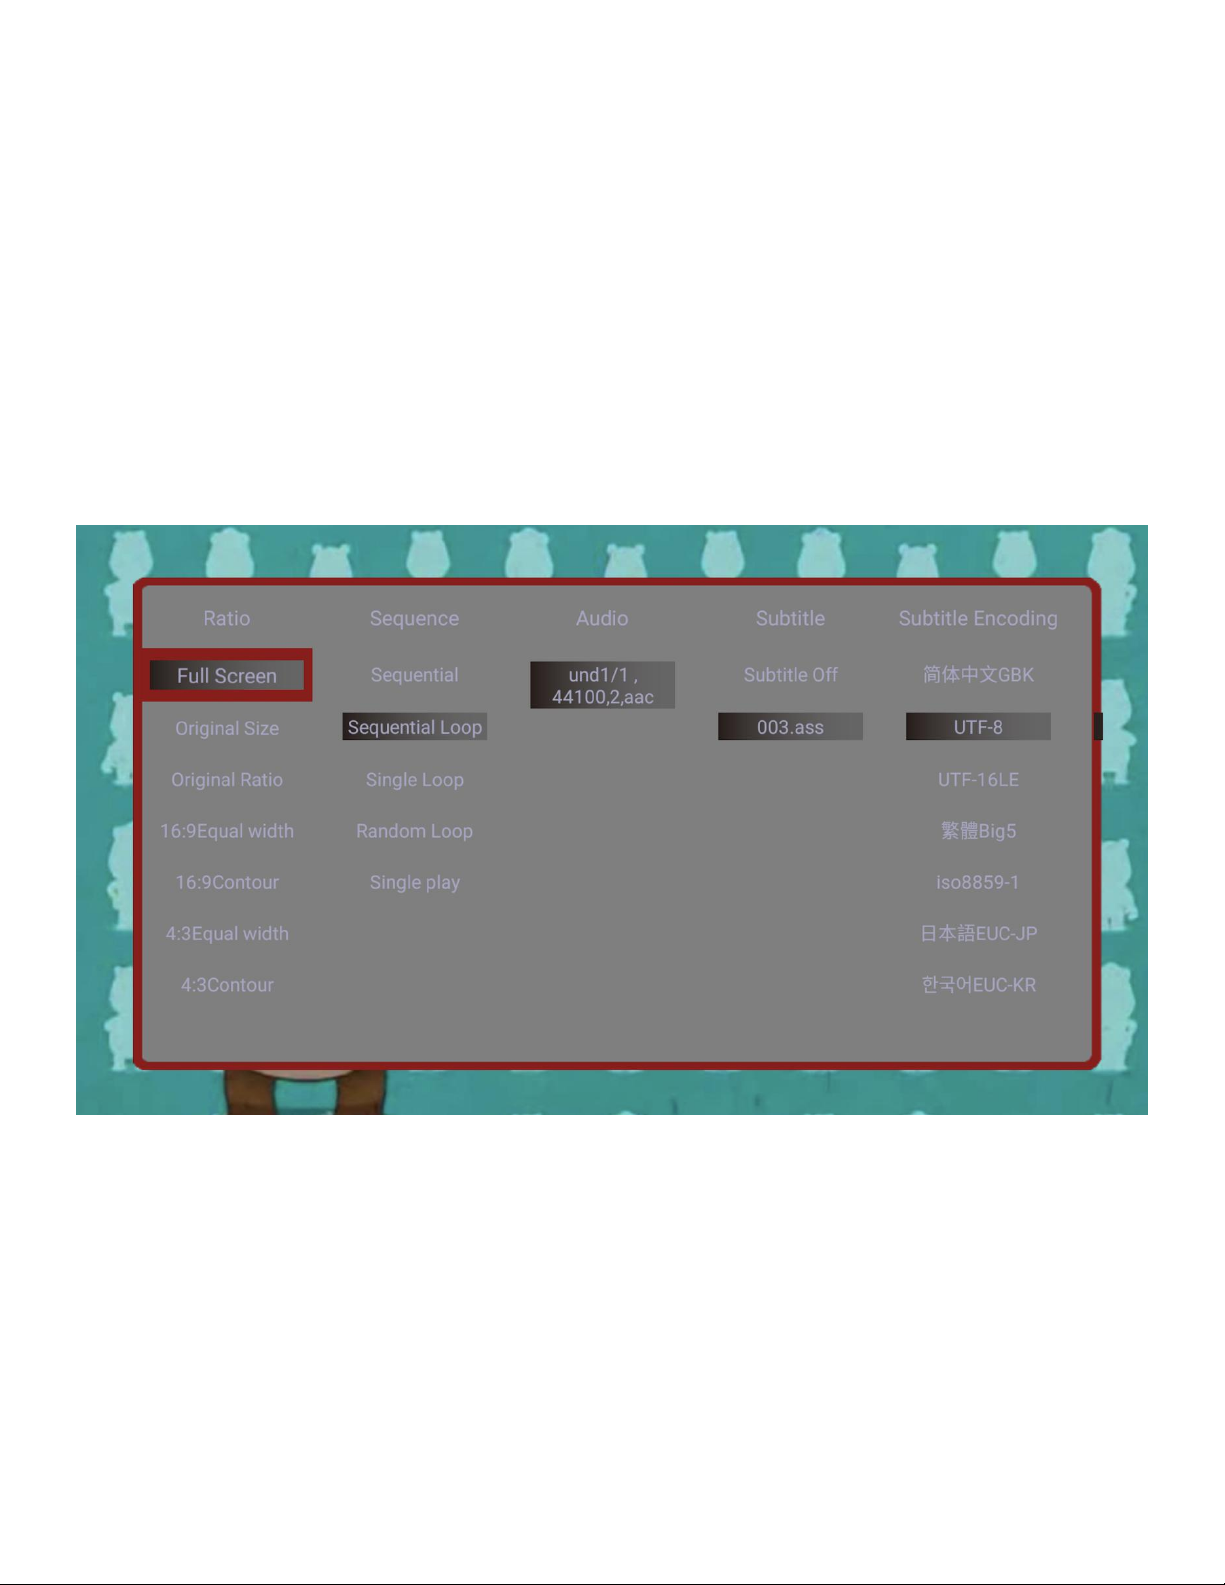
Photos have black bars on the sides or above/below
The media player shows all photos without cropping any portion of the photo. For photos that do
not exactly match the display ratio of the TV screen, there will be black bars added to the sides or
above/below the photo. This is normal behavior and your computer/phone work the same way. To
eliminate black bars, make sure your photos are a perfect match for the resolution of the TV
screen, such as 1920x1080.

The player does not respond to remote control
To see if the remote is working, please use the cell phone trick where you look at the remote's
signal emitter through your cell phone's camera. If you have an iPhone, use it in selfie mode with
the front camera since the main camera has an IR filter. If the remote is working, you'll see the
emitter light up through your phone's camera. This helps determine if the remote is bad.
Low Audio Volume
The media player has its own built-in volume control. By default, it is set to maximum but can be
adjusted lower using the remote control. If the audio volume is low, try increasing the media player
volume using the media player’s remote control.

Settings Menu
Language - Sets the media player’s operating language
Display Resolution - Sets the video output resolution. By selecting Auto, the player will attempt to
determine the optimal resolution setting. Select a different resolution if desired. If the media player
is not sending a 4K video signal, make sure the TV’s HDMI input supports 4K and the HDMI cable is
version 2.0 or higher. Some TVs support 3840x2160 at 60Hz but 4096x2160 at only 30Hz – if your
TV behaves this way, set the media player’s Display Resolution to 3840x1060 60Hz for the best
video quality
Display Zoom - Adjusts the edge of the output image so that it properly fits the TV screen.
Audio Output - Sets the audio output format for HDMI. The Default setting is stereo PCM output.
Select RAW Pass through to send surround sound audio to a home theater receiver.
Video Resume - Remembers the stopping point of recently played videos and resumes playing
from the stopping point. This capability can be used in conjunction with the Auto Play feature to
automatically resume a video if power is lost and restored.
Subtitle Display - Sets the subtitle display behavior when playing a video. When turned on,
subtitles will be displayed if available.
Auto Play - Automatically plays videos, music, or photos found on the root directory of a USB drive
or Memory Card. The Videos+Photos option first plays videos and then photos. The Photos+Music
option plays a photo slide show with background music.
Sensor Setting – Sets the player's behavior when the trigger button is pressed. Place two videos
named “loop” and “trigger” in the root directory of a USB drive or SD card. The files should be a
supported video type such as MP4 or MKV. If set to Trigger Play, the player will at first
continuously loop the video named “loop”, play the video named “trigger” once when triggered,
then start playing “loop” again. While the “trigger” video is playing, additional presses of the trigger
button have no effect. If set to Trigger Play with Restart, the player will restart playing the
“trigger” video each time the trigger button is pressed, even if it is already playing the “trigger”
video.
Firmware Version - Displays the current firmware version
Factory Reset - When selected, resets all settings back to factory default. Please disconnect all
drives from the media player before performing a factory reset.

Specification
Video File Support
Container files: MKV, MP4, MOV, VOB, AVI, TS, M2TS, WMV
MPEG1, MPEG2, MPEG4/ASP, VP8 – maximum 1920x1080@60fps, 50mbps
H.264/AVC, H.265/HEVC – maximum 4096x2304@30fps, 200mbps
Music File Support
Formats: MP3, FLAC, OGG, APE, AAC
Bitrate: 32kbps to 320kbps
Photo File Support
Formats: JPG, PNG, GIF (non-animated), BMP
Storage Drive Support
USB drives with FAT32, exFAT, or NTFS file systems
SD cards with FAT32, exFAT, or NTFS file systems
Video Output
HDMI: 720p, 1080i, 1080p, 2160p, all @50Hz/60Hz
AV: 720x576 (PAL), 720x480 (NTSC)
Audio Output
HDMI: PCM, Passthrough
AV: Stereo
Power Source:
Included AC adapter: AC 90-230V 50/60Hz, 5V/2A DC Output
Table of contents
Popular Media Player manuals by other brands

Sony
Sony DSX-A100U operating instructions

Sony
Sony NSZ-GS7 Quick setup guide

SODIFF E&T Co., Ltd.
SODIFF E&T Co., Ltd. AP-200 Series user manual

Sony
Sony SAT-T60 Welcome to DIRECTV & TiVo Instructions (primary... Dimensional drawing

Haier
Haier ibiza Rhapsody owner's manual

Iomega
Iomega ScreenPlay TV Link DX quick start guide