Culina UBTCC75 User manual

User Manual
UBTCC75
Built-in ceramic hob

2
1)The appliance is not to be used by persons
(including children) with reduced physical, sensory or
mental capabilities, or lack of experience and
knowledge, unless they have been given supervision
or instruction. children being supervised not to play
with the appliance.
2)WARNING: If the surface is cracked, switch
off the appliance to avoid the possibility of
electric shock, for hob surfaces of glass-ceramic or
similar material which protect live parts.
3)WARNING: a steam cleaner is not be used 。
4)That the appliance is not intended to be operated
by means of external timer or separated remote-control
system.
5)Danger of fire: Do not store items on the cooking
surfaces.
6)CAUTION: The cooking process has to be
supervised. A short term cooking process has to
be supervised continuously.
7)If the supply cord is damaged, it must be
replaced by the manufacturer, its service agent or
similarly qualified persons in order to avoid ahazard.
8)This appliance can be used by children aged from
8 years and above and persons with reduced
physical, sensory or mental capabilities or lack of
experience and knowledge if they have been given
supervision or instruction concerning
Warning

3
use of the appliance in a safe way and understand
the hazards involved. children shall not play with the
appliance. cleaning and user maintenance shall not
be made by children without supervision.
9)WARNING: The appliance and its accessible parts
become hot during use.
10)Care should be taken to avoid touching heating
elements.
11)Children less than 8 years of age shall be
kept away unless continuously supervised.
12)WARNING: Unattended cooking on a hob with
fat or oil can be dangerous and may result in fire.
13)NEVER try to extinguish a fire with water, but
switch off the appliance and then cover flame e.g. with
a lid or a fire blanket.
14)WARNING: Danger of fire: do not store items on
the cooking surfaces.
15)WARNING: Use only hob guards designed by
the manufacturer of the cooking appliance or
indicated by the manufacturer of the appliance in
the instructions for use as suitable or hob guards
incorporated in the appliance. The use of
inappropriate guards can cause accidents.
16)The Power cord must not be accessible after
installation.
Warning

4
Contents
Environmental note 5
Important safety information 4 – 9
Specifications
10 – 12
Ceramic hob layout
10
Control panel layout
12
Using the ceramic hob
12 - 16
Before first use
12
Touch controls
13
Switching the hob top on and off
13
Operating procedures and function instructions
13
Switching on a zone and setting a power level
14
Using the dual / oval cooking zones
15
Pause button
15
Timer function
16
Using the timer as a minute minder
16 - 17
Setting the timer to turn cooking zone off
17 - 18
Residual temperature
18
Hob guidelines 19 - 20
Cleaning and maintenance
20
Cleaning the ceramic hob top
20
After each use
20
Installation
21 - 25
Positioning
21
Installing the appliance
22
Electrical connection
24
Connecting the mains supply cable
24
Replacing the mains supply cable
25
My appliance isn’t working correctly
26-27

5
o
The packaging materials that we uses are environmentally
friendly and can be recycled.
o
Please discard all packaging material with due regard for the
environment.
Environmental note

6
Your safety is of the utmost importance to us. Please
make sure that you read this instruction booklet before
attempting to install or use the appliance. If you are
unsure of any of the information contained in this
booklet, please contact our Customer Care Department.
General Information
o
This appliance is designed for domestic household use and for
the cooking and frying of domestic foodstuffs.
o
IMPORTANT: The adjacent furniture and all materials used in
the installation must be able to withstand a minimum
temperature of 85°C above the ambient temperature of the
room it is located in, whilst in use.
o
Certain types of vinyl or laminate kitchen furniture are
particularly prone to heat damage or discolouration at
temperatures below the guidelines given above.
o
Any damage caused by the appliance being installed in
contravention of this temperature limit, will be the liability of
the owner.
o
Your new appliance is guaranteed against electrical or
mechanical defects, subject to certain exclusions that are noted
in our Conditions Of Guarantee. The foregoing does not affect
your statutory rights.
o
The use of this appliance for any other purpose or in any other
environment without the express agreement of us. will invalidate
any warranty or liability claim.
o
You should not use this appliance to store items on or as a work
surface.
o
No modifications to the appliance are permitted by us.
Important safety information

7
o
You should not store or place flammable or highly flammable
liquids/materials on top of or near the appliance. Items made
from aluminium, plastic or plastic film should also be kept away
from the appliance, as they may fuse to the surface.
o
Repairs may only be carried out by our service engineers
or their authorised service agent.
Child Safety
o
We strongly recommend that babies and young children are
prevented from being near to the appliance and not allowed to
touch the appliance at any time. During and after use, all
surfaces will become hot.
o
If it is necessary for younger family members to be in the
kitchen, please ensure that they are kept under close supervision
at all times.
o
Older children should only be allowed to use the appliance when
supervised.
General Safety
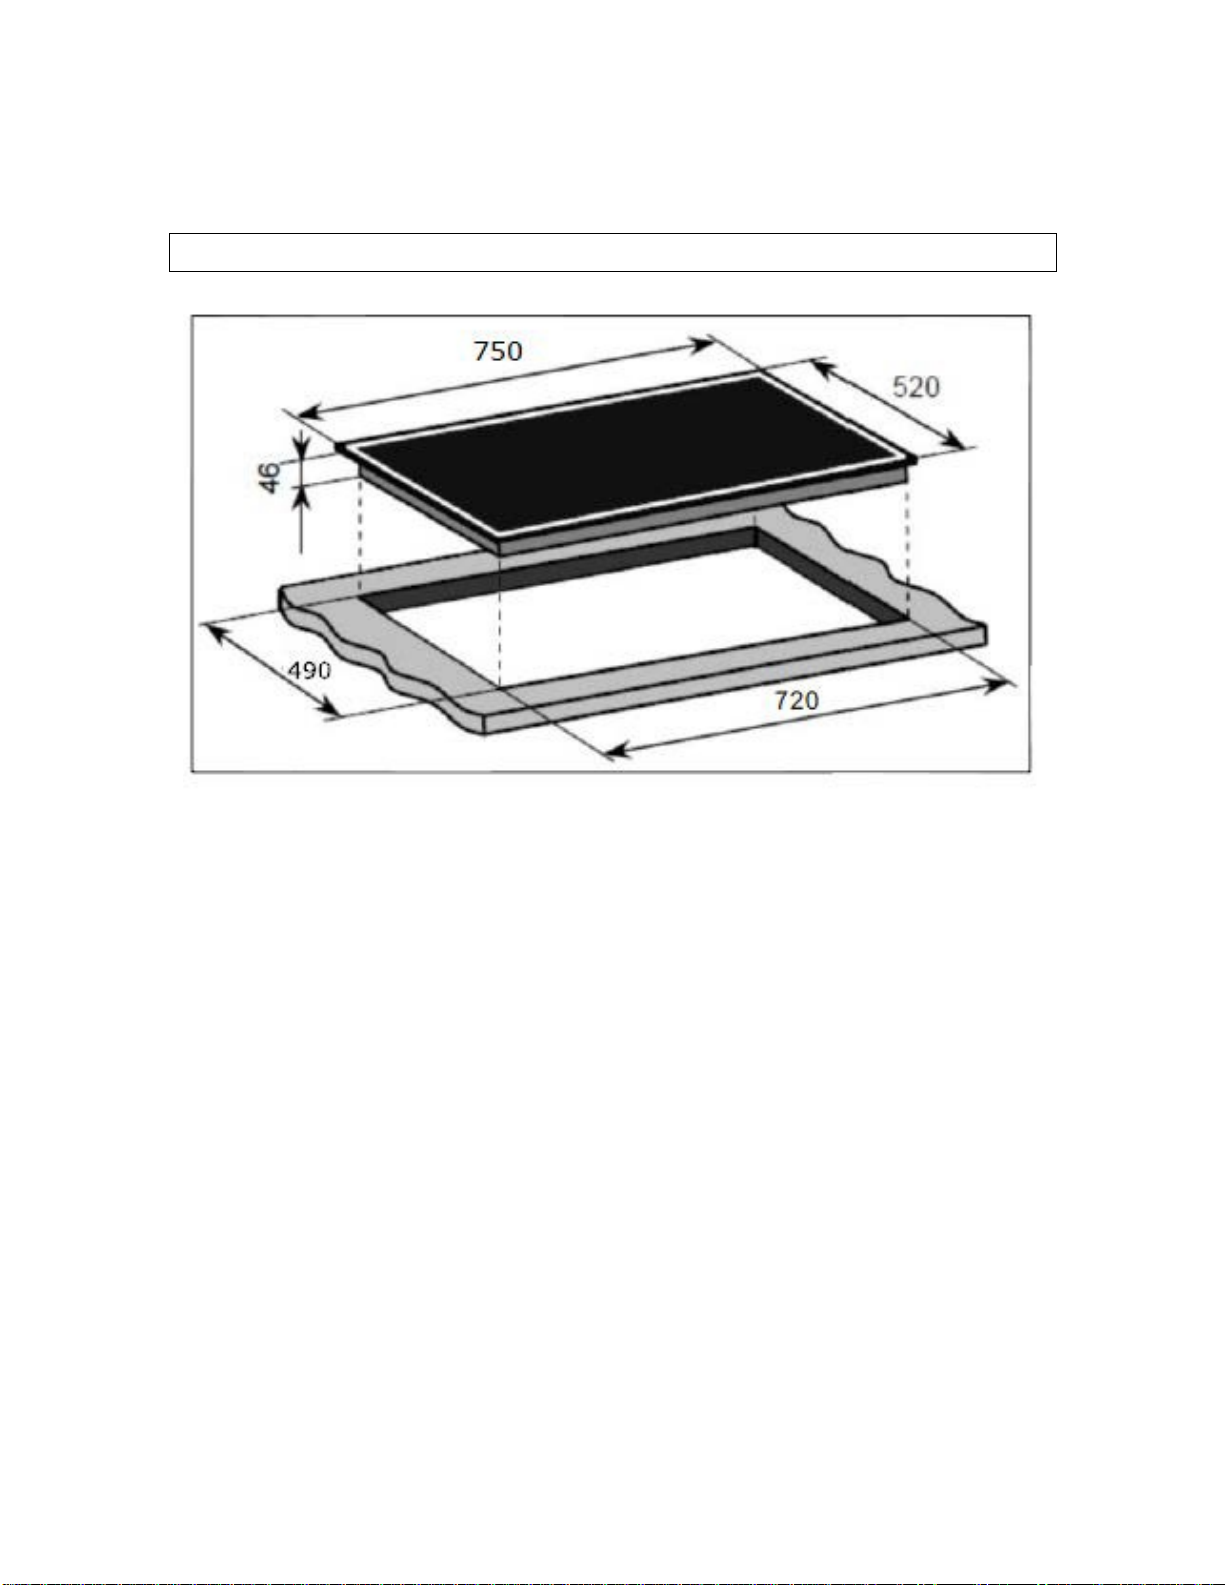
The appliance should only be installed and connected by a
suitably qualified person.
Care should be taken to ensure that the units and work surfaces
that you build the appliance into, meet with the relevant
standards.
If you notice any scratches, splits or cracks in the ceramic glass,
you should immediately switch off the appliance and disconnect
it from your mains supply. Otherwise there is the risk of electric
shock occurring.
During use
Any film or stickers that are present on the hob surface when it
is delivered should be removed before use.
Care should be used when utilising the appliance, otherwise
there is a risk of burns being caused.

8
o
You should not allow the electrical connection cables to come
into contact with the hob surface when it is hot or any hot
cookware.
o
If fat and oil overheats, then it can ignite extremely quickly. For
this reason, when cooking with fat and oil the appliance should
not be left unattended.
Make sure that all of the cooking zones are switched off after use.
Cleaning
o
Cleaning of the hob should be carried out on a regular basis.
o
IMPORTANT: Before attempting to clean the appliance, it should
be disconnected from the mains and allowed to cool.
o
Great care should be taken whilst using this appliance and when
following the cleaning procedure.
o
You should not use a steam jet or any other high pressure cleaning
equipment to clean the appliance.
Installation
This appliance must be correctly installed by a suitably
qualified person, strictly in accordance with the
manufacturer’s instructions. Please see the specific
section of this booklet that refers to installation.
o
We declines any responsibility for injury or damage, to
person or property, as a result of improper use or
installation of this appliance.
Declaration of conformity
This appliance complies with the following European Directives:
-2014/35/EU General regulations / Low tension
-1935/2004/CE 90/128/EEC This appliance is suitable to come in
contact with food
-2014/30/EU Electromagnetic compatibility

9
o
The manufacturer declares that the hob is built using certified
materials and requires the appliance to be installed in accordance
with the standards currently in force. This appliance must be used
by a trained person for domestic purposes only.
To avoid damaging your appliance
o
The ceramic glass can be damaged by objects falling onto it.
o
The ceramic glass edge can be damaged by knocks from cookware.
o
Cast iron and cast aluminium cookware with damaged bases may
scratch the ceramic surface if they are dragged across it.
o
Pans should be lifted on and off the hob surface and not dragged.
o
Cooking zones should not be switched on without cookware placed
on it. Also the cookware should not be empty.

10
Product dimensions:
Depth: 520 mm
Width: 750 mm
Height: 46 mm
Product specifications:
Aperture dimensions:
Depth: 490 mm
Width: 720 mm
o 1 x 1.00 / 2.10 kW double zone (Ø 126/220 mm)
o 1 x 1.40 / 2.20 kW oval zone (Ø 180/275 mm)
o
1 x 1.80 kW zone (Ø 190 mm)
o
1 x 1.20 kW zone (Ø 155 mm)
o
Front touch control operation
o
4 individual residual heat indicators
o
Safety lock
o
Timer
Specifications

11
Electrical details
Rated Voltage: 380-415V 3N~
50/60Hz
Supply Connection: 32 A
Max Rated Inputs: 7.3 kW
Mains Supply Lead: 5 core x 1.5 mm²
Ceramic hob surface layout
1a) 1 x 1.80 kW zone (Ø 190 mm)
2a) 1 x 1.40 / 2.20 kW oval zone (Ø 180/275 mm)
3a) 1.20 kW zone (Ø 155 mm)
4a) 1.00 / 2.10 kW double zone (Ø 126/220 mm)

12
Control panel layout
1.
Safety lock button
2.
Minus button
3.
Cooking zone selection buttons
4.
Plus button
5.
Timer display
6.
Timer button
7.
Zone timer activated LED
8.
Zone temperature display
9.
Pause button
10.
Power button
Before first use
IMPORTANT: You should clean the ceramic hob surface.
Please see the “Cleaning and maintenance” section.
o
You should switch on one cooking zone at a time, for 5 minutes
at the maximum setting. This will help to eliminate any new
smell that exists and evaporate any humidity that has formed on
the heating elements during transit.
o
Do not burn off more than one zone at once.
o
You must place a saucepan filled half full with cold water on
each zone as you burn it off.
Using the ceramic hob

13
Touch controls
o
All operations are performed by means of the touch controls that
can be found on the control panel.
o
Each touch control has a visual display that corresponds to it.
o
Switching the hob top on and off
o
Press the power button (10) to switch on the appliance.
o
Pressing the power button again will turn the whole hob off.
o
Operating procedures and function instructions
1.
After the power is on, the display will be fully lit for 2 seconds,
the buzzer will sound, then it will go into hibernation, and the digital
tube will not be displayed.
2.
The power button (10) can be operated under any circumstance.
When the power is not turned on, other keys cannot be operated except
for the Safety lock button(1)。
3.
Press the power button (10)to start the power, all cooking zone
indicators display"--", and enter standby mode. Whilst in standby
machine if the appliance is not operated within 1 minute, hob will
automatically turn off the power and display and go to sleep.
4.Lock the hob interface using the Safety lock button(1), and the
display on the right will show "Lo", and the child lock should be
removed by pressing and holding the safety lock button for 3
seconds. The Child lock can also be unlocked when power is not
turned on. If a timing function is set, "Lo" alternates with the timing
time, and the switching frequency is 1second.

14
Switching on a zone and setting a power level
o press the Cooking zone selection button(3) to start the cooking
function, the display will show power level 5(default setting),then click
the Minus button(2)“-”or Plus button(4)”+” to increase or decrease the
power leve.
o The power level can be adjustable from 0 to 9, with a long press of
the Minus button(2)“-”or the Plus button(4)”+”, and the power level
can be adjusted rapidly and continuously. At the same time, press the
Minus button(2)“-”and Plus button(4)”+”, simultaneously and the
power level is reset to zero.
o During the operation of the cooking zone, press the(3) button, and
the display flashes, which can be adjusted again.
o Press the power button (10) to close all the cooking zones directly.
The operating time of the cooking zones :
Power
Level
0
1
2
3
4
5
6
7
8
9
Power on
time
0
2
7
11
13
17
23
31
42
60
Power off
time
6
0
58
53
49
47
43
37
29
18
0

15
Using the dual /oval cooking zones
Your hob comes with three dual cooking zones. Zone 2a/4a is a circular
dual zone.
o
The dual cooking zone 2a/4a has two
cooking areas that you can use - a central
section and an outer section. You can use
the central section (A) independently or
both sections (B) at once.
o
Press the cooking zone selection button (3) for the dual circuit
zone.
o
The central section of the dual cooking zone will switch on (A).
o
If you wish to activate the outer section as
well, you should press the dual cooking zone
button again.
o
Adjust the zone between power levels 1 and
9, using the plus (2) and minus (4)
buttons,or the slider control button.
o
To switch off the zone after use, firstly ensure that the correct
cooking zone has been selected by pressing the relevant
selection button once.
o
Once the zone has been selected, pressing the selection button
again will turn the zone off.
o
The residual heat indicator (“H”) will show in the zone display
(8).
NOTE: The above information applies to both dual cooking
zones.
Pause button
o
This feature allows the user to “pause” all cooking operations,
and is particularly useful for situations such as answering the
door or telephone, or for cleaning the control panel without
changing the settings.

16
o
Pressing the pause/resume button(9) for 3 seconds , it will stop
all zones from heating and will also pause any active timers, the
zone displays will show “P”.
o
The control panel will automatically be locked and only the
power button(10)and the pause/resume(9) button will operate.
o
Press the pause/resume button again to resume all previously in
use zones.
o
The zones will resume heating at the power level which they
were originally set at and will display the original power settings.
o
The pause function will only operate for 10 minutes. After this
time, the hob will turn off.
Timer Function
You can use the timer in two different ways:
• You can use it as a minute minder. In this case, the timer will not
turn any cooking zone off when the set time is up.
• You can set it to turn all the cooking zone off after the set time is up.
• You can set the timer for up to 99 minutes.
Using the Timer as a Minute Minder
If you are not selecting any cooking zone
1. Make sure the hob is turned on.
Note: you can use the minute minder even if you’re not selecting any
cooking zones.
2. Touch the timer button (6) , the timer indicator show “10 ”,
And the second digit will start flashing.
3. Touching the Minus button(2)“-” or Plus button(4)”+”control once to
decrease or increase the time in 1 minute steps.
4. Touch the timer control again and the first digit will Start flashing: you
can adjust the time in 10-miute Steps.
5. Touching the Minus button(2)“-”and the Plus button(4)”+” together,
the timer is cancelled, and the ”--“will show in the minute display
6. When the time is set, it will begin to count down immediately. The

17
display will show the remaining time and the timer indicator will flash
for 5 seconds.
7. Buzzer will beep for 30 seconds and the timer indicator shows “- -
“when the setting time finished.
8. “- - “when the setting time finished.
Cancelled the Minute Minder
1.Make sure no zone is selected
2.Touch the timer button(6), it shows the remaining minute timer
3.Set the time by touching the Minus button(2)“-” or the Plus
button(4)”+” control to “00” as above. Or touch these two button
together to set the timer to ”00”immediately.
Setting the timer to turn one cooking zone off
1.Touching the Cooking zone selection button(3)
2.Touch the Timer button(6), the timer indicator show “10”.
3.Set the time by touching the control of the timer as setting a minute
minder
4. Touching the Minus button(2)“-” and the Plus button(4)”+” together,
the timer is cancelled, and the will show “00”in the minute display.
When the time is set, it will begin to count down immediately. The
display will show the remaining time and the timer indicator flash for 5
seconds.
NOTE: The red dot next to power level indicator will illuminate indicating
that zone is selected.

18
Setting the timer to turn more than one cooking zone off
1. If more than one heating zone is using this function, the timer
indicator will show the lowest time.
2. Once the countdown timer expires, the corresponding zone will switch
off. Then it will show the new min. timer and the dot of corresponding
zone will flash.
3. When cooking timer expires, the corresponding cooking zone will be
switch off automatically.
NOTE: If you want to change the time after the timer is set, you have to
start as above.
Residual temperature
o
A. After the cooking zone is heated, the corresponding display
will flash "H", indicating the high temperature.
o
B. The display time is as follows:
The burner is open for 3 seconds and "H" is not displayed.
Open the burner for 3-10 seconds, and "H" for 10 minutes. The
burner is open for more than 10 seconds, and "H" shows 45
minutes.
H will be displayed for up to 45 minutes at mose.

19
Hob guidelines
o
The first few times the hob top is used, it may give off an acrid,
burning smell. This smell will disappear completely with repeated
use.
o
The hob is fitted with cooking areas of different diameter and power.
o
The positions where the heat will radiate from are clearly marked
on the hob top. The saucepans must be positioned exactly on these
zones for efficient heating to occur. Pans should have the same
diameter as the cooking zone that they are being used on.
o
You should not use saucepans with rough bottoms, as this can
scratch the ceramic surface.
o
Before use, make sure that the bottoms of the saucepans are clean
and dry.
o
When cold, the bottom of the pans should be slightly concave, as
they expand when hot and lie flat on the surface of the hob. This will
allow the heat to transfer more easily.
o
The best thickness for the bottom of the pans is 2 – 3 mm of
enamelled steel and 4 – 6 mm for stainless steel with sandwich
type bottoms.
o
If these rules are not followed, then there will be a great loss of
heat and energy. Heat not absorbed by the saucepan, will spread to
the hob, frame and surrounding cabinets.
o
Preferably cover pans with a lid to permit cooking at a lower heat.
o
Always cook vegetables and potatoes, etc. in as little water to
reduce cooking times.
o
Food or liquid that has high sugar content may damage the hob top
if it comes into contact with the ceramic hob surface. Any spillages
should be wiped up immediately, however this may not prevent the
hob surface from becoming damaged.
o
IMPORTANT: The ceramic hob surface is tough; however it is not
unbreakable and can be damaged. Especially if pointed or hard
objects are allowed to fall on it with some force.

20
o
DO NOT USE THE HOB IF THE SURFACE BECOMES BROKEN
OR CRACKED. YOU SHOULD CONTACT THE CUSTOMER CARE
DEPARTMENT IMMEDIATELY.
Cleaning operations must only be carried out
when the hob is cool.
The appliance should be disconnected from your
mains supply before commencing any cleaning
process.
Cleaning the ceramic hob top
Any residues that are left on the hob top surface from cleaning
agents will damage it. You should remove any residues with
warm water mixed with a little washing up liquid.
Abrasive cleaners or sharp objects will damage the hob
surface; you should clean it using warm water mixed with a
little washing up liquid.
You may find it easier to clean some deposits whilst the hob
surface is still warm. However you should take care not to burn
yourself if cleaning the hob surface when it is still warm.
After each use
o
Wipe the appliance over with a damp cloth.
o
Dry the appliance by rubbing the surface with a clean cloth.
Cleaning and maintenance
Table of contents
Other Culina Hob manuals

Culina
Culina UBTCC90 User manual

Culina
Culina UBIND60BV Specification sheet

Culina
Culina ICONCER60RF User manual

Culina
Culina UBTCC60KC User manual

Culina
Culina UBGHJ60 User manual

Culina
Culina UBTCC60BVT Specification sheet

Culina
Culina CLASSGH6BK User manual

Culina
Culina UBTCC60LCW User manual

Culina
Culina UBGHJ608 User manual

Culina
Culina IND60KC User manual