Curb Roller Manufacturing BATT Screed 6000 User manual

www.curbroller.com
785-467-3132
MODEL 6000
OWNER’S MANUAL

Congratulations on your
purchase of the BATT Screed!
Curb Roller Manufacturing
proudly manufactures the BATT
Screed 6000 in the USA.
Before using the BATT Screed
6000 you must read and follow
this instruction manual for
proper use and set up. You also
must read the DeWalt DCD460
manual.
The use of this screed may be
hazardous. The screed has rotating
parts and lithium ion battery power.
Make sure anyone using the Batt
Screed 6000 understands the
proper way to set up and operate
the machine to avoid accidental
injury. Before each use make
sure the equipment has not been
damaged or altered.
As with any laborious job do not
operate the BATT Screed 6000 if
you are too tired or if you have a
medical condition that might be
aggravated by strenuous work.
WARNING
WARNING
NOTICE
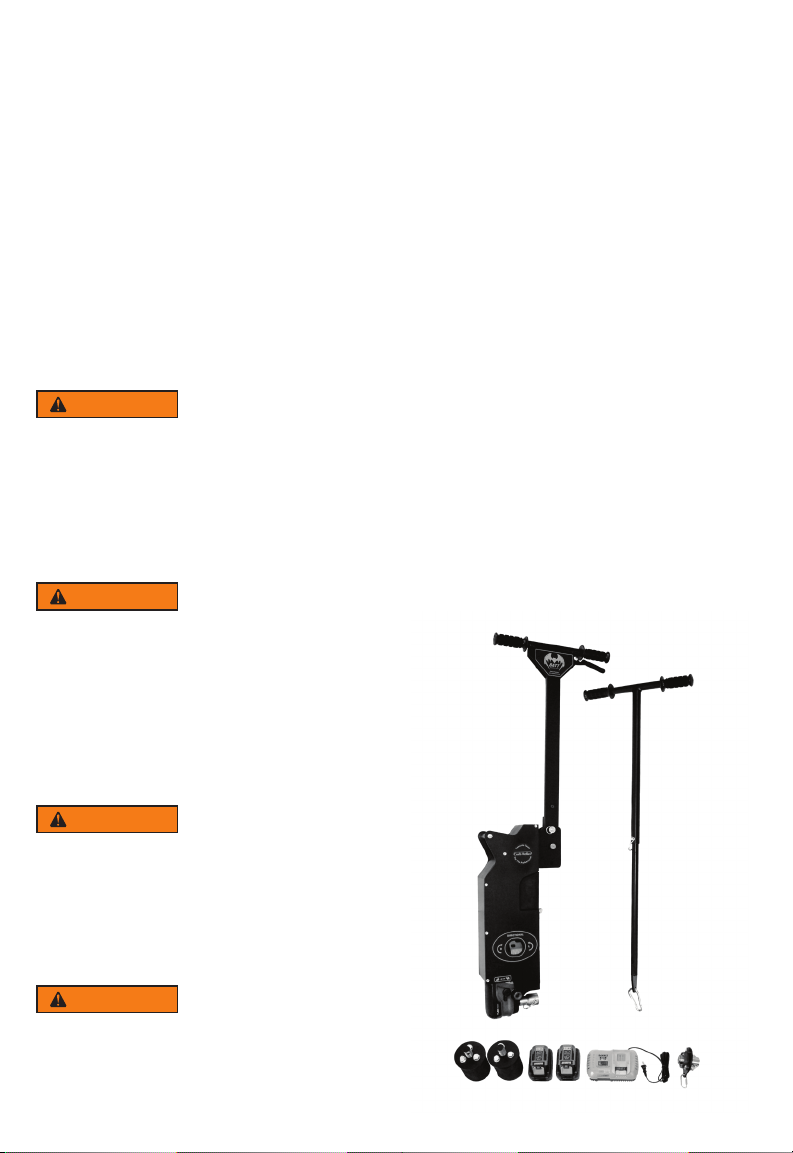
Minimal assembly is required for the
BATT Screed 6000.
After removing packaging, inspect
equipment for any damage that may
have occurred during shipping. If
any damage or defects are found
please stop and take photos. Email
photos to info@curbroller.com.
If you have safety concerns or
questions that are not addressed in
this manual please feel free to call
us at 785-467-3132 or email at
info@curbroller.com.
As the first battery powered roller
screed on the market, the BATT
Screed 6000 introduced the world
to a new level of roller screed
innovation and is the most versatile
roller screed on the market. Curb
Roller Mfg. constructed the BATT
Screed 6000 with the basics in
mind and it has been carefully
designed to protect the battery and
drill with an all steel housing for
longer life and durability.
Engineering Improvements and
Changes
Curb Roller Mfg. is constantly
improving on product quality
and eectiveness. As a result,
engineering changes and
NOTICE

WARNING
WARNING
WARNING
WARNING
improvements will be made from
time to time. Please note some
changes or modifications may not
be covered in this manual. If the
operating characteristic or the
appearance of your machine diers
from those described in this manual,
please contact Curb Roller Mfg. for
questions or assistance.
Safety
Always transport the BATT 6000
with the batteries removed from
the drill to avoid any accidental
rotation or power loss.
Do not install battery until the
drive unit is hooked up to the
pipe insert and hands and
fingers are away from the chuck
and any moving parts.
Make sure the second operator
has a good hold on the opposing
t-bar handle attached to the
pipe.
Make sure everyone around the
pipe is aware the pipe is about
to spin.
BATT Screed 6000 Package
This package includes:
(1) Drive Unit
(1) T-bar Assembly
(2) Expandable Pipe Ends
(2) DeWalt 12-Amp Hour Batteries
(1) DeWalt FLEXVOLT Charger
*Pipe is sold separately. If buying
from outside source, Curb Roller
Mfg. recommends using aluminum
pipe:
6061-T6 EXTRUDED PORTHOLE
PIPE - ASTM B429 - 4” SCH 40
(4.500 OD X .237 W)

Set up and Operation
Before each use charge all batteries
and inspect all moving parts for
concrete or other debris that
may hinder smooth operation.
Always replace or repair any part
that has become damaged or is
malfunctioning before operation.
Take proper safety precautions
as you would with any other
construction equipment.
To install the expandable pipe
inserts into the pipe you will need
a ¾” ratcheting socket, wrench, or
preferrably a battery impact. Push
expandable insert into the end of
the pipe until flange is tight against
pipe end. Equally tighten the lug
bolts on the expandable pipe
inserts to ensure proper fitting into
pipe.
Make sure the pipe ends have
been cut true and are not angled.
Ends not properly cut will cause
excessive shaking and may
cause damage to the drive unit.
Use a factory cut end of the pipe
whenever possible to install the
drive end on. This will ensure
against excessive wobble and
shaking.
Once both ends are properly and
securely installed in the pipe, the
next step is to attach the drive end
to the pipe. Make sure the battery
is removed from the machine to
protect the operator in case of
accidental trigger activation. Lay the
drive unit down next to the pipe and
align the chuck to the expandable
insert shaft. Push drive head all the
way onto the shaft. Take one hand
and roll the pipe forward until you
can see down through the chuck
and shaft hole. Once you have the
two holes aligned install the lock
pin. The drive end is now installed.
Repeat this process with the T-bar
assembly on the idle end.
WARNING
WARNING
1
23

After the tube has been attached
to both handles, install the battery.
With both operators holding firmly
on the handles lightly pull the
variable speed trigger to see which
direction the pipe turns. The pipe
should roll away from the operators
for proper operation. If the pipe
rolls towards the operators, simply
change the rotation of the pipe by
pushing the directional button on
the side of the machine.
Cleanup and Maintenance
Excessive wet concrete may be
removed with a rag, wire, or bristle
brush.
Dry concrete may be gently
removed using a scraper or similar
tool.
Curb Roller Mfg. recommends
removing the expandable pipe
inserts after each pour and storing
them in the non-compressed
position. It is also recommended
to remove the bolts from the ends
and re-apply a coat of anti-seize on
them at least once a year.
Troubleshooting
Trigger Sticks
Check bolt on handle and loosen
nylon nut if necessary.
Check slide for concrete build up.
Linkage may be bent and binding.

Short Battery Life
Keep from running the machine in
high gear all the time.
Low slump concrete or sand.
Prevent excessive concrete in front
of roller.
Old, defective, or not properly
charged battery.
Excessive Shaking or Pipe
Jumping
Check to see if pipe is bent.
Check if the drive end of pipe is cut
o at an angle.
Verify the pipe insert is installed
properly and not at an angle.
Avoid abrupt or excessive
movement of the drive unit to
reposition pipe location.
Access Door Won’t Stay Shut
Tighten door bolt.
Drive End Falls in Concrete / Won’t
Stand
1
1
2
2
FLEX
VOLT
1
1
2
2
FLEX
VOLT

Install the handle/kickstand
supplied with screed in opposing
mounting nut.
Nothing Happens When Trigger is
Pulled
Check battery life by pressing
indicator button.
Remove battery and reinsert.
Check all linkage for proper
activation of drill trigger.
Check directional button and make
sure it is depressed all the way in.
FLEX
VOLT


Parts
No.
1
18
1
2
60003-001
60018-003
Arm - Pivot
Flange - Rtng, Outside (SS)
2
19
1
4
60005-001
1143-001
Arm-Link, Speed Control
Grip - Rubber, Handle
3
20
2
1
1500-105
1143-001
Battery - DeWALT 12 Amp Hour
Grip - Rubber, Lever
4
21
2
1
253-005
60010-001
Bolt - Carraige 1/4”x1.25
Handle - Lift
5
22
1
1
153-076
60009-001
Screw-SHC, 1/4”-20 Unc x 1” Lg, Blk Oxide
Handle Wdmt - Control
6
23
4
1
313-004
60000-001
Bolt - Carriage 5/16”x1”
Housing - Front
7
24
6
1
501-520
60001-001
Bolt - Hex 1/2x5”
Housing - Rear
8
25
4
1
119-108
60008-001
Nut-Nylock, 5/16”-18 Unc, Zc Pltd
Lever - Control, Speed
9
26
1
1
155-086
1003-024
Bolt-Shldr, Allen, 3/8” OD x 1/2” Lg, 1/4”-20 Thd, Blk Oxide
Link-Snap, 3/8”
10
27
2
1
1203-003
105-101
Bushing - Rubber
Nut - Flange 1/4
11
28
1
6
60004-001
105-102
Bracket - Position
Nut - Flange 5/16
12
29
1
1
60012-001
1135-001
Chuck
Tubing-Vinyl, Clear, 1/2” OD x 3/8” ID
13
30
3
2
315-105
60016-001
Coupler - 5/16 Threaded Coupler
Nut-Mounting, Dewalt, Replacment
14
31
1
2
60015-001
1001-322
Coupler, Static End
Pin - Clevis 5/16x0.5”
15
32
1
1
60002-001
1001-351
Door - Access
Pin - Clevis 5/8x1.5”
16 1 1500-001Drill - DeWALT
17 2 60014-001Flange - Rtng, Inside (MS)
Qty. Part No.Description


Parts
No.
33
50
1
2
1001-005
101-522
Pin - Detent 3/8x1.5
Washer, Nylon 5/16x.88x.06
34
51
2
1
1001-511
101-107
Pin - Hair .08x1
Washer-Flat,1/4”, SAE, Zc Pltd
35
52
1
1
1001-517
1003-003
Pin - Hair .125x3
Link-Quick, 1/4”, Zc Pltd
36
53
3
2
1001-107
119-107
Pin-Lock, Rd Dbl Wire 3/8
Nut-Nylon Hx, 1/4”-20, G2, UNC, ZC Pltd
37
54
1
1
60011-001
1147-001
Plate - Pull, Static End
Bearing, 3 Bolt Flange
38
55
1
1
60017-001
1500-051
Plate-Rtng, U-Bolt (Replacement)
Charger - DeWALT, 20V, Fan Cooled
39
56
7
1
313-003
19000-005
Bolt-HCS, 5/16”-18 Unc x 3/4” Lg, Zc Pltd
Decal Kit - BS6000
40
57
1
3
60006-001
19001-503
Slide
Serial Number
41
58
1
1
1007-001
60020-001
Spring - Tension 0.5x2.5
Handle Wdmt -”T”, Upper
42
59
1
1
313-014
60020-003
Bolt-HCS, 5/16”-18 Unc x 3-1/2” Lg, Zc Pltd
Handle Wdmt -”T”, Lower
43
60
10
1
151-019
19000-501
Tap - Self Tappers # 10
Decal: “Batt” Handle Emblem
44
61
1
1
315-005
19000-502
Ubolt-Rd, 5.16”-18 Unc, 1-3/4” W x 3-1/2” L, Zc Pltd
Decal: “Tortoise/Hare”
45
62
6
1
102-010
19000-503
Washer - Flat 1/2
Decal: “Danger” (2-1/2” x 3-1/2”)
46
63
2
1
101-108
19000-504
Washer - Flat 5/16
Decal: “Flag” (W/ USA Ribbon)
47
64
2
2
101-527
19000-505
WSHR-FLT, NYLON 3/8”, 0.375” ID x 1.25” OD x 0.125” THK
Decal: “R/L Directional Oval”
48 5 103-108Washer - Lock 5/16
49 1 155-064Bolt-Shldr, Allen, 5/16” OD x 3/8” Lg,1/4”-20 Thd, Blk Oxide
Qty. Part No.Description


Parts
No.
65 1 19001-501Manual
66 1 061-1134” Sch 40 Aluminum Pipe
67 1 60021-001Kickstand
Qty. Part No.Description

Batt Screed 6000 Warranty
Curb Roller Manufacturing warrants
to the original purchaser that this
product will be free from defects in
material and workmanship.
Curb Roller Manufacturing
agrees to repair or replace, at the
manufacturer’s discretion, any
defective product free of charge
within the warranty time period.
Curb Roller Manufacturing must
authorize all work and returns prior
to any work being performed or
returns made. If the customer does
perform work and makes a return
without authorization, the customer
does so with the understanding that
Curb Roller Manufacturing or any of
its agents shall not be obligated for
the cost of any such unauthorized
expenses or actions.
Proof of purchase in the form of
your dated sales receipt showing
serial number and the model of
the product will be required before
our dealers can perform warranty
service on the product.
The purchaser of any goods
covered by this warranty
understands and agrees that the
sole and exclusive remedy against
Curb Roller Manufacturing shall
be for the replacement or repair
of defefctive goods as provided
herein.
Warranty questions or service
information can be obtained from your
dealer or by contacting Curb Roller
Manufacturing at 785-467-3132.
Machine warranted for a period of
one (1) year after date of original
purchase to original purchaser.
Batteries warranted for a period of
three (3) years after date of
original purchase to original
purchaser.
Please visit www.curbroller.com to
register your product.


Curb Roller Mfg., 112 South Main Street, Fairview, KS 66425
Patent Pending
(May 2019)
Table of contents
Other Curb Roller Manufacturing Construction Equipment manuals