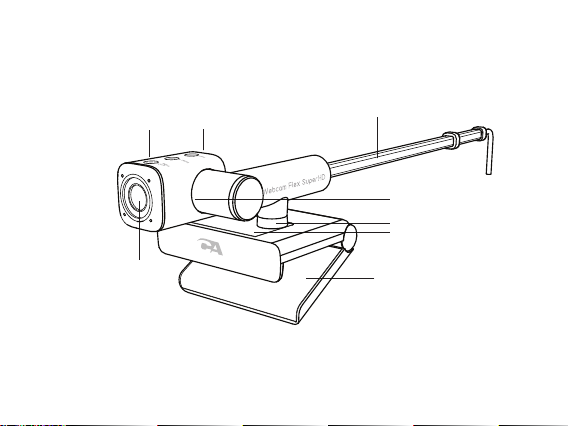
Cyber Acoustics Essential Webcam Flex User manual

Your Essential Webcam Flex
Quick Start Guide
www.CyberAcoustics.com CA P/N: WC-Flex Rev. A00
2023-08
Webcam Flex (WC-Flex)

In the Package
Quick Start Guide
CA Essential Webcam Flex (WC-Flex)
Your Essential Webcam Flex
Quick Start Guide
www.CyberAcoustics.com CAP/N: WC-Flex Rev. A00
2023-08
Webcam Flex (WC-Flex)

Pages
1
2
7
8
10
Table of Contents
3
9
Connecting the CA Essential Webcam Flex
Attaching the CA Essential Webcam Flex to Your Monitor
Using the CA Essential Webcam Flex with Your Windows
and Mac Computer
Using Camera Applications on Your Windows 10 Computer
Using Camera Applications on Your Mac Computer
CA Essential Webcam Flex Specifications
Fixing Video Flickering
Customer Support
Safety and Precautions
Compliance Information
11,12
13
14
15
Manipulate the Camera View
Button Functions
4
5,6
Features of the CA Essential Webcam Flex

Features of the CA Essential
Webcam Flex
Auto Focus
HD Lens
Page 1
Adjustable Arm
Camera Rotaon
Posion Adjustment Points
Dual Omnidireconal
Microphones
Control Buons
Adjustable Mulfuncon
An-Skid Base

Connecting the CA Essential Webcam Flex
Insert the end of the USB Webcam Flex
cable into the USB Type A port on your
computer as shown.
The CA Essential Webcam Flex features full plug and play support for Windows,
OS X / MacOS and Chromebooks. After plugging the webcam into the computer’s
USB Type A port, you may start any application that accepts a USB video stream,
such as Skype, and begin using your webcam.
Important:
To use the webcam’s internal microphone you will have to select it as a USB audio
input in your application settings.
If the computer does not automatically recognize the webcam when it is plugged into
the USB Type A port, try plugging the USB Webcam Flex Cable into a different USB
Type A port. If this does not work then restart the computer. This will cause the
webcam to be recognized in most instances.
Page 2

Attaching the CA Essential Webcam Flex to Your Monitor
1 - Mount on top of your monitor
2 - Slide front of
webcam up against
the front of monitor
3 - Push adjustable base
against the rear of monitor
Page 3
Traditional View Table View Center View

Manipulate the Camera View
Page 4
Table View
Center View
Adjust the arm
Rotate the
camera down
Rotate the arm
Rotate the
camera up

Page 5
Button Functions
Zoom Buon
Image Buon
Focus Button
The Webcam Flex features three dierent buttons that control the focus and orientation
functions of the camera. These buttons ensure your viewers
properly see what you are sharing.
Zoom Button - This button controls the ve available levels of
zoom to enable proper framing of your subject matter.
- Press the button once to increase the level of zoom. This can be
repeated four more times.
- When the zoom reaches the highest level, the next press of the Zoom Button will return
the Webcam Flex to the full image.
Image Button - This button controls image rotating and mirroring functions for Table View
mode. Please note that the default settings may cause the image seen by your audience to
be upside down, and in some situations your application may also mirror the image in a
horizontal direction, so the left side of the image will be seen on the right, and the right side
will be seen on the left. The image button corrects both of these functions.
To rotate an image:
- Press the Image Button once to rotate the image 180 degrees so it is seen in the proper
orientation by your audience.
- When returning to Center View or Traditional View, press the button again to rotate the
image back to the previous orientation.

Page 6
Button Functions
To correct mirroring:
- Press and hold the Image Button for two seconds to ip the
image horizontally.
- To return the image back to the previous setting, press and hold
the Image Button for two seconds.
Focus Button - The Webcam Flex comes in auto focus mode by default (the light will be
solid, indicating auto focus is active). If your image is blurry, or if the camera keeps
re-focusing and won’t stabilize, such as in a busy environment where the camera can’t
determine the proper focal point, the Focus Button enables image re-stabilization.
Manual
- If your image is blurry and won’t focus, press the Focus Button once to re-focus the
camera. The light will ash once.
Auto Focus and Fixed Focus
- If you see the camera re-focusing and won’t stabilize, change to xed focus. To change
to xed focus at a location 18-24 inches from the camera, press and hold the Focus
Button for two seconds. The light will ash slowly when in xed focus.
- Press and hold again to return to auto focus. The light will be lit solid.
Zoom Buon
Image Buon
Focus Button

Page 7
To use the webcam with your Windows computer you may need to allow applications
installed on your computer to access the webcam in the Windows security settings.
- Select the Start button
- Select ‘Settings’
- Select ‘Privacy’ (Scroll down to bottom of page)
- Select ‘Camera’
- Turn on the ‘Allow access to the camera on this device’
To use the webcam with your Mac computer you may need to allow applications
installed on your computer to access the webcam in the Mac OS security settings.
- Select the Apple menu in the top left corner of the screen and choose
‘System Preferences’
- Select ‘Security & Privacy’ preference panel
- Select ‘Privacy’
- Select ‘Camera’ from the list on the left side
- Locate the application(s) you want to allow access to the webcam and check the
box alongside the application name to enable the application to access the
webcam
Using the CA Essential Webcam Flex with Your Windows
and Mac Computer

Camera application - Allows you to preview the webcam image, capture still
frames and video clips.
- Select the Start button
- Select ‘Camera’ from the list of applications
After you open the Camera app:
- Select Photo or Video then select it again to take a picture or start a video.
If you are making a video, select Video again to finish recording.
- To see your new photo or video, or ones you’ve taken before
- Select the Start button
- Select ‘Photos’ from the list of applications
Note:
If you are using a laptop with an integrated camera or have a second camera
installed, you will need to change the camera selected in the app so that
CA Essential Webcam Flex is selected.
- To select between cameras, select the camera icon with the circular arrow in the
top right corner of the application. Selecting the icon will switch between installed
cameras.
- If only one camera is installed on your Windows computer, the camera icon with
the circular arrow will not be displayed.
Using Camera Applications on Your Windows 10 Computer
Page 8

Photo Booth Application - Allows you to preview the webcam image, capture still
frames and video clips.
Note: You will need to enable the webcam in the Mac OS security settings, refer
to instructions on page 7.
- Select the Finder button, select ‘Applications’ and then select ‘Photo Booth’.
- At the top of the screen, select ‘Camera’ in the Photo Booth application menu and
select ‘CA Essential Webcam Flex’ from the list of options.
- To capture images from the webcam, select the red camera icon.
- To switch to video mode, select the film strip button in the bottom left corner of the
application. The red camera icon will change to a video icon .
QuickTime Player - Allows you to easily create video recordings that use the full
webcam resolution.
Note: You will need to enable the webcam in the Mac OS security settings, refer to
instructions on page 7.
- Select the Finder button, select ‘Applications’ and then select ‘QuickTime Player’.
- Select ‘File’ and then select ‘New Movie Recording’.
- To select the webcam input, select the small downward facing arrow next to the
round record button .
- Select the record button to capture video.
Using Camera Applications on Your Mac Computer
Page 9

CA Essential Webcam Flex Specifications
Page 10
Features:
- High Resolution HD Digital Camera CMOS Sensor
- Maximum video size 2592 x 1944 (5Megapixels)
- USB 2.0 High-Speed
- Transmission: 2592 x 1944 up to 30 frames per second under MJPG mode
- Image Focus: 7 cm to infinity
- AWB (Automatic White Balance)
- Auto Focus
- View Angle: 73 degrees in horizontal plane
- High precision glass lens
- Built-in microphones
Basic System Requirements:
- 1GHz Intel Core 2 Duo or above
- 512MB RAM or more
- 200MB available hard drive space
- Internet connection for use with streaming and chat applications
- USB Type A 2.0 port
- OS X 10.7 or above
- Windows 7 / 8 / 10
Requirements for 1080P 5MP Video Recording:
- 3GHz Intel Core 2 Duo
- 2GB RAM
- 2592 x 1944 HD screen resolution
®™
®™

Fixing Video Flickering
Video ickering can be xed by following the recommended settings:
- The Flicker Control setting is preset at 60Hz.
- When traveling to another country where the PowerLine Frequency is 50Hz, you may nd that
the video is ickering. This will require switching the Flicker Control to 50Hz.
- When returning back to your home country, switch the Flicker Control back to 60Hz.
There are two ways to stop your video from ickering:
- Utilize a third-party application called AMCap
(see instructions below)
- Change through the settings of your Video Messaging
application
AMCap:
- Download and install AMCap Demo version from
https://amcap.en.softonic.com/download?ex=NB-6.2
- Launch AMCap
- Select Options --> Video Device -->Properties
- Select appropriate Flicker Control to 50Hz or 60Hz in
Light Source row.
Page 11

Fixing Video Flickering
Skype Application:
When using Skype with the CA Essential Webcam Flex:
- Launch and sign in to Skype
- Go to Tools > Options > Audio & Video Settings
- Click the Webcam settings button
- Change the PowerLine Frequency (Anti Flicker)
based on the recommended settings as
- Click Apply and then click OK
For other applications using video, please refer to your software user guide on how to adjust
the Flicker Control.
Page 12
mentioned on Page 11

Customer Support
If you have a question about your CA Essential Webcam Flex, our Customer Support
Team wants to assist you.
Contact us at:
www.cyberacoustics.com/support/contact
Page 13

Safety and Precautions
-
Read and follow all instructions – All operating and use instructions should be followed.
- Protect the USB Type A Cable from being pinched, particularly at the connectors. Unplug
during lightning storms or when unused for long periods of time.
- If the webcam becomes hot after running for a long time, stop using the webcam for a
period of time to let the webcam cool down.
- Do not place near any heat sources that produce heat.
- Do not make alterations to the webcam.
- Do not place near naked flame sources, such as lighted candles
- Do not expose to excessive heat (e.g. from storage in direct sunlight, fire or the like).
- Avoid touching the lens with fingers, sharp or coarse materials; use a clean, soft cloth for
cleaning.
- Avoid dropping the webcam; impacts may cause damage to the lens, internal malfunction
or scratches to the camera surfaces.
Page 14
2023 Cyber Acoustics or its subsidiaries. All rights reserved. Cyber Acoustics and other trademarks
are trademarks of Cyber Acoustics or its subsidiaries. Other trademarks may be trademarks of their
respective owners.

Unique Identifier: (WC-Flex)
Responsible Party - Cyber Acoustics, Inc.
3109 NE 109th Ave., Vancouver, WA 98682
cyberacoustics.com
FCC Part 15
This device complies with Part 15 of the FCC Rules. Operation is subject tothe following two conditions:
1. This device may not cause harmful interference, and
2. This device must acceptany interference received, including interference that may cause undesired
operation.
This equipment has been testedand found to comply with the limits fora Class B digital device, pursuant
to Part 15 of the FCC Rules. These limits are designed to provide reasonable protection against harmful
interference in a residential installation. This equipment generates, uses and can radiate radio frequency
energy and, if not installed and used inaccordance with the instructions, may cause harmful interference
to radio communications. However, there is no guarantee that interference will not occur in a particular
installation. If this equipment does cause harmful interference to radio ortelevision reception, which can
interference by one or more of the following measures:
•Reorient or relocate the receiving antenna
•Increase the separation between the equipment and receiving device
•Connect the equipment into an outlet on a dierent circuit from the receiving device
•Consult the dealer or an experienced radio/TV technician for help
•Changes or modications not expressly approved bythe party responsible forcompliance could
void the user's authority to operate theequipment.
Page 15
This manual suits for next models
1
Table of contents
Other Cyber Acoustics Webcam manuals