Cycle Force Group BICYCLE BABY TRAILER & JOGGER User manual

Please read these instructions before attempting
to construct your newly purchased trailer.
CALL 877-BIKEAID (245-3243) or visit
www.bikeaidonline.com
DO NOT RETURN
THIS TRAILER TO THE PLACE OF PURCHASE
If you should experience a problem with your purchase,
in most cases, a BikeAid representative can resolve
your problem over the phone. Your feedback is vital to
our success and our quality improvement program.
BICYCLE BABY
TRAILER & JOGGER

BICYCLE BABY TRAILERAND JOGGER 2 IN 1
INSTRUCTION MANUAL

Safety
Precautions:
1. The gross weight rating of the trailer must not exceed 40 kgs.
2. Children must not be transported in the trailer until they can sit safely on their own.
3. The child must have at least 100 mm head clearance (spacing between
the top edge of the safety helmet and the upper edge of the frame structure)
to reduce the risk of injuries to the child if the trailer should roll over.
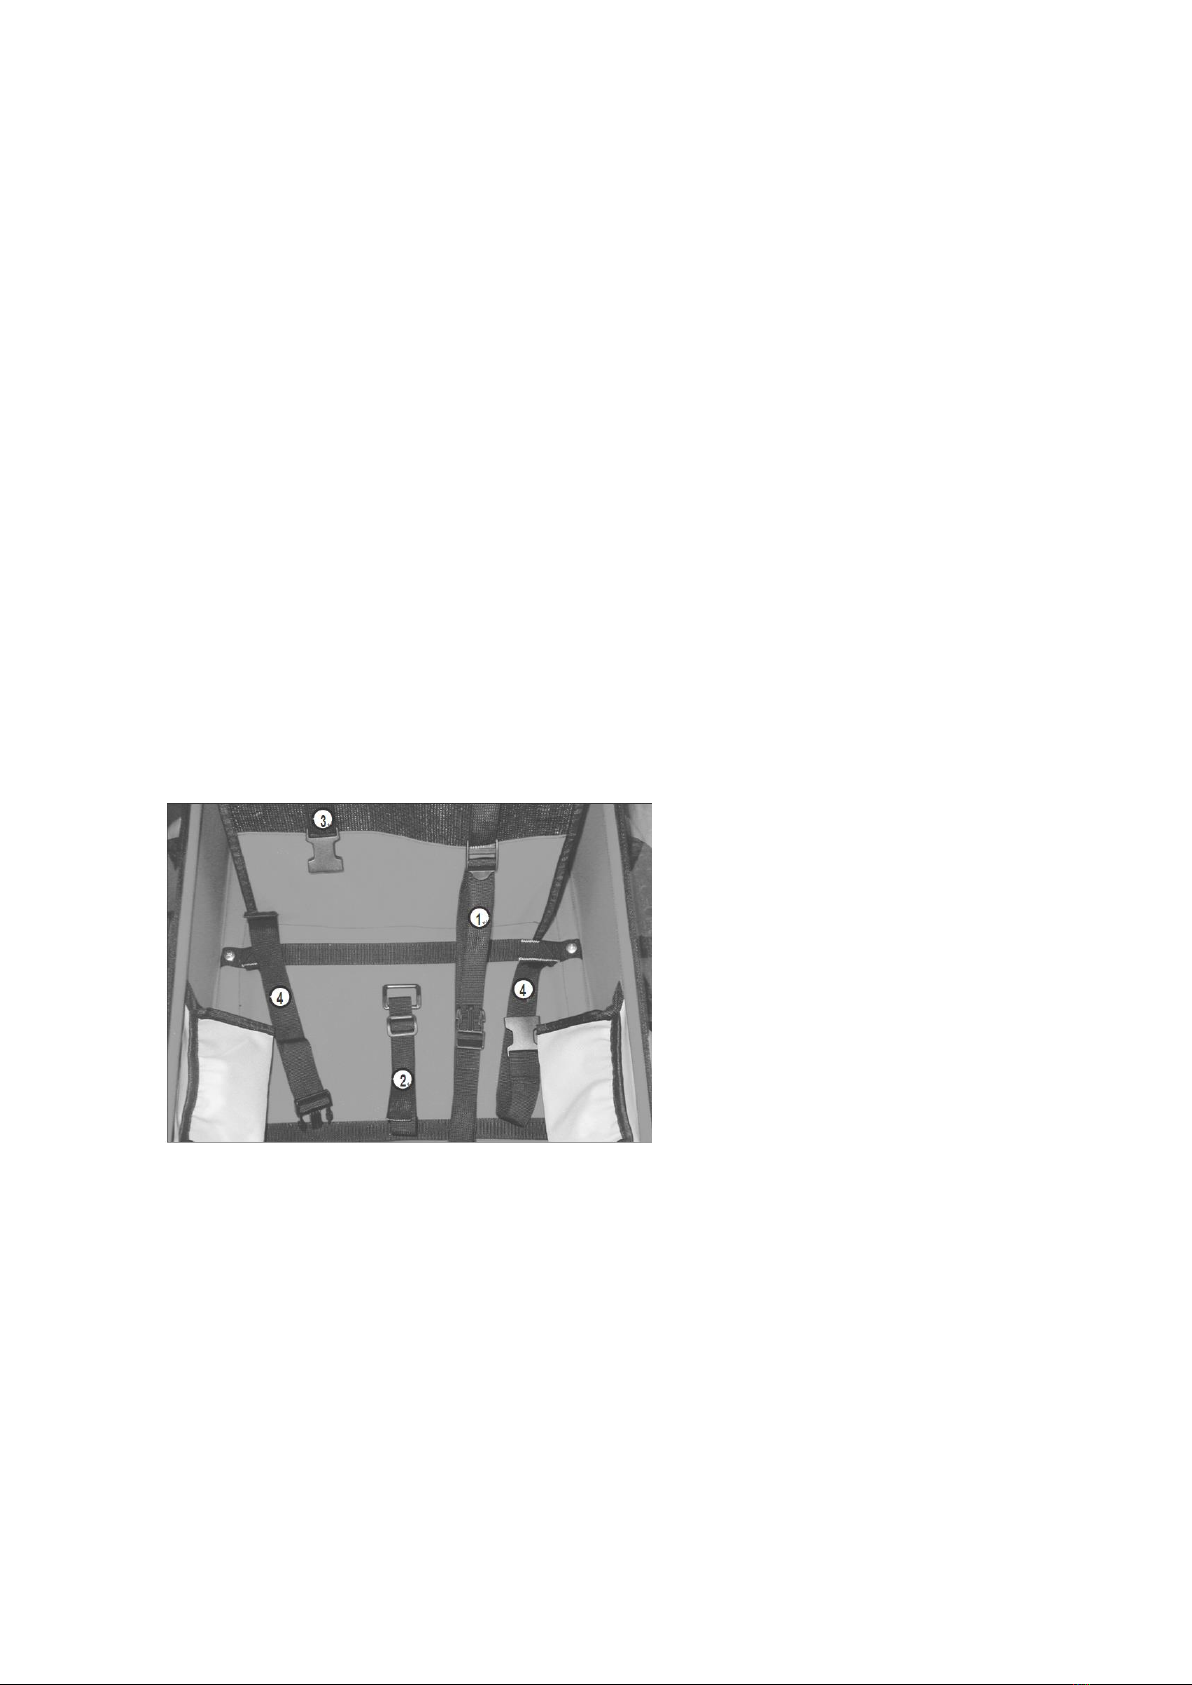
4. The child must always be strapped in when the trailers is moving.
5. Never leave the child unsupervised in the child trailer.
6. Do not make any technical modifications to the trailer.
7. Do not apply any additional loads to the tow bar.
8. Max. speed 16 km/h.
9. Do not use the trailer on very stony or otherwise dangerous roads.
10. Always be extremely careful in road traffic to avoid any danger.
11. When cycling with the child trailer, please note that the braking distance and turning circle
is larger than just the bicycle on its own.
12. The cyclist on the bicycle pulling the child trailer should be at least
18 years old and in good form.
13. The cyclist or the child should wear a safety helmet during the ride.
14. The trailer may be used to transport one child not older than 7 years.
15. Optionally, a disabled person can be transported.
The age restriction does not apply in this case.
16. Ensure that the bicycle pulling the trailer is in perfect technical condition.
17. It is recommended to fit rearview mirrors to the bicycle pulling the trailer.
18. Before every ride, check that all parts fit correctly, particularly the fastening of the quick
coupling and the wheels.
19. The cover must always be closed during the ride to protect the child from any injuries
which could be caused by road dirt and little stones.
20. The lighting must always be switched on in the twilight.
21. Every time you cycle with the child trailer, check that the batteries still have sufficient
energy (see battery indicator).
22. Always strap your child in.
23. Make sure that the safety belts are adjusted and fastened correctly.
24. We cannot accept any liability for third-party accessory parts.
25. The child trailer must only be pulled by bicycles whose user manual includes specific
permission from the manufacturer for use with a trailer.
26. The retailer should check the deceleration of the bicycle plus trailer to ensure that the
following required values are met.
Deceleration of bicycle plus trailer (full braking) with a total mass of 140 kg.
Front wheel brake a 3.4 m/s2 (dry) a 2.2 m/s2 (wet) Rear wheel brake: a 2.2 m/s2
(dry) a 1.4 m/s2 (wet)
27. The gross weight rating of the unbroken trailer must not exceed 40 kgs.
28. Practice somewhere safe with weights in the trailer (max. load) to get used to how the
bicycle and trailer react together.

Practice in particular going round bends, uphill and downhill gradients, braking in an
emergency and starting off with the trailer on the back of the bicycle,
on different road surfaces.
29. Fit the supplied pennant to make the bicycle and trailer more noticeable.
30. Before setting off with the bicycle and trailer, make sure that there is sufficient air pressure
in the tyres, because inadequate air pressure in the tyres can change the behaviour of the
bicycle and trailer.
31. When the trailer is connected up, there is an increased risk of the bicycle itself tipping over
when at a standstill. Particularly when the luggage rack is full, make sure that the bicycle
stands in a stable position (great care is advised especially when using a child seat).
In this case we recommend a double stand.
Step 1: Parts List: below picture shows the accessory parts which belong to this
product:
Jogger kit(with knob screws),handlebar(with bracket set),trailer body, top cover,
support bar(with screws), two wheels.
Please note that towing bar folded under trailer body, see below picture.

Step 2: Assembly the trailer body as per following pictures and steps:
Make sure each step mounted safety.
(1).Mount the frame
(2).Mount the support bar by screws
(3).Mount the handlebar bracket

(4).Mount the top cover

(5).Mount the handlebar (The foldable handlebar is adjustable)
(6).Mount the wheel, insert the wheel axle into the frame wheel mounting hole and
make sure it locked safety.
If you want to remove the wheels, lift back of trailer up and simply push on the push
buttons located on the axle and remove the wheel (See below picture).

Step 3:
Installing the Tow Bar
Lift the trailer up. Remove safety pin from back hole in two bar mount. Swivel the
tow bar 180o. Lock the tow bar into place by re-inserting the safety pin.(see below
picture)
WARNING! The two bar safety pin must be locked into place before using the trailer.
A tow bar that has not secured properly could loose during travel, resulting in serious
injury or death.
Step 4:
Hitching the Trailer on the Bicycle
NOTE: The universal hitch is only suitable for bicycle with full axle or/and with
quick release axle.
1. Bicycles with Full Axle
Remove the left hand axle nut from the bicycle. Any
spacers or washers can generally be retained. Put the
hitch on the axle and re-attach the nut.
WARNING: The axle nut must be tightened on the axle
thread by at least 5 full turns, so that adequate clamping
force is ensured. A thread which is too short can result in
accidental loosening of the rear wheel and therefore
cause serious injury or death. If in doubt, contact your
specialist dealer.
2. Bicycles with Quick Release Axle
Remove the quick release from the bike and
guide it through the hitch along with the quick
release axle. Push the quick release through the
wheel hollow axle again, screw the nut and

clamp the quick release with the correct pressure.
In order to ensure that the hub is clamped sufficiently in the hollow axle, the quick
release lever must begin gripping as it moves from the open to the middle position,
and approaching the closed position you should clearly feel resistance as you tighten.
If it is too easy or too difficult to move the quick release lever, tighten or loosen the
quick release nut on the other side of the hub.
WARNING: The thread of the quick release nut must be tightened on the quick
release axle by at least 5 full turns, so that adequate clamping force is ensured. A
quick release axle with is too short can result in accidental loosening of the rear wheel
and therefore cause serous injury or death. If in doubt, contact your specialist dealer.
Insert the safety pin through holes in both hitch and hitch connectors. Rotate and lock
up the pin.
Wrap the safety strap around the chain stay and fasten it to the tow bar D-ring with the
snap hook.
WARNING! Hitch and safety strap must be properly installed. Inspect the hitch and
tow bar frequently for any damage or loose fasteners. Damaged or improperly
installed can result in serious injury or death.
The belt system:
Handling the belt system
1:Shoulder strap of the Y-belt
2:Lower receptacle of the Y-belt
3:Fastener for the Y-belt
4:Lap belt
Strapping your child into the trailer Seat your child in the middle of the trailer.
To strap your child in with the belts, take the belt (1)
through the eyelet on the upper part of the belt (2)
and close the belt by putting the fastener of the belt (1)
in the belt fastener (3). Always remember to strap your
child in with the lap belt (4) as well.

Install the jogger kit
Insert the jogger kit into the frame bracket and lock the knob screw tightly to make sure safety.
Install the safety flag
Insert the safety flag into the side pocket.

Other Cycle Force Group Bicycle manuals