CYP MED-AS60 User manual

Operation Manual
Operation Manual
Multi-Input Switcher with Multi-Window Display
MED-AS60

®
registered trademarks of HDMI licensing Administrator, Inc.

DISCLAIMERS
The information in this manual has been carefully checked and is believed
to be accurate. Cypress Technology assumes no responsibility for any
infringements of patents or other rights of third parties which may result from
its use.
Cypress Technology assumes no responsibility for any inaccuracies that
may be contained in this document. Cypress also makes no commitment to
update or to keep current the information contained in this document.
Cypress Technology reserves the right to make improvements to this
document and/or product at any time and without notice.
COPYRIGHT NOTICE
No part of this document may be reproduced, transmitted, transcribed,
stored in a retrieval system, or any of its part translated into any language
or computer le, in any form or by any means—electronic, mechanical,
magnetic, optical, chemical, manual, or otherwise—without express written
permission and consent from Cypress Technology.
© Copyright 2018 by Cypress Technology.
All Rights Reserved.
TRADEMARK ACKNOWLEDGMENTS
All products or service names mentioned in this document are trademarks of
the companies with which they are associated.

SAFETY PRECAUTIONS
Please read all instructions before attempting to unpack, install or operate
this equipment and before connecting the power supply. Please keep the
following in mind as you unpack and install this equipment:
• Always follow basic safety precautions to reduce the risk of re,
electrical shock and injury to persons.
• To prevent re or shock hazard, do not expose the unit to rain, moisture
or install this product near water.
• Never spill liquid of any kind on or into this product.
• Never push an object of any kind into this product through any openings
or empty slots in the unit, as you may damage parts inside the unit.
• Do not attach the power supply cabling to building surfaces.
• Use only the supplied power supply unit (PSU). Do not use the PSU if it
is damaged.
• Do not allow anything to rest on the power cabling or allow any weight to
be placed upon it or any person walk on it.
• To protect the unit from overheating, do not block any vents or openings
in the unit housing that provide ventilation and allow for sucient space
for air to circulate around the unit.
• Please completely disconnect the power when the unit is not in use to
avoid wasting electricity.
VERSION HISTORY
REV. DATE SUMMARY OF CHANGE
RDV1 2020/10/23 Preliminary release

CONTENTS
1. Introduction.......................................................................1
2. Applications ......................................................................1
3. Package Contents ............................................................1
4. System Requirements......................................................2
5. Features.............................................................................2
6. Operation Controls and Functions .................................3
6.1 Front Panel...................................................................3
6.2 Rear Panel....................................................................4
6.3 RS-232 Pinout and Defaults.........................................5
6.4 Software Control...........................................................6
6.4.1 Software Installation............................................6
6.4.2 Device Connection ..............................................7
6.4.3 Settings Tab.........................................................8
6.4.4 System Tab........................................................10
6.5 Serial Commands....................................................... 11
7. Connection Diagram ......................................................20
8. Specications .................................................................21
8.1 Technical Specications .............................................21
8.2 Video Specications ...................................................22
8.3 Audio Specications ...................................................23
8.3.1 Digital Audio ......................................................23
8.4 Cable Specications...................................................24
9. Acronyms ........................................................................25

1
1. INTRODUCTION
This Multi-Input Switcher with Multi-Window Display unit supports all of
the most common professional video formats used by medical devices at
resolutions up to 1080p@60Hz (4:4:4, 12-bit). Available inputs include: 4
HDMI, 2 SDI, 2 RGBHV (VGA), and 2 composite video. After connecting
multiple medical device signal sources, this unit converts all of the signals
to HDMI to allow the information to be integrated together within a variety
of convenient multi-window (up to 4 simultaneous windows) preset
arrangements for output and easy monitoring. With two independently
congured video output channels it’s possible to arrange the information
to match two dierent viewing scenarios simultaneously while a third,
independently switchable, output can select which multi-window channel to
monitor.
This multiviewer is optionally expandable with the addition of external video
management units to enable recording and/or streaming the content of any
of the video outputs for archival or educational purposes if required. Control
is provided via front panel buttons, easy to use PC software, or RS-232
commands.
2. APPLICATIONS
• Medical Equipment Multiviewer and Monitoring
• Lecture Room Presentations
• Showrooms & Demo Rooms
3. PACKAGE CONTENTS
• 1× Multi-Input Switcher with Multi-Window Display
• 1× 24V/2.7A DC Power Adapter
• 1× 3-pin Terminal Block
• 1× Shockproof Feet (Set of 4)
• 1× Operation Manual

2
4. SYSTEM REQUIREMENTS
• HDMI, VGA, SDI, and composite video source equipment such as video
cameras, medical equipment, or set-top boxes.
• HDMI receiving equipment such as HDTVs, monitors or audio ampliers.
• Windows 10 or later PC for conguration and control.
• External network streaming/recording unit. (Optional)
5. FEATURES
• HDMI 1.4 and DVI 1.0 compliant (with the use of an HDMI-DVI adapter)
• HDCP 1.x compliant
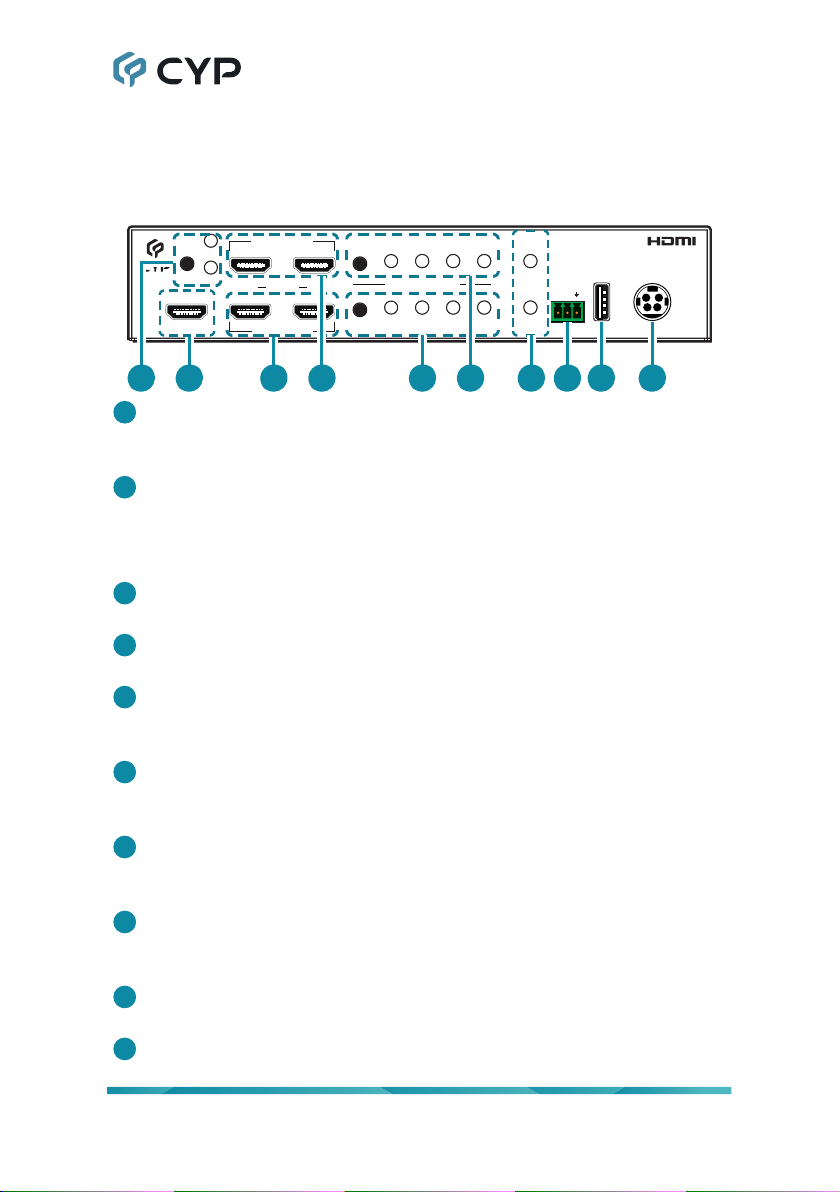
• 4 HDMI, 2 SDI, 2 RGBHV (VGA), and 2 composite video inputs
• 5 HDMI outputs (2 unique output channels, other ports are mirrored)
• HDMI inputs/outputs support up to 1080p/WUXGA (6.75Gbps,
1080p@50/60Hz 4:4:4, 12-bit) video input and output
• HDMI inputs/outputs support 2 channel LPCM audio
• SDI inputs support the following video standards: SMPTE 259M-C,
SMPTE 292M, and SMPTE 424M/425M-A
Note: SDI audio is not supported.
• Composite video inputs support both NTSC and PAL
• Supports conversion of multiple video formats to HDMI output
• Supports dual independent output paths with selectable full screen or
multi-window congurations. Multi-window congurations include PiP,
Equal Quad-view, Large-Left Quad-view, and Large-Top Quad-view with
denable primary window source.
• Independent audio source selection via RS-232
• Intuitive and easy adjustment of multiviewer window congurations and
routing using the Windows PC software
• Control is provided via front panel buttons, easy to use PC software, or
RS-232 commands

3
6. OPERATION CONTROLS AND FUNCTIONS
6.1 Front Panel
IP B
HDMI OUT B
HDMI OUT A
IP
12 PORT
A
CAM 2
SDIHDMIVGACVBS
1
2
CAM 1
SDIHDMIVGACVBS
RS-232
TX RXTX RX
SERVICE DC 24V
GROUP SELECT LINK
21 3 4 5 7 8 9 106
1IP A/B Button & LEDs: Press this button to toggle between monitoring
HDMI output A or B on the IP output. The LED will illuminate to indicate
which output is currently being monitored by the IP output.
2IP HDMI Output Port: Connect to an HDMI TV, monitor, amplier or
other HDMI receiving device for digital video and audio output.
Note: This output port is primarily intended for monitoring and will
typically be connected to a IP streaming or recording device.
3HDMI OUT A Ports 1 & 2: Connect to HDMI TVs, monitors, or ampliers
for digital video and audio output.
4HDMI OUT B Ports 1 & 2: Connect to HDMI TVs, monitors, or ampliers
for digital video and audio output.
5GROUP SELECT 1 Button and LEDs: Press this button to sequentially
switch through the available sources to display in the “Group 1” window.
The LED will illuminate to indicate which source is currently selected.
6GROUP SELECT 2 Button and LEDs: Press this button to sequentially
switch through the available sources to display in the “Group 2” window.
The LED will illuminate to indicate which source is currently selected.
7CAM 1 & 2 Link LEDs: These LEDs will illuminate to indicate that a live
source has been detected on the associated input port. When no source
is detected the LED will remain o.
8RS-232 3-pin Terminal Block: Connect directly to a PC, laptop, or
other serial control device with a 3-pin adapter cable to send RS-232
commands to control the unit.
9SERVICE USB 2.0 Port: This port is reserved for rmware update use
only.
10 DC 24V Port: Plug the 24V DC power adapter into this port and connect
it to an AC wall outlet for power.

4
6.2 Rear Panel
HDMI IN
HDMI IN
SDI IN
SDI IN
VHBGR
VHBGR
CVBS
CVBS
CAM 2
CAM 1
GROUP 1 GROUP 2
1 3 42
1GROUP 1:
SDI IN Port: Connect to SDI source equipment such as a video camera,
medical equipment, or set-top box.
Note: SDI audio is not supported.
HDMI IN Port: Connect to HDMI source equipment such as a video
camera, medical equipment, or set-top box.
RGBHV 5-BNC Port: Connect to VGA source equipment such as a PC,
medical equipment, or set-top box. The use of a 15-pin to 5-BNC adapter
may be required.
Note: YUV, RGBS and RGsB sources are not supported.
CVBS Port: Connect to composite video source equipment such as a
video camera or medical equipment.
2GROUP 2:
SDI IN Port: Connect to SDI source equipment such as a video camera,
medical equipment, or set-top box.
Note: SDI audio is not supported.
HDMI IN Port: Connect to HDMI source equipment such as a video
camera, medical equipment, or set-top box.
RGBHV 5-BNC Port: Connect to VGA source equipment such as a PC,
medical equipment, or set-top box. The use of a 15-pin to 5-BNC adapter
may be required.
Note: YUV, RGBS and RGsB sources are not supported.
CVBS Port: Connect to composite video source equipment such as a
video camera or medical equipment.
3CAM 1 Port: Connect to HDMI source equipment such as a media
player, game console, or set-top box.
4CAM 2 Port: Connect to HDMI source equipment such as a media
player, game console, or set-top box.

5
6.3 RS-232 Pinout and Defaults
Serial Port Default Settings
Baud Rate 19200
Data Bits 8
Parity Bits None
Stop Bits 1
Flow Control None
1
2
3
RxD
GND
TxD
3-pin
Terminal Block

6
6.4 Software Control
This unit’s dedicated control software provides complete control over the unit
via the RS-232 terminal block connection. This software provides control over
source switching, multiview layout selection, IP output monitoring selection,
output resolutions, primary input type selection, audio source selection, and
per-window proc-amp settings.
Note: This software is only compatible with PCs running Windows 10 or later
Windows operating systems.
6.4.1 Software Installation
Before beginning the installation of the software, it is recommended to
uninstall any previously installed versions of the software, to avoid potential
conicts, by using the Windows “Add or Remove Programs” function.
Please obtain the control software’s installer from your authorized dealer and
save it in a directory where you can easily nd it. Extract all les from the *.zip
le, nd the Install.exe le, and execute it to launch the Installation Wizard.
Follow the installation prompts and select your preferred installation location
to complete the installation. After the installation is complete, a shortcut will
be placed on the Windows desktop. Double click on the shortcut to start the
control software.

7
6.4.2 Device Connection
By default, when the software starts, it will not be connected to a unit, and a
blank starter screen will be displayed.
To connect to a unit, switch to the System Tab and use the dropdowns to
select the correct COM port and baud rate for connecting to the preferred
unit.
Note: If a USB dongle was added to the PC to provide RS-232 functionality,
the COM port might not appear initially. In this case, click the “Refresh”
button to update the list of available COM ports in the dropdown.
Once the COM port and baud rate has been selected, click on the “Connect”
button and the software will connect to the unit and download it’s current
conguration and settings. After this is completed, you may switch to the
Settings Tab to begin controlling the unit directly.

8
6.4.3 Settings Tab
This tab provides convenient access to control over all input, output, and
display conguration functions of the unit. At the top of the page is a Sync
icon ( ) that can be clicked on to force the software to resynchronize with
the unit, if necessary.
1) Input Port Section: This section contains controls for renaming inputs
and selecting the input source type used by input groups 1 and 2. If a
source is not currently detected as active, the port icon will be replaced
with a No Sync icon ( ).
Rename Inputs: To rename any input, double click on the input’s
name, above the icon. This will open the “Rename” dialog window.
Type in the preferred new name, up to 32 characters long, and then
click “OK”.
Note: Group 1 and 2 input names can only be changed when they are
active as the current source for that group.
Input Group 1/2 Source: To change the currently active
source for Group 1 or 2, right click on the associated
section to open up the source selection window then
select a new source from the 4 available options.
2) Multiview Output A/B Sections: This section provides control over the
multiview layouts for HDMI outputs A and B as well as output resolutions,
audio source selection, and proc-amp settings for each individual
multiview window.

9
Rename Output: To rename either output, double click on the output’s
name to open the “Rename” dialog window. Type in the preferred new
name, up to 32 characters long, and then click “OK”.
Multiview Window Color Settings:
To adjust the brightness, contrast, or
saturation of a multiview window, click on
the Color Settings icon ( ) and a window
will pop up. This allows you to select the
multiview window to modify, and set your
preferred values. To return the window to
its default values, click on the “Default”
button.
Note: Changes made to these settings will occur immediately.
Output OSD: Click on the OSD icon ( ) to enable or disable the
display of the information OSD on the associated HDMI output.
Audio Out: Use the dropdown to select the audio source to use for
the associated HDMI output.
Timing: Use the dropdown to select the output resolution for the
associated HDMI output.
Multiview Layout: To change an HDMI output’s multiview layout,
click on the preferred new layout from the 5 provided premade layouts
that are associated with the HDMI output. If the selected layout has
multiple variations, a “Layout Selection” window will pop up to allow
you to select the preferred window/input assignments.
Note: The quad-view layout only has one window arrangement.
3) IP Out Section: Use the dropdown to select which primary HDMI output
set (A or B) to mirror over the unit’s IP HDMI output.
Note: Changing the IP Out mirror source may cause the selected mirror
source to briey blink out and back on during the switch.

10
6.4.4 System Tab
Once connected to a unit, this tab provides access to basic unit details such
as model name, serial number, and rmware versions, as well as a way to
reset the unit to its factory defaults, update the primary MCU’s rmware, and
disconnect from the unit. At the top of the page is a Sync icon ( ) that can be
clicked on to force the software to resynchronize with the unit, if necessary.
1) Connect: Press this button, when not already connected to a unit, to
connect to a unit after selecting an appropriate COM port and baud rate.
Note: Please refer to section 6.4.2 for more details.
2) Disconnect:
Press this button to disconnect the software from a unit.
3) Model Name/Serial Number: Displays the unit’s model name and serial
number.
4) Firmware Versions: Displays the current rmware version of the primary
MCU, hardware module 1, and hardware module 2.
5) Firmware Update: Provides a way to update the primary MCU’s
rmware. To update the rmware, click the “Update” button and the follow
the prompts. When prompted, insert a USB thumb drive, with a valid
rmware le (*.bin format) in the root directory, into the unit’s USB service
port and the update process will begin. After the update is complete the
unit will automatically reboot.
Note: Only the primary MCU’s rmware is updated when using the
software’s rmware update function. In the unlikely event that the
rmware for module 1 and 2 need to be updated, please contact your
authorized dealer for detailed instructions.
6) Factory Default: Selecting this will reset the unit’s settings back to their
factory defaults.

11
6.5 Serial Commands
COMMAND
Description and Parameters
help
Show the full command list.
help N1
Show details about the specied command.
N1 = {Command}
?
Show the full command list.
? N1
Show details about the specied command.
N1 = {Command}
get fw ver
Show the unit’s current rmware version.
get command ver
Show the unit’s current command version.
get model name
Show the unit’s model name.
set factory default
Reset the unit to the factory defaults.
get update lename
Show the unit’s update rmware lename.
set out N1 name N2
Set the name of the specied output.
Available values for N1:
A [HDMI output A]
B [HDMI output B]
N2 = {ASCII Name} [Output name, 32 characters max]

12
COMMAND
Description and Parameters
get out N1 name
Show the name of the specied output.
Available values for N1:
A [HDMI output A]
B [HDMI output B]
get out name list
List the names of all outputs on the unit.
set out N1 timing N2
Set the output resolution to use for the specied output.
Available values for N1:
A [HDMI output A]
B [HDMI output B]
Available values for N2:
0 [720×480p@60Hz]
1 [720×576p@50Hz]
2 [1280×720p@50Hz]
3 [1280×720p@60Hz]
4 [1920×1080p@24Hz]
5 [1920×1080p@25Hz]
6 [1920×1080p@30Hz]
7 [1920×1080p@50Hz]
8 [1920×1080p@60Hz]
9 [1024×768@60Hz]
10 [1280×800@60Hz]
11 [1280×1024@60Hz]
12 [1366×768@60Hz]
13 [1440×900@60Hz]
14 [1600×900@60Hz RB]
15 [1600×1200@60Hz]
16 [1680×1050@60Hz]
17 [1920×1200@60Hz]
18 [Native]

13
COMMAND
Description and Parameters
get out N1 timing
Show the current resolution used by the specied output.
Available values for N1:
A [HDMI output A]
B [HDMI output B]
set audio out N1 route N2
Route the specied audio input to the specied audio output.
Available values for N1:
A [HDMI output A]
B [HDMI output B]
Available values for N2:
1 [Cam 1 audio]
2 [Cam 2 audio]
3 [Group 1 HDMI audio]
4 [Group 2 HDMI audio]
get audio out N1 route
Show the current audio input routed to the specied audio output.
Available values for N1:
A [HDMI output A]
B [HDMI output B]
set out N1 window N2 contrast N3
Set the contrast level for the specied window on the specied output.
Available values for N1:
A [HDMI output A]
B [HDMI output B]
N2 = 1~4 [Window number]
N3 = 0~100 [Contrast level]

14
COMMAND
Description and Parameters
get out N1 window N2 contrast
Show the current contrast level for the specied window on the
specied output.
Available values for N1:
A [HDMI output A]
B [HDMI output B]
N2 = 1~4 [Window number]
set out N1 window N2 brightness N3
Set the brightness level for the specied window on the specied
output.
Available values for N1:
A [HDMI output A]
B [HDMI output B]
N2 = 1~4 [Window number]
N3 = 0~100 [Brightness level]
get out N1 window N2 brightness
Show the current brightness level for the specied window on the
specied output.
Available values for N1:
A [HDMI output A]
B [HDMI output B]
N2 = 1~4 [Window number]
set out N1 window N2 saturation N3
Set the saturation level for the specied window on the specied output.
Available values for N1:
A [HDMI output A]
B [HDMI output B]
N2 = 1~4 [Window number]
N3 = 0~100 [Saturation level]

15
COMMAND
Description and Parameters
get out N1 window N2 saturation
Show the current saturation level for the specied window on the
specied output.
Available values for N1:
A [HDMI output A]
B [HDMI output B]
N2 = 1~4 [Window number]
set out N1 osd info display N2
Enable or disable the info OSD for the specied output.
Available values for N1:
A [HDMI output A]
B [HDMI output B]
Available values for N2:
ON [Info OSD enabled]
OFF [Info OSD disabled]
get out N1 osd info display
Show the current info OSD state for the specied output.
Available values for N1:
A [HDMI output A]
B [HDMI output B]
set group N1 in N2 name N3
Set the name of the specied input within the specied group.
Available values for N1:
1 [Group 1]
2 [Group 2]
Available values for N2:
1 [SDI input]
2 [HDMI input]
3 [VGA input]
4 [CVBS input]
N3 = {ASCII Name} [Input name, 32 characters max]
Table of contents
Other CYP Switch manuals