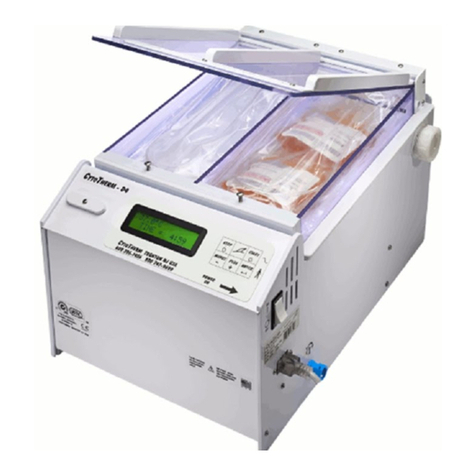
CytoTherm CT-4T User manual

CytoTherm
110 Sewell Ave. Trenton NJ 08610 USA
Tel 800 747-9699 or 609 396-1456 Fax 609 396-9395
CytoTherm-4T
PLASMA THAWING
ROCKING WATER BATH
with TURBO ACTION
Model
CT-4T
Owners Manual
Version 409 and higher.
Corral mounts on shelf.
W A R R A N T Y
Each CytoTherm product is produced under rigid quality control standards. This unit is fully warranted for a period of two
years from the date of purchase. Call 609 396-1456 or 800 747-9699 for help. If necessary send unit to:
CytoTherm 110 Sewell Ave. Trenton, NJ USA Tel 609 396-1456 Fax 609 396-9395
Please mail in your warranty card.
Please record the following: Serial No. ___________ Date of Purchase _________
TABLE OF CONTENTS
Draw\Instruct CT Products \CT4TinsN.docx 27 Jun 16
1 Specifications 6 Troubleshooting
2 Description 7 Maintenance
2 Setting-up 8 Parts List
4 Operation 8 Technician Functions
4 Leaky Plasma Bag 9 Safety Features
5 Modes 9 Accessories
10 Wiring Diagram
SPECIFICATIONS
Thawing temperature adjustable 25
o
C to 40
o
C. Preset to 37.0
o
C. Overtemp Alarm 1.0
o
C over thawing
temperature. 45
o
C safety thermostat. Accuracy 0.1
o
C. Easy to do, digital temperature calibration. Power 770
Watt, Available in 120 Volt or 230 Volts, 50 or 60 Hz. (must be grounded). Will thaw 300 ml. & 450 ml. plasma
bags.

2
DESCRIPTION
The CytoTherm-4T (CT-4T) is a laboratory instrument that consists of a recirculating water temperature bath
that uses a rocking action to generate bursts of flow to massage the plasma. This massaging action speeds up the
thawing time.
The CT-4T comes with one CORRAL that will thaw 1 to 6 plasma bags at a time. A second CORRAL will let you
thaw 6 more plasma bags for a total of up to 12 plasma bags at a time. The operator never comes in contact with
the water in the bath when handling the plasma bags. The CORRAL keeps the entry ports of flat- frozen units out
of the water so an overwrap bag is not necessary. Folded frozen plasma units require an overwrap bag to protect
the entry ports. Both type of freeze methods can be thawed together.
A large digital display indicates the temperature and counts down the thawing time. The CT-4T comes with a
clear evaporation lid.
SETTING-UP
The unit comes packed in 1 box. Make sure you have received the following:
….. Control Panel ….. Bath
….. Corral with 6 Bag Clamps ….. 2 Arms
….. Drain Tubing ….. Evaporation Lid
….. Power Cord …...Instruction Book
….. Overwrap bags ….. Drain tubing with male drain fitting
…...Algaecide. USA only
Instructional video can be found at www.cytotherm.com
Screw the ARMS to the side of the CONTROL SECTION. The notched side of the ARMS face up.
Place the BATH in front of the CONTROL SECTION so that the chassis on the BATH is next to the indented
portion of the CONTROL SECTION.
Connect the umbilical cord of the CONTROL SECTION to the plug receptacle on the back of the BATH section.
* * THE POWER SWITCH MUST BE OFF
WHEN CONNECTING OR DISCONNECTING THIS CONNECTION * *
Lift the BATH and position it so that the pivots on the side of the BATH slip into the notches on the ARMS.
Make sure the power switch is OFF. Connect the power cord to a properly grounded electrical outlet. Mount the
CORRAL inside the BATH. Push The SLIDERS on both sides of the BATH towards the front of the BATH. In
this SLIDER position the CORRAL can be placed on the BACK SHELF. Mount the first CORRAL towards the
back of the BATH. The cutout of the CORRAL should be on the right side. Push the SLIDER to its middle
position, this will hold the CORRAL in place.
Second CORRAL (optional accessory). If you are mounting a second CORRAL to thaw up to 12 plasma bags at a
time, push the SLIDERS towards the back of the unit and mount the second CORRAL on the front SHELF. The
second CORRAL mounts like the first CORRAL. Move the SLIDER to the center to hold both CORRALs.

3
Make sure that the DRAIN Valve is closed (horizontal). Fill the BATH with tap water to the bottom of the
SHELF if you have one CORRAL mounted and to the screw of the shelf if you have 2 CORRALs mounted.
If your tap water contains a lot of lime, use distilled or de-ionized water, add a pinch (0.01gr.) of salt to make
the water conductive so that the level sensors will work. Do NOT use saline solution. . Add Algaecide Part
#ALG240 (1.0 ml. per 4 liter of water. Available USA only) to the water. Any other bath clearing agent can
also be used.
Make sure the power switch is OFF. Plug the power cord into a properly grounded electrical outlet.
Turn the power switch ON. The pump will start pumping the water and the display will indicate the temperature.
The unit will heat up to 37.0
o
C. The display will show “HEAT ON” when the unit is heating.
Use the LID over the bath to prevent evaporation and help keep the water cleaner. DO NOT USE THE LID
WHEN THAWING, as water condensate from the lid may drip onto the plasma bag ports.
Open the LID by lifting from the front. Hold the front of the LID up to let the condensate flow back into the Bath,
then lift up the LID and place it aside.

4
OPERATION
Wait for the water to heat up to 37.0
o
C.
For your protection, use gloves when working with any blood products.
Flat-frozen plasma units can be thawed without an overwrap bag. Hold a
bag of flat-frozen plasma (bare or overwrapped) with the ports up and the
label on the plasma unit away from the center of the CORRAL. Slip the
CLAMP (plastic bar with a stainless spring attached) over the top of the
bag and line up the 3 grooves in the CLAMP with the ports of the plasma
bag.
Place the bottom of the plasma bag into the water, between the stainless
rods of the CORRAL. Pull the stainless spring of the CLAMP over the
screw head in the CORRAL. The spring should pull the plastic bar and
plasma bag snugly against the corral. The spring tension can be adjusted
by bending the stainless steel spring. If the stainless steel spring breaks,
the clamp must be replaced (Part # C4T-CLM).
Folded frozen plasma must be overwrapped. Load it the same way. The
CLAMP will hold the plasma unit by the overwrap bag.
Push START to begin thawing for the programmed time. The Rocking
Motor will turn on. The water in the bath will be forced to flow through
the large holes in the dividing plate of the CORRAL and will massage the
plasma bags.. Use PLUS or MINUS to increase or decrease the thawing
time. When the time is finished, the buzzer will call the operator back.
The STOP switch ends the thawing. If more thawing time is needed, hold
PLUS while pushing START and the unit will thaw for another 3 minutes.
LEAKY PLASMA BAG
If a Plasma bag leaks, turn the unit off and discard the leaking bag. The
remaining bags are not contaminated, because the ports are always kept
out of the water. Dry off the plasma bags with paper towels and wipe with a bleach towelette or a 10% bleach
solution. The bath water is contaminated and must be drained and the bath cleaned. See MAINTENANCE.

5
MODES
STANDBY MODE. Just turn the unit ON. The unit recirculates the water in the BATH, The unit heats
up and maintains 37.0
O
C in the BATH.
THAWING MODE. The unit continues recirculating tempered water through the BATH and rocks the BATH to
provide mixing of the plasma inside the plasma bags. A count-down timer is started to display the time-to-
completion of thawing. START initiates thawing. Timing out or pushing STOP stops thawing.
DIAGNOSTIC MODE. Is for technician access. Hold MINUS as you turn the unit ON.
1. To restore the unit to initial factory settings, press ENTER while still holding MINUS. The unit
displays “UNIT RESET”. Turn the unit off. You have to re-calibrate the temperature after
resetting the unit.
2. “PUMP TEST” is a diagnostic tool to check if each actuator turns on. It is checked only when a
pump does not operate. Release MINUS then push ENTER to verify that you are a technician. The
display shows “PUMP TEST”. MINUS turns on Pump 1, ENTER turns the rocking motor. Push
PLUS to go to next function.
3. Overtemperature Alarm Test. Hold MINUS as you turn the unit ON. DIAGNOSTICS will be
displayed. Push ENTER. Push and release PLUS until ALARM TEST is displayed. Push
ENTER, the heater will heat continuously and the pumps will turn on. When the temperature
reaches 1.0C above the target temperature the alarm will sound. Turn Off the unit. If alarm does
not sound, contact CytoTherm. Alarm test should be performed every 3 months as part of unit
maintenance.
PROGRAM MODE. Allows you to:
1. Program the thawing time.
2. Calibrate the temperature.
3. Set the target thawing temperature. The Alarm temperature is 1.0C above the target temperature.
4. Select the signal when thawing is done (continuous or pulsed).
Enter PROGRAM MODE by holding ENTER while turning the unit ON. Follow the displayed
instructions to program. Pushing PLUS advances the menu to the next parameter.
Programming the Thawing Time. When the thawing time is displayed, press MINUS because you want
to change the time. Use PLUS or MINUS to set the desired new thawing time, press ENTER to
program in the new time. Turn the unit off.
Calibrating Temperature. Turn the unit on and let it heat up to 37.0
o
C. Check the displayed
temperature with your accurate thermometer. Hold or hang your thermometer so the end is in the
water in the bath. If the displayed temperature needs to be changed, turn the unit off. Enter
PROGRAMMING MODE by holding ENTER as you turn the unit on. When the thawing time is
displayed push PLUS until the display shows “CALIBRATE TEMPERATURE”. Push MINUS
because you want to change the displayed temperature. Use PLUS or MINUS to make the displayed
temperature agree with your thermometer. Push ENTER to record the calibration. Turn the unit off.
If the unit can not be calibrated, or if the calibrated temperature is not stable, have a technician check
the unit. See TECHNICIAN FUNCTIONS.
SWITCH FUNCTIONS There are 6 switches on the front panel:
START. Starts function.
STOP. Stops function.
ENTER. Records parameter changes.
PLUS. Steps through parameters and increases value of parameter.
MINUS. Allows change in parameter and decreases value of parameter.
Sketch of FIN logo. Not currently used. Future expansion.

6
TROUBLESHOOTING
English: Unit should be opened by qualified technicians only.
French: Ne puet être ouvert que un techicien autorize.
Unit is "dead" Verify that you are plugged into a live, grounded outlet.
Have qualified technician check if fuse is blown or connectors are
loose. There are three fuses (see wiring diagram) in the unit. Fuse-1 &
Fuse-2 are located on the circuit board.. 8Amp for 120Vac models and
5Amp for 240 Vac models. Fuse-3 is a ¾ Amp slow blow inline fuse
on the transformer 12 Vac line.
Computer does not boot when
turned on. Does not display
readable messages.
Unit is not responding, but the display is backlit. Backlit display
indicates that the unit has power. Turn unit off for at least 10 seconds
and turn unit back on. If this does not solve problem, replace the
computer (program module part# C4T-PM).
Display says “low water” but
there is water.
The unit is not sensing that water is present.
a. Make sure you are using tap water or adding salt to deionized
water to make it conductive.
b. The level sensor (screw inside the BATH on the right side) is dirty.
Scrape it and then clean with alcohol.
Unit does not heat but
"heating" is displayed
Was the unit filled with water over 40C.? If yes then cool the water to
20C to reset the safety thermostat.
Check the Safety thermostat (#C-TH) and the heaters (#14-77) for
continuity.
Temperature calibration does
not “hold”, it changes .
Replace temperature sensor (#CT4-TS).
Temperature calibration is out
of range.
Have technician check the voltage at TP1 (see wiring diagram) , it
should be 0.395 +/- .001 Vdc. If TP1 was correct, replace the
temperature sensor (#CT4-TS).
If TP1 was not correct, restore the unit to initial factory settings (see
DIAGNOSTICS) do full calibration. See Technician Functions > Full
Calibration.
Pump does not circulate. No hum. No power to pump or pump winding open. Check the umbilical connector.
Check the pump (#14-PM). DO NOT DISASSEMBLE PUMP.
Pump does not circulate. Makes
humming noise.
Blow air through pump outlet tubing to clear small obstruction. Check pump
(#14-PM). DO NOT DISASSEMBLE. Any evidence of leaking on motor side
means pump must be replaced.
Waterbath not rocking. Check if cam is loose on motor. Check the rocking motor (#C-RM).
MESSAGES
, Troubleshooting
COLD indicates that the water temperature is less than 20.0C. As soon as the temperature rises above
20C, it will display the true temperature.
TOO HOT is an audible and displayed alarm condition that indicates that the bath temperature is 1.0C
higher than the set temperature. If the operator pours hot water into the bath he/she will trigger this
alarm.
This should never happen in normal operation. If it does, contact CytoTherm.

LOW WATER
First make sure that a pinch ( 0.01 gr) of salt was added if deionized water was used.
Pour water into the BATH to the correct level (see SETTING UP).
MAINTENANCE
Daily: Wipe off the unit.
Once every two weeks:
CLEANING the BATH
Remove the CORRAL(S) take them to the sink, clean under running water and wipe with bleach
towelettes or a 10% bleach solution.
For your protection use gloves when working with any blood products. Turn the unit off.
Drain the bath. The drain fitting #C
-
Assembly # C-
VLVM into the Drain Valve housing #C
the draining flow.
After water starts
to flow, gently pinch the drain tubing and release to remove any air inside the tubing to
improve flow. Manually tilt the bath towards the front.
Wipe the BATH with bleach towelettes or a 10% bleach solution. Use
bleach solutions for cleaning. DO NOT USE CONCENTRATED BLEACH. Use alcohol for removing oil or
grease. WIPE THE PUMP SCREEN FROM THE OUTSIDE ONLY. DO NOT REMOVE THE SCREWS.
RINSING the BATH. Rinse off the bleach with water. Close the DRAIN by
counterclockwise lightly and pull out. Fill the bath with water to 2.5 Cm. (1 Inch) above the pivot screws. If you
use deionized or distilled water add a little pinch ( about 0.01 gr.) of table salt to make the water conduc
Add 5.5 ml. of Algaecide Part #ALG240 (1.0 ml. per 4 liters of water) . Available USA only) to the water
Every 3 Months:
Temperature Calibration.
Run temperature calibration at least every 3 months or more often if your
institution procedures or regulations require. See PROGRAM MODE > TEMPERATURE
CALIBRATION.
Overtemperature Alarm Test.
Hold MINUS as you turn the unit ON. DIAGNOSTICS will be
dis
played. Push ENTER. Push and release PLUS until ALARM TEST is displayed. Push ENTER, the
heater will heat continuously and the pumps will turn on. When the temperature reaches 1.0C above
the target temperature the alarm will sound. Turn Off the unit. If
CytoTherm. Alarm test should be performed every 3 months as part of unit maintenance.
7
First make sure that a pinch ( 0.01 gr) of salt was added if deionized water was used.
Pour water into the BATH to the correct level (see SETTING UP).
Remove the CORRAL(S) take them to the sink, clean under running water and wipe with bleach
towelettes or a 10% bleach solution.
For your protection use gloves when working with any blood products. Turn the unit off.
-
VLVF is mounted on the left side of the Bath. Insert the Drain tubing
VLVM into the Drain Valve housing #C
-
VLVF and Twist clockwise until it engages. This will start
to flow, gently pinch the drain tubing and release to remove any air inside the tubing to
improve flow. Manually tilt the bath towards the front.
Wipe the BATH with bleach towelettes or a 10% bleach solution. Use
only
water and bleach towelettes
bleach solutions for cleaning. DO NOT USE CONCENTRATED BLEACH. Use alcohol for removing oil or
grease. WIPE THE PUMP SCREEN FROM THE OUTSIDE ONLY. DO NOT REMOVE THE SCREWS.
RINSING the BATH. Rinse off the bleach with water. Close the DRAIN by
removing the Drain Tubing. Twist
counterclockwise lightly and pull out. Fill the bath with water to 2.5 Cm. (1 Inch) above the pivot screws. If you
use deionized or distilled water add a little pinch ( about 0.01 gr.) of table salt to make the water conduc
Add 5.5 ml. of Algaecide Part #ALG240 (1.0 ml. per 4 liters of water) . Available USA only) to the water
Run temperature calibration at least every 3 months or more often if your
institution procedures or regulations require. See PROGRAM MODE > TEMPERATURE
Hold MINUS as you turn the unit ON. DIAGNOSTICS will be
played. Push ENTER. Push and release PLUS until ALARM TEST is displayed. Push ENTER, the
heater will heat continuously and the pumps will turn on. When the temperature reaches 1.0C above
the target temperature the alarm will sound. Turn Off the unit. If
alarm does not sound, contact
CytoTherm. Alarm test should be performed every 3 months as part of unit maintenance.
First make sure that a pinch ( 0.01 gr) of salt was added if deionized water was used.
Remove the CORRAL(S) take them to the sink, clean under running water and wipe with bleach
VLVF is mounted on the left side of the Bath. Insert the Drain tubing
VLVF and Twist clockwise until it engages. This will start
to flow, gently pinch the drain tubing and release to remove any air inside the tubing to
water and bleach towelettes
or a 10%
bleach solutions for cleaning. DO NOT USE CONCENTRATED BLEACH. Use alcohol for removing oil or
grease. WIPE THE PUMP SCREEN FROM THE OUTSIDE ONLY. DO NOT REMOVE THE SCREWS.
removing the Drain Tubing. Twist
counterclockwise lightly and pull out. Fill the bath with water to 2.5 Cm. (1 Inch) above the pivot screws. If you
use deionized or distilled water add a little pinch ( about 0.01 gr.) of table salt to make the water conduc
tive.
Add 5.5 ml. of Algaecide Part #ALG240 (1.0 ml. per 4 liters of water) . Available USA only) to the water
.
Run temperature calibration at least every 3 months or more often if your
institution procedures or regulations require. See PROGRAM MODE > TEMPERATURE
Hold MINUS as you turn the unit ON. DIAGNOSTICS will be
played. Push ENTER. Push and release PLUS until ALARM TEST is displayed. Push ENTER, the
heater will heat continuously and the pumps will turn on. When the temperature reaches 1.0C above
alarm does not sound, contact
CytoTherm. Alarm test should be performed every 3 months as part of unit maintenance.

8
PARTS LIST CT-4T
14-MP Pump, Magnetic DP-SW Switch, 2-pole
14-77 Heater (2 needed) C-TH Safety Thermostat
CT4-PC Printed Circuit Board C4-DISP Display
C4T-BTH Bath Section C4-UMB Wiring Harness
C-RM Rocking Motor C4T-PM Program Module
C4-TS Temperature Sensor C4T-CLM Clamp ( bag to cor.)
C4T-LID Lid C4T-CORS Corral ( 6 plasma units)
C4-TR Transformer 120V ALG240 Algaecide. USA only
C-VLVF Drain Valve Female
Mounted on Bath
C-VLVM Drain Valve Male
With Tubing
C4-TR2 Transformer 240V
Always specify model and serial number when ordering.
SOURCES for SUPPLIES
BAGS overwrap 15 cm. wide by 30 cm. (6” x 12”) long are available from US Plastics 1390 Neubrecht Rd. Lima
OH 45801 Tel. 800 537-9724. Part #47352.
TECHNICIAN FUNCTIONS
FULL CALIBRATION
Adjust the 10-turn potentiometer so that the voltage between TP1 and Ground (Earth) is .395 V (see
wiring diagram for locations). Actual temperature calibration is then set in Programming Mode (see
PROGRAMMING MODE).
The trimmer near the BODY connector adjusts the display contrast.

9
SAFETY FEATURES
WATER LEVEL SENSOR
The unit will display LOW WATER and beep if there is not enough water to cover the level sensor
inside the bath, a screw located 3/4" above the temperature sensor. The heat will also turn off. The
water must be conductive in order for the level sensor to work. Use tap water or add a pinch (0.01 gr.)
of salt if you are using de-ionized or distilled water.
OVER TEMPERATURE
The unit will display TOO HOT and emit double-beeps if the temperature reaches 1.0
o
C above the
thawing temperature. The controls will turn the heaters off. In the unlikely situation that there is a
component failure and the unit continues heating, an independent safety thermostat will turn the
heating off at 45
o
C.
SAFETY THERMOSTAT
An independent safety thermostat will turn heaters off if the temperature goes above 45
o
C. It has to be
cooled to 20 C to reset.
FUSING
The main fuses (Fuse-1 & Fuse-2) are located on the Printed Circuit Board and are 8Amp for 120Vac
and 5Amp for 240Vac. Correct the cause of the blown fuse.
The transformer has a ¾ Amp slow blow fuse (Fuse-3) on the wires of the 12 Vac winding used to
generaate the 5 Vdc supply.
ISOLATION
The circuitry is isolated from the power lines by a transformer and from the heaters by an opto-
coupled solid state relay.
ACCESSORIES
Each CORRAL holds up to 6 units of PLASMA. One CORRAL (C4T-CORS) is included with the unit.
If you wish to process up to 12 units at a time, you will need another CORRAL (#C4T-CORS).

10
3
7
9
5
1
2
3
7
9
Ground is Green with Yellow stripe
Ground
Wire Nut
Female Housing
Male Pins
Strain Relief mounted on connector
Male Housing
Female Pins
Bath Section
120V
Wiring CT-DR / CT-4T
D 351B.kcw
File \Draw#\D#351.kcw Home
30 Nov 2000
1 Jul 02. 8A Fuses for 120/100
Ground Pin (5)
is longer
Whi
Whi
Level
Sensor
Screw
Thermostat
Safety
Pump
Temperature
Sensor
Blk
Heater
Heater
1
1
1
11
4
4
2
1
Blk
5
Blu Blu
Vio
Vio
Orn
Orn Orn
Orn
Brn
Brn
120/100V wired as shown
240V the 2 heaters are in series
Brn
Whi
Grn
Orn
Red
Blu
Vio
Brn
Orn
Whi
Blu
Red
Vio
Grn
[H]
[N]
[M]
[X]
[12VAC]
5
1
2
=MOV
120V xform
3
4
8
[H]
[N]
[X]
[12VAC]
4
1
2
240V xform
5
3
8
1
[M]
1
Grn
Blu
Orn
Orn
Grn
Red
Red
Orn
Switch
Grn
High
Volt
Filter
Brn=High V
Grn/Yel=Gnd
Blu=Neutral
Power Cord
Orn
Blu
Orn
Blu
Grn/Yel
/Yel
Mag. Sensor
Sensor
Connector Level
Sensor in
Rack
Level
Sensor in
Rack
Start
Stop
Minus
Plus
Enter
ReedSensor
RockPosition
Thermistor
Blu
Grn
Vio
2Grn
2Orn
2Brn
Blk
Whi
Yel
Red
Brn
Orn
Ribbon Cable
&
CT-4D Board
Rocking
Motor
Blk
Blk
2
2 2
2
= 240V MOV
100V uses dual transformer.
see Dwg# 361
51 6 7 4 2
CONNECTOR to Flex Switch. 3= NC
1/4" Spade
8
Blu
Rev B. 4 Jan 04
1. Add separate Neutral
wire from Bath Conn# 5 to
9- pin conn #8. Wire separate
neutral wires to heaters & pump.
2. Spade connectors on heaters.
3. CT-DR & 4T on one drwg.
8
Rack section
on CT-DR only.
100V units
4. Move heater wires to 1/4" spade
connectors from BATH connector.
5. Remove SWITCH conn. & solder
wires directly to board.
Blu
Yel
~
Yel
Blu
~
Fuse-1
Fuse-3
+
Fuse-3
GND TP1
Fuse Amps Vac Type
1 & 2 8 120 Fast
1 & 2 5 240 Fast
3 3/4 12 Slow Blow
Fuse-2
Rev 25 June 06 Fuse Table & TP1
Rev 5 June 04 add 3/4A slow blow fuse
to 12 Vac Xform lead. See D 467.
Table of contents
Other CytoTherm Laboratory Equipment manuals
Popular Laboratory Equipment manuals by other brands

IKA
IKA RH basic manual

Integra
Integra PIPETBOY pro operating instructions

Applied Photophysics
Applied Photophysics Chirascan Integrating Sphere user manual

OHAUS
OHAUS MB95 quick start guide

Kinematica
Kinematica POLYTRON PT 2500 E operating instructions

RR Mechatronics
RR Mechatronics STARRSED RS Instructions for use