D-Flector D600 User manual

D600
DSG045
1
InstallationGuide Released Date –Jan 2024
D-Flector Stone Guards: Best safety companion for the road untraveled.
You have acquired a D-Flector accessories , Congratulations.
D-Flector stone guard provided unparallel protection to your RV, adjustable fittings, remain
durable in harshest outback conditions.
Important:
1. Refer to your fitting instructions to ensure that product is installed correctly.
2. Check the contents of kit before commencing fitment and report any discrepancies.
3. Keep checking D-Flector website to ensure you have latest revisions of these instructions.
Fit Time : 30 mins
PERIODICALLY CHECK TO ENSURE THAT ALL
FASTENERS ARE TIGHT AND ALL STRUCTUAL
COMPONENTS ARE SOUND.
Maxwell & Higgs Pty Ltd, AUSTRALIA
6/94-102 Keys Rd,
Moorabbin, Vic, 3189
support@d-flector.com.au
www.d-flector.com.au
www.youtube.com/watch?v=xBX4PjLa79E
D600
DSG045
2
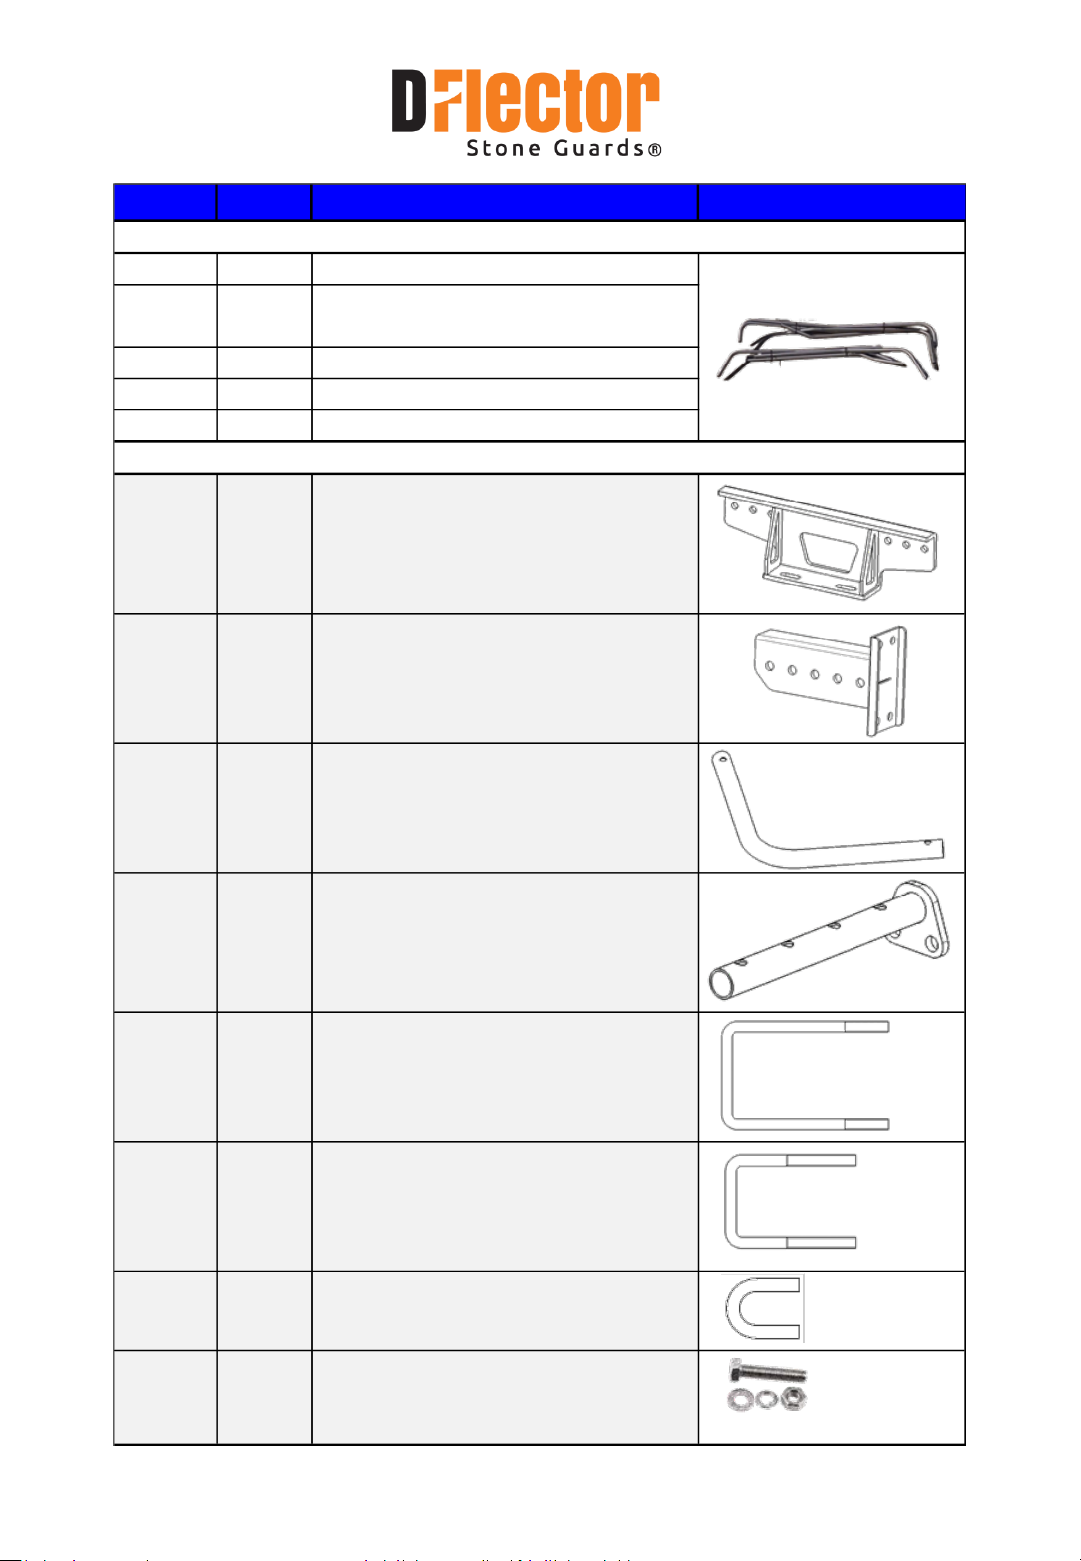
Part list:
Item No Qty Part Description Image
01 1 each Tube Lower Front RH & LH - 58/59
02 1 each
Tube Support Front Upper RH & LH -
65/66
03 2 Tube Lower Rear - 67
04 2 Tube Middle Rear Support - 68
05 1 each Tube Upper Rear RH & LH - 69/70
06 1
Front Mounting Bracket Adjustable
Assy -BKT008
07 1
each
Bracket Front mount OTR RH & LH
Sub-Assy - BKT005/BKT006
08 1 V -Tube Front Cross Brace - TBE071
09 2 Tube Front Cross Brace - TBE072
10 1
U Bolt
M12(50T) x 100(W) x 180(L) - UBT001
11 1
U Bolt (alternative)
M12(75T) x 77(W) x 130(L) - UBT019
12 6
U Bolt Small Round
M10(25T) x 26(W) x 47(L) - UBT012
13 Sets
Fasteners - GAL- Nuts, Bolts,Washer,
Spring Washer and SS - Bolts and
nylon nuts
HWK001 (Front Hardware Kit)
Tube Set D600
D600
DSG045
3
01
02
03
04
05
LABEL
D
LABEL
C
LABEL
E
RIGHT =“A”
LEFT = “B”
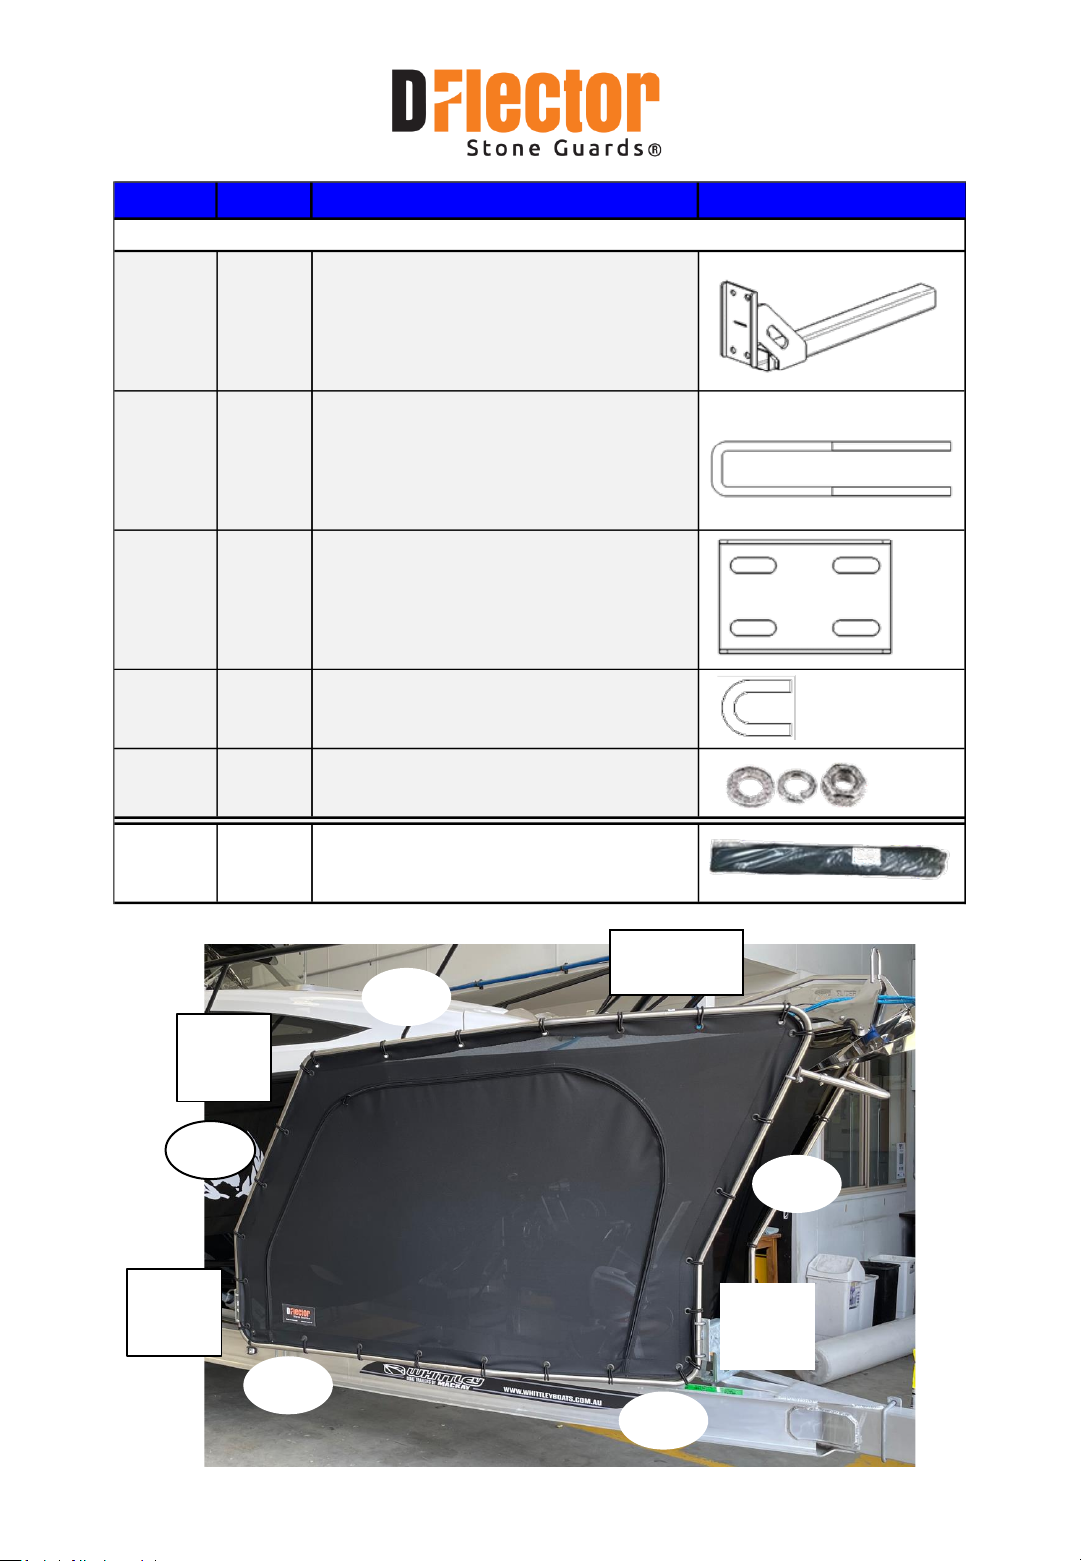
Part list:
Item No Qty Part Description Image
14 2
Rear Mounting Bracket Sub-Assy -
BKT003
15 4
U Bolt Rear
M12(140T) x 41(W) x 270(L) - UBT017
16 2
Chassis Rear lower Mounting Plate -
PLA048
12 4
U Bolt Small Round
M10(25T) x 26(W) x 47(L) - UBT012
17 Sets
Fasteners - Nuts, Washer and Spring
Washer
18 1
Mesh RH & LH + Bungees (Qty-56 PC) -
CVR045
HWK008 (Rear Hardware Kit)
D600
DSG045
4
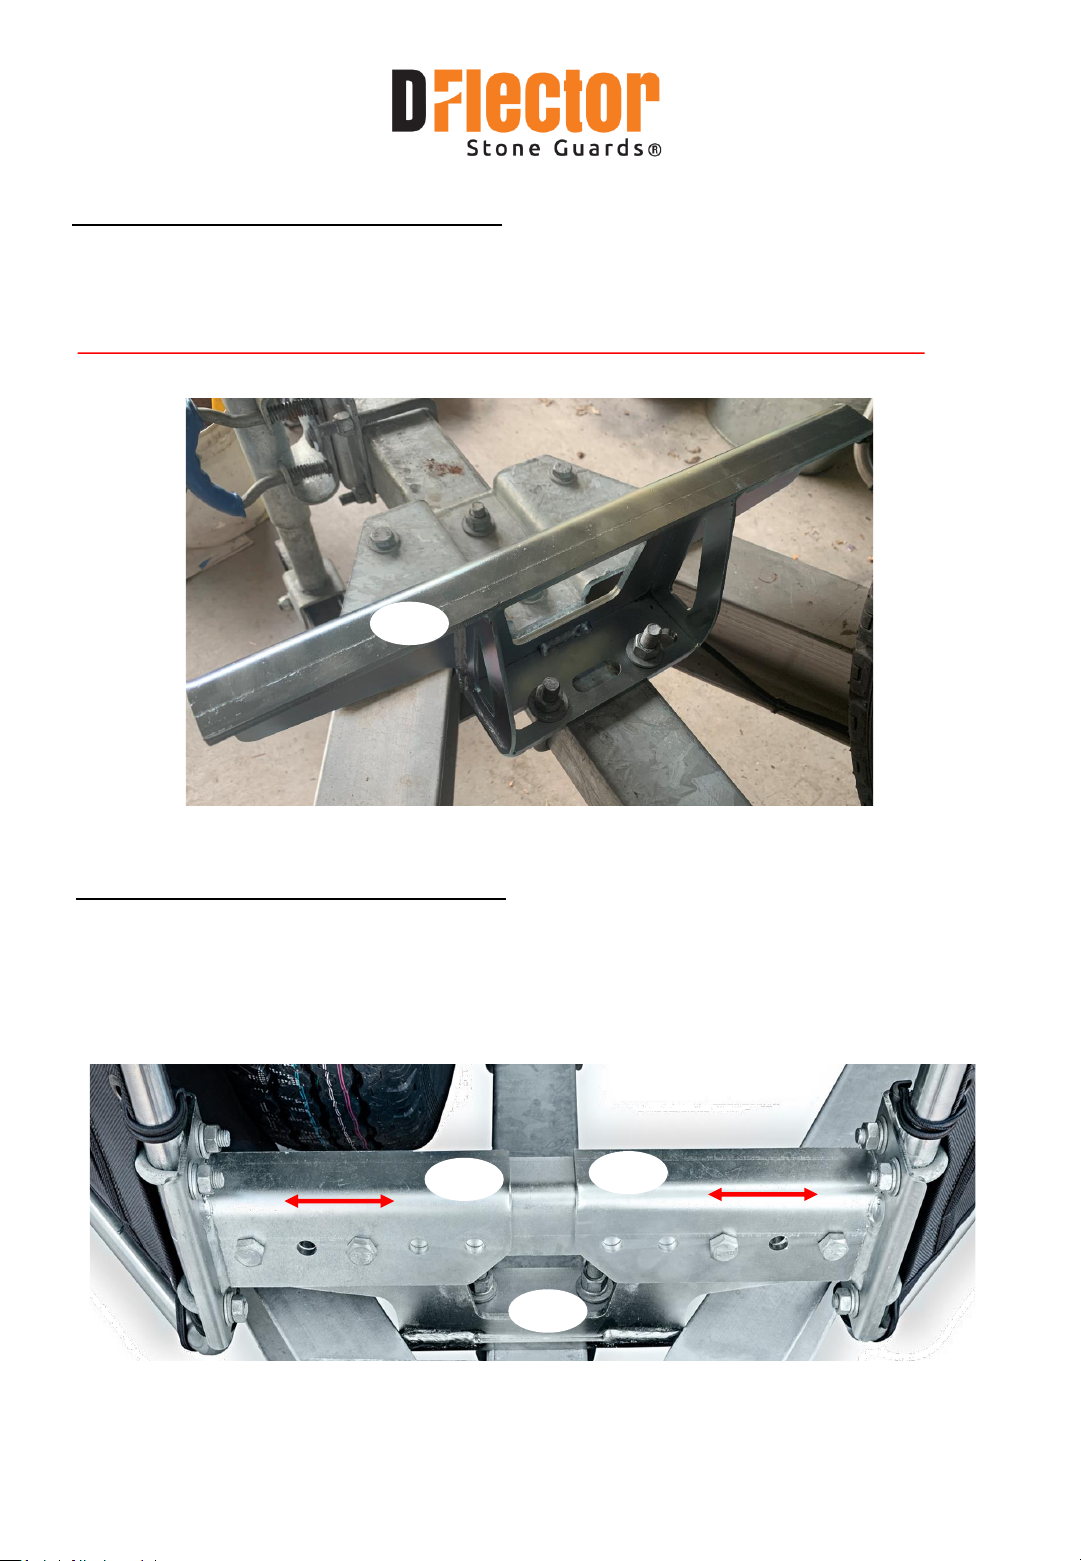
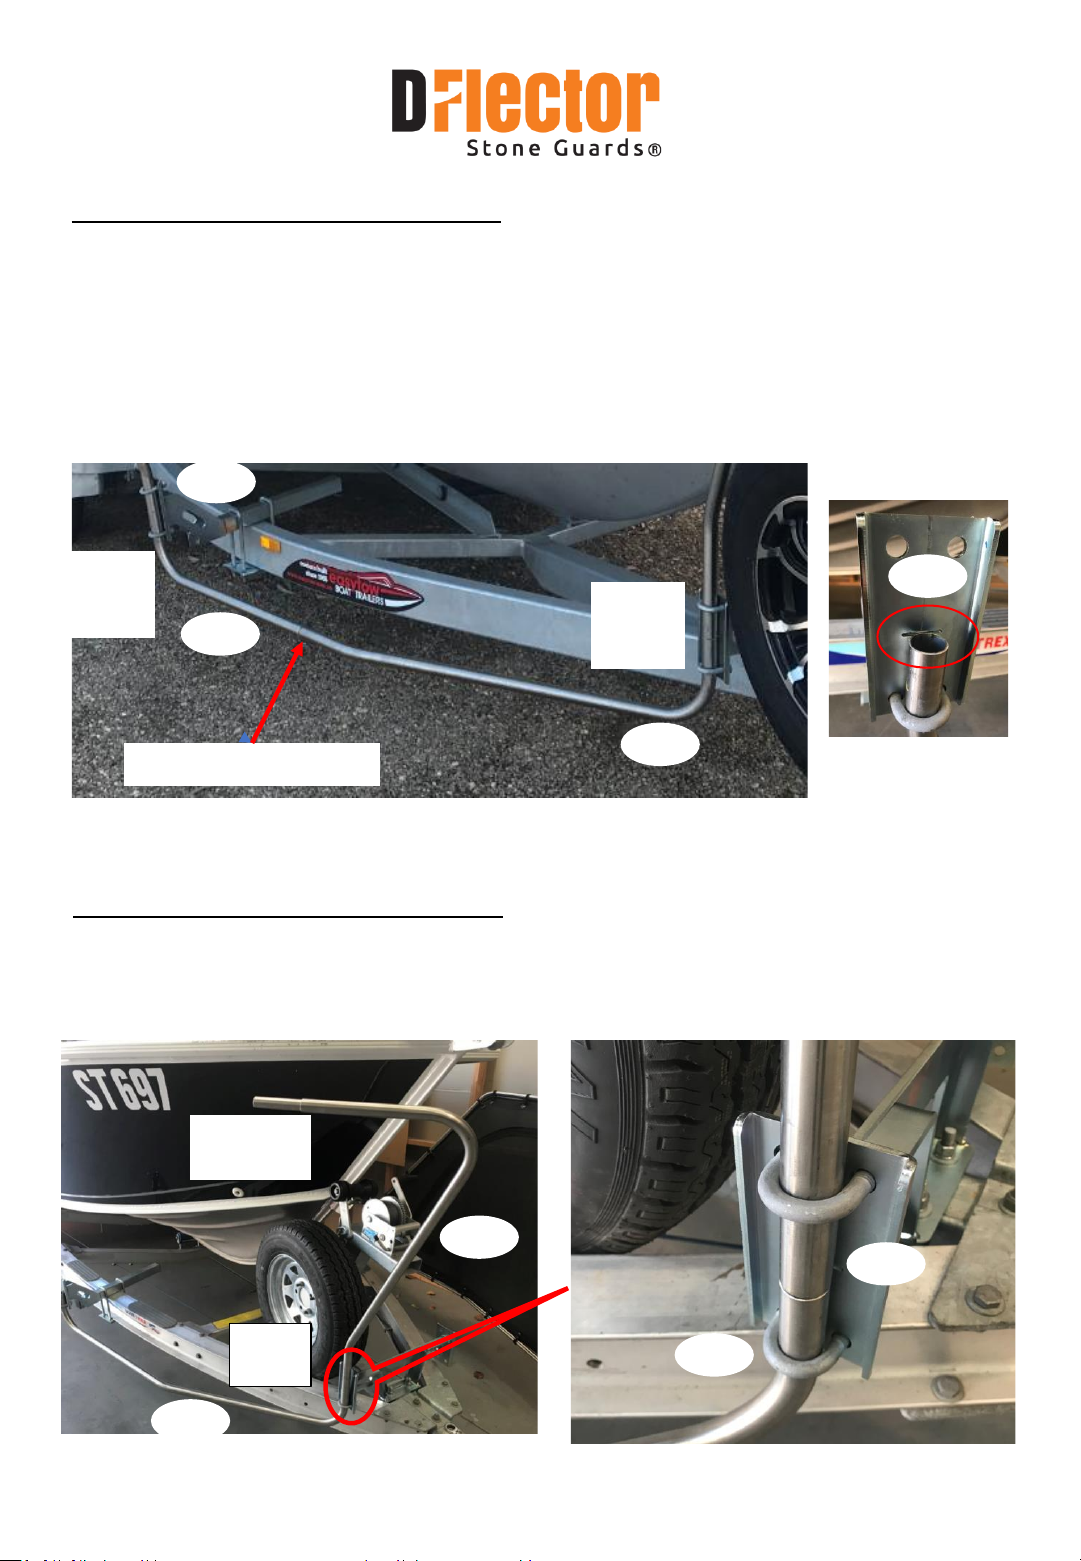
Step 2
Step 1
Fit Front Mounting Bracket Assembly (06) to a symmetric position on the trailer drawbar
using the U Bolt (10) M12(50T) x 100(W) x 180(L) or U Bolt (11) M12(75T) x 77(W) x 130(L)
depending on chassis thickness.
Warning:- Ensure any cables running along or under the chassis are not interred with
06
Fit Outer Mounting Plates Assy (07)to each end of the Front Mounting Bracket Assy (06)
using the M12 x 25 Bolts, Spring Washer and nuts (13). Do tighten at this stage, but these
may need adjusting in or out during the assembly process.
06
07
07
D600
DSG045
Figure 1
5
Bolt
Step 3
Fit Rear Mounting Square Tube Assembly (14) to trailer chassis using the two square U bolt
(15) M12(140T) x 41(W) x 270(L) and Lower Mounting Plate (16). Make sure that a Rear
Mounting square Tube assembly position is at equal distance from front, so that at both side
of the Boat chassis, Stone guard will remain symmetric.
Warning:- Ensure any cables running along or under the chassis are not interred with
Keep appropriate and same gap on left- and right-hand side of chassis to
keep minimum 100mm gap between Gunnel and
upper Rear end of the Stone Guard.
14
16
15
D600
DSG045
6
Bolt
Figure 1
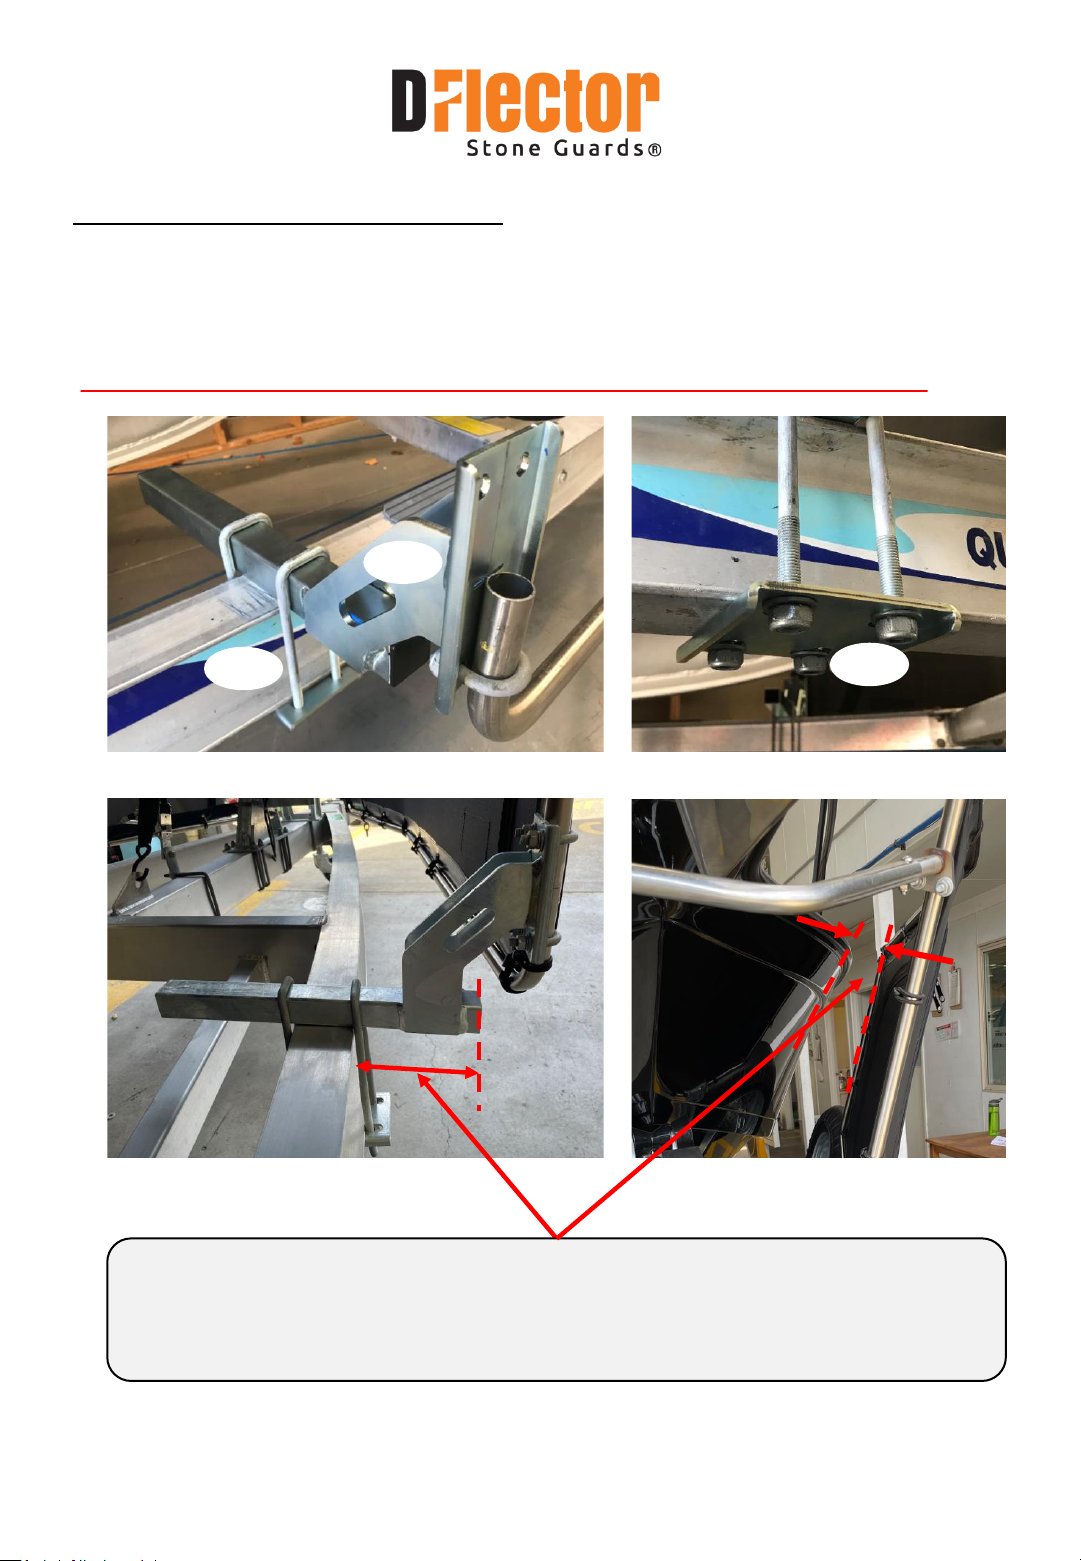
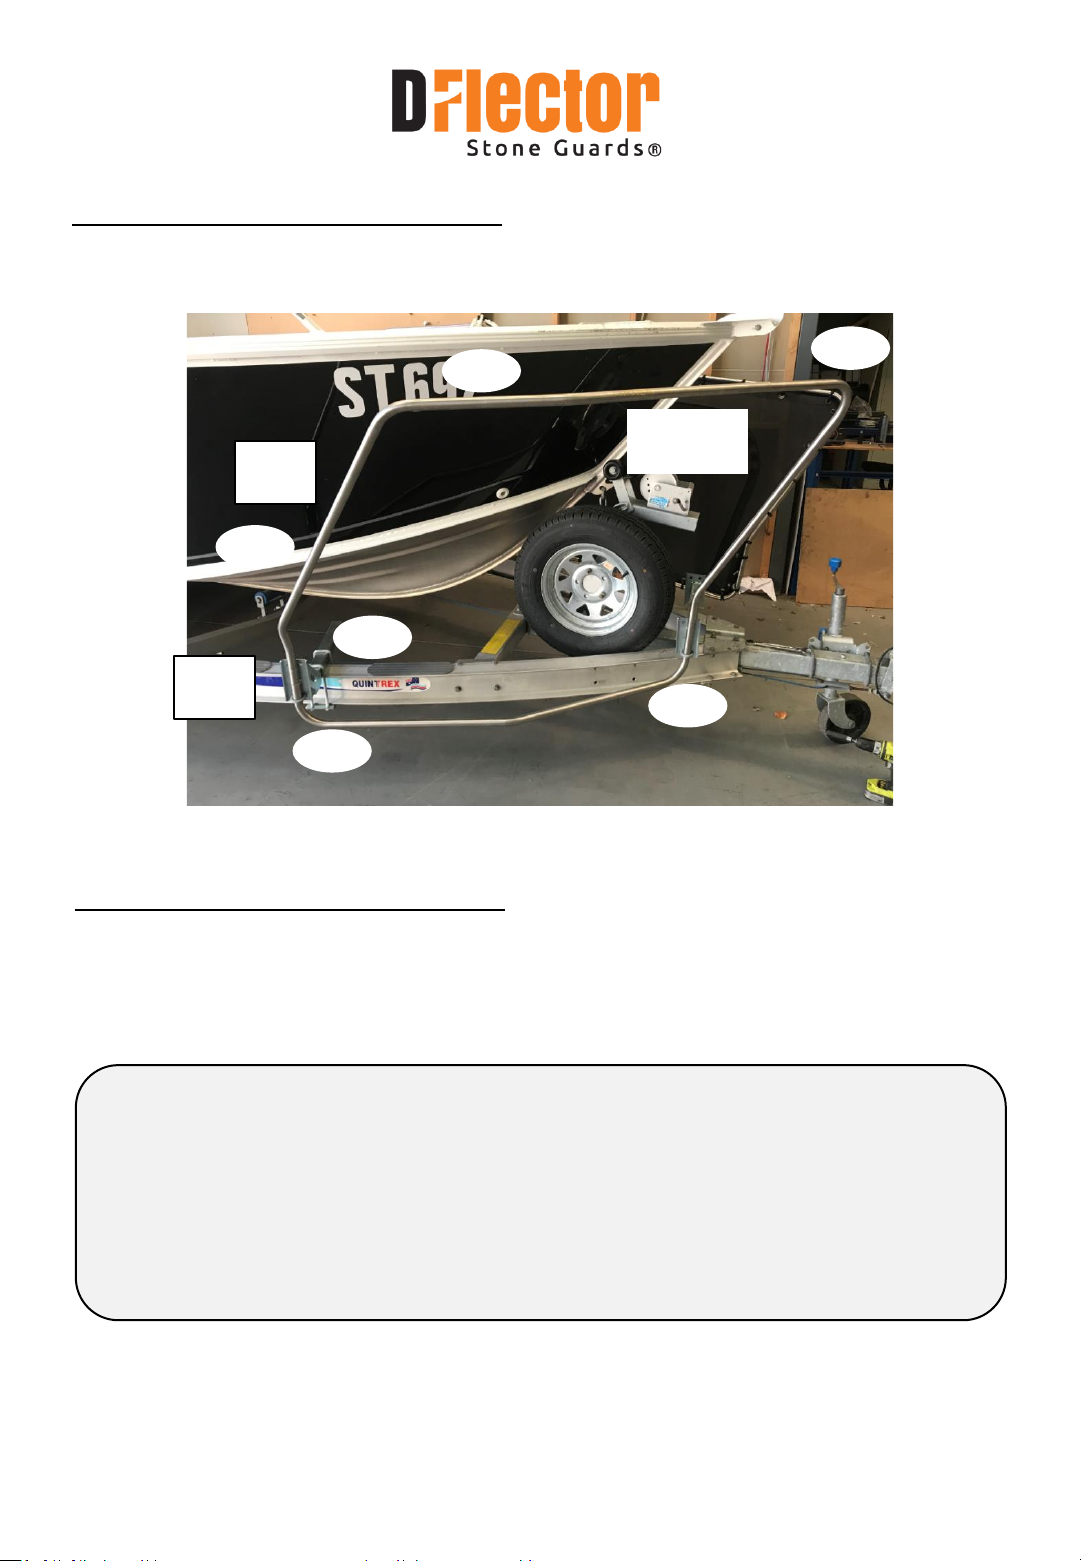
Step 4
Fit Front Lower Tube (01)(LABELS “D”) to Front Mounting Bracket (07)using the Small round
U Bolt (12) M10(25T) x 26(W) x 47(L). Top of the tube should be positioned in line with the slot
in the mounting bracket plate as shown in image.
Join by sliding the Rear Lower Tube (03)in the end of the Front Lower Tube (01). Adjust
position of Rear Mounting Bracket Assy (14) if required. Fit Rear Lower Tube (03)(LABELS “C”)
to Rear Mounting Bracket Assy (14) using the Small round U Bolt (12) M10(25T) x 26(W) x
47(L).
LABEL
D
LABEL
C
JOIN IN TUBE
Step 5
Slide the Front Support Tube upper RH (02)into the end of the Lower Tube (01)and secure to
Front Mounting Bracket (07)with a Small Round U Bolt (12) M10(25T) x 26(W) x 47(L).
RIGHT =“A”
LEFT = “B”
LABEL
“D”
Slot alignment
with Top of the Tube
07
01
03
14
02 07
12
01
D600
DSG045
7
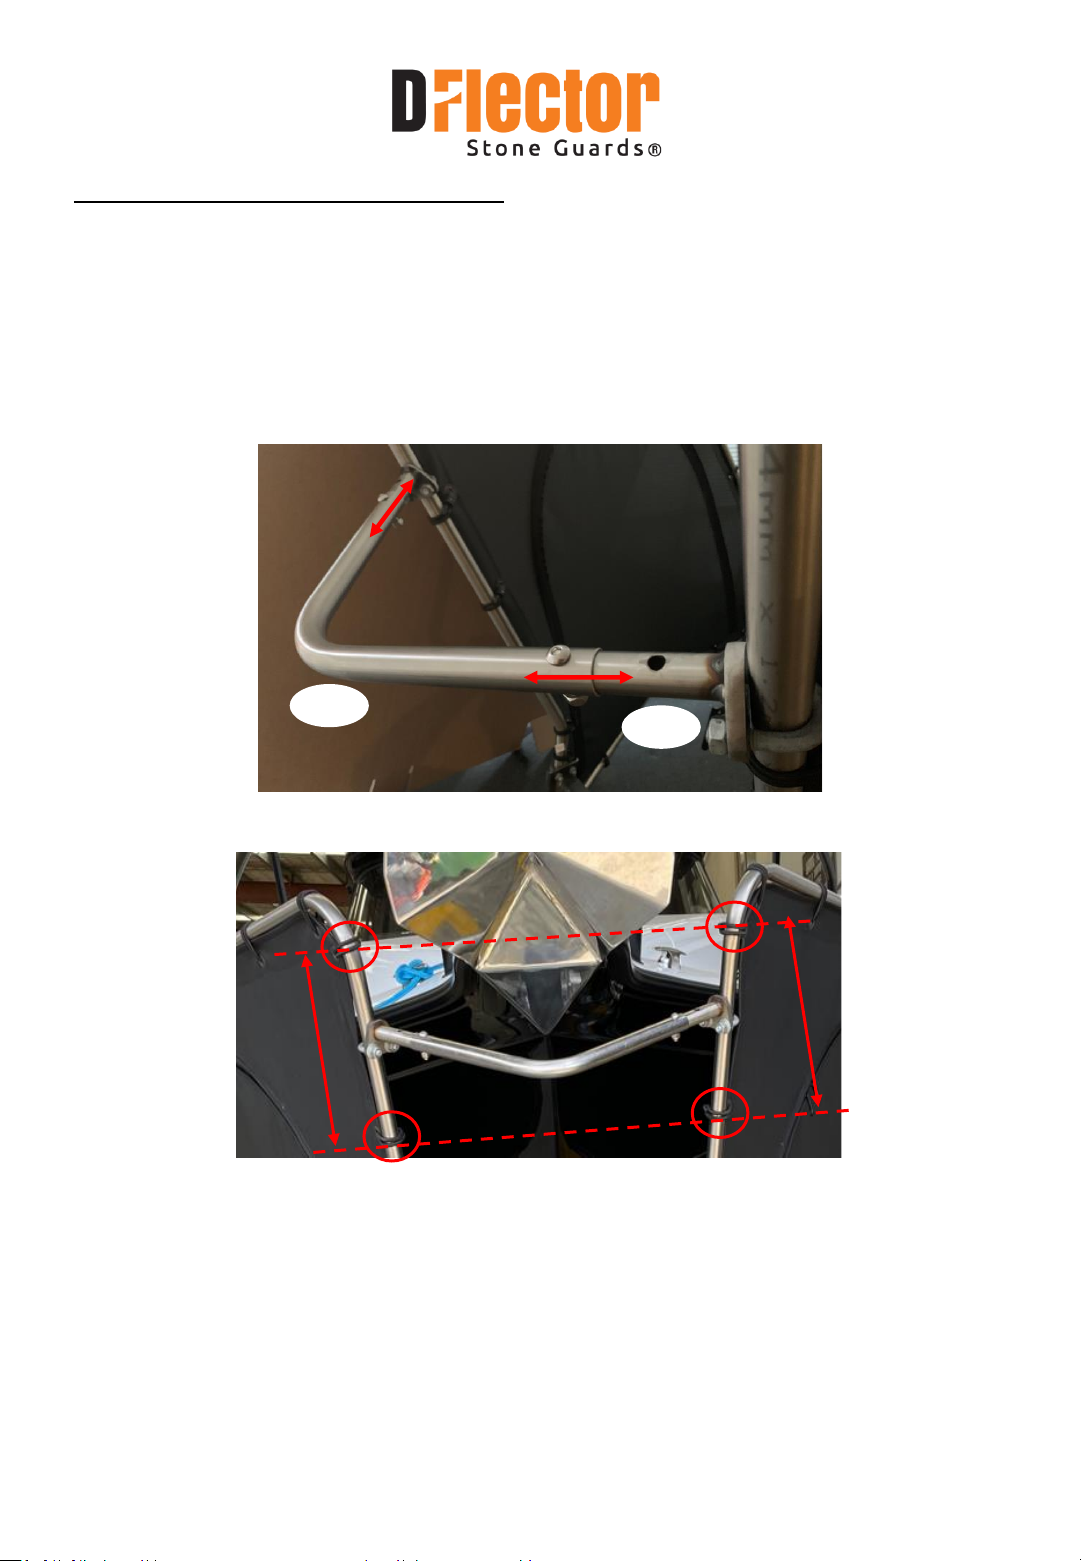
Step 6
Slide the Upper Rear Tube RH (05)into the end of the Front Support Tube RH (02)using the
“A” & “B” labels as a guide.
Slide the Rear Mounting Tube (04) into the Rear Lower Tube (03) (LABELS “C”) and end of
Upper Rear Tube (05) (LABELS “E”).
Secure Rear Mounting Tube (04) to Rear Mounting Bracket Assy (14) with a Small Round U
Bolt (12) M10(25T) x 26(W) x 47(L).
Step 7
Adjust width of Front Mount Bracket (07) and position of the Rear
Mounting Bracket (14) to allow minimum 100mm of clearance between
stone guard frame and boat gunnel.
NOTE:- NO PART OF THE STONE GUARD IS ALLOWED TO EXTEND OUTSIDE
WIDEST PART OF BOAT OR TRAILER.
LABEL
“C”
RIGHT =“A”
LEFT = “B”
LABEL
“E”
05
03
04
02
01
14

D600
DSG045
8
Attach the Mesh (18)using the bungee cords (18) on RH and LH side. Recommended
sequence for attaching bungee cords uniformly is, first at each corner of frame (XX), secondly
at each middle section of frame (YY) and then remaining portion of frame as per below
image.
Step 8
XX
XX
XX
XX
YY
YY
YY
YY
D600
DSG045
9
Attach the Front Cross Brace Assembly (08,09) to the Front Support Tube RH & LH (02) using
2 off the Small Round U Bolts (12) M10(25T) x 26(W) x 47(L). Preferred location is
approximately middle of top 2 bungee cords position. Adjust the V-tube Front cross brace
(08) to suit the required gap as per boat width then place the SS Bolts (13)into available hole
on both side and tightened the Nylon nut (13).
Step 9
Maxwell and Higgs Pty Ltd provides a three-year warranty from the date of purchase against
defects in materials and workmanship. If the product is found to be defective , the product
will be repaired or replaced at our discretion. This warranty excludes product alterations,
misuse, or improper installation, and does not cover incidental or consequential damages.
For warranty service, return the product with proof of purchase to the address listed in this
manual.
09
08
This manual suits for next models
1
Table of contents
Other D-Flector Automobile Accessories manuals

Popular Automobile Accessories manuals by other brands


ULTIMATE SPEED
ULTIMATE SPEED 279746 Assembly and Safety Advice

SSV Works
SSV Works DF-F65 manual

ULTIMATE SPEED
ULTIMATE SPEED CARBON Assembly and Safety Advice

Witter
Witter F174 Fitting instructions

WeatherTech
WeatherTech No-Drill installation instructions

TAUBENREUTHER
TAUBENREUTHER 1-336050 Installation instruction