D-Link i2eye DVC-1000 Original operating instructions

1
DVC-1000
Fast Ethernet
VideoPhone
Before You Begin
1. Using the D-Link i2EyeTM DVC-1000 VideoPhone requires a connection to the
Internet over a Broadband connection (e.g., a Cable modem or a DSL modem with a
router).
2. Attaching a telephone to the i2eye is optional, but highly recommended for optimal
sound quality.
3. If you are sharing the connection with another device (such as a PC) you will also
need a broadband router or home gateway.
Check Your Package Contents
Stand-alone
Videoconferencing Over
Broadband IP.
No PC Needed!
5V DC, 2A Power Adapter
i2eye DVC-1000 Video Phone
Quick Installation Guide & Instruction Manual
Ethernet (CAT5 UTP/Straight Through) Cable
Standard Composite RCAAudio/Video Cable
Intelligent Remote Control
PatentPending
different voltage rating
will damage and void
the warranty for this
product.
Using a power
supply with a

2 3
Sharing a Broadband Connection
With the i2eye DVC-1000
If you are sharing your broadband connectionwith any other
devices, use additional Ethernet (CAT5 UTP) cables to connect
your broadband equipment to a router or home gateway.
When you have completed the steps in this Quick Installation
Guide, your connected VideoPhone should look similar to this:
Before using your D-Link i2eye VideoPhone, you will want to understand
the network requirements for this device. If you are using a home gateway
or routerand sharing thebroadband connectionwith yourDVC-1000, please
read Using the DVC-1000 with a Router or Gateway on Page 33 of the
manual included with theDVC-1000.
Connecting the DVC-1000 Videophone
A. First,place the i2eye VideoPhone directly on top of a television. To
obtain the best viewing experience, the i2eye should be approximately 5
to 10 feet away from where you are viewing it.
B. Attach the supplied audio/video cable to the i2eye and to the matching
audio/video jacks onthe television or VCR.
C. Attach the supplied Ethernet cable to the i2eye and to the Cable or DSL
modem or Ethernet network device (hub, switch or router).
D. Attaching a telephone is optional, but recommended for optimal sound
qualitywhen videoconferencing.Attach a standard telephone cable to the
telephone and directly to thei2eye. Do NOT attach the telephone to a
wall telephone outlet.
E. Plug the suppliedAC power cable into an AC outlet and then into the
i2eye.
F. Attaching an external microphone is optional, but recommended for
optimal sound for a group videoconference.
B.
D.C.
E. F.

4 5
Using a Telephone with the i2eye
In addition to providing optimalsound quality, a telephone:
Can be used to start a videoconference similar to the way you
would place a regular telephone call.
Lets you receive a videconference call similar to the way you
would receive a regular telephone call.
Using the On-Screen Keyboard
Whenever you need to enter numbers or letters into a Setup screen, press
ENTER on the remote control and the on-screen keyboard appears:
Full-Screen/
Picture-in-Picture
Self-View/
RemoteView
After entering characters or numbers, and to execute a selection, press
ENTER on the remote. Use the arrow keys to move the cursor on the screen
to the desired character. The cursor can wrap around on the right and left side
of the keyboard to assist you in typing”a character quickly.
To remove the keyboard from the screen, highlight the OK key and press
ENTER on the remote. Also, the CANCEL key on the remote removes the
keyboard from the screen, leaving what you typed on the screen.
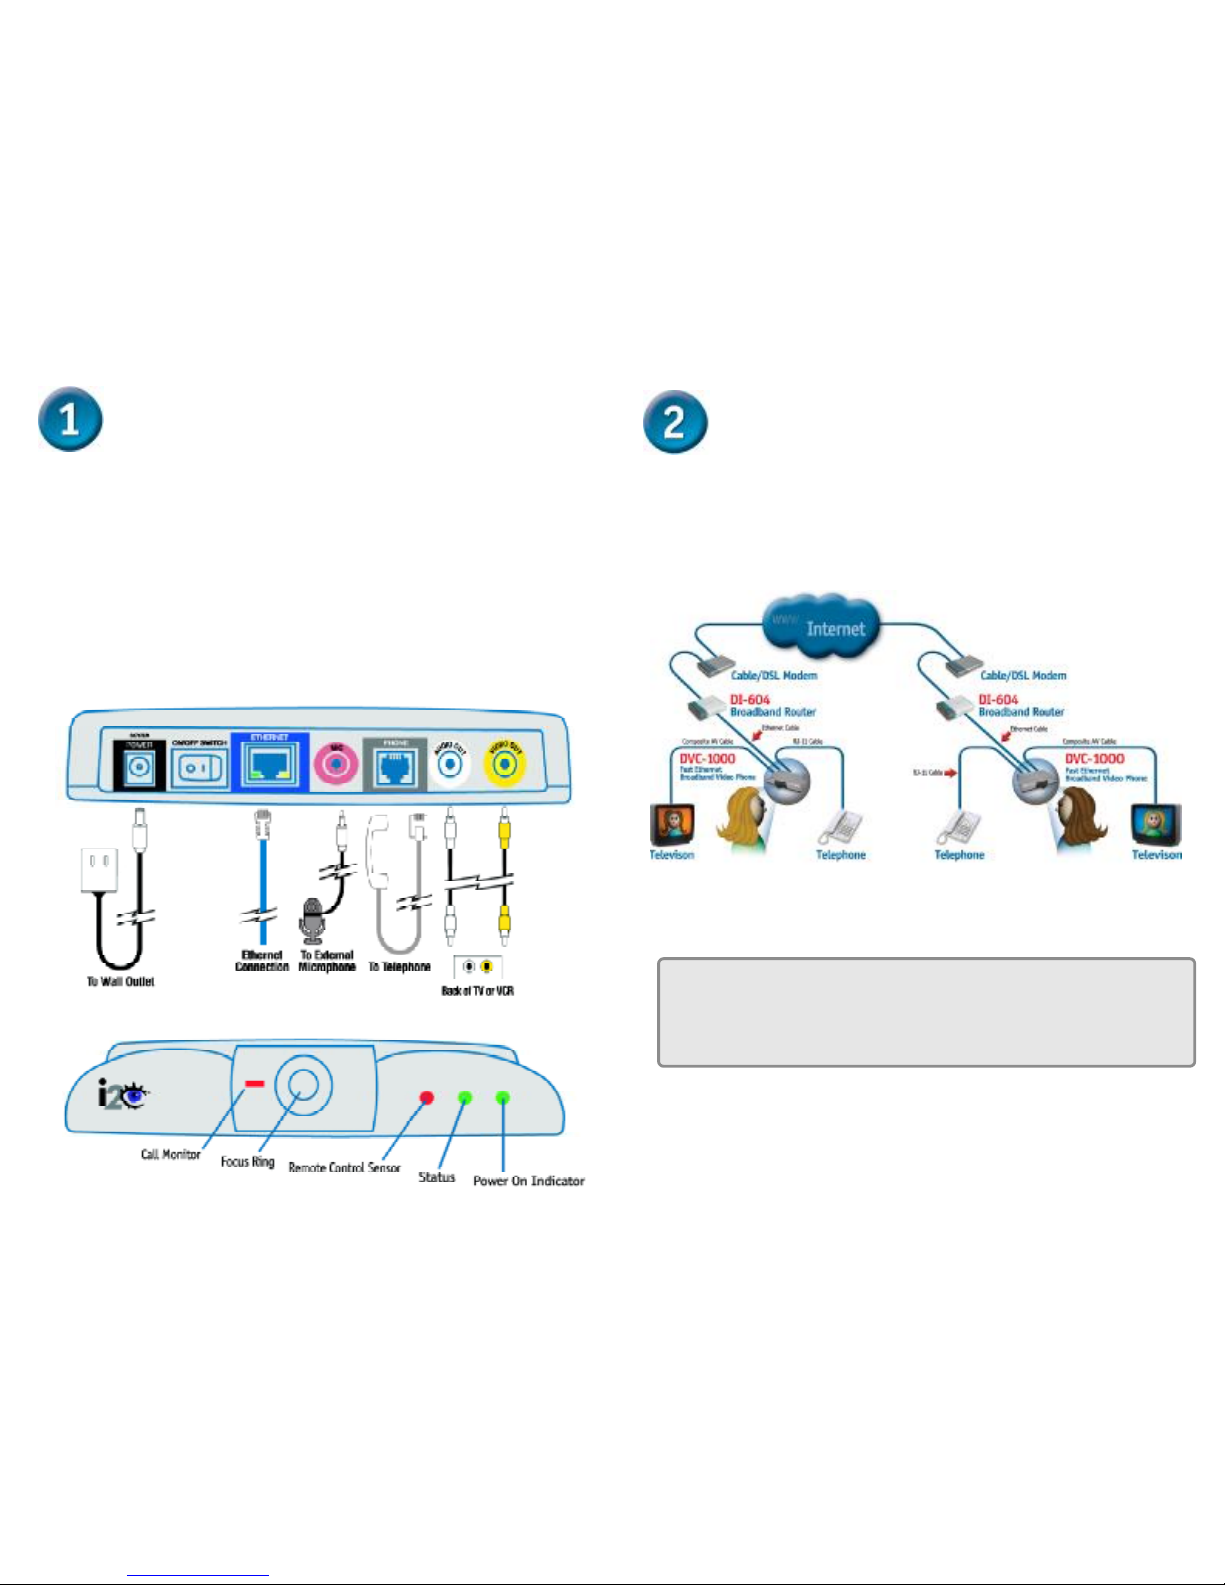
You cannot use a telephone plugged into the i2eye VideoPhone
to place regular phone calls as the phone would not be connected
to a standard phone line. Only VideoPhone calls over the Internet
can be made with a telephone connected to the DVC-1000.
Using the Remote Control
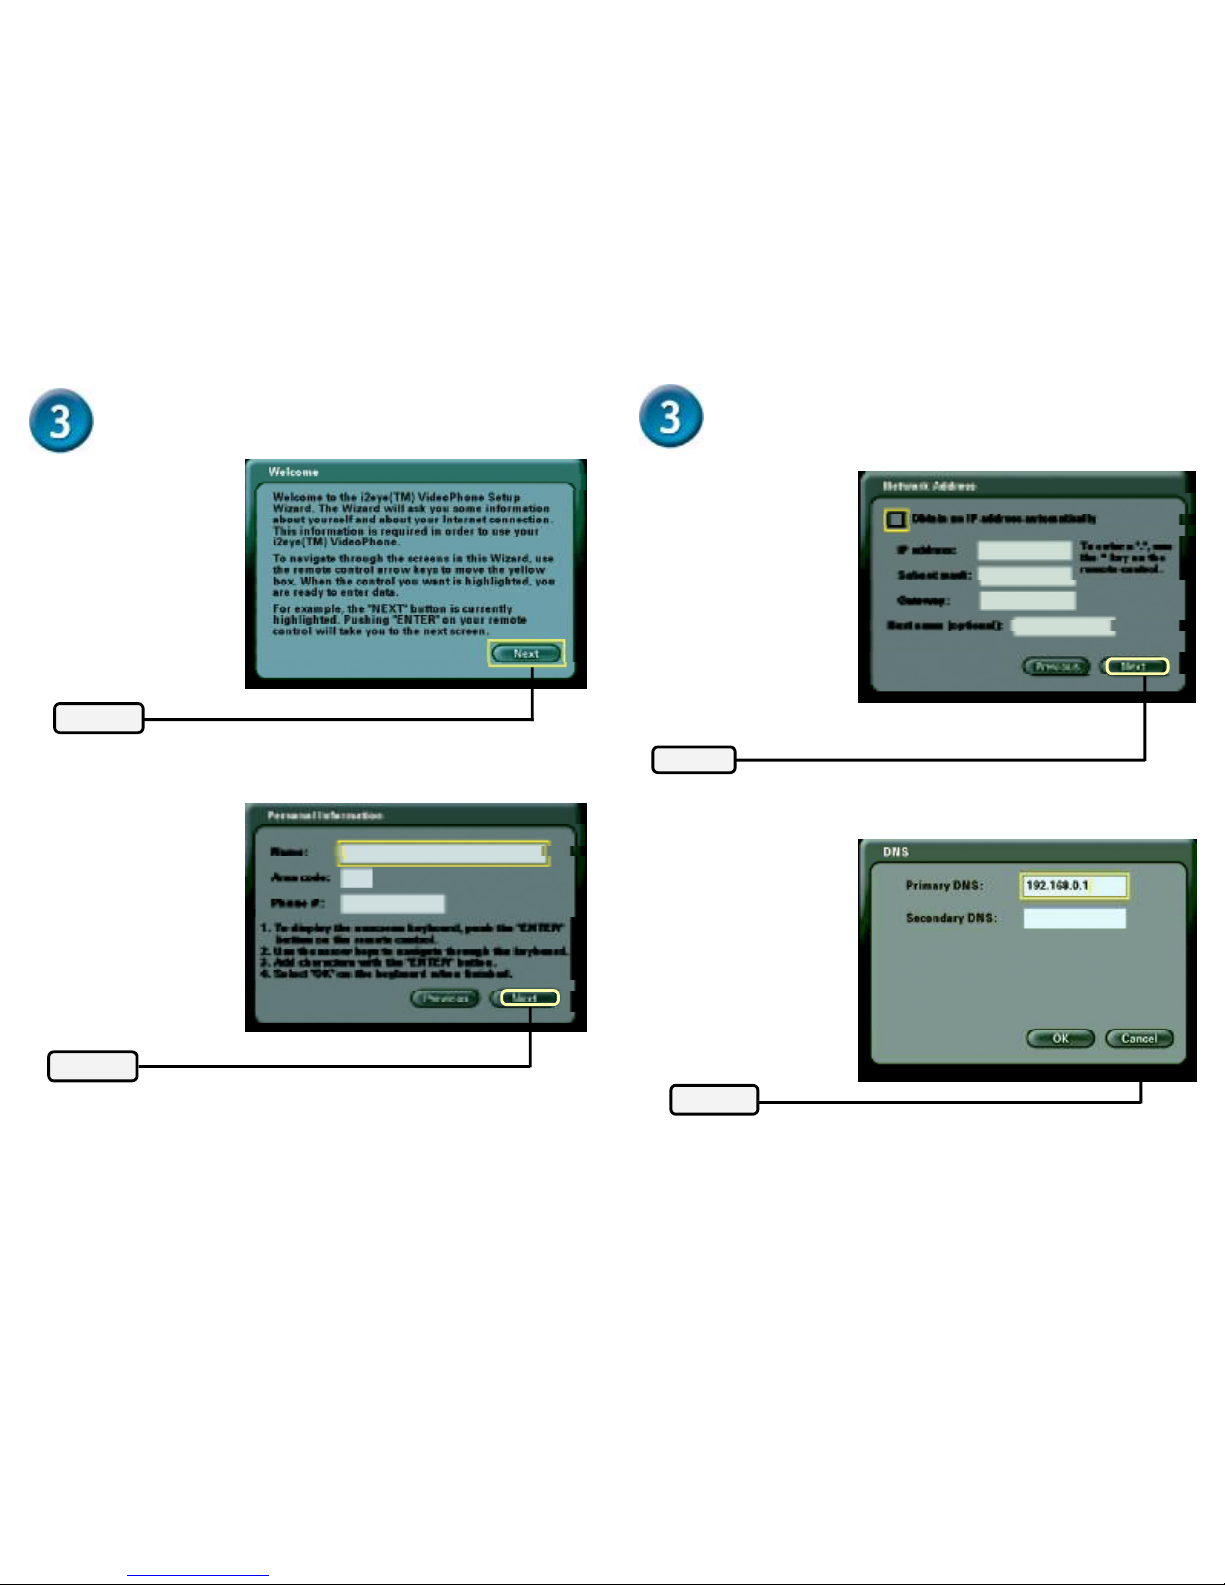
The i2eye VideoPhone needs to be setup before use. There is an easy to
use Setup Wizard built-into the i2eye to accomplish the setup.
You will use the Setup Wizard along with the remote control included with the
i2eye. The remote control is used to enter numbers, characters and make
selections from a keyboard that is displayed on the TV screen.
Mute Video
MuteAudio
Cancel
ENTER key
Number sign
AdjustContrast
Shift Key for
UPPER,lower
case or shift lock
The * (asterisk--sometimes called
a star”key) is used to enter a .”
(period also called a dot”.)
When entering alphanumeric
information, the left arrow key
performs a backspace, deleting
the character to the left of the on-
screen cursor.
When a numeric input is
required, (e.g., a telephone
number or IP address) enter it
directly by pressing the
number keys.
Speakerphone
Mode
Use the arrow keys to move
the position of the on-screen
cursor.

6 7
The Setup Wizard (continued)
The Setup Wizard
Welcome Screen
Personal Information Screen
Enteryournameandphone
number.
Thephonenumberyouenteris
one youcreateforfamily,friends
andotherstocallyou. Youcan
useyourregularphonenumber
ormakeupanewone. The
CallerIDfunctiondisplaysthis
nameattheotherendofthe
connection. Yournumberwilll
notbevisibletoanyone.
Click Next
Click Next
Network Address Screen
Leave the Obtain an IP
address automatically
checkbox checked to obtain
an IP address and other
Internet settings
automatically.
If you cannot automaticallybe
assigned an IP address
(throughDHCP), then
uncheck the checkbox and
manuallyenter the IP
Address, Subnet mask and
Gateway. Host name is rarely
used and this field is not
required.
Click Next
N S Screen
If you manually entered an IP
address in the Network
Address screen, you will see
the screen for setting DNS
server addresses. Only the
primaryDNS is required,
although entering both a
primary and secondary DNS
is recommended.
Click Next
X

8 9
NOTES
The Setup Wizard (continued)
N etw ork Sp eed Screen
Select the type of broadband
Internet connection you use.
Click Next
Your Setup is Complete!
Sy stem Restart
Click Yes

10
Technical Support
You can find the most recent user documentation on the i2eye website.
D-Link provides free technical support for customers within the United States and
Canada for the duration of the warranty period on this product.
U.S. and Canadian customers can contact D-Link Technical Support through our
web site or by phone.
D-Link i2Eye Technical Support over the Telephone:
(800)93-i2EYE
24 hours a day, seven days a week
D-Link Technical Support over the Internet:
http://www.i-2-eye.com
email:support@i-2-eye.com
Tech Support for customers within the United States:
Tech Support for customers within Canada:
D-Link Technical Support over the Telephone:
(800)361-5265
Monday to Friday 8:30am to 9:00pm EST
D-Link Technical Support over the Internet:
http://support.dlink.ca
email:support@dlink.ca
Other manuals for i2eye DVC-1000
2
Table of contents
Other D-Link Conference System manuals