D-Link DVX-2002F User manual


DVX-2005F IPPBX
Table of Contents
Chapter 1Feature Codes...................................................................................................1
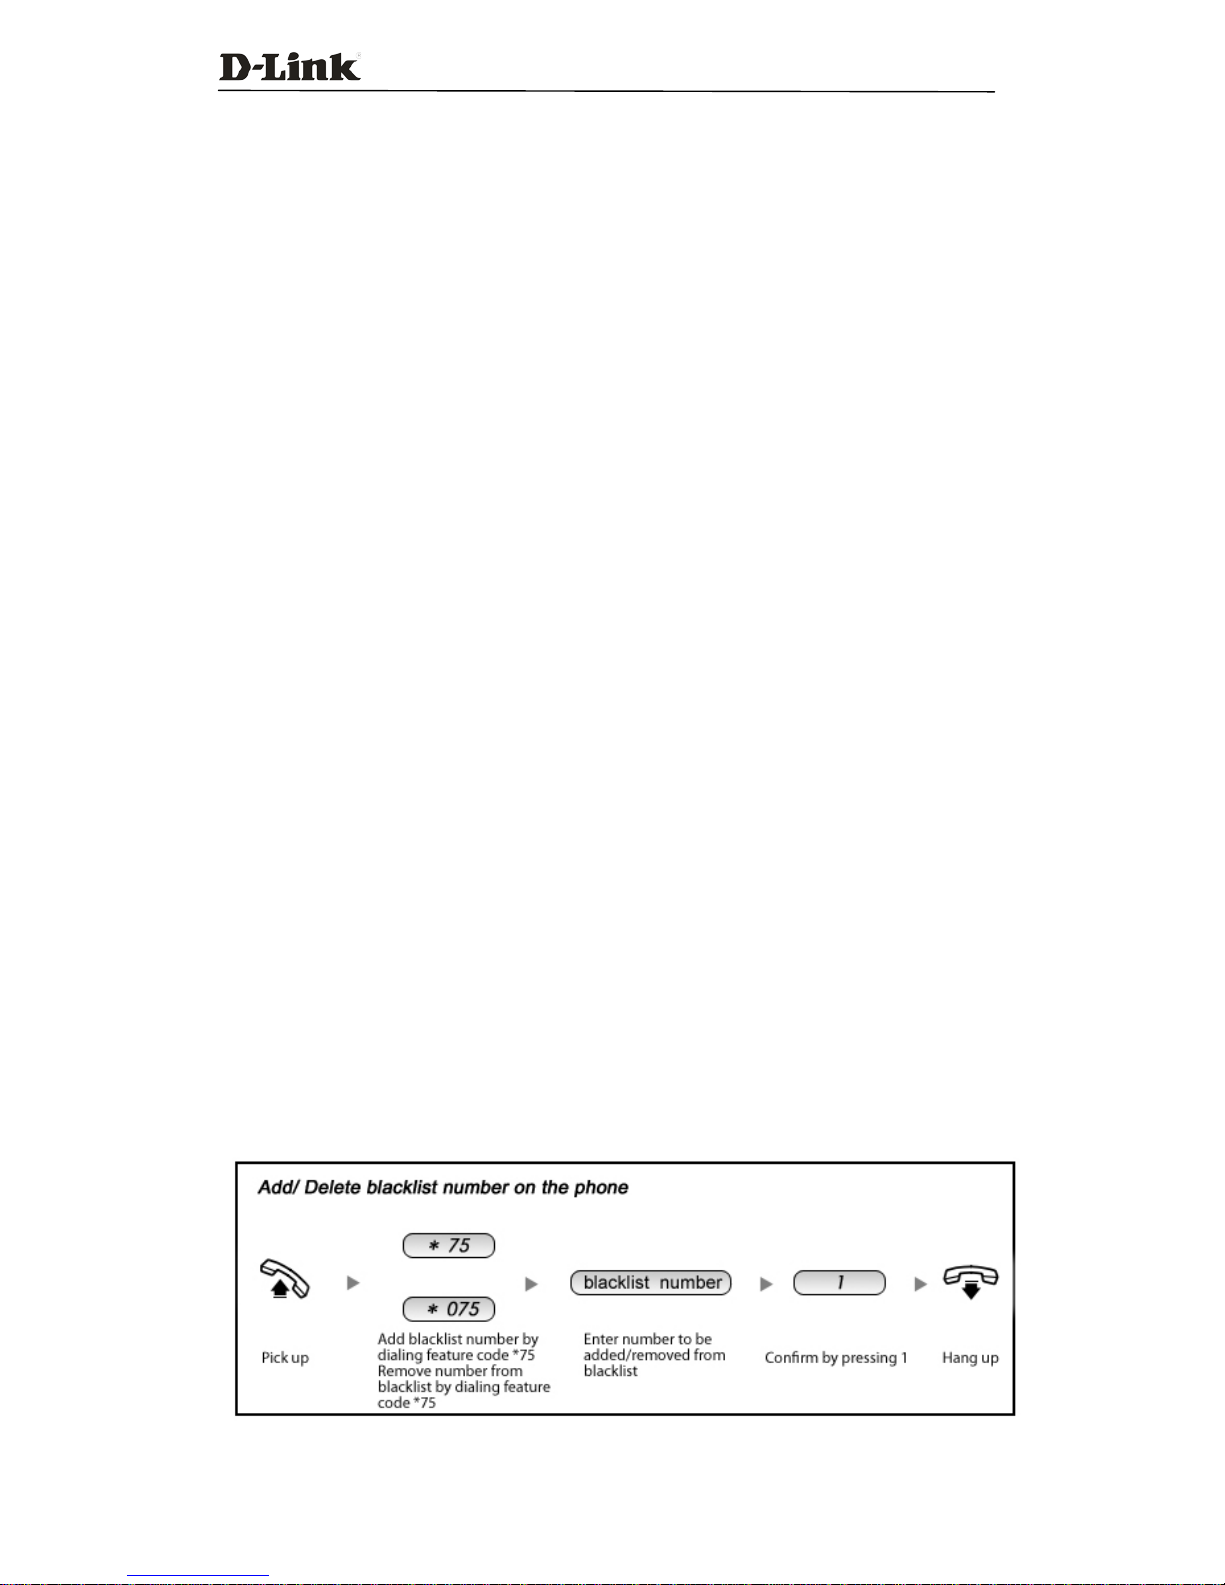
1.1 Blacklist ..............................................................................................................................1
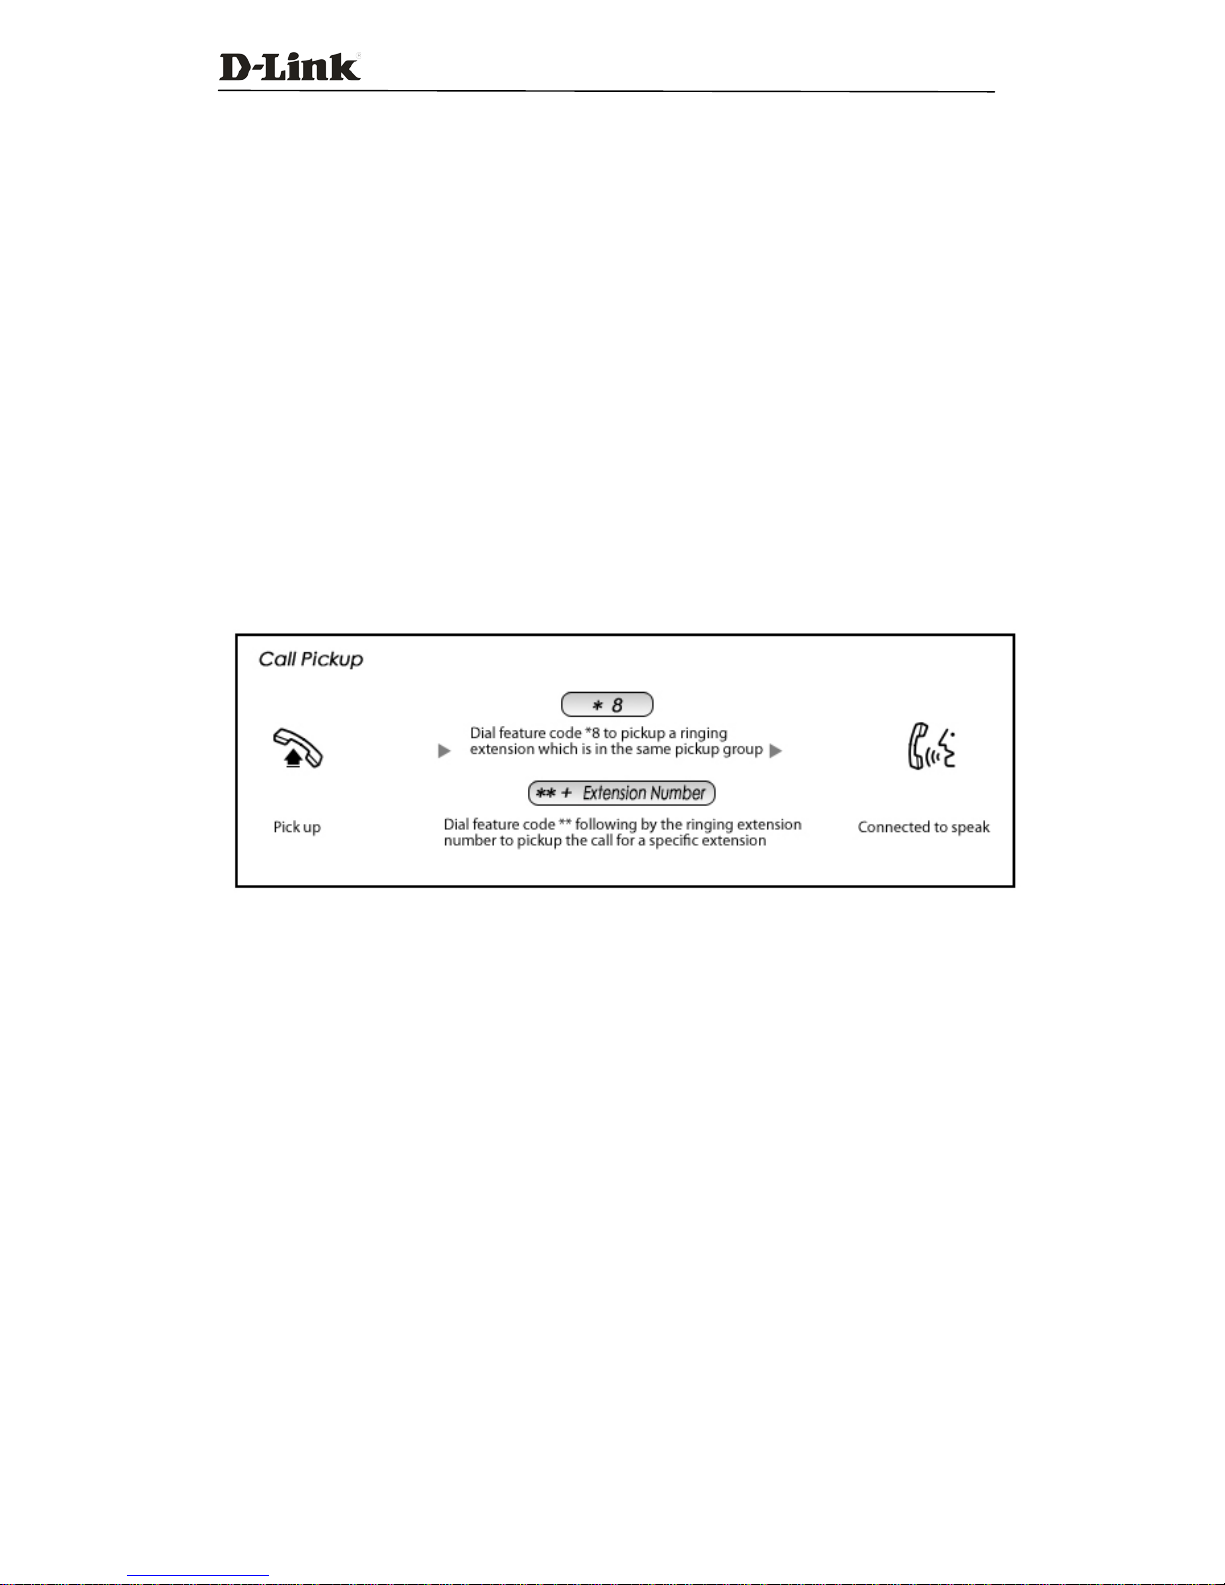
1.2 Pickup Call..........................................................................................................................2
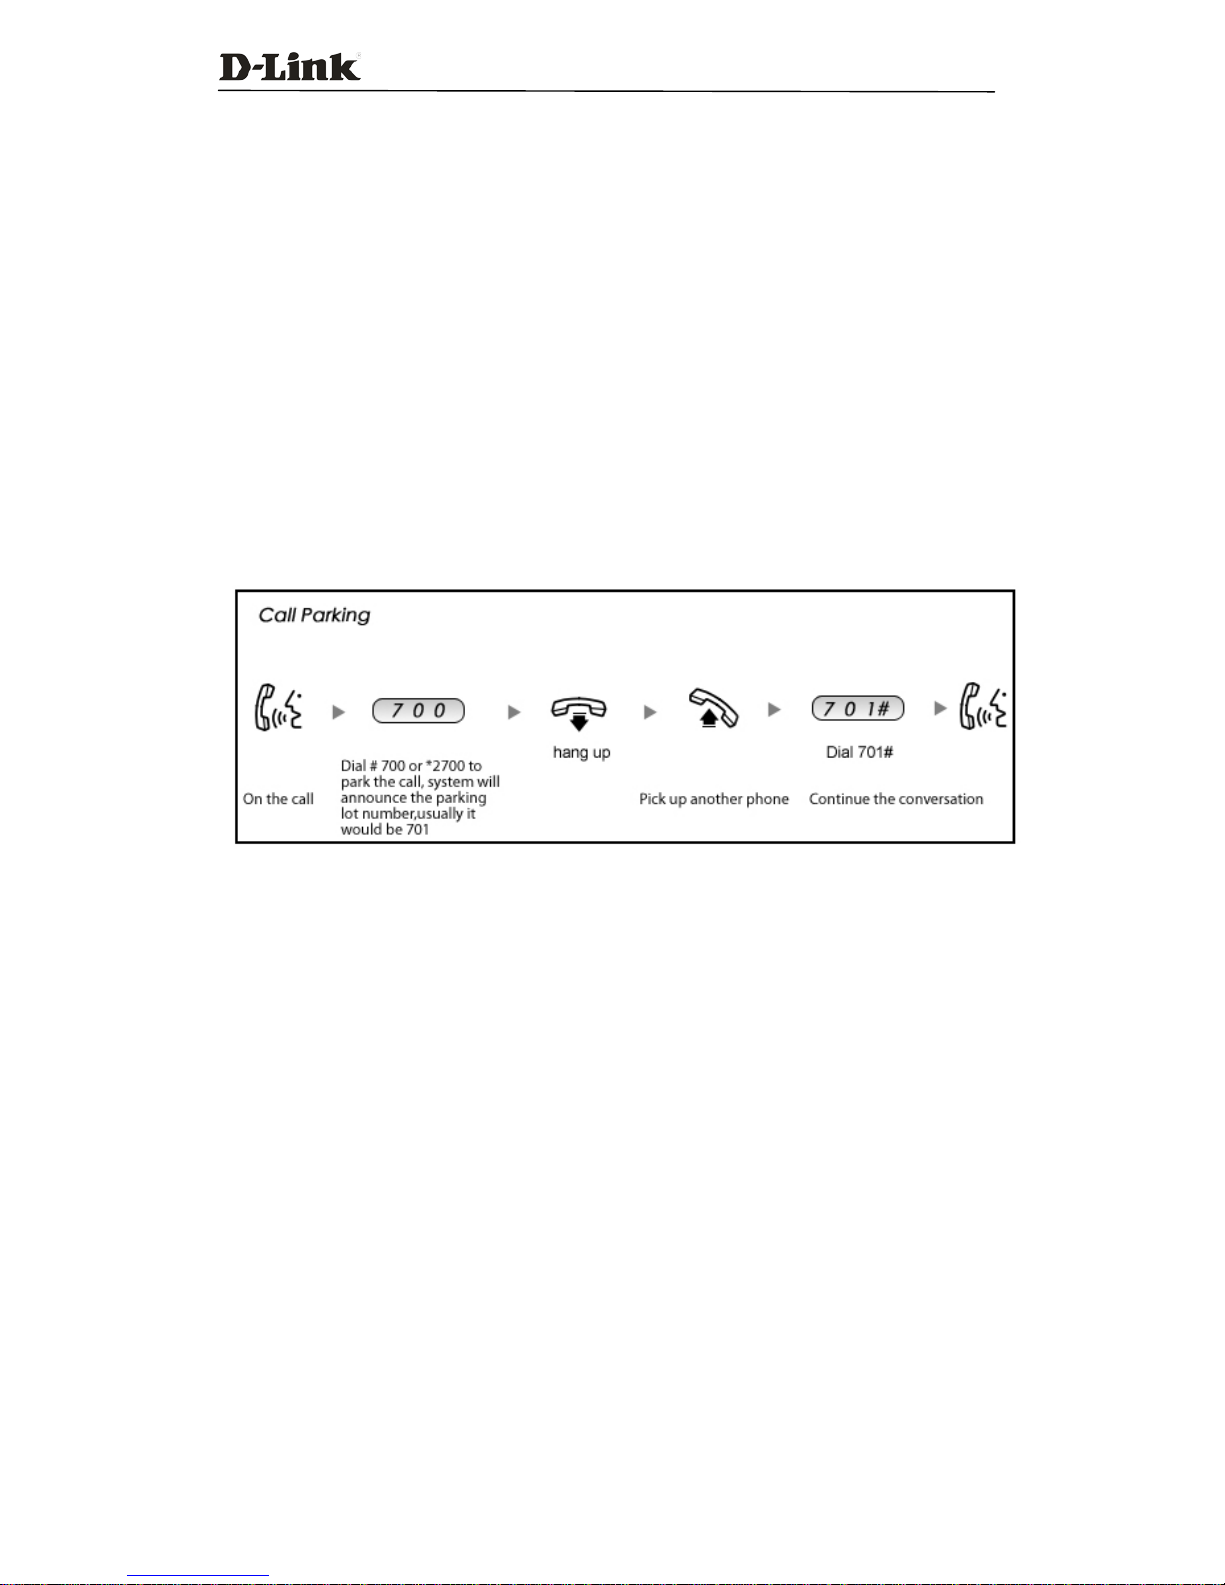
1.3 Call Parking.........................................................................................................................3
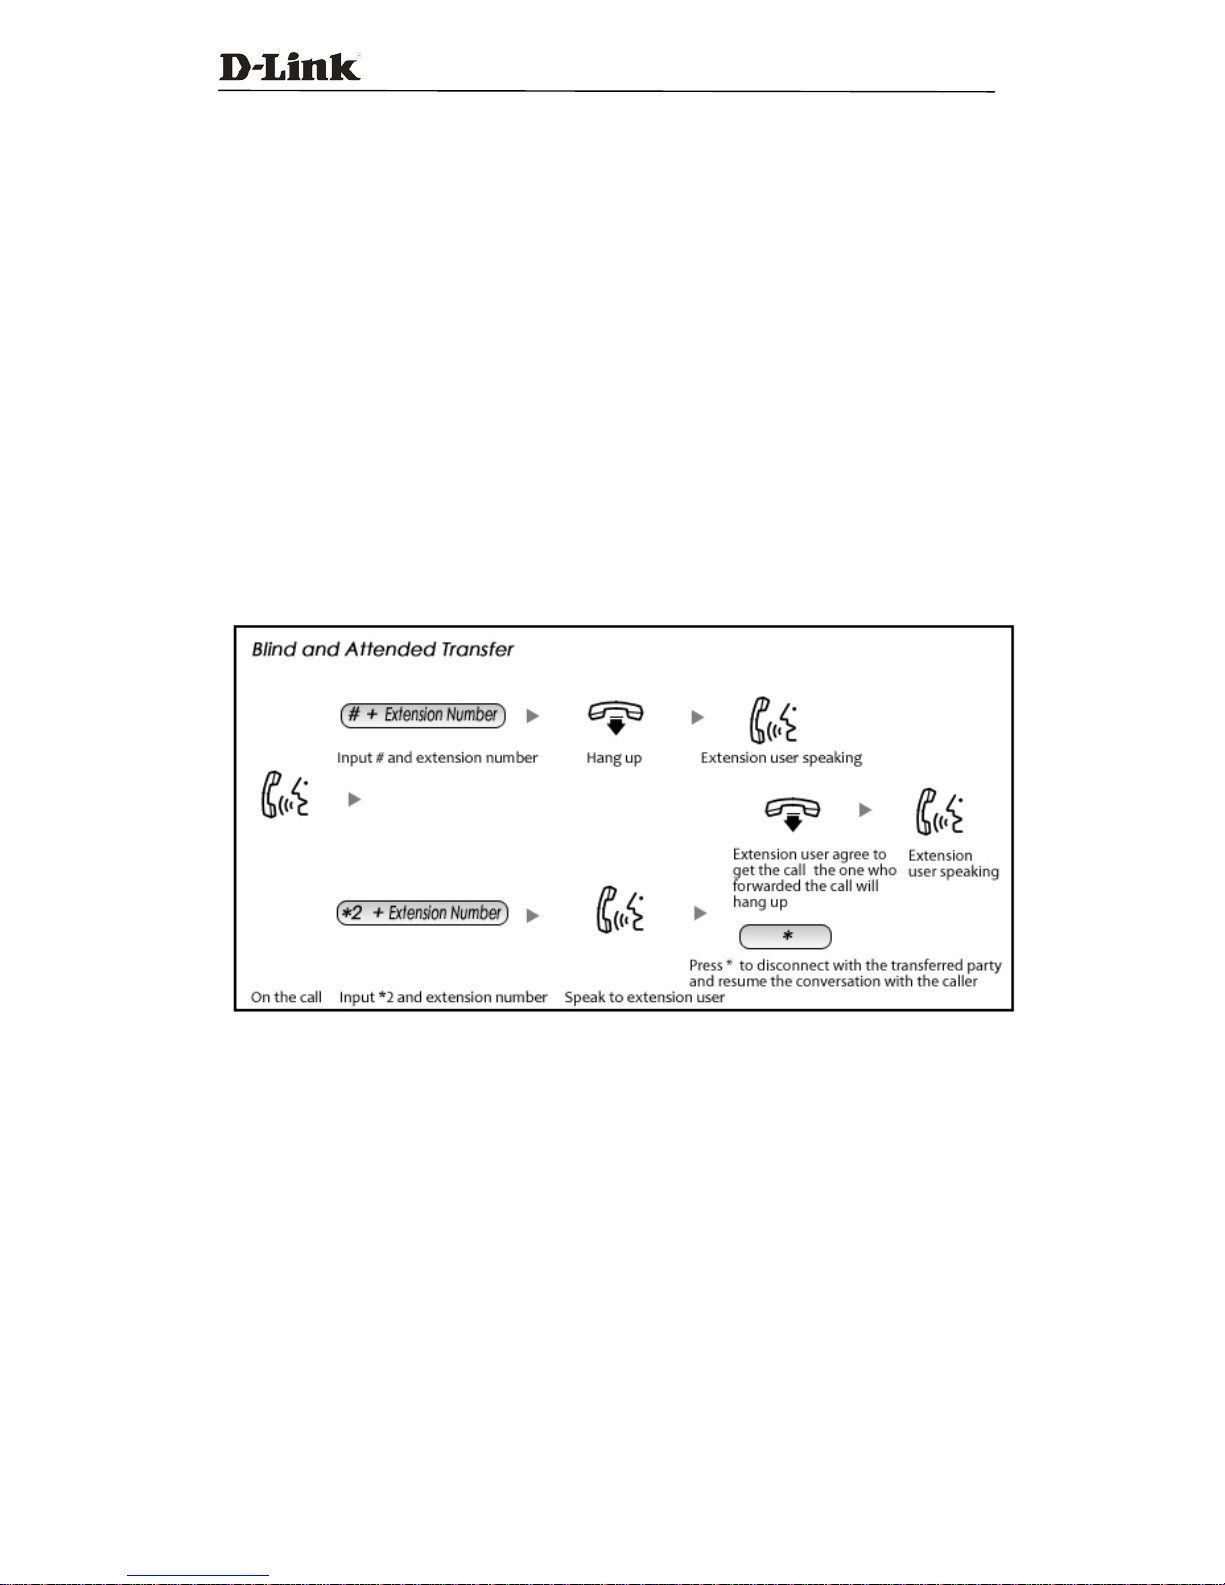
1.4 Call Transfer........................................................................................................................4
1.5 Conference..........................................................................................................................5
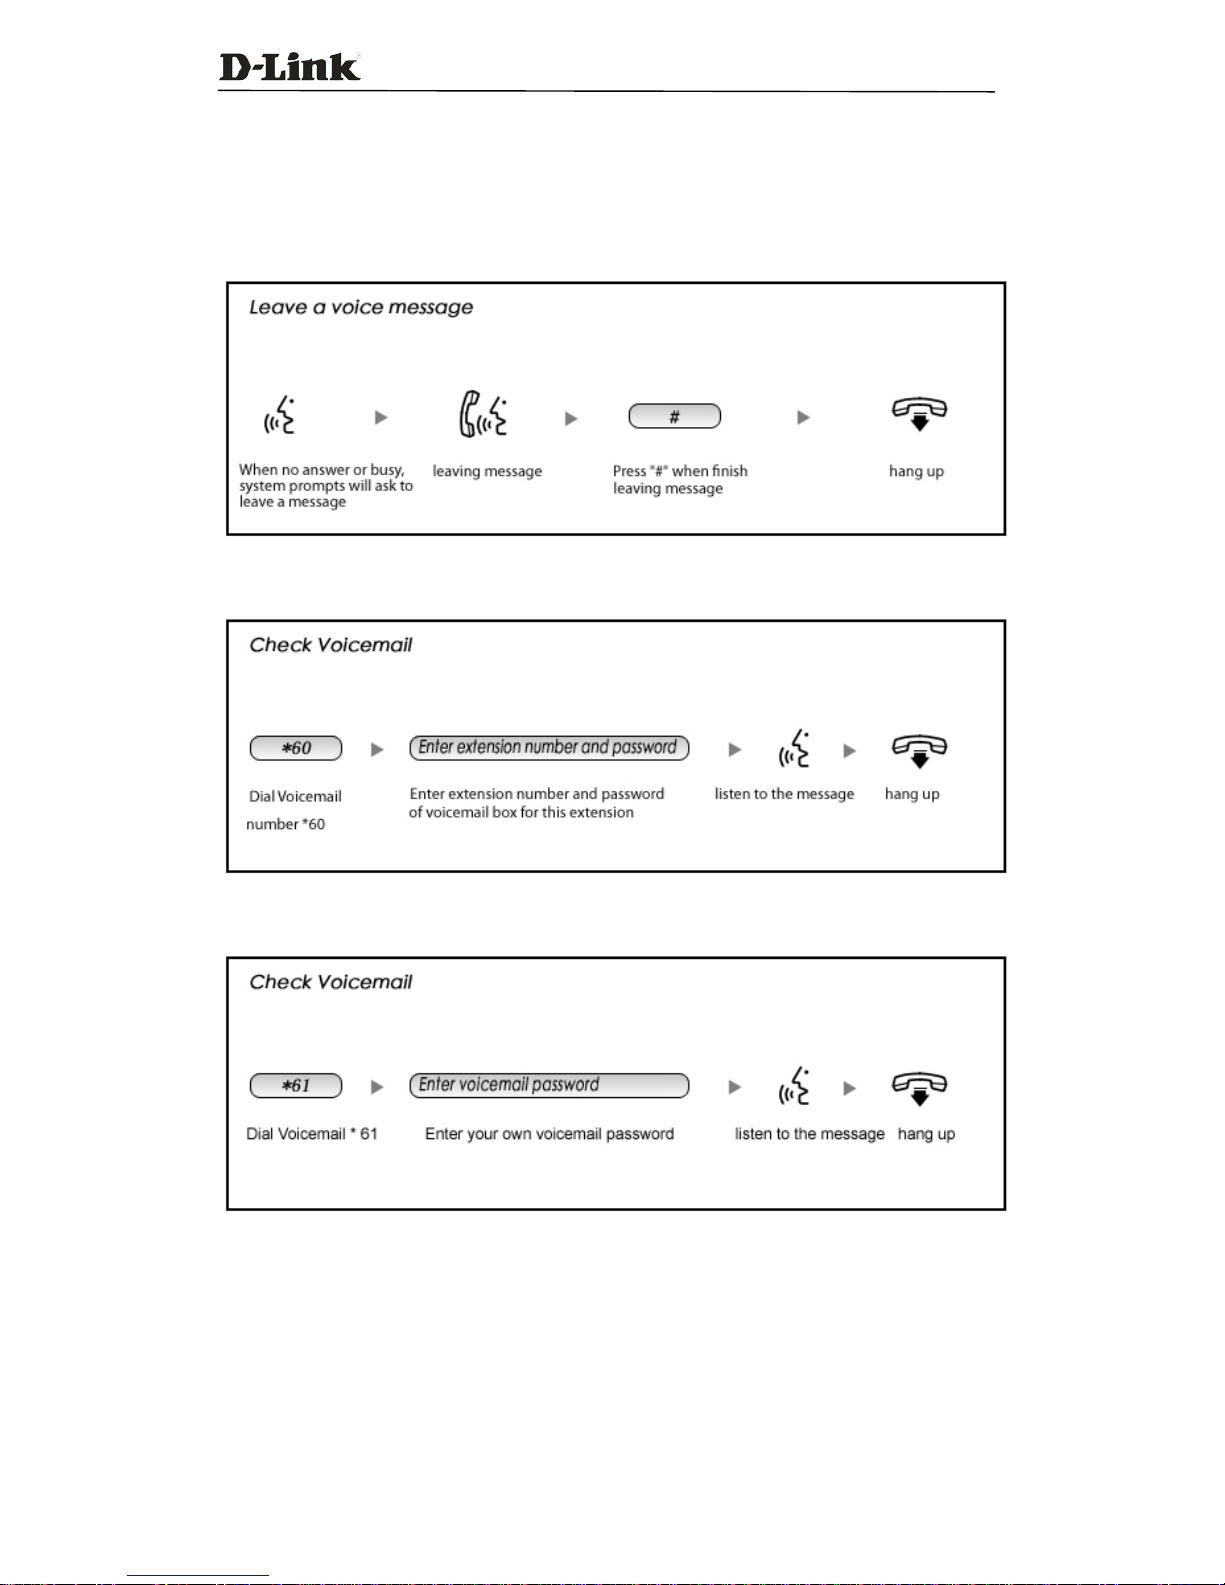
1.6 Voicemail.............................................................................................................................6
1.7 One Touch Recording..........................................................................................................7
1.8 Call Forward .......................................................................................................................8
1.9 Call Spy...............................................................................................................................9
1.10 Call QueueAgents’ Feature Codes..................................................................................10
1.11 Paging and Intercom Call................................................................................................11
1.12 Directory (Dial by Name) ...............................................................................................12
Chapter 2Extension User Web Portal............................................................................13
2.1 Extension User Web Login................................................................................................13
2.2 Phone Book and Speed Dial..............................................................................................14
2.3 Web Dial............................................................................................................................15
2.4 Call Logs...........................................................................................................................16
2.5 Record List........................................................................................................................17
2.6 Voicemail List ...................................................................................................................18
2.7Call Forward ......................................................................................................................19
2.8Follow Me..........................................................................................................................20
2.9User Settings......................................................................................................................21
2.10 Send/Receive Faxes ........................................................................................................22

DVX-2005F IPPBX
1
Before Reading:
This manual has been written specifically for extension users.
An extension user registered to IP PBX is able to check the system phonebook,
call logs, recordings and faxes
Chapter 1 Feature Codes
Feature codes are special codes that users can dial to access various features on IPPBX
system.
All feature codes introduced below are factory defaults. This chapter will introduce the
most commonly used feature codes such as Blacklist, Pick-up Call, Call Parking, Call
Transfer, Conference, and Voicemail.
If an operation associated with these feature code fails, then please contact your system
administrator to check the feature codes settings as they may have been changed from
default values.
1.1 Blacklist
By setting a Blacklist you can block specific numbers from calling inbound to your IPPBX
system. You can add a number to your blacklist by dialing feature code *75 on your
phone, to remove a number from the blacklist you must dial *075.
The following diagram details the process for adding and deleting numbers from your
blacklist:

DVX-2005F IPPBX
2
1.2 Pickup Call
When one of your colleagues is away from their phone extension and the phone rings,
you can pick-up this call on your extension without physically walking over to the ringing
extension.
IPPBX system can divide the extensions into different call pick-up groups, usually an
administrator willcreatethese groups by their relevent departments. Extensions in the
same department (pick-up group) can pick-up inbound call in the same department by
using feature code *8 directly. If different departments, users can dial ** following by
the ringing extension number to pick-up the call.
Please follow the process below to pick-up a call:

DVX-2005F IPPBX
3
1.3 Call Parking
If you receive a call on your phone but the call is actually for another extension user
who is currently busy, then you can temporarily park the call.
To do this, you transfer the call to 700 (a system number used for parking calls), as soon
as you transfer this call to 700 the IPPBX system will announce to you which position the
call is parked in, usually 701.
This call will park on 701 for 45 (default) seconds, and you can notify the extension user
that they have a caller waiting for them on 701. The user can then simply retrieve the
call by dialing 701 directly.
Note:
While a call is parked, the caller will hear music while they are waiting. If the call is not
answered within 45 seconds then it will go back to the extension which parked this call.

DVX-2005F IPPBX
4
1.4 Call Transfer
You can transfer a call to another extension or an external number using feature codes
of the IPPBX system.
There are 2 sets of feature codes that can be used to perform a call transfer. One is blind
transfer where the feature code is #, the other is attended transfer where the feature
code is *2.
With blind transfer, you can transfer the call directly, while with attended transfer you
are allowed to introduce the call to the third party first before deciding whether to
complete or cancel the transfer.
The full transfer process is detailed in the diagram below:

DVX-2005F IPPBX
5
1.5 Conference
Participating in a conference call is as simple as dialing the conference number and
entering the conference password.
There are two levels of conference call login, conference admin and ordinary conference
participant. They are distinguished from each other by the login password used.
The following diagram details how to participate in a conference call:
When a conference has commenced, the administrator can invite a new guest
(extension user or external number) into the conference. (Default password for admin is
2345)
The process for inviting a guest into a conference call is detailed in the diagram below:

DVX-2005F IPPBX
6
1.6 Voicemail
Please follow the process detailed in the diagram below when leaving a voicemail:
Follow the process detailed below to check voicemail messages from another extension:
Check your own voicemail by following the simple process described below:
Voicemail messages can also be sent direct to your email box. If you require this
feature then please contact your system administrator who can make the necessary
configuration changes.

DVX-2005F IPPBX
7
1.7 One Touch Recording
There are 2 methods to initiate call recording.
Auto call recording
One touch recording
Auto call recording is activated by your administrator from the admin Web GUI. If you
want all your inbound and outbound calls recording, then you can ask your
administrator to activate this feature for you.
One touch recording requires no pre-configurations, you simply record a call by
pressing *1 on an ongoing call.
To check your phone call recordings please refer to Chapter 2.5 Record List.

DVX-2005F IPPBX
8
1.8 Call Forward
You can activate/deactivate call forward directly on your phone by using feature codes.
The feature codes to activate/deactivate call forward in different conditions are
detailed below:
Condition 1: Call Forward All Calls (forward unconditionally)
The feature code for activating call forward all calls is*71
Dial *71 followed by the number you require calls forwarding to and end with #, your
extension is now set to unconditionally forward all incoming calls. For example, dial
*71803# to forward all your calls to extension 803, or dial *71985337096# to forward
all your calls to 85337096(9 is the prefix to call outbound).
The feature code for deactivating call forwarding of all calls is*071
Dial *071# to deactivate unconditional call forward.
Condition 2: Call Forward On Busy
The feature code for activating call forward on busy is*72
Dial *72 followed by the number you want the calls forwarding to and end with #,
now your extension is set to forward incoming calls when you are busy on the phone.
The feature code for deactivating call forward on busy is*072
Dial *072# to deactivate call forward on busy.
Condition 3: Call Forward On No Answer
The feature code for activating call forward on no answer is*73
Dial *73 followed by the number you wish calls forwarding to and end with #, now
your extension is set to forward incoming calls when a call is not answered.
The feature code for deactivating call forward on no answer is*073
Dial *073 to deactivate call forward on no answer.
Notice:
Condition 1 is mutually exclusive with Condition 2 and 3. So if you’ve configured
unconditional call forward, call forward on busy and call forward on no answer are of
no use. Call forward on busy and call forward on no answered can be configured at the
same time.

DVX-2005F IPPBX
9
1.9 Call Spy
Call spy feature allows you to monitor an ongoing call of an extension user. This
feature must be activated for the extension before it can be used. Please contact your
system administrator to request spy feature activation if required.
There are 3 scenarios when using call spy.
Scenario 1: Normal Spy
With normal spy you can only listen to both speakers but they cannot hear anything
from your phone.
Feature code for normal spy is *90.
An example of using normal spy is if you wish to spy on extension 405, you simply
pick-up your phone and dial *90405.
Scenario 2: Whisper Spy
Whisper spy is also known as coaching and with whisper spy you can listen to both
speakers and talk to the extension number you have spied on.
Feature code for whisper spy is *91.
An example of using whisper spy is if a new employee whose extension number is 405
is talking to a customer on the phone, the supervisor can dial *91405# to listen to
their conversation and speak to train the new employee.
Scenario 3: Barge Spy
Barge spy is more like an instant 3-way conference call. While the extension user is
talking to someone on the phone, you can barge in and talk to both of them.
Feature code for barge spy is *92.
An example of using barge spy is while extension user 405 is talking to someone on
the phone, you can dial *92405# to barge into this call and talk to both of the
speakers.

DVX-2005F IPPBX
10
1.10 Call Queue Agents’ Feature Codes
This section is for call queue agents and if this is not applicable to your role then you
can skip this section. There are feature codes to pause and un-pause the IPPBX system
from distributing calls from a queue to your extension.
Feature code to pause distributing calls is*95 and to un-pause is *095.
If you are leaving your position for a coffee break and don’t want any calls from the
call queue to be sent to your extension during this period, you can simply dial *95# on
your phone and leave.
After your coffee break has finished and you are back at your desk then just dial *095#
to resume call processing from the call queue .

DVX-2005F IPPBX
11
1.11 Paging and Intercom Call
On DVX-2005F IP phone system, you can use your extension to make paging/intercom
calls to a group of extension users or a single extension user. The called party will auto
answer on the IP phone in speaker mode and the caller can talk directly to the called
party.
Paging and intercom are almost the same features. The only difference between
paging and intercom is the called party of an intercom call can talk to the caller while
the called party of paging call cannot talk to the caller but instead can only listen.
These 2 features are useful for making an instant announcement over company IP
phones.
Toper form a paging/intercom call to a group of extensions, first please ask your
system administrator to create a group and give you the number of the group. Now
you can make a paging/intercom call. As an example, if you have a group number 660
then you can dial 660# and talk directly on the phone, other extension users within
the group will now hear you from their phones on speaker mode.
The Feature code to perform an intercom to a single extension number is *50, and the
feature code to make a paging call to a single extension number is *51. For example,
you dial *50407#/*51407# and the intercom/paging will be sent to extension number
407.
Notice:
Paging/Intercom feature requires the support of auto-answer feature on your IP
phones, so you can only make paging/intercom call to IP phones extensions. Analog
extensions, soft-phone extensions are unable to make paging/intercom calls.

DVX-2005F IPPBX
12
1.12 Directory (Dial by Name)
Directory feature is also known as “dial by name”. Its feature code is *3. With this
feature you are able to call certain extension users without knowing their extension
numbers.
If you dial*3# then you’ll hear a voice prompt asking you to enter the first 3 letters of
the user’s first or last name. You can press on the phone keypad to enter either the
first 3 letters of the user’s first name or last name and then the IP phone system will
announce a user name and extension number and then simply press 1 to confirm or
press * to match another entry.
For example, you have extension users James and Jane at your company and you are
planning to call Jane. You dial *3# and after listening to the voice prompt you press
the buttons 5, 2 and 6. System will now ask if you want to call James, press 1 to
confirm or * to go on to the next entry, if you press * the system will ask if you wish to
call Jane and if you press 1 then you will call Jane’s extension.
Notice:
On your IP phone, when you finished dialing a feature code, an extension number, or
an external phone number, you should end it with a#symbol as this will force your IP
phone to send out the number dialed immediately. If your extension is an analog
phone please DO NOT use # to end dialing a number.

DVX-2005F IPPBX
13
Chapter 2 Extension User Web Portal
Extension users can use their extension number and voicemail password to login to
IPPBX Web GUI to configure some features and also view certain logs related to your
own extensions.
For security related reasons, the extension user portal is not activated for users by
default; please contact your system administrator to activate this feature from the
admin Web GUI.
2.1 Extension User Web Login
Ask for IPPBX Web GUI URL from your administrator and enter it into a browser address
bar, press Enter and you’ll see a login page as below:
Enter your extension number and voicemail password , click "login” and you will see the
following extension user portal.

DVX-2005F IPPBX
14
2.2 Phone Book and Speed Dial
On the Phone Book page you can see the contacts which have been added to the IPPBX
system by your administrator and other extension users.
As you can see in the above, there is a speed dial code for each contact. Speed dial
codes can be used to call the contacts with feature code *99. For example, the speed
dial code of contact John is 01, extension users can dial *9901 to call John without
dialing his complete phone number.
To avoid conflicts, extension users are not allowed to define speed dial codes. After you
have created a new contact, please contact your system administrator who will create a
speed dial code for your new contact.

DVX-2005F IPPBX
15
2.3 Web Dial
While you are logged into your user Web portal, you can call a number from the Web
GUI without dialing from the phone keypad. Input the number required and click
“Call” . Your extension will now ring and once you pick-up your phone the call will be
automatically made for you.

DVX-2005F IPPBX
16
2.4 Call Logs
On the call logs page, you can check all of your call detail records. In the dropdown list
entitled “Field” select “Caller ID” and click “Filter” and now you can find the call
records you made. By selecting “Destination ID” and clicking on “Filter” you can find
out the call records that you received.
By clicking download you can download your call records as a CSV file to save it on
your hard disk drive.

DVX-2005F IPPBX
17
2.5 Record List
All auto call recording files made for your calls can be found from the Recording List
page under the Call Recording tab.
You have the options to play this recording directly from your browser or playback
with an extension phone device by clicking “Play”.
Type 1 is used to playback the recording within the browser directly by clicking ,
and Type 2 is used to playback the recording on a phone, please select an extension
number and click “Play”.
For recorded files, you also have the option to download it to your local hard disk
drive, please click the button to download.
One touch recording files can be found under the One Touch Recording tab. You have
the same playback options for the one touch recording files as you do for auto
recorded files.

DVX-2005F IPPBX
18
2.6 Voicemail List
There are feature codes for extension users to listen to their voicemail messages
directly from their phones and on the extension user web portal a user can also check
and playback voicemail messages.
On the Voicemail List page, you can see all of your new and old voicemail messages by
selecting the appropriate folder on the “Field” dropdown list.
You have the options to playback, delete and download voicemail messages.
By selecting a folder in the dropdown list on the left and a different folder on the right
side and clicking “Move to” you can move a message from one folder to another. For
example, on the left side if you select “New” and on the right side you select “Old”
and click “Move to” you can move the message from “New” folder to “Old” fo lder.
This option is to mark the new (unchecked) message as old (checked). After
completing this action, you will no longer receive the message waiting indication on
the phone.
Other manuals for DVX-2002F
2
This manual suits for next models
1
Table of contents
Other D-Link PBX manuals
Popular PBX manuals by other brands

Yeastar Technology
Yeastar Technology MyPBX U300 installation guide

Grandstream Networks
Grandstream Networks GXE5102 user manual

Planet
Planet IPX-330 Quick installation guide

Planet
Planet Internet Telephony PBX System IPX-300 Series user manual

Planet
Planet IPX-2500 Frequently asked questions

LevelOne
LevelOne VOI-9200 user manual