D-Teg Smarty CX1000 User manual

E
3
[Customer Support]
The CX1000 may be upgraded periodically with new functions and
features, please check our website (www.d-teg.com) or with your sales rep
to stay updated and maximize your experience.
Keep a separate record of your device’s serial number as customer service
may be limited without it.
Video Playback Software (PC Viewer)
The video playback software (PC Viewer) installation file can be found in the
provided micro SD card [pcsw] folder. Please install this program on your PC
to fully utilize your CX1000.
To safeguard private information, all video data is coded and can only be
viewed through the PC Viewer. Using the PC viewer the data can be made
into a more standard AVI file.
To install, copy the exe file to your desktop and double click the setup.exe
icon. Follow the on screen instructions to complete.
Power ON
The device will automatically power up and start recording when external
power is supplied. You can also power up the device by pushing the [power]
button for 3 seconds, if the battery is charged.
Power OFF
When external power is cut off, the device will automatically stop recording
and shut down. Data being processed will be safely saved before powering
off. Power can be manually turned off by pressing the [power] button for 3
seconds.
Plugging in the micro SD card
Plug in the micro SD card only when the device is powered off. Push the card
in all the way until it clicks securely. Power on only when the micro SD card is
firmly plugged in.
Extracting the micro SD card
Extract the card only after the device is fully powered off: LCD is off, red LED
is off, and green LED is off. Push the micro SD card to unlock and pull out.
Do not force the card out as it may cause damage to the card and device.
Operaciones Básicas

E
4 5
Failure to follow these safety instructions could result in fire, electric shock,
or other injuries, or damage to you, your CX1000, or other property. Read
all the safety information below before using the device and operate in
accordance to this user guide.
Install the CX1000 where it does not block the driver’s visibility
and out of the way of airbags.
Do not expose the device or any accessories to rain, snow, or
other forms of moisture.
The suitable operating temperature for this device is -10°C ~
60°C (14°F ~ 140°F)
Keep the recorder lens clean, clear all obstructions in front of
the device, and refrain from excessive sun film use to maximize
visibility.
The quality of the recorded video may vary depending on the
brightness, reflections, and sudden change in illuminance.
Take care not to drop, impact, or poke the device as it may
damage it.
Clean the area before installing the mount to strengthen the hold.
Dry your hands before handling the cigarette lighter plug as you
may get electrocuted.
■ Operation Basics ......................................................... 3
■ Table of Contents........................................................ 4
■ Safety Advice ............................................................. 5
■ Product Description and Preface ..................................... 7
■ Contents ................................................................... 8
■ Overview .................................................................. 9
■ Installation ...............................................................11
■ Getting Started ..........................................................12
■ Operation Basics ........................................................13
■ Installing the PC Viewer Program ...................................16
■ Playback ..................................................................17
■ Trouble Shooting .......................................................18
■ Recording Time Table .................................................19
■ Product Specifications ................................................20
■ Accessories (Sold Separately) .......................................21
■ Product Warranty ......................................................22
Safety AdviceTabla de contenidos
Do not clean the device with flammable substances like
benzene, thinner, or alcohol as it may damage the device.

E
6 7
The D-TEG Smarty Drive Recorder CX1000 is a an onboard mobile CCTV
fitted at the front window of a car and used to record traffic data: including
video, audio, GPS, and g-sensor. It can also be detached easily and used as a
portable camera to collect evidence in traffic incidents or unexpected Kodak
moments.
Please drive safely with your mobile ally: Smarty CX1000.
Damages due to production malfunction, loss of data, or other damages
occurring while using this product shall not be the responsibility of the
manufacturer. Please familiarize yourself with the capabilities your new
Smarty CX1000 by reading this user guide carefully before use.
Although the product is a device used for recording videos, we cannot
guarantee all data will be recorded absolutely. To reduce chances of
malfunction, please check the device, accessories, and the micro SD card
periodically.
To prolong your use of Smarty CX1000, please check the data on your micro
SD card, back up the data you wish to keep, and reformat the storage media
once every week.
Check the Recording Time Table on page 19 and keep note of the reference
recording time for your setting as important data may be lost due to
overwriting, when set to overwrite, or missed, when set to stop when data
folders are full. Please back up your data frequently and immediately when
in an accident.
Do not disassemble or modify the device unless by an official
dealer or at an authorized service center. Any damage due to such
actions may cause the warranty to be void.
When using a permanent power source, check if it has a low
voltage cut-off function so it does not drain your battery dead.
Use only genuine or approved D-TEG products, parts, and
accessories. D-TEG Security Co., Ltd. will not take any responsibility
for damage caused by use of non-genuine articles.
Micro SD cards included with the CX1000 are approved for use in
this model only and should not be used with other devices.
At 1080P Full HD resolution recording, the device will not create
separate event files. Please back up your files regularly, especially
if you are in an accident, as data might be overwritten.
Product Description
Preface
Safety Advice

E
8 9
When purchasing the CX1000 the following items are included, please check if
all contents are included in your purchase and if not talk to your seller.
1. Drive Recorder
(Model: CX1000)
2. Micro SD Card
The playback software (PC Viewer)
installation file: setup.exe is stored
in the [pcsw] folder.
Please install immediately to
fully utilize all the functions.
4. Cigarette Lighter Plug
3. Mount
NOTE
When using the cigarette lighter plug, the CX1000 will shutdown when
the ignition is off, to record while your vehicle is parked, you can purchase,
separately, a permanent power plug.
NOTE
The enclosed micro SD card is initialized for immediate use, if you wish to use
a different micro SD card you must initialize it with the PC Viewer prior to use.
Please refer to page 18 for instructions.
Mount
Use the double-sided tape to
fasten the mount.
Lens
The lens should be
clean for optimal
Visual quality
|
Front
|
Power Input
5V
Power
Record
Micro SD Card
4GB, larger size micro SD cards
can be purchased separately
| Side |
OverviewContents
Speaker

E
10 11
NOTE
Pressing the reset button on the bottom of CX1000 will reboot the CPU
but the configurations will remain the same. To reset the configuration,
use the reset menu which will retune the device but not remain the
language and time zone the same. The device can be reset entirely by
selecting factory default and then restarting.
Mount Screw
Turn clockwise to
secure the position.
Up/ Zoom In
Down/ Zoom Out
Mode/ OK
Menu/ Return
Internal Mic
Reset
A/V Out
| Back |
For safety, park your vehicle in a brightly lit flat space and turn your vehicle
off before installing the CX1000. Use only genuine D-TEG power connectors
when supplying power.
1. Select a location where the
CX1000 will not obstruct the
driver’s line of vision and where the
device will have best field of view.
Clean and dry the area where the
mount will be attached. Peel off
the paper backing of the double-
sided tape, position the mount,
and push firmly for a few seconds.
Most drivers install their drive recorders right in front of the rear
view mirror.
2. Adjust the device’s field of view using the LCD display
3. Connect the cigarette lighter plug to the device. You can organize
the cable by tucking it into the front window’s headliner, behind
the A-pillar, and then under the dashboard.
4. Plug in the cigarette lighter plug into the cigarette lighter socket
InstallationOverview

E
12 13
Automatic Start
The CX1000 is designed to automatically start when power is supplied. If
the cigarette lighter plug is correctly connected the device will power up
automatically when the vehicle ignition is turned on.
Language Selection
When the CX1000 is turned on for
the first time, follow the onscreen
instructions to set the language
using the arrow buttons and then
confirm by pressing the OK button.
Automatic Booting and Record
When connected properly, CX1000 will automatically boot and start
recording when the ignition is turned on. Booting may require up to 15
seconds, recording will start immediately after this process.
Recording Modes
1. Normal (Continuous) is the main mode of recording. Resolution and frame
rates should be set per your preference and considering the size of the
micro SD card. Changes in configuration can be made through the [Device
Setting] tab on the PC Viewer or go to [Video Settings] on the device.
2. Event (Shock and Panic) is a supplementary mode of recording that
activates when triggered by either an impact or a push of the [REC] button.
In such events, 15 seconds of pre and post event will be stored separately
in the micro SD card under [gsnr] and [recsw] folders respectively. A total of
10 events can be stored in each folder and will be, depending on settings,
overwritten or not recorded when full.
A. Shock triggered video and data will be recorded automatically when the
g-sensor senses a change in g-force of more than the set limit. This limit
can be set through the [Device Setting] tab on the PC Viewer or go to
[Video Settings] on the device.
B. Panic video and data will be recorded when the [REC] button is pushed.
NOTE The default setting for record is “normal (continuous)” at
30 FPS, 720p resolution. This allows for separate event and panic
recordings. At this setting, the storage medium may fill up quickly
and will, depending on the settings, overwrite or stop recording when
full. To avoid losing valuable data, back up all relevant data to a
separate storage medium immediately after each incident.
NOTE When recording at 30FPS, 1080p HD resolution, separate
Event files (Shock and Panic) will not be stored. If you wish to keep
separate event files, change the settings to a lower resolution or
frame rate, e.g. 10FPS, 1080p HD or 30FPS, 1080p
Operation BasicsGetting Started
Timezone Setting
Check your time zone’s time offset
and use the arrow keys to select the
correct one.
Examples
Seoul, Tokyo: +9 / Sydney: +10
New York: -5 / Chicago: -6
London: 0 / Paris: +1
NOTE
Recording will start immediately once Timezone is set.

E
14 15
LCD Display ON/OFF
You can turn the LCD monitor off and on by pressing [OK] during a recording.
Recording will continue regardless of the LCD’s status.
You can also set the LCD to automatically turn off after 10 seconds by
setting the LCD Auto Off to ON either through the [Device Setting] tab on
the PC Viewer or go to [Video Settings] on the device.
Modes
CX1000 has three modes: Video, Photo, and Playback. Modes can be
changed by pressing the [OK] button while on standby.
In Video mode, press [REC] to start recording and [MENU] to stop.
In Photo mode, press [REC] to take photos.
In Playback mode, press [MENU] to enter Playback Settings and Folder
Change. Use the arrow buttons to change folders. Once you have accessed
the folder of choice, use the arrows buttons to change files. During Video
Playback press [REC] to play, [MENU] to stop, and arrow buttons to fast
forward or rewind.
Settings
CX1000 has four settings: General, Video, Photo, and Playback. General
Settings can be accessed in any mode by pressing [MENU] and the other
mode settings can be accessed by pressing [MENU] while in each mode. For
Video Settings, video recording needs to be discontinued before settings can
be accessed. Press the arrow buttons to move between the selections, [OK]
to select, and [MENU] to deselect and return to previous stage.
Battery
CX1000 comes with a built-in lithium polymer battery and can be turned on
for 15 ~ 30utes without external power.
Delayed Shutdown
You can choose to continue recording during quick stopovers by turning the
delayed shutdown function on. When activated, the CX1000 will continue
recording for max 5utes, depending on the battery life, after external power
is cut off.
Parking Mode
You can use the CX1000 as a surveillance camera while your car is parked.
For this function to work you need to use a permanent power source that
will not disconnect when the ignition is turned off. You need to then go to
Video Settings and turn this function on. With the Parking Mode activated,
if your vehicle is still for more than 5utes, CX1000 will recognize this as being
parked and will automatically change modes. In Parking Mode, recording will
be at 1 FPS, the LCD will turn off, and the red recording LED will blink. Once
your vehicle starts moving, recording will return to its original setting.
Firmware Upgrade
To upgrade your CX1000, please follow these steps. The device will not
upgrade unless an external power is connected.
1. Download the firmware you wish to install from our website: www.d-teg.
com or distributor.
2. Extract the micro SD card from the device and plug into your PC.
3. Access the card and create a folder called “program”
4. Copy the firmware file (CX1000_X.X.X.bin) into the “program” folder
5. Plug in the micro SD card into the device and power on.
6. The two LED lights will blink while upgrading.
7. After upgrade, the device will automatically reboot for use.
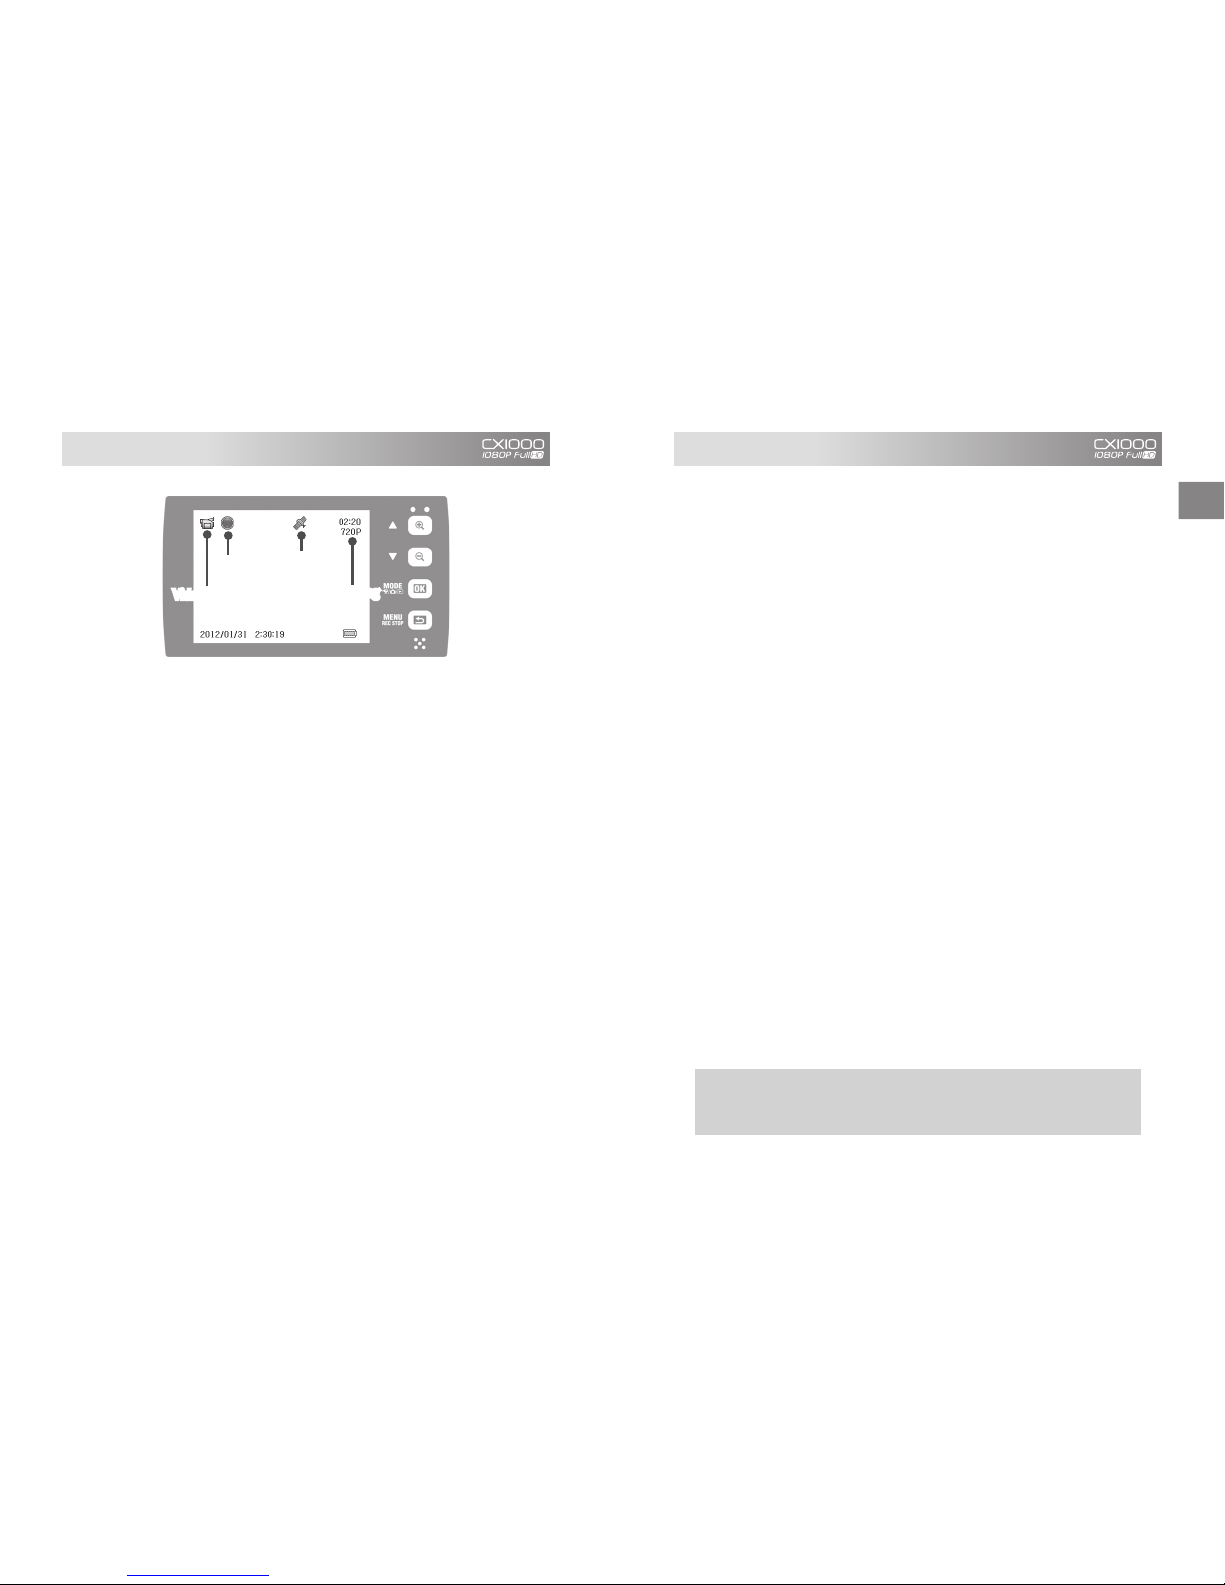
Recording
Time
GPS
connection
Recording
Video Mode
WARNING Cutting off power during the upgrade will seriously
damage the device. Leave the external power connected, car ignition
on, and device power on during upgrade.
Operation BasicsOperation Basics

E
16 17
The PC Viewer for Smarty CX1000 is in the micro SD card “pcsw” folder.
1. Plug in the micro SD card into your PC.
2. Open the “FHDREC1” drive
3. Open the “pcsw” folder and execute the “setup.exe” file.
4. Select your language and follow the on screen instructions.
5. The above icon will appear if installation is successful and you checked the
Box to create a desktop icon.
The data files generated by Smarty CX1000 are all encrypted to
safeguard personal information and can only be played back using the
PC Viewer. Once data is loaded, it can be transformed into the more
common AVI file by using the [Save to AVI] icon.
You must install the PC Viewer to view or use recorded data.
Uninstalling
To uninstall, make sure the program is not running. Click on the
Start Menu, then click on Control Panel. Select Uninstall and select
“PCViewer CX1000.”
Downloading PC Viewer Program
To download the PC Viewer for CX1000, go to www.d-teg.com Click
“SUPPORT” and check the list under “Downloads” for the appropriate
software.
①
Click the “Open” icon.
②
Select the micro SD card drive.
NOTE : Select the drive and not the individual
folders within the micro SD card.
③
Click“OK”
④
Check the data files you wish
to view or click “Check All” to
select all data files.
⑤
Click “Load”
to load selected
data.
PlaybackInstalling the PC Viewer Program

E
18 19
CX1000 does not power on
Check if the power is plugged in securely on both ends. If it is, take the micro
SD card out and reboot. If CX1000 powers on without the micro SD card,
there is a problem with the storage media and needs to be reformatted or
renewed.
Alarm is ringing
If the micro SD card is not securely plugged in or is damaged, the alarm will
go off and the red LED will blink.
1. Check if the micro SD card is working properly
2. Reformat the storage media using the PC Viewer
3. Check if the micro SD card is securely plugged
WARNING
When reformatting the micro SD card, all data will be deleted, please back
up all important data before proceeding.
How to reformat the micro SD card
1. Launch the PC Viewer
2. Click the “Init SD”
icon
3. Select the micro SD card drive
4. Follow the on screen instructions
NOTE
If an error message pops up, re-plug in the micro SD card and try formatting
again. If it still does not work after several tries, there maybe a problem with
the micro SD card, please contact your seller
Playback is not smooth
The smoothness of the data playback depends on the recorded frame rate
and in some cases, your PC’s performance. If the playback seems rough, try
selecting fewer files to playback. Also, once converted into an AVI file the
playback may become smoother.
Resolution FPS Micro SD card (in minutes)
4GB 8GB 16GB 32GB
1080P HD
30 57 123 257 523
10 73 218 508 1,089
Parking Mode
228 683 1,593 3,413
1080P
30 47 142 332 711
10 85 256 597 1,280
Parking Mode
310 931 2,172 4,655
720P
30 72 215 502 1,076
10 163 488 1,138 2,438
Parking Mode
427 1,280 2,987 6,400
VGA
30 213 640 1,493 3,200
10 245 735 1,716 3,677
Parking Mode
1,138 3,413 7,964 17,067
NOTE
This table is for reference only and may differ depending on
configuration and use.
Recording Time TableTrouble Shooting

E
20 21
Camera Sensor 1/3” 3 mega pixel CMOS sensor
Angle of view 150° (Horizontal: 116° , Vertical: 86° )
Recording Speed
and Resolution
30 FPS @ 1080P Full HD (1920x1080)
30 FPS @ 1080P (1440x1080)
30 FPS @ 720P (720x1080)
30 FPS @ VGA (680x480)
Video Recording
Mode Normal (continuous), Event (Shock Sensor, Panic), Parking
Mode
Compression
Format Video: H.264, Audio: G.711
Recording Time 8GB: 50 min ~ 960 min, 32GB: 470 min ~ 150 hours
Max Event Files Shock Sensor: 10, Panic: 10
Photo JPEG, 100 shots, 3.5M Pixel, Full HD, 1080p, 720p, VGA
Shock Sensor Internal 3-dimension Gravity Sensor
GPS Internal GPS
Storage Media Micro SD/SDHC card (min 4GB, max 32GB supported)
Real Time Clock Rechargeable internal battery
Buzzer Event trigger alarm, micro SD card error
LED 2 LED (Red: Recording, Green: Power)
LCD Display 2.4”, 16bit, 65,536 color, limited viewing angle from left
Battery Lithium Polymer (max 25 min at Full HD recording )
Memory Backup
Power Super-capacitor (max 5 ~ 10 sec)
Data access PC Viewer Program (playback, print, back up, file conversion)
Power Input DC 5V (cigarette lighter plug or permanent power connector)
Power Use 5W( average)
Size 88(W)mm X 55(H)mm x 17(D)mm
Weight 75g
Operating
Temperature -10°C ~ 60°C
Video Out Cable( AV-150)
Use the included cable to view
video and images on a monitor or
navigation device.
Hardwire Power Junction Box
(GES-5015L)
Use this to hardwire CX1000 to the
vehicle's fuse box.
Low Voltage Disconnect Switch
(DPWR-300)
This switch disconnects power when
the battery voltage drops below
a preset limit (12V or 24V) which
prevents batteries from becoming
over-discharged. Use with GES-
5015L to ensure the battery does
not go dead and to extend battery
life.
Accessories (Sold Separately)Product Specification

S
3
[Servicio de Atención al Cliente]
El CX1000 puede actualizarse periódicamente con nuevas funciones
y características. Por favor, visite nuestro sitio web (www.d-teg.com)
o comuníquese con su representante de ventas para estar al día para
maximizar su experiencia.
Por favor, Mantener un registro separado de número de serie del
dispositivo como servicio al cliente puede ser limitado sin él.
El software de reproducción de vídeo
El software de reproducción de vídeo (Visor del PC) archivo de instalación se
pueden encontrar en la carpeta pequeña tarjeta SD [pcsw]. Por favor, instale
este programa en su computadora para utilizar plenamente su CX 1000
CX1000.
Para proteger información privadaTodos los datos de vídeo está codificada
y sólo se pueden ver a través del visor de PC. Utilizando el visor de PC, los
datos se pueden hacer en un archivo AVI más estándar.
Para instalar, copiar el ‘exe’ archivo en el escritorio y haga doble clic en el
setup.exe icono. Siga las instrucciones en pantalla para completar.
Poder ENCENDIDO
El dispositivo automáticamente tienen poder y comenzar a grabar cuando se
suministra la alimentación externa. También puede encender el dispositivo
pulsando el botón [power] durante 3 segundos, si la batería está cargada.
Poder APAGADO
Cuando se corta la alimentación externa, el dispositivo automáticamente
detener grabación y apagar. Datos procesados se guardarán con seguridad
antes de apagar.
El poder puede ser apagado manualmente pulsando el botón [power]
durante 3 segundos.
Poner la pequeña tarjeta SD en el CX 1000
Ponga la tarjeta micro SD en el CX1000 solamente cuando el dispositivo
está apagado. Empuje la tarjeta hasta que oiga el clic seguro. Encienda el CX
1000 sólo cuando la tarjeta SD está firmemente enchufada.
Extracción de la pequeña tarjeta SD de la CX1000
Debe extraer la tarjeta sólo después de que el dispositivo está
completamente apagado: LCD está apagado, LED rojo está apagado y LED
verde está apagada. Empuje la tarjeta pequeña SD para desbloquear y sacar.
No fuerce la tarjeta, ya que puede causar daños en la tarjeta o el CX1000.
Operaciones Básicas

S
4 5
El hecho de no seguir estas instrucciones de seguridad puede causar un
fuego, choque eléctrico, otras lesiones, daño a ti , daño a su CX1000, o otra
propiedad. Por favor, lea toda la información de seguridad abajo antes de
usar el dispositivo y operar de acuerdo a esta guía del usuario.
Instale el CX1000 donde que no obstruya la visibilidad del
conductor y alejados de las bolsas de aire.
No exponga el dispositivo o cualquier accesorio a la lluvia, nieve
u otras formas de humedad.
La temperatura de funcionamiento adecuada para este
dispositivo es -10°C ~ 60°C (14°F ~ 140°F)
Limpiar la lente de la cámara, despejar obstrucciones frente del
dispositivo y abstenerse del uso de película excesiva en el sol para
maximizar la visibilidad.
La calidad del video grabado puede variar dependiendo de la
luminosidad, reflexiones y cambios repentinos de iluminancia.
No suelta, golpear o empujar el dispositivo porque esto podría
dañarlo.
Limpiar el área antes de instalar el monte para reforzar la
sujeción.
Séquese las manos antes de manipular el encendedor de
cigarrillos como usted puede conseguir electrocutado.
■ Operaciones Básicas .................................................... 3
■ Tabla de Contenidos .................................................... 4
■ Consejos de Seguridad ................................................. 5
■ Descripción del Producto y Prefacio ................................. 7
■ Contenidos ................................................................ 8
■ Visión de Conjunto ...................................................... 9
■ Instalación ...............................................................11
■ Para Empezar ...........................................................12
■ Operaciones Básicas ...................................................13
■ Instalar el programa Visor de PC ....................................16
■ Reproducción ...........................................................17
■ Solución de Problemas ................................................18
■ Tabla Tiempo de Grabación ..........................................19
■ Especificaciones del Producto .......................................20
■ Accesorios (Vendidos por Separado) ...............................21
■ Garantía del Producto .................................................22
Consejos de SeguridadTabla de contenidos
No limpie el dispositivo con sustancias inflamables como
benceno, disolventes o alcohol ya que puede dañar el dispositivo.

S
6 7
The D-TEG Smarty Drive Recorder CX1000 is a an onboard mobile CCTV
fitted at the front window of a car and used to record traffic data: including
video, audio, GPS, and g-sensor. It can also be detached easily and used as a
portable camera to collect evidence in traffic incidents or unexpected Kodak
moments.
Please drive safely with your mobile ally: Smarty CX1000.
Daños causados por mal funcionamiento de la producción, pérdida de
datos u otros daños que ocurren mientras utiliza este producto no será la
responsabilidad del fabricante. Familiarízate con las capacidades de su
nuevo CX1000 Smarty leyendo este manual cuidadosamente antes de usar.
Aunque el producto es un dispositivo utilizado para la grabación de vídeos,
no podemos garantizar que todos los datos se registrarán absolutamente.
Para reducir las posibilidades de mal funcionamiento, por favor, verifique el
dispositivo, accesorios y la pequeña tarjeta SD periódicamente.
Para prolongar su uso de Smarty CX1000, por favor compruebe los datos de
tu tarjeta SD pequeña, los datos que desea conservar y cambiar el formato
de los medios de almacenamiento una vez por semana.
Revise la tabla de tiempo de grabación en la página 19 y tome nota de la
referencia de tiempo para la configuración de grabación. Datos importantes
pueden ser perdidos de sobrescribir o perderse si las carpetas de datos están
llenos. Por favor, resguarde sus datos con frecuencia e inmediatamente
cuando en un accidente.
No desmonte ni modifique el dispositivo a menos que por un
distribuidor oficial o en un centro de servicio autorizado. Cualquier
daño debido a tales acciones puede causar la garantía para ser
nulo.
Cuando se utiliza una fuente de alimentación permanente,
compruebe si tiene una función de corte de baja tensión para que
no drena la batería muerta.
Utilice sólo genuino o aprobado por D-TEG productos, piezas
y accesorios. D-TEG Security Co., Ltd. no tendrá responsabilidad
alguna por daños causados por el uso de accesorios no originales.
Pequeñas tarjetas SD incluidas con el CX1000 están aprobadas
para su uso en este modelo solamente y no deben utilizarse con
otros dispositivos.
En la grabación de resolución HD 1080p, el dispositivo no creará
archivos de evento separado. Por favor respaldar sus archivos con
regularidad, especialmente si estás en un accidente, como datos
podrían ser sobreescritos.
Descripción del Producto
Preface
Consejos de Seguridad

S
8 9
Cuando compra la CX1000 los siguientes artículos se incluyen, compruebe
si todos los contenidos están incluidos en su compra. Si no, hable con su
vendedor.
1. Grabadora de Viaje
(CX1000)
2. Pequeña Tarjeta SD
El software de reproducción (PC Viewer)
archivo de instalación: ‘setup.exe’ se
almacena en la carpeta [pcsw].
Por favor, instale inmediatamente a
utilizar plenamente todas las funciones.
4. Enchufe del alumbrador
del cigarrillo
3. El Monte
NOTA
Cuando utilice el enchufe del encendedor de cigarrillos, el CX1000 va
a apagarse cuando el motor está apagado. Para grabar mientras está
estacionado su vehículo, usted puede comprar (por separado) un enchufe de
poder permanente.
NOTA
La pequeña tarjeta SD incluida se inicializa para uso inmediato. Si desea utilizar
una pequeña tarjeta SD diferente, debe inicializarlo con el Visor de PC antes de su
uso. Consulte la página 18 para obtener instrucciones.
El Monte
Use la cinta de doble cara
para sujetar el monte.
El Lente
La lente debe estar
limpia para una
óptima calidad visual.
| Frente |
Entrada del Poder
5V
Poder
Grabar
Pequeña Tarjeta SD
4GB, las tarjetas SD con más gigabytes
se pueden comprar por separado.
| El Lado |
Visión de ConjuntoContenidos
Altavoz

S
10 11
NOTA
Presionando el botón reinicializar en la parte inferior del CX1000 se
reiniciará la CPU pero las configuraciones serán siendo el mismo. Para
restablecer la configuración, utilice el menú de reajuste que va volver a
afinar el dispositivo. El dispositivo puede restablecerse completamente
por selección por defecto de fábrica y luego reiniciar.
El tornillo del Monte
Gírelo hacia la derecha
para asegurar la posición.
Arriba/ Ampliar
Abajo/ Alejar
Modo/ OK
Menú/ Regresar
Micrófono Interno
Reinicializar
A/V Afuera
| Detrás |
Para seguridad, aparque su vehículo en un espacio plano y iluminado,
y apague su vehículo antes de instalar el CX1000. Utilice cables de
alimentación D-Teg originales sólo cuando suministrando eléctrica.
1. Seleccione una posición para la
CX1000 que no obstruya la visión
del conductor, y donde el dispositivo
tendrá la mejor vista de la carretera
. Limpie y seque el área donde el
montaje debe ser conectado. Quite
el documento sobre la cinta de doble
cara, coloque el monte(soporte) y
empuje firmemente durante unos
segundos.
La mayoría de los controladores instalan sus grabadores en frente
del espejo retrovisor.
2. Ajuste el campo de vista del dispositivo utilizando la pantalla LCD.
3. Conecte el enchufe del encendedor de cigarrillos al dispositivo.
Puedes organizar el cable poniéndola en estrella de la ventana
delantera, detrás de la columna A y luego bajo el salpicadero.
4. Conecte el enchufe del encendedor de cigarrillos en el zócalo del
cigarrillo.
InstalaciónVisión de Conjunto

S
12 13
Inicio Automático
El CX1000 está diseñado para iniciarse automáticamente cuando se
suministra la alimentación. Si el enchufe del encendedor de cigarrillos está
conectado correctamente, el dispositivo se enciende automáticamente
cuando el vehículo está encendido.
Selección de idioma
Cuando el CX1000 se enciende por
primera vez, siga las instrucciones
en pantalla para configurar el idioma
usando los botones de flecha, y luego
confirmar pulsando el botón OK.
Arranque automático y registro
Cuando está conectado correctamente, CX1000 arrancar automáticamente
y empezar a grabar cuando la ignición se enciende. Arranque puede requerir
hasta 15 segundos, la grabación se iniciará inmediatamente después de
este proceso.
Modos de Grabación
1. Normal (continuo) es el principal modo de grabación. Las tasas de resolución y
marco deben establecerse por su preferencia y teniendo en cuenta el tamaño
de la tarjeta pequeña SD. Cambios en la configuración pueden hacerse a
través de la pestaña [configuración de dispositivo] en la pantalla del PC o ir a
[configuración del Video] en el dispositivo.
2. Evento (Choque y Pánico) es un modo suplementario de grabación que se
activa cuando se activa por un choque o una pulsación del botón [REC] En
estos eventos, 15 segundos de video antes y 15 segundos de video después
del evento serán almacenados por separado en la tarjeta micro SD bajo
[gsnr] y [recsw] carpetas, respectivamente. Un total de 10 eventos se pueden
almacenar en cada carpeta, y será (según la configuración) sobrescribir o no
grabado cuando esté llena.
A.
Datos y video choque provocada se grabará automáticamente cuando el sensor
g detecta un cambio en la fuerza g más que el límite establecido. Este límite
puede establecerse a través de la pestaña [configuración de dispositivo] en la
pantalla del PC o ir a [configuración del Video] en el dispositivo.
B. Videos y datos pánico se registrarán cuando se presiona el botón [REC].
NOTA El ajuste predeterminado para el registro es "normal (continuo)"
a 30 FPS, resolución de 720p. Esto permite que las grabaciones se
separa, el evento y el pánico. Con este ajuste, el almacenamiento
puede llenar rápidamente. Dependiendo de la configuración, se va a
sobreescribir o detener la grabación cuando esté llena. Para evitar perder
datos valiosos, guardar todos los datos pertinentes en un dispositivo de
almacenamiento separado inmediatamente después de cada incidente.
NOTE When recording at 30FPS, 1080p HD resolution, separate
Event files (Shock and Panic) will not be stored. If you wish to keep
separate event files, change the settings to a lower resolution or
frame rate, e.g. 10FPS, 1080p HD or 30FPS, 1080p
Operaciones BásicasPara Empezar
Configuración de Zona Horaria
Verifique su zona horaria (tiempo
compensado) y utilice las teclas de
flecha para seleccionar la correcta
zona.
Ejemplos:
Seoul, Tokyo: +9 / Sydney: +10
New York: -5 / Chicago: -6
London: 0 / Paris: +1
NOTA
El CX1000 se iniciará la grabación cuando se selecciona la zona horaria.

S
14 15
Pantalla LCD encendido y apagado
Usted puede apagar y encender el monitor LCD pulsando [OK] durante una grabación.
Grabación continuará independientemente del estado de la pantalla LCD.
También puede configurar la pantalla LCD para apagar automáticamente después de 10
segundos estableciendo el 'LCD Auto Off' en 'ON' a través de la pestaña [configuración de
dispositivo] en la pantalla de PC, o vaya a [configuración de Video] en el dispositivo.
Modos
CX1000 tiene tres modos: Video, Foto y Reproducción. Los modos se pueden
cambiar pulsando el botón [OK] mientras que en modo de espera.
En el modo de Vídeo, pulse [REC] para iniciar la grabación y [MENU] para parar.
En modo de Foto, pulse [REC] para tomar fotos.
En modo reproducción, pulse [MENU] para introducir Ajustes de Reproducción y
cambio de carpeta. Utilice las teclas de flecha para Cambiar las Carpetas. Cuando
usted tiene acceso a la carpeta de su elección, utilice los botones de flecha para
cambiar los archivos. Durante la reproducción de vídeo pulse [REC] para empezar,
[MENU] para parada y botones de la flecha para avanzar o retroceder.
Settings
CX1000 tiene cuatro opciones: General, Vídeo, Foto, y R eproducción.
Configuraciones generales pueden consultarse en cualquier modo presionando
[MENU] y las configuraciónes de las otras modas pueden accederse pulsando
[MENU] mientras que en cada modo. Para la configuración de vídeo, grabación de
vídeo debe suspenderse antes de estos ajustes pueden accederse. Pulse los botones
de flecha para moverse entre las selecciones, [OK] para seleccionar y [MENU] para
deseleccionar y volver a la pantalla anterior.
Tiempo de
grabación
Conexión
GPS
grabación
Modo Video
Caución Corte de energía eléctrica durante la actualización dañará
seriamente el dispositivo. Dejar la alimentación externa conectada,
ignición de automóviles y enciende el dispositivo durante la
actualización.
Operaciones BásicasOperaciones Básicas
Batería
CX1000 viene con un batería de polímero de litio y puede ser activado para 15 ~ 30
minutos sin alimentación externa.
Parada Retardada
Usted puede continuar grabación después de apagar su auto por activar la función de
apagado retardado. Cuando se activa, la CX1000 continuará grabación de máximos 5
minutos, dependiendo dela batería, después se corta la energía externa.
Modo Aparcamiento
Puede utilizar la CX1000 como una cámara de vigilancia mientras está estacionado.
Para que esta función trabajar, necesitas utilizar una fuente de energía permanente
que no se desconectará cuando la ignición se apaga. Tienes que ir a configuración de
vídeo y activar esta función. Con el modo de estacionamiento activado, si su vehículo
está inmóvil por más de 5 minutos, CX1000 esto reconocerá como ser estacionado
y cambiará automáticamente los modosEn el modo de estacionamiento, grabación
será en 1 FPS, la pantalla LCD se apaga, y la roja LED parpadeará. Cuando su vehículo
empieza a moverse, grabación volverá a la configuración original.
Actualización del Firmware
Para actualizar su CX1000, por favor siga estos pasos. El dispositivo no se actualizará
a menos que una alimentación externa está conectada.
1 Descargue el firmware que desea instalar desde nuestro sitio web: www.d-teg.com
o el distribuidor.
2. Extraiga la pequeña tarjeta de SD del dispositivo y conecte a su computadora.
3 .Tenga acceso a la tarjeta y cree una carpeta llamada "program“
4. Copie el archivo de firmware (CX1000_X.X.X.bin) en la carpeta "program”
5. Enchufe en la pequeña tarjeta SD en el dispositivo y encendido.
6. Las dos luces LED parpadeará durante la actualización.
7. Después de actualización, el dispositivo se reiniciará automáticamente para usar.

S
16 17
El Visor de PC para el CX1000 está en la carpeta “pcsw” de la tarjeta SD
pequeña.
1. Conecte la tarjeta pequeña SD en tu PC.
2. Abra la “FHDREC1” unidad
3. Abra la carpeta “pcsw” e inicia el archivo “setup.exe”
4. Seleccione su idioma y siga las instrucciones en la pantalla.
5. El icono que se muestra más arriba aparecerá si la instalación es correcta
y está seleccionada la casilla crear un icono en el escritorio.
Los archivos de datos en el CX1000 Smarty todos son encriptados para
proteger la información personal y sólo pueden ser jugados utilizando
el visor de PC. Cuando se cargan datos, puede ser transformada en el
archivo AVI más comunes usando el icono [guardar a AVI]
Debe instalar el Visor de PC para ver o utilizar datos grabados.
Desinstalar
Para desinstalar, asegúrese de que no se está ejecutando el
programa. Haga clic en el Menú Inicio, haga clic en Panel de Control.
Seleccione desinstalar y seleccione "PCViewer CX1000".
Descargar programa Visor de PC
Para descargar el visor de PC para CX1000, vaya a www.d-teg.com,
haga clic en "SUPPORT" y compruebe la lista debajo de "Downloads"
para el software apropiado.
①
Haga clic en el icono de 'Abierto'
②
Seleccione la unidad de la tarjeta pequeña SD.
NOTA : Seleccione la unidad (no las carpetas
individuales) de la pequeña tarjeta SD.
③
Haga clic en “OK”
④
Haga clic en los archivos de
datos que desea ver, o haga clic
en todos.
⑤
Haga clic en "cargar"
para selección-ar datos
cargados.
ReproducciónInstalar el programa Visor de PC

S
18 19
CX 1000 no se enciende
Compruebe si la alimentación está conectado correctamente en ambos
extremos. Si es así, tome la pequeña tarjeta SD y reinicie. Si CX1000
enciende sin la pequeña tarjeta SD, hay un problema con los medios de
almacenamiento y es necesario cambiar el formato o renovado.
Alarm is ringing
Si la tarjeta micro SD no está firmemente enchufada o está dañada, la
alarma se apagará y el LED rojo parpadeará.
1. Compruebe si está funcionando correctamente la pequeña tarjeta SD
2.
Cambiar el formato de los medios de almacenamiento utilizando Visor de PC
3. Compruebe si la pequeña tarjeta SD está firmemente enchufada
Caución
Cuando el reformateo de la pequeña tarjeta SD, todos los datos se
eliminarán , por favor salve(ahorre) todos los datos importantes antes de
continuar.
Cómo volver a formatear la tarjeta SD pequeña
1. Inicie el Visor de PC
2. Haga clic en este “Init SD”
icono
3. Seleccione la unidad de pequeña tarjeta SD
4. Siga las instrucciones en la pantalla
NOTA
Si aparece un mensaje de error, vuelva a conectar en la pequeña tarjeta SD
e intente formatear de nuevo. Si todavía no funciona después de varios
intentos, es posible que haya algún problema con la pequeña tarjeta SD.
Póngase en contacto con el vendedor.
La reproducción no es uniforme
La suavidad de la reproducción de datos depende de la velocidad de
fotogramas grabados y en algunos casos, el rendimiento del PC. Si la
reproducción parece dura, pruebe a seleccionar menos archivos para
la reproducción. Además, cuando se convierte en un archivo AVI, la
reproducción puede llegar a ser más suave.
Resolución FPS Pequeña tarjeta SD (en minutos)
4GB 8GB 16GB 32GB
1080P HD
30 57 123 257 523
10 73 218 508 1,089
Modo
Aparcamiento
228 683 1,593 3,413
1080P
30 47 142 332 711
10 85 256 597 1,280
Modo
Aparcamiento
310 931 2,172 4,655
720P
30 72 215 502 1,076
10 163 488 1,138 2,438
Modo
Aparcamiento
427 1,280 2,987 6,400
VGA
30 213 640 1,493 3,200
10 245 735 1,716 3,677
Modo
Aparcamiento
1,138 3,413 7,964 17,067
NOTA
Esta tabla es sólo para referencia y puede variar dependiendo
de la configuración y uso.
Tabla Tiempo de GrabaciónSolución de Problemas

S
20 21
Sensor de cámara 1/3” 3 pixeles súper CMOS sensor
Ángulo de visión 150° (Horizontal: 116° , Vertical: 86° )
FPS y Resolución
30 FPS @ 1080P Full HD (1920x1080)
30 FPS @ 1080P (1440x1080)
30 FPS @ 720P (720x1080)
30 FPS @ VGA (680x480)
Modo Grabación de
Video Normal (continuo), Evento (sensor de Choque, Pánico)),
Modo Aparcamiento
Formato de
compresión Vídeo: H.264, Audio: G.711
Tiempo de
Grabación 8GB: 50 min ~ 960 min, 32GB: 470 min ~ 150 horas
Max archivos de
evento Shock Sensor: 10, Pánico: 10
Foto JPEG, 100 shots, 3.5M Pixel, Full HD, 1080p, 720p, VGA
Sensor de Choque Interal, 3-dimensión sensor de gravedad
GPS Interal GPS
Medios de
almacenamiento Pequeña SD/SDHC tarjeta (min 4GB, max 32GB supported)
Reloj en Tiempo
Real La batería interna recargable
Vibrador Alarma de evento disparador, error de pequeña tarjeta SD
LED 2 LED (Rojo: Grabación, Verde: Poder)
Pantalla de LCD 2.4”, 16bit, 65,536 color, ángulo de visión limitada de la
izquierda
Batería Polímero de litio (max 25 minutos at más HD grabación)
Memoria de
respaldo energía condensador estupendo (max 5 ~ 10 sec)
Acceso a datos Visor de PC (imprimir, copiar, convertir)
Poder DC 5V (conector para encendedor de cigarrillos)
Usar del Poder 5W (medio)
Talla 88(W)mm X 55(H)mm x 17(D)mm
Pesa 75g
Temperatura -10°C ~ 60°C (Puede Funcionar)
Salida de vídeo cable(AV-150)
Utilice este cable para ver video
e imágenes en un dispositivo de
navegación o monitor.
Cuando conectado un monitor
externo, la pantalla LCD se apagará
automáticamente.
Caja de conexiones de alimentación
Hardware (GES-5015L)
Use este para hardwire CX1000 a la caja
de fusibles del vehículo.
Interruptor de desconexión de
baja tensión (DPWR-300)
Este interruptor desconecta la
energía cuando el voltaje de la
batería cae por debajo de un
límite preestablecido (12V o 24V)
que evita que las baterías sean
demasiado descargada. Utilice esta
con el GES-5015L para asegurarse
de que la batería no está muerto y
para prolongar la vida de la batería.
Accesorios (Vendidos por Separado)Especificación de Producto
Table of contents
Languages:
Other D-Teg Dashcam manuals