Daewoo DVT-14H3UB User manual

100
GB
INSTRUCTION
MANUAL
DVT-14H3UB/DVT-14H3UD
DVT-20H4UB/DVT-20H4UD/ DVT-21H4UB
CUSTOMER SERVICES
HELPLINE
01189 252 577


Pleasekeepthetelevideomachine’sguaranteecardreceiptsafe
forwarrantypurposes.
WORTH
knowing
Precautions
◆
Readcarefully throughthis manualto familiariseyourself withthis highquality
televideo.
◆
Makesure therating ofyour householdelectricity supplymatches thatshown
onthe backof thetelevideo.
◆
Referto thischapter andthe “Initialinstallation” chapterto helpyou install
andadjust yourtelevideo.
Do not…
◆
Exposethe televideoto highlevels ofhumidity andheat, toavoid therisk of
fireand electricshock.
◆
Openthe televideo.Have aqualified techniciancarry outrepairs.
◆
Connectthe televideoto thepower supplyif youhave justmoved itfrom a
coldto warmenvironment. Thiscan resultin condensationinside therecorder
andcause seriousdamage tothe machineand cassettes.Wait aroundtwo
hoursto allowit toreach roomtemperature.
Make sure…
◆
Thetelevideo isplaced ona steady,flat surface.
◆
Youplace thetelevideo wherethere isa minimumdistance(Of 10Cm)around
theapparatus forgood ventilation.
◆
Youclean thetelevideo onlywith asoft,lint-free cloth: donot useaggressive
oralcohol-based cleaningagents.(Unplug theset fromthe mains)
◆
Youdisconnect thepower supplyif thetelevideo appearsto beworking
incorrectly,is makingan unusualsound, hasa strangesmell, hassmoke
emittingfrom itor liquidshave gotinside it.
Havea qualifiedtechnician checkthe televideo.
◆
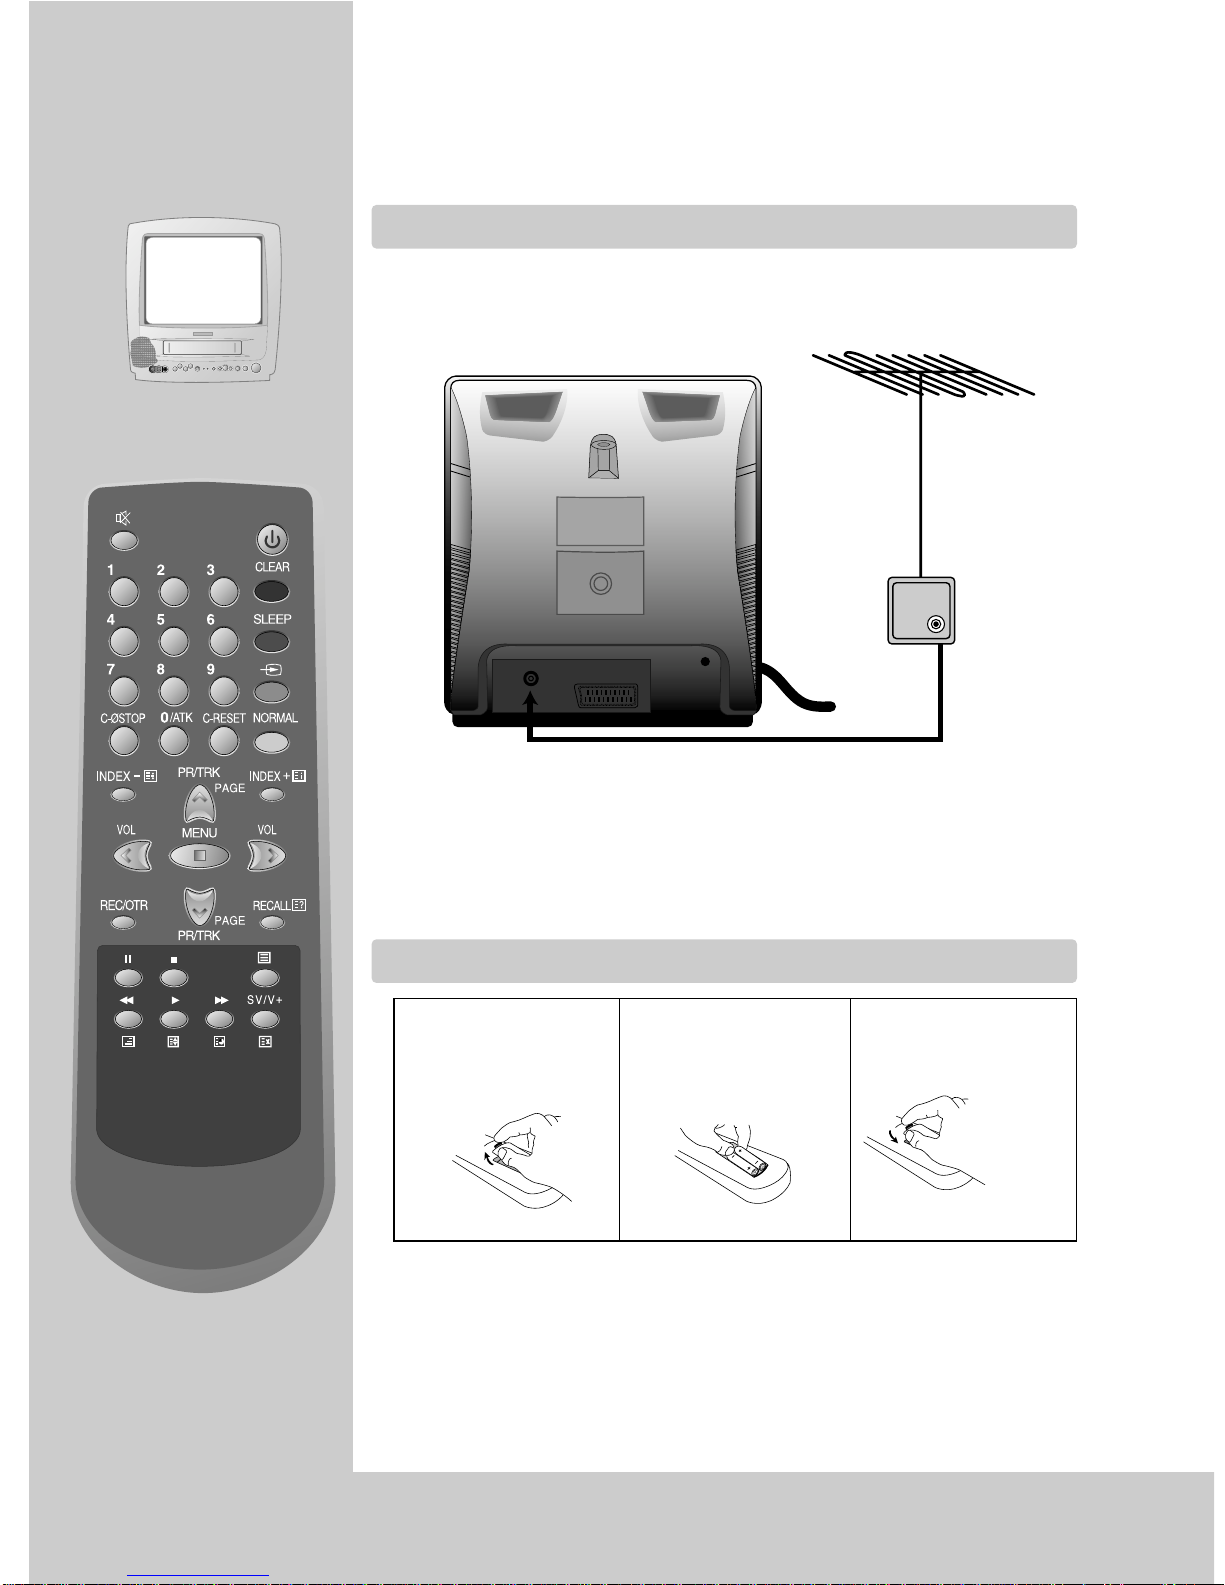
Youdisconnect thepower supplyand ANTENNAif youwill notbe usingthe
televideofor along periodor duringa thunderstorm.
◆
Theapparatus shallnot beexposed todrips orsplashes andthat noobjects
filledwith liquids,such asvases, shallbe placedon theapparatus.
For your own safety!
◆
Thereare nocomponents inthis televideoyou canservice orrepair
yourself.
◆
Donot openthe caseof thetelevideo. Onlyallow qualified
personnelto repairor serviceyour set.
◆
Thistelevideo isdesigned forcontinuous operation.Switching itoff
doesnot disconnectit fromthe mains(stand-by)
Todisconnect itfrom themains, youhave tounplug it.
◆
Recordingany copyrightprotected materialmay infringea
copyright.
Note :Ifthetelevideoismovedorplacedinadifferentdirection,themainpower
switchmustbeswitchedoffforatleast15minutesinordertotakeoutcolour
purityerrorsonthescreen.


1
WORTH
Knowing
Contentss
Controls
Theremote controlunit 2
Thefrontpanel’s button, Onscreendisplay 3
Initial installation
Connectingup thetelevideo, Fittingthe remotecontrol’s batteries 4
Settingtimeand date, Languageselection 5
Autosetup,Manual tuning, Finetuning,Edit 6~7
Playing cassettes
Playingback 8
Variablepicturesearch, Auto repeat,VCRsystem 9
Recording Cassettes
Simplerecording -REC, Onetouch recording- OTR
Whenrecording timeoverlaps 10
Timerprogramme,Auto tracking 11
Timerrecordingusing Videoplus+ 12
More functions
Index+/-, Resettingthe counterto zero,Mute ,Child lock 13
Cassettes,Pictureadjustment, Recall 14
Wakeup,Aspect, Counter setting,Sleepfeature 15
Teletext 16
Connections
Copying 17
Scartsocket 18
Beforerequestingservice 19
◆
Onthe followingpages, thepictures showthe buttonsyou presson theremote controlto
performthe function,and whatyou shouldsee onthe OnScreen Displayor machine
display(if present).
Beforedoinganythingwiththetelevideo,please
readthechapter“initialinstallation”.

◆
Theremotecontrolistheprinciplemeansofcontrol,butthemainplaybackand
recordfunctionsarealsoavailableonthefrontoftelevideo.
2
CONTROLS
The remote control unit
Máx.7m
30˚|30˚
Toswitch televideoon andoff (standby)
Soundon/off
Digitkey
0/ATK: Autotracking.
Todelete inputdata orprogramme.
Buttonfor thesleep timer.(pressrepeatedly)
Toselect orexternal inputsource.(EG:-SATELLITE,
DVD,CAMCORDER)Alsofor selectingthe sourcefor recording.
NORMAL1/NORMAL2/FAVOURITE picturecontrol.
Toreset thecounter data.
VHSIndex SearchSystem +/-. TXTPage Hold/IndexPage.
PRup/down. Trackingup/down whilePB mode.TXTPage
Up/Down
Volumeup/down.
Selectmain menu
Toselect onscreen displays.TXTReveal
Playbackstop, Pausewhile recording.
Teletexton/off
Thecontrols forTimer Recording using the VIDEOPLUS+/SHOWVIEW
codesvia ON-SCREENDISPLAY. TXT Cancel
Rewinding/fastforwarding acassette fromstop, orpicture
searchbackwards/forwardsfromplayback.TXTMix,Size,Sub-page
Therecord orOTR button(One touchrecording means: each
timeyou pressthe buttonrecording isextended by30 minutes)
Towind thecassette tocounter position0:00:00

3
Controls
The front panel’s button
On screen display
Thetelevideo’s menusystem givesyou
easy-to-understandaccess tothe less
usedfunctions suchas tuningto stations,
clocksetting andmore
Themenus showyou whichbutton to
pressfor thenext step.
NOTE :Thetelevideoclosesthemenusautomaticallyafterapprox.1minute,ifnoentryismade.
VW
:Select
CB
:Adjust
MENU :Previous
VIDEO AUDIO
PR REC REW FF
STAND
-BY REC/
T.REC
PLAY STOP/
EJECT /
ION/OFF
Remote
sensor
VIDEO
AUDIO
HEADPHONE
Power
on/off
Indicator
ST-BY:Standbyled(Red)
REC/T.REC:Record/Timer.Record(Red)
PLAY
REW/REV
STOP/EJECT
FF/CUE
VOL/PR.
UP/DOWN
CURSOR:
CB VW ACON/OFF
Picture
Contrast 58
Brightness 32
Colour 32
Sharpness 48
REC

Pleaseplaceyourtelevideo
◆
Horizontallyonaflat,steadybasesothataircancirculatearounditforventilation.
◆
Awayfromhumidityandheat,magneticfields,suchasthosefromloudspeakers
etc.andwithnoheavyobjectsplacedontop.
4
INITIAL
installation
Connecting up the televideo
Fitting the remote control’s batteries
Switchoff allcomponents whenconnecting ordisconnecting cables.
◆
Plugthe aerialcable into“ANT” socketof thetelevideo.
◆
Makesure therating ofthe householdmains supplymatches therating
shownon theback ofthe televideo.
Nowplug inthe mainslead.
◆
Fitthe batteries,size 1.5VAAA asshown above
◆
Protectyour environmentby returningused batteriesto yourdealer. Since
batteriescontain toxicsubstances theyrequire specialdisposal methods.
◆
Makesure thebatteries arealways ofthe sametype andage, andremove
themfrom theremote controlif youare notusing itfor along period.
1
Removethebattery
coveronthereverse
sideoftheremotecon-
trol.
2
Installtwobatter-
ies(“AAA”size)intothe
remotecontrol.
3
Replacethebattery
cover

5
Initial
INSTALLATION
Setting time and date
Language selection
Callup thetelevideo menu.
Andmove thecursor downto the“Clock” line.
Placethe cursorto “Clock:”with theVW buttons.
Accessby pressingthe CB buttons.
Setthe numbersfor theexact timeand thecorrect
date.
Date: dd/mm/yy
Time: hour/min.
Youcan chooseto displaythe onscreen menusin
English,Deutsch, Italiano,Español, Nederlands,
Français,Svenska...
Tochange theon screenlanguage, selectthe language
menuat theMain menuusing VWbuttons.
Accessby pressingthe CBbuttons.
Placethe cursorto “RequiredLanguage” withthe PR.
VW buttons.
◆
Mistakeor change?
Movecursor tothe positionyou wishto correctby usingCB VW.
◆
Ifyou donot set“Date” and “Time”menu,you cannot setWake uptimer andTimer
programme.
◆
N.B.: Thetime anddate willbe lostif theset isever switchedoff bythe mainON-OFF switch.
◆
AUTOCLOCK SETTING(OPTION)
Ifyouwanttosetautomaticallytheclockdata,youmustchangetheautocolumnfrom“No”to“Yes”,then
ensurethePr.No.columnhasachannelwithuncorruptedteletextIfselectedchannelhasapoorsignal,
clocksettingdatamaybecorrupted.ifyouraerialreceptionisgenerallypoorthenpleasesettheclockdata
usingthemanualmethod.
Recommendedchannelsareasfollows:(withTELETEXTchannel)
◆
Pressthemainpowerswitchonthefrontpanel
toturnonthesetandthenpress /Ibutton.
Language,Countryselectionmenuswillbe
displayed.
VW
:Select CLEAR:Delete
CB
:Access
MENU :Previous
Clock
Clockset
Date Web
03/01/2001
Time --:--
Auto No
Pr 01
Country Channelname Country Channelname Country Channelname
U.K BBC1,BBC2 Spain TVE,TV3 Ireland RTE1,NET2
Switzerland SF1 Germany ARD,ZDF Belgium BRTN
France TF1,FR2 Sweden SVT1 Italy RAI1, RAI2
Norway NRK1 Nederland NED1,NED2 Denmark DR1
VW
:Select
CB
:Access
MENU :Previous
Language
English
Deutsch
Italiano
Español
Nederlands
Français
Svenska
W

◆
If you want to use AV(Audio Video input) from satellite, DVD or CAMCORDER
instead of RF(ANT input). Press the
button .
6
INITIAL
installation
Auto setup(Automatic tuning system)
Manual tuning
Fine tunig
Selectthe Installmenu fromthe menu.
Placethe cursorto “Autosetup” withthe VW buttons.
Please wait!
Manualtuning C21 >P01
Finetuning 06
Pressthe CB button.
Countryset menuwill bedisplayed. Pleaseselect country,then access.
Thecursor willmove fromleft toright onthe UHFBand.
Pleasewait untilthe Editmenu appears.
VW
:Select
CB
:Access
MENU :Previous
Install
Autosetup
Manualtuning
Finetuning
Edit
VW
:Select
CB
:Access
MENU :Previous
Country Set
UK
Ireland
Others
Please wait!
Autosetup C21 >Pr01
Locate the cursor to Manual tuning with VW buttons
attheInstallmenuandthenpressCB buttons.
Duringmanualtuning“Pleasewait!”willbedisplayed
onthescreen.
Keep tuning until the channel received matches the
programmenumber.
Ifyouareunabletogetagoodpictureorsoundbecause
of poor reception, it is possible to adjust the fine tuning,
to try to improve it Select the Fine tuning at the Install
menu press CB buttons to get the best picture and
sound.

7
Initial
INSTALLATION
Edit
Movingthechannels
Position the cursor to Pr. No. to move and press the SLEEP button.
SelectedPr.No.colourwillbechanged.
PositionthecursortoPr.No.tochangeandpresstheSLEEPbutton.
Skippingthechannels
Youcanselectskip“Yes”or“No”withtheVWbuttons.
A programme marked with with Skip “Yes” is skipped when using PR
buttons,however,wheneveraskipped.
Pr. No. is selected by Digits 0~9 the number on the screen will be
displayedinredalongwiththepicture.
Deleteprogrammepositiondata
Position the cursor to Pr. No. to delete and press the CLEAR button.
While this is being carried out the “Please wait !” appears and the
deleted Pr.No. will transfer to programme No. 99 and is changed to
skip“Yes”.
EnterastationName
PresstheCB button.
Stationnametablesappearabovethescreen.
UsingtheVW button,selectthedesiredletterornumberorblank.
Ifyouwanttostorepress button.
TheEdit menushows youthe programmeposition assignment.
Youcan changethis programmeposition assignmentaccording toyour personalpreferences.
ABCDEFGHIJKLMNOPQRST
UVWXYZ+- /0123456789
VW
:Select CLEAR: Delete
CB
:Access SLEEP:Move
MENU :Previous :Store
Edit
Pr Name Ch Skip
01
-----
C52 Yes
02
-----
C52 Yes
03
-----
C52 Yes
04
-----
C52 Yes
05
-----
C52 Yes
06
-----
C52 Yes

◆
Yourtelevideoisswitchedonbythemainpowerswitchonthefrontpanelandby
the button.
8
PLAYING
cassettes
Playing back
Loadthe cassetteby pushingit
smoothlyand squarelyinto thecassette
bay,with itswindows pointingup.
Startplayback byusing theB button
onthe(Remote controlleror frontpanel
button)
Stopplayback byusing theL button
onthe(Remote controlleror frontpanel
button)
Ejectthe cassette(front panelbutton
only)
Tofast forwarduse theFon either
thefront panelor remotecontroller
fromthe cassettestop position
Rewind byusing theG on either the
frontpanel orthe remotecontroller
◆
Asmaller picturemay beseen whileswitching fromthe Searchmode tothe
PBmode. Thisis nota signof malfunction.
◆
Whenyou loada protectedcassette (e.g.pre-recordedfilm) playbackstarts
automatically.
◆
Duringsearch, youdon’t hearthe sound.
◆
Youcan reducehorizontal interferencestripes resultingfrom inaccurate
tracking(when playingtapes ofpoor qualityor recordedon thermachines) by
usingthe PR/TRKbuttons duringplayback ortry autotrackin using0/ATK button.
B
PLAY SP
00:12:34
L
STOP
00:12:34
EJECT
00:12:34 Pr 01 ARTE
Clock 12:34
F
FF
00:12:34 Pr 01 ARTE
Clock 12:34
G
REW
00:12:34 Pr 01 ARTE
Clock 12:34
Pr 01 ARTE
Clock 12:34

9
Playing
CASSETTES
Variable picture search
Auto repeat
VCR system
◆
Yourtelevideoisswitchedonbythemainpower
switchonthefrontpanelandbythe button.
Startfrom playbackyou cancontrol searchspeed in2
stepseither forwards (F)or backwards (G). Press
repeatedly.
Play( B)button switches back to normal playback.
Choose“Miscellaneous” fromthe “mainmenu”
Movethe cursordown tothe “Autorepeat” line.
Changeto “Yes”by cursorCB.
Auto repeat works with or without safety tab.
Playback >End ofcassette > Rewind >
Playback
F
CUE SP
00:12:34
G
REV SP
00:12:34
B
PLAY SP
00:12:34
Note :Thistelevideo hasthe functionof NTSCplayback (SPtape only)Don’t useNTSC SLPtape. Althoughyou
cansee thepicture andsound, wecan notguarantee pictureand soundquality.
Thisis themode toset upthe colorof picture.
Choose“Miscellaneous” fromthe “mainmenu”
Afterselecting the“VCR system”,you shouldselect the
wantedmode ofpicture of
“Auto“ “4.43NTSC” “PAL”,by pushingthe
CBbuttons.
Itwill setup “Auto”if TAPEis inserted.
VW
:Select
CB
:Change
MENU :Previous
Miscellaneous
Wakeup
Lock
Aspect Auto
Autorepeat No
Tapespeed SP
Countersetting
VCRsystem Auto
VW
:Select
CB
:Change
MENU :Previous
Miscellaneous
Wakeup
Lock
Aspect Auto
Autorepeat No
Tapespeed SP
Countersetting
VCRsystem Auto

●
OTR preparation
Beforesetting OTR,Make surethat.....
Thecassette tapehas thesafety tab.
Thetape islong enoughto recordthe programme.
◆
Duringrecording youcan switchthe screenoff pressing button.
Meanwhilethe recordingcontinues.
◆
Yorcan releasethe OTRmode bypressing “stop”during RECmode.
◆
Ifthe displayshows “AV”instead of“PR” press button.
◆
Ifyou programevents withoutsetting thetime, itwill automaticallyreturn to
“Clock”mode. Ifyou programevents thatoverlap, atleast oneof yourevents
willnot recordcorrectly.
Whensetting theprogrammable timer,be carefulnot tooverlap the
presettimes. Ifyou happento overlapthe presetprograms, theEnd
timehas priorityand theoverlapped programmescannot berecorded.
◆
Yourtelevideoisswitchedonbythemainpowerswitchonthefrontpanelandby
the button.
10
RECORDING
cassettes
Simple recording - REC
One touch recording - OTR
When recording time overlaps
Choosethe stationwhose
programmeyou wantto record.
Startyour recording.
Ifyou wishto interruptrecording
briefly-then continue.
Stopyour recording.
Choosethe stationyou wantand
press“REC/OTR” repeatedlyuntil
desiredperiod isdisplayed.
LSTOP
00:12:34 Pr 01 ARTE
Clock 12:34
PAUSE
00:12:34 Pr 01 ARTE
Clock 12:34
LSTOP
00:12:34 Pr 01 ARTE
Clock 12:34
MREC SP
00:12:34
MOTR SP
00:12:34
00:30
Pr 01 ARTE
Clock 12:34
REC Pr01
Pr 01 ARTE
Clock 12:34
REC Pr01

11
Recording
CASSETTES
Timer programme
Auto tracking
◆
Fortimerrecording,clock,date,andstations
mustbesetcorrectly.
◆
Loadacassettewithitssafetytabinplaceand
withsufficientfreespacefortherecording.
◆
To enter stationnumbers using thecursors VW.
◆
Youcan switchyour televideooff duringrecording usingthe button.(Don’t usethe
mainpower button(ON/OFF) onthe frontpanel ofthe set.)
Thetelevideo willswitch onand offautomatically torecord thetimer event.
◆
Ifyou havemade amistake, moveto theposition youwant tochange usingthe VW
CB buttonand changethe setting.
◆
Therecorder willeject cassetteswhich havethe safetytab removed.
◆
Youcannot access“Install menu”when “Timerporgramme” issetting. Thatmeans, if
youwant toaccess “Installmenu”, youshould deleteall datain “Timerprogramme”.
◆
Selectthe programmingto eraseor changeIf youwant toerase thisprogramming
pressbutton CLEAR.
◆
Ifyou wishto recordfrom asatellite receiverselect under“Pr” thesatellite programme
locationor AV(depending onthe connectionwith theaerial cableor aSCART cable.)
NB: Leavethe satellitetuner switchedon andto theprogramme youwant torecord.
Choose”Timerprogramme”.
Selecta freetimer memory.
Set......
-
Pr.No
-
Thedate (date,daily = osd is displayed ”day”, sun~sat)
-Start andend time.
-The recordingspeed.
Ifyou pressthe 0/ATKkey inPlayback mode,the televideowill operatethe autotracking functionagain.
VW
:Change CLEAR: Delete
CB
:Select :Store
MENU :Previous
Timer programme
No. Pr. Date Start End PDC SP/LP
1 01 05 14:18 17:15 Off SP
2 --- --- --:-- --:-- Off SP
3 --- --- --:-- --:--- Off SP
4 --- --- --:-- --:--- Off SP
5 --- --- --:-- --:--- Off SP
6 --- --- --:-- --:--- Off SP

12
◆
Ifyou havenot setthe clock,when youpress theVideoPlus+
buttonto settimer recording,the setwill automaticallychange tothe “CLOCK”
menu.
◆
Ifyou don’thave theVideoPlus+ numbers see page11 forthe normaltimer.
◆
Ifyou havemade amistake, moveback tothe relevantposition withthe C
buttonand changethe setting.
◆
Duringrecording youcan switchthe screen off bypressing button.
◆
Thescreen willindicate ifthe stationis notprogrammed (page5~7).
◆
Inthe caseof errormessages, correctthe inputor checkthe dateand timeon
yourtelevideo (alsocheck yourTV guide).
◆
Fortimerrecordings,clock,date,andstationsmustbesetcorrectly(page5).
◆
Loadacassettewithitssafetytabinplace(seepage10)andwithsufficientfree
spacefortherecording.
RECORDING
cassettes
Timer recording using VideoPlus+
Callthe VideoPlus+menu
usingSV/V+ button.
Fromyour TVmagazine, type
inthe numbernext tothe
programmeyou wantto
record.(Digit key)
Confirm( button)
0-9 :Digit Entry
:Store
CLEAR :Delete
SV/V+ :Exit
Video Plus+
---------
01/01/2001 13:57
Ifyou pressthe button,
TimerProgramme menuwill
bedisplayed.
Ifyou wantto changedata,
Press
VW
buttons.
Confirm( button)
VW
:Change CLEAR: Delete
CB
:Select :Store
MENU :Previous
Timer programme
No Pr Date Start End PDC SP/LP
1 01 05 14:18 17:15 Off SP
2 -- -- --:-- --:-- Off SP
3 -- -- --:-- --:--- Off SP
4 -- -- --:-- --:--- Off SP
5 -- -- --:-- --:--- Off SP
6 -- -- --:-- --:--- Off SP

More
FUNCTIONS
◆
Yourtelevideoautomaticallysetsanelectronic
marker(index)atthebeginningofeach
recordingandtimerrecordings.
Itisthesemarkerswhicharedetectedbythe
indexfunction.
INDEX +/-
Resetting the counter to zero
Child lock
Mute
Pressthe buttondepending onthe numberof recordings(index
marks)that youwish towind forward.
e.g.3x for3 recordingsahead.
Pressthe buttondepending onthe numberof recordings(index
marks)that youwish towind backwards.
e.g.3x for3 recordingsback.
PressC-RESET buttonto resetthe counterto 0: 00: 00
Afteryou havefinished recordingpressing theC-ØSTOP buttonwill
causethe televideoto windto theposition 0: 00: 00and stop.
Pressingthe mutebutton onceturns thesound off.
Thesound returnsif buttonis pressedonce more
Choose“Miscellaneous” fromthe “mainmenu” andselect “Lock”.
Youcan preventuse ofthe Televideowith theremote controller.
Theset ischild lockedafter youinput anysecret number.
Subsequentlythe TVpicture willbe overlaidwith thechild lock(OSD)
OnScreen Displayand thesound willbe muted.And VCRplayback
willbe inopperable.
Tounlock (Childlock mode)re-enter yoursecret fourfigure number.
Ifyou select“Local lock”to yes,all thebuttons onthe frontpanel
becomeinoperative.
F
IFF
00:12:34
INDEX 02
Pr 01 ARTE
Clock 12:34
I
G
REW
00:12:34
INDEX -02
Pr 01 ARTE
Clock 12:34
M
REC
00:00:00 Pr 01 ARTE
Clock 12:34
G
REW
00:12:34
Go to zero
Pr 01 ARTE
Clock 12:34
0- 9 :Digit Entry
:Store
CLEAR :Delete
MENU :Previous
Child lock
Enternumber
tolock
----
13
VW
:Select
CB
:Change
MENU :Previous
Lock
Childlock
Locallock Yes

14
MORE
functions
Cassettes
Useonly goodquality tapecassettes withthe VHSlogo.
◆
Keepcassettes awayfrom excessivemoisture ordust, magneticand
electricalfields eg.(loudspeakers andcomputers).
◆
Alwayswind thetape tothe beginningwhen youhave finished.Store
withthe fullspool atthe bottonand withthe cassettein itscover.
Youcan protectyour preciousrecordings frombeing wipedby breaking
outthe safetytab onthe sideof thecassette (somecassettes havea
slide).
Shouldyou wishto re-usethe tapeafter removingthe tab,cover the
holewith adhesivetape.
Recall
Whenthis buttonis pressed,the followingcontents aredisplayed.
PrNo., Presenttime (Clock),VCR status,VCR counter.
Theseitems remainon screenfor about5 seconds.
DuringVCR mode(e.g. FF/REW,CUE/REV, INDEX+/-,etc)On ScreenDisplay doesnot disappear.
Type Timer Recording/Playbacktime
SP Mode(Standard Play) LP Mode(Long Play)
E-30 30min. 1hour
E-60 1hour 2hours
E-90 1hour 30min. 3hours
E-120 2hours 4hours
E-180 3hours 6hours
E-240 4hours 8hours
E-300 5hours 10hours
Recording/Playback time of Video tape.
Picture adjustment
Choose“Picture” menuand afterselecting theappropriate title.
PressCB button toadjust todesired level.
◆
Whenyou pressthe NORMALbutton repeatedlyyou can
callup threepicture settingsfor NORMAL1(hardpicture),
NORMAL2(softpicture),FAVOURITE(adjustable picture).
◆
Notethat ifyou setthe brightnessand contrastvalues too
low,the OnScreen Displaybecomes sodark.
Youcan notsee it.
Contrast 48

15
More
FUNCTIONS
◆
Youcanprogramyourtelevideosothatit
switchesonand/oroff(withtheselected
station)atatimeyouwant.
Wake up
Sleep feature
Choose“Miscellaneous” fromthe “mainmenu”.
PressCBVW buttons toadjust todesired wakeup time
andPr. No.
◆
Adjustingthe “Wakeup” oncewill causethe televideo
toswitch onevery dayat thesame time(till youclear or
changethe setting)
Youcan setyour televideoto automaticallyswitch off
aftera periodof 20to 120minutes.
Bypressing thesleep buttonrepeatedly.
Tocancel select”0”
◆
Ineject modeif thePlayback, FF/REW,STOP/EJECT, INDEX+/-key ispressed symbol OnScreen Display
isdisplayed.
Sleep 60
VW
:Select
CB
:Access
MENU :Previous
Wake up
Wakeup No
Time 06:00
Pr 01
Aspect
Thisis themode toset upthe sizeof picture.
Choose“Miscellaneous” fromthe “mainmenu”
Afterselecting the“Aspect”, youshould selectthe wantedsize ofpicture of
“Auto” “4:3” “16:9” bypushing theCBbuttons.
VW
:Select
CB
:Change
MENU :Previous
Miscellaneous
Wakeup
Lock
Aspect Auto
Autorepeat No
Tapespeed SP
Countersetting
VCRsystem Auto
Counter setting
Choose“Miscellaneous” from the“main menu”.
Access“Counter setting”.
Length
Youcan setlength of tape (e.g.E-180, E-240,E-300)
Time
Youcan displaycounter oftape selectingeither “used”or “remain”.
Ifyou playbackor recordin “used”mode, OSDdisplay lookslike
“00:00:10”.
Thiscounter showshow muchtape hasbeen used.
Andif youplayback orrecord in“remain” mode,the OSDdisplay looks
like“R00:30”. Thiscounter showshow muchtape remains.
VW
:Select
CB
:Change
MENU :Previous
Counter setting
Length E-180
Time used

16
MORE
functions
Teletext (Option)
SWITCHING TELETEXT ON/OFF
Press the TELETEXT button ( ). The index page viewed last will appear. Press the TELETEXT button to return to the TV mode.
COLOUR BUTTONS IN TOP/FLOF TELETEXT
A red, green,yellow and cyan field is shown at the bottom of the screen.
If TOP or FLOF teletext (FASTEXT) is transmitted by the station, by pressing the corresponding colour button on the remote controller, you can
easily select the desired page.
SELECTING PAGES
The NUMBER buttons 0...9 are used to enter a page number.
The selected page number appears at the top of the screen and the page appears after a short time.
The UP/DOWN buttons increase or decrease the current page number by 1.
INDEX PAGE
You can switch directly to the progamme preview(with TOP text) or the overview page of the station you are currently viewing by pressing
the INDEX ( ) button.
PAGE HOLD
Several sub pages can be combined under a page number and are scrolled at an interval determined by the TV station.
The presence of sub pages is indicated by, for example, 3/6 beneath the time, which means that you are looking at the 3rd page of a total of
6 pages.
If you want to look at a subpage for a longer period of time, press the HOLD ( ) button.The contents of the subpage shown are kept on the
screen and no longer updated or switched to other subpages. Pressing the HOLD button again, the current subpage appears.
CALLING UP SUBPAGE DIRECTLY
Pressing the SUBPAGE ( ) button “Page No./...”
appears at the bottom of the screen. Enter the subpage number that you want to call up with the NUMBER buttons 0...9, for example, the 2nd
page. sequence 0002. The desired subpage is sought and displayed. To exit, press SUBPAGE ( ) button again.
WATCHING TELEVISION DURING TELETEXT MODE
Some pages are continually updated, for example, stock market reports, sports announcements, and the latest news. If you want to watch
TV and stay informed at the same time, press CANCEL ( ) button.
The regular programme is still visible when the teletext symbol ( ) appears at the top of the screen. Pressing the CANCEL button again,
the teletext page will appear with the updated information.
REVEAL ANSWER
This function can be used on certain pages to reveal the solution of riddles. Press the REVEAL button ( ) to reveal a hidden answer and
press again to hide it.
TV/TELETEXT
Watch the TV programme and the Teletext pages simultaneously. The next press returns to the normal display.
CONTRAST AND BRIGHTNESS CONTROL IN TELETEXT MODE
Press the MENU button in teletext mode, the contrast and brightness control menu will be displayed in the bottom of the screen. You can
adjust contrast and brightness using the corresponding colour button on the remote controller.
DOUBLING CHARACTER SIZE
Repeatedly pressing the SIZE button ( ) doubles the character size in the following order:
Upper half of the page Lower half of the page Return to normal size.
This manual suits for next models
4
Table of contents
Other Daewoo TV VCR Combo manuals

Daewoo
Daewoo DVQ 14H1FC User manual

Daewoo
Daewoo DVT-14/20H1(T)D User manual

Daewoo
Daewoo DVQ-13H1FC User manual

Daewoo
Daewoo DVQ-13H1FCN User manual

Daewoo
Daewoo DVQ-9H1FC User manual

Daewoo
Daewoo 14H1N, 20H1N 14H1T, 20H1T 14H2 User manual

Daewoo
Daewoo DVQ-10H1FCN User manual

Daewoo
Daewoo DVN-14F6N User manual

Daewoo
Daewoo GB14H3T1 User manual

Daewoo
Daewoo GB14H1T User manual