2 www.daikincomfort.com IO-DOPAC IO-DOPAC www.daikincomfort.com 3
Locaon
This air cleaner is adaptable to unitary residential forced air
heang or cooling systems. It is designed to be installed in the
return air duct close to the blower compartment of the furnace
or air handler. This location provides the most even air flow
across the lter helping to keep the system motor and fan clean.
Installaon
WARNING!
Turn o the heang and cooling system fan before performing
maintenance to the air cleaner.
i
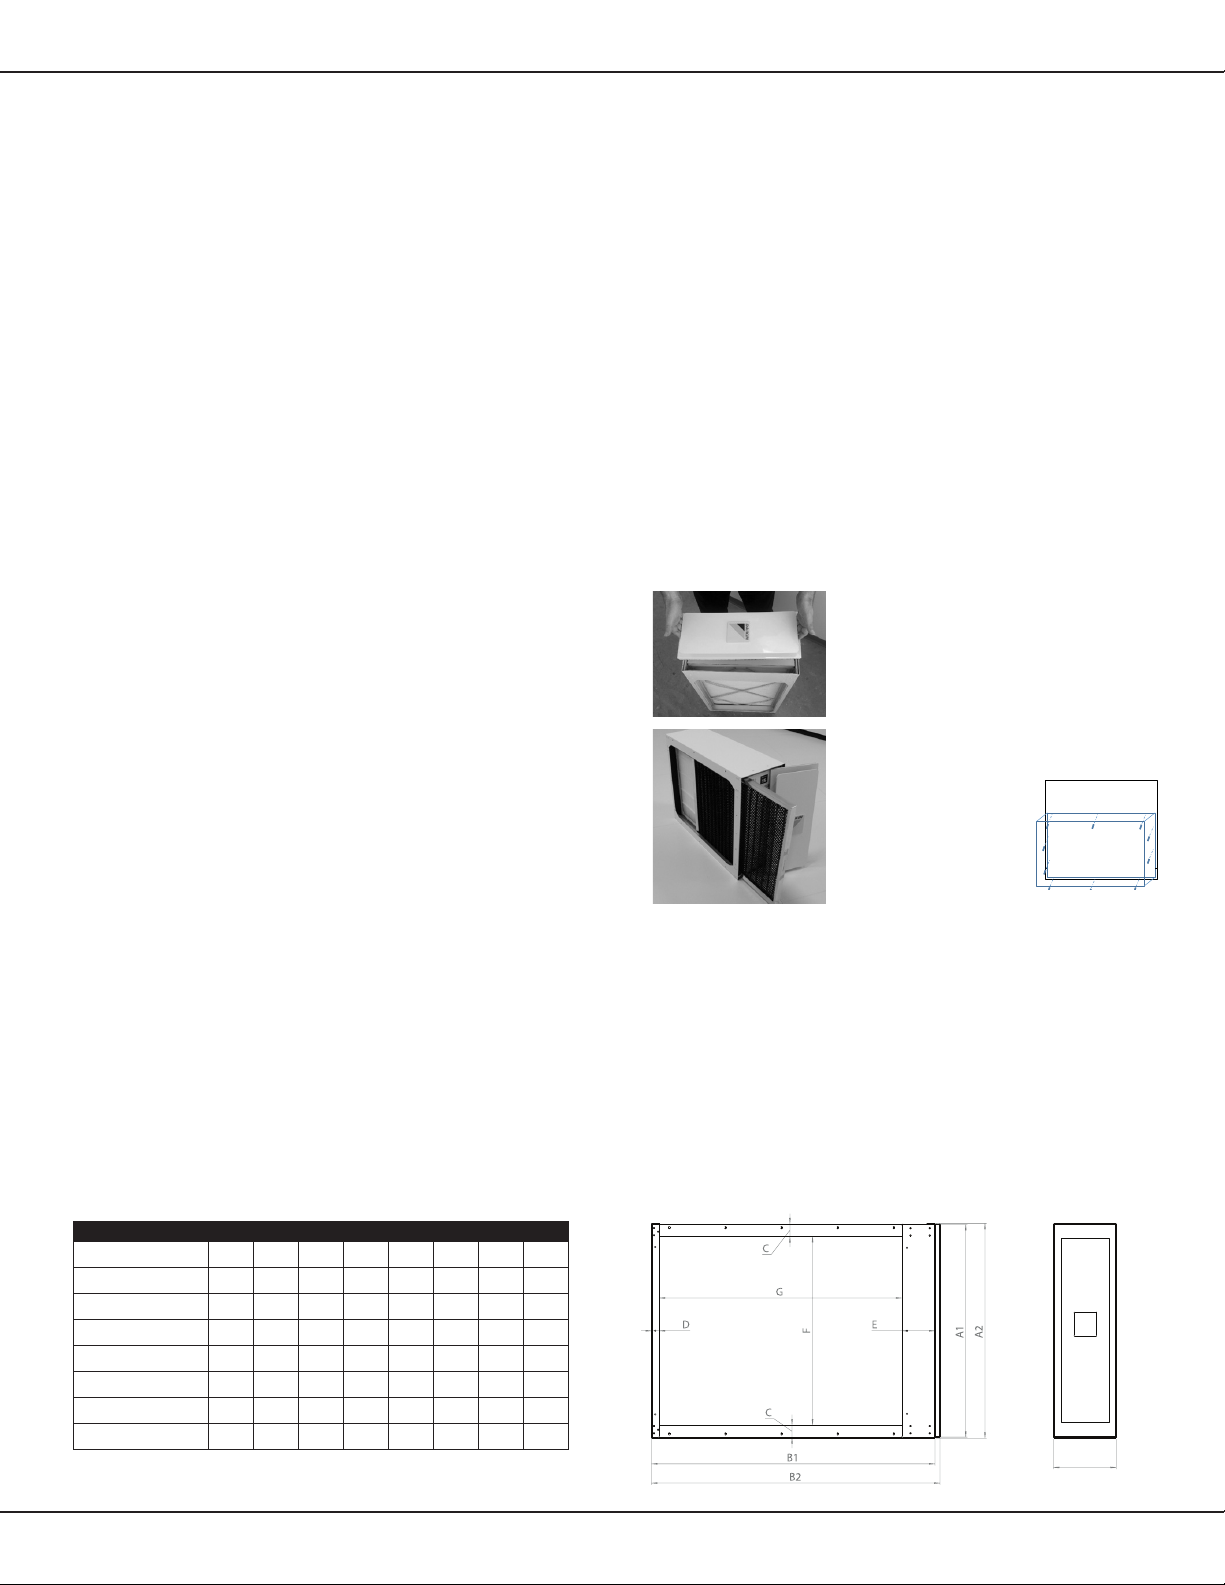
Dimensions (in)
MODEL A B1 B2 C D E F G
DV1-15-2117-AB 17.5 21.1 21.7 1.4 0.8 1.3 14.7 19.4
DV1-15-2121-AC 21.0 21.1 21.7 1.4 0.8 1.3 18.2 19.4
DV1-15-2124-AD 24.5 21.1 21.7 1.4 0.8 1.3 21.7 19.4
DV1-15-2814-FA 14.0 28.0 28.6 0.8 0.8 3.8 12.5 23.9
DV1-15-2817-FB 17.5 28.0 28.6 0.8 0.8 3.8 16.0 23.9
DV1-15-2821-FC 21.0 28.0 28.6 0.8 0.8 3.8 19.5 23.9
DV1-15-2824-FD 24.5 28.0 28.6 0.8 0.8 3.8 23.0 23.9
Installation
IMPORTANT: This air cleaner may cause more of a restricon on the
airow in the air-handling system than a standard 1" equipment lter,
because of its increased eciency. As the lter collects parculates,
the pressure drop increases and airow through the lter decreases.
This air cleaner is not recommended where added pressure drop would
cause operaonal problems with the heang and cooling equipment.
7.5
To improve the performance of the air cleaner,
these simple steps are recommended:
• Run your heang/cooling system fan connuously, on low
speed if available, since the air cleaner only removes parculate
maer when the system fan is operang.
• Ensure there are no obstrucons to airow (for example, from
furniture or carpets) in front of the return air grilles so that air
moves freely to the heang/cooling equipment.
Storage of Replacement Room Temperature Catalyst Insert
and MERV 15 lter
• Keep away from any chemical (solvents and strong oxidizers).
• Keep away from heat sources.
• Prevent dust generaon
• Store in well-venlated area.
• Keep the package ghtly closed and away from dampness
and humidity.
Disposal of Replacement Room Temperature Catalyst Insert
and MERV 15 lter
• Dispose of in accordance with naonal, state and local regulaons.
Disposal requirements are dependent on the hazard classicaon
and will vary by locaon and the type of disposal selected.
• Do not contaminate the ground or water with waste; do not
dispose of waste into the environment.
General Installation Steps
1. Remove exisng equipment lter (if present) and clean
blower compartment: Thoroughly clean the blower
compartment, since the air cleaner cannot remove accumulated
dirt from the blower chamber and distribuon ducts.
2. Leave sucient room around the air cleaner: There must be
adequate room to remove and replace the lter from the air
cleaner cabinet.
3. Transions: If the air duct does not t the air cleaner
opening, a gradual transion is recommended to reduce air
turbulence through the air cleaner and ensure its ecient
operaon. A maximum of 20° of expansion, or approximately
4 inches per running foot (10 cm per 30 cm), is
recommended for each side of the transion ng.
Note: Do not reduce ductwork size to t a smaller air
cleaner. This will increase the velocity of airow and may
decrease cleaning eciency.
4. Turning vanes: If the air cleaner is installed adjacent to an elbow
or angle ng, eld-installed turning vanes are recommended to
improve air distribuon across the lter.
5.Remove the door: When remov-
ing or replacing the door, hold the outer
door panel with both hands. The door
has industrial strength magnets in it
which can pinch ngers if caught
between door and cabinet.
6. Remove lters: remove lters (MERV 15
& RTC) from cabinet
7. Install the cabinet: Aach cabinet to
furnace and lter riser,
air handler or to
plenum with the ten
self-tapping hex head
screws provided. Note
direcon of ow
indicated on top and boom of cabinet.
8. Seal the joints in the return air system: All joints and seams
between the air cleaner, the heang / cooling equipment and the
return air duct should be sealed with aluminum tape or masc to
prevent dust from entering the clean air stream.
9. Replace lters and door: Aer aaching cabinet and sealing all
joints, reinstall lters (note direcon of ow). Reinstall door,
making sure it is properly seated. Remove plasc bag before
installing the room temperature catalyst (RTC) insert.
10. Adjust Daikin Badge: If a dierent orientaon is needed, slide
badge up and pull out of door. Rotate to proper orientaon
and reinstall.
Furnace
8⁄32" x ½"