Daikin Reiri for Home Lite User manual

DHOS-CS-IM-2107004D
Reiri for Home
(Lite Version)
Installation Manual
Model
DCPH02
Reiri for Home (Lite Version) Lite is smart centralised controller that provide AC solution for
residential application. It offers full control of Daikin air-conditioning system in one screen through
Reiri for Home (Lite Version) mobile app.

DHOS-CS-IM-2107004D
Contents
Part 1 –Hardware Setup
1. Hardware Installation ........................................................................................................................1
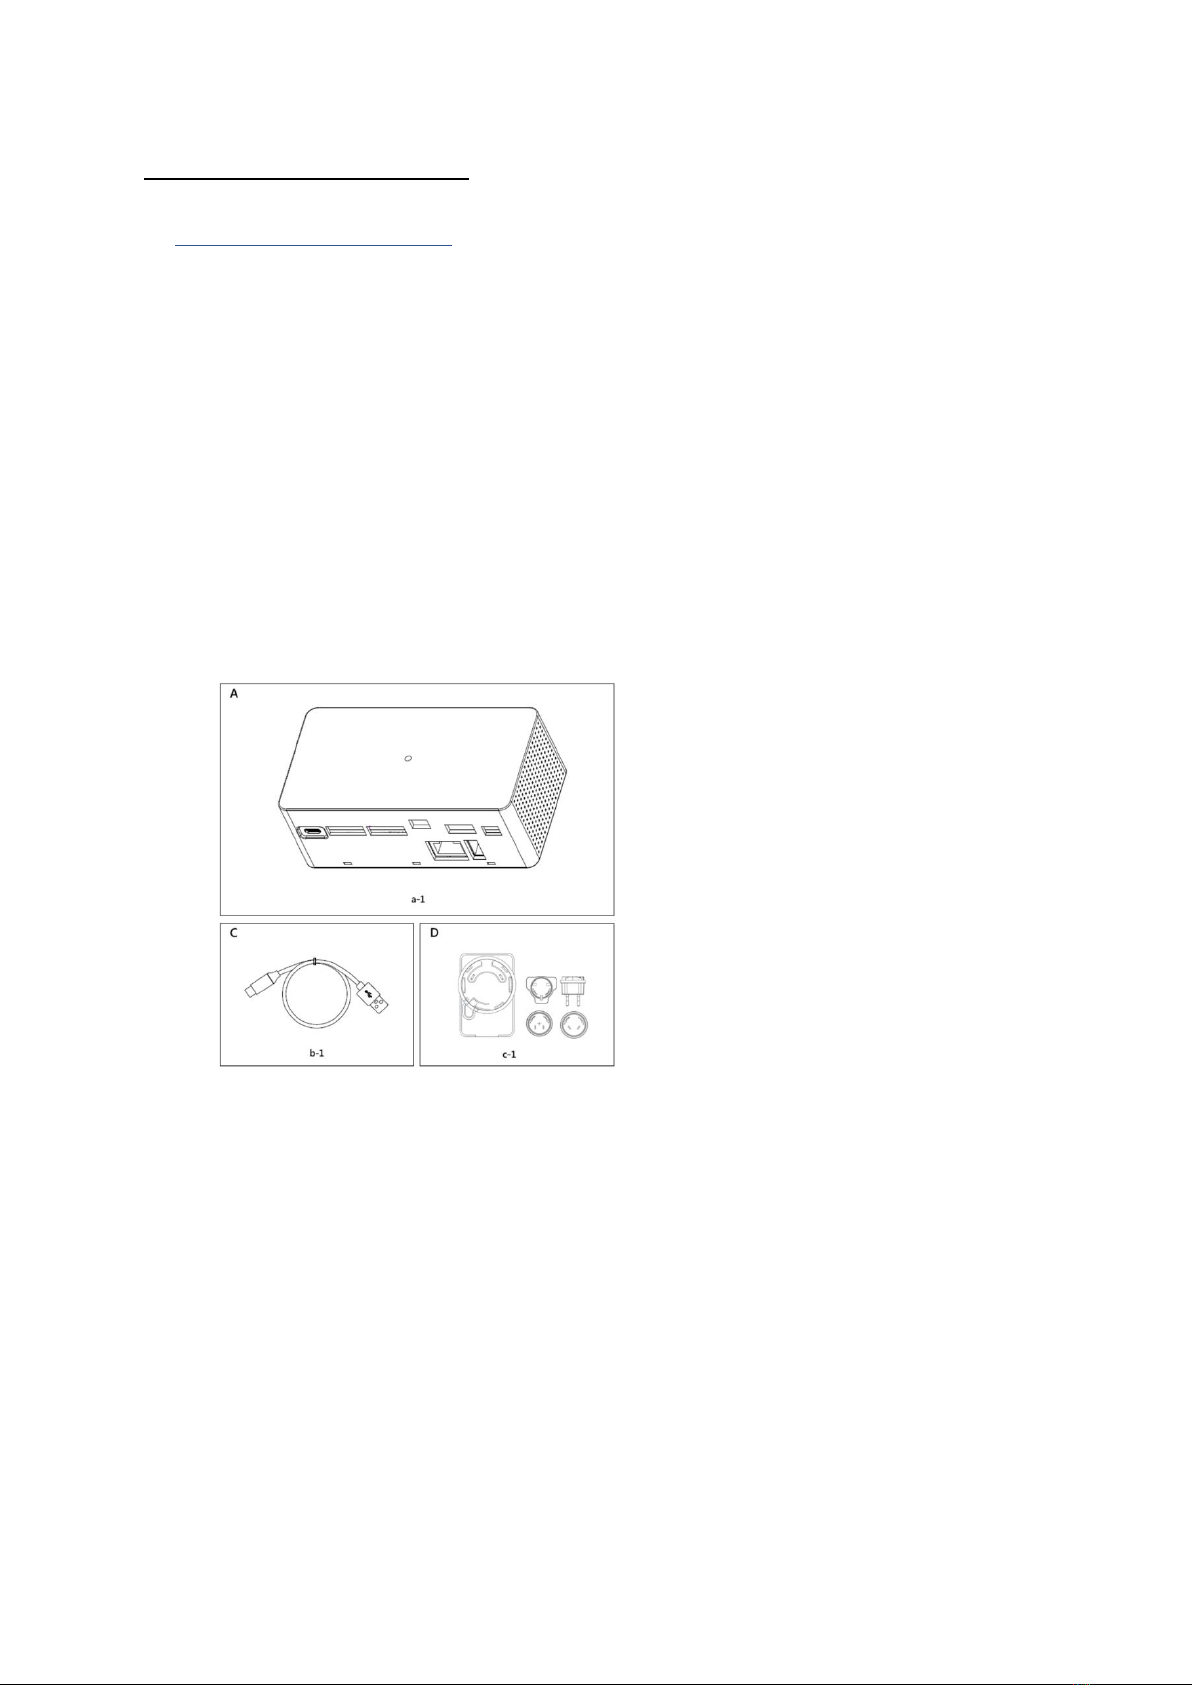
1.1 Checking that all accessories are included..................................................................................1
1.2 Understanding external dimensions ...........................................................................................2
1.3 Understanding where terminal and switches are located..........................................................3
1.3.1 Rear face ................................................................................................................................3
1.4 Determining installation place.....................................................................................................3
1.4.1 Installation place and mounting direction.............................................................................3
1.4.2 Environmental conditions......................................................................................................4
2. Connection..........................................................................................................................................4
2.1 Connecting to DCPA01 through RS485........................................................................................4
2.1.1 Terminals Location and Conceptual Diagram ........................................................................4
2.1.2 Requirements that must be met............................................................................................4
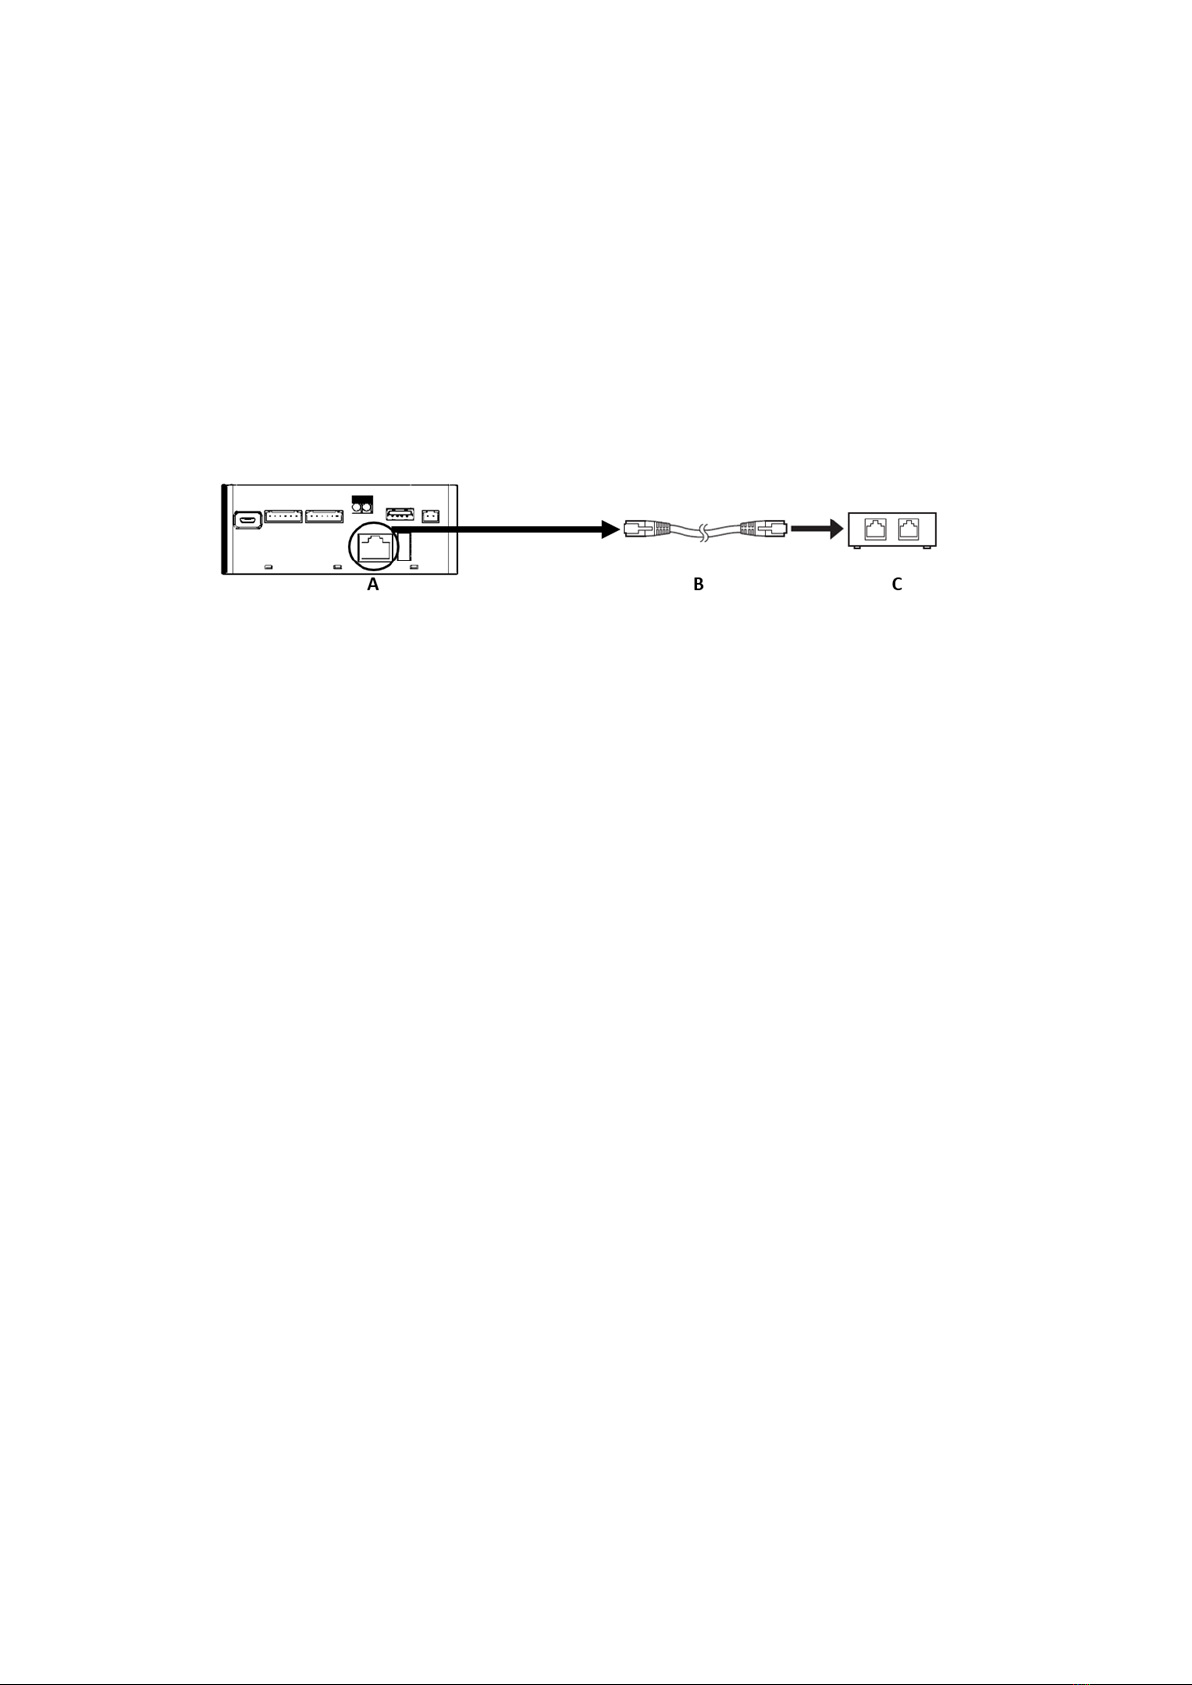
2.2 Connecting a LAN cable................................................................................................................5
2.2.1 Terminal Location and Conceptual Connection Diagram ......................................................5
2.2.2 Requirements that must be met............................................................................................5
2.3 Connecting to Modbus device(s) by USB Ports...........................................................................5
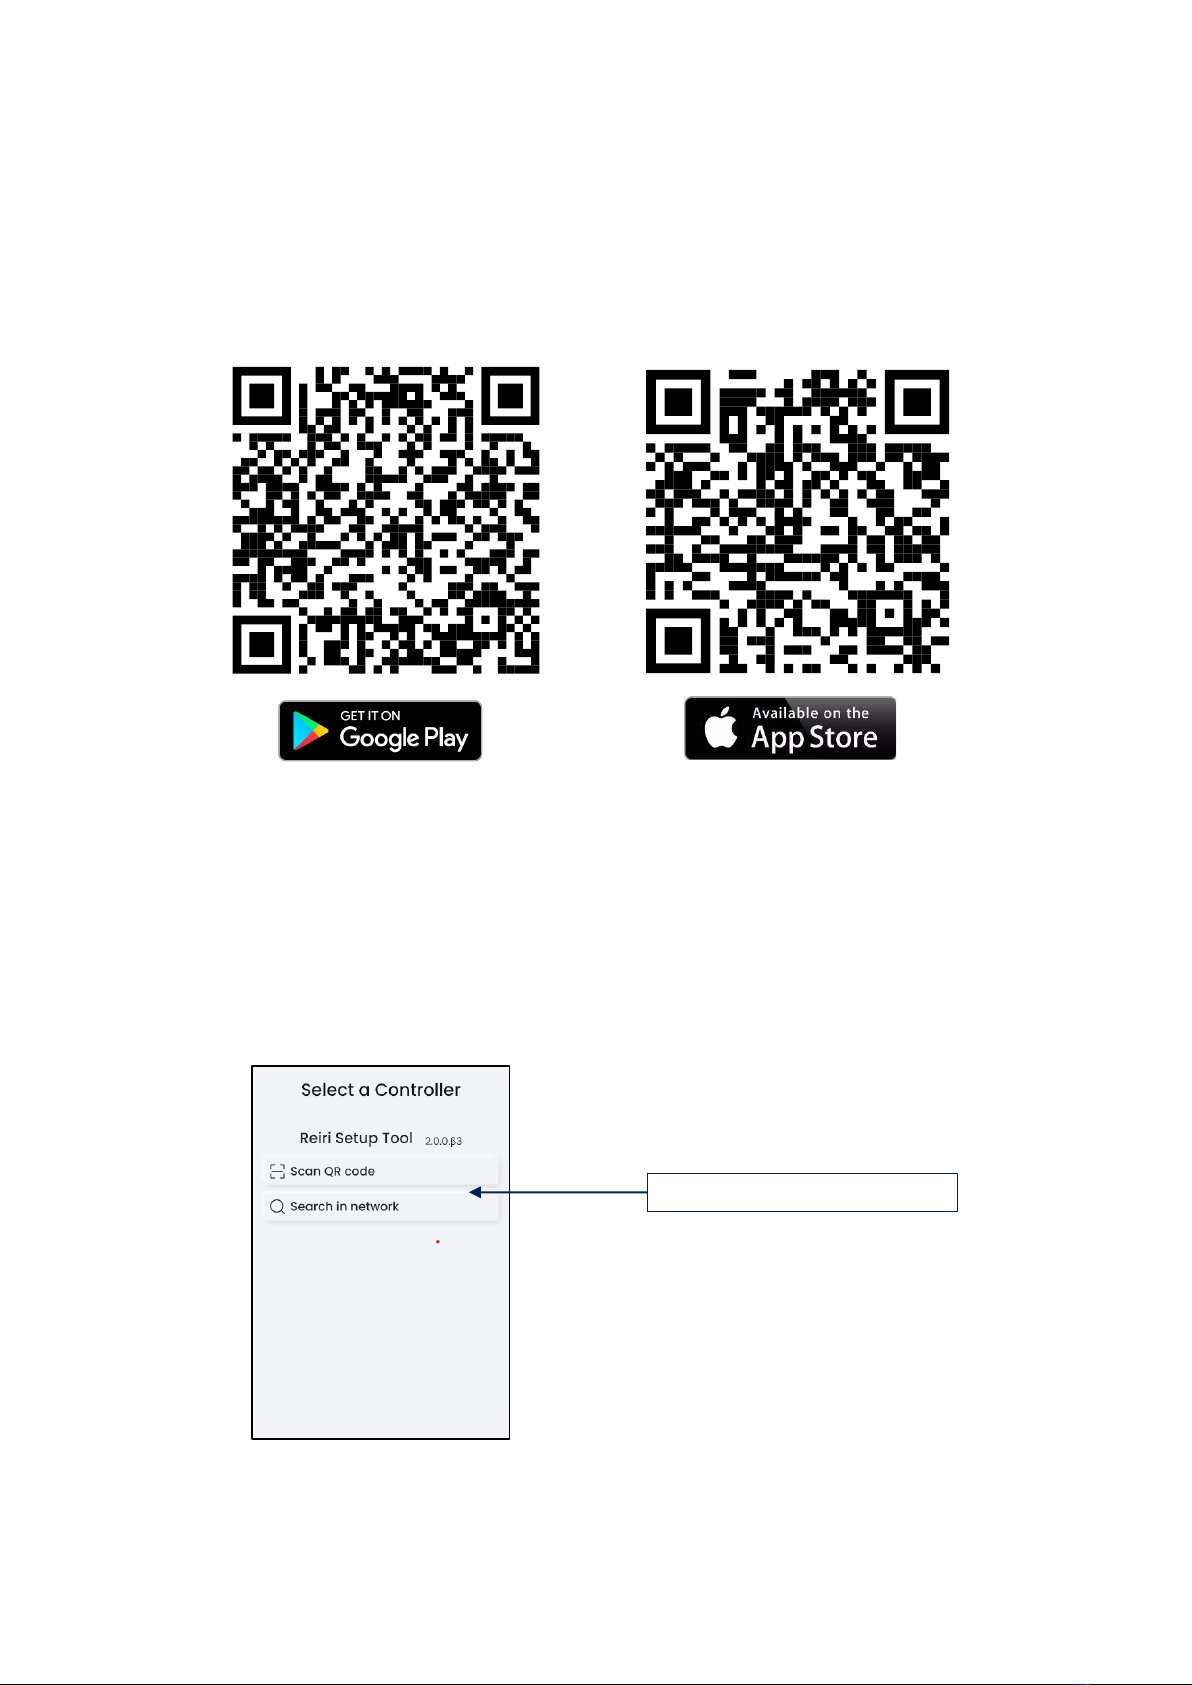
3. Reiri Controller Setup.........................................................................................................................6
3.1 Hardware Preparation .................................................................................................................6
3.2 Controller Setup ...........................................................................................................................7
3.3 Connection Settings for Compatible Devices ............................................................................13
3.4 Customise Point Attributes........................................................................................................14
3.5 Reiri Setup Tool Functions .........................................................................................................15
3.5.1 User Administration.............................................................................................................15
3.5.2 Controller Settings ...............................................................................................................17
3.5.3 Time and Date......................................................................................................................20
3.5.4 Activate Optional Function ..................................................................................................21
3.6 Reiri Setup Tool - Device Connection Settings ..........................................................................27
3.6.5 Configuring for D-Mobile Adaptor.......................................................................................30
3.6.7 Configuring for DAMA IOT Module......................................................................................30
3.7 Point Settings..............................................................................................................................31
3.8 Backup and Restore....................................................................................................................36
3.9 Clear Account .............................................................................................................................38

DHOS-CS-IM-2107004D 1
Part 1 –Hardware Setup
1. Hardware Installation
Before you start installing the Reiri for Home (Lite Version), complete the following preparation.
•Check that the Reiri for Home (Lite Version) comes with all accessories.
•Confirm where the terminals and switches of the Reiri for Home (Lite Version) are located.
•Check that an appropriate space for installing the Reiri for Home (Lite Version) is available.
1.1 Checking that all accessories are included
Based on the following accessory list, check that all accessories for the Reiri for Home (Lite
Version) are included. Should there be any missing or defective parts, contact your dealer where
you have purchased the product.
<Accessories included with Reiri for Home (Lite Version)>
A (a-1) DCPH02 body (1 pc.)
B (b-1) USB A-Micro USB cable
C (c-1) Interchangeable Plug Power Adapter

DHOS-CS-IM-2107004D 2
1.2 Understanding external dimensions
•Top face OF Reiri for Home (Lite Version)
•Rear face of Reiri for Home (Lite Version)

DHOS-CS-IM-2107004D 3
1.3 Understanding where terminal and switches are located
Understand the arrangement of terminals and the location of openings on the unit and plan
how to route the cable and in which order to connect its wires to facilitate the installation
procedure. For connection details including the cable type and terminal size, refer to
“Chapter 2. Connection”.
1.3.1 Rear face
<Rear face of Reiri for Home (Lite Version)>
A [Network Reset] Network configuration reset pin.
B1 [USB 2.0] 1st priority USB 2.0 Type A port.
B2 [USB 2.0] 2nd priority USB 2.0 Type A port.
C [LAN] 1 GbE speed LAN.
D [RS485] 1 x RS485 port.
E [Micro USB] Micro USB power connector, 5V DC power input.
*NOTE: Please connect all the necessary devices into the USB port before powering on
Reiri for Home (Lite Version) controller
1.4 Determining installation place
Be sure to install the Reiri for Home (Lite Version) in a place that meets the condition
described in 1.4.1 through 1.4.2 below.
1.4.1 Installation place and mounting direction
Below are the description of the installation place and mounting direction. Be sure to
confirm.
•Installation place: Indoor, free from dust and water splashes
•Mounting direction: Horizontal

DHOS-CS-IM-2107004D 4
1.4.2 Environmental conditions
Make sure that the installation environment meets the following conditions:
•The ambient temperature must be 0 to 40°C.
•The ambient humidity must be 85% RH or less (without condensation).
•There must be no electromagnetic disturbance.
2. Connection
2.1 Connecting to DCPA01 through RS485
2.1.1 Terminals Location and Conceptual Diagram
Connect DCPA01 to Reiri for Home (Lite Version) via the RS485 port. Take note of the
polarity of the ports as shown in the picture below.
Connect a pair of RS485 cable from the port to DCPA01 (Adaptor for Reiri).
For more detailed description on DCPA01, please refer to “Chapter 4. DCPA01 Installation (to
ODU/IDU).”
2.1.2 Requirements that must be met
Cable type: Twisted pair cables
•Core thickness: AWG 24 (0.25 mm2) to AWG 18 (0.75mm2)
•When using a shielded cable, connect only one end of each shield wire to the ground
•The maximum wire distance must be kept to 200m

DHOS-CS-IM-2107004D 5
2.2 Connecting a LAN cable
Connecting Reiri for Home (Lite Version) controller to router with LAN cable enables the user
to:
1. Use the controller via Reiri for Home app
2. Set up the controller via Reiri Setup Tool
2.2.1 Terminal Location and Conceptual Connection Diagram
Using a LAN cable, connect the LAN socket to the router.
A LAN socket
BLAN cable
CRouter
(*NOTE: Reiri for Home (Lite Version) controller requires Internet connection to adjust
internal clock when controller reboots. If schedule function is used, Internet connection is
necessary.)
2.2.2 Requirements that must be met
•Applicable cable standard: CAT 5/5e/6
•Connector standard: RJ-45
2.3 Connecting to Modbus device(s) by USB Ports
Reiri for Home (Lite Version) comes with 2 USB ports for connection of up to 2 RS485/USB
converter (port B1 & B2).
<How to use RS485/USB ports>
Step 1: Connect RS485 cable from Modbus device to a RS485/USB converter
Step 2: Insert RS485/USB converter (CH341-S*) to USB port B1 (1st priority) of Reiri for Home
(Lite Version). Refer to section 1.3.1 to understand the USB ports’ priorities)
Step 3: Should there be a need, please insert second RS485/USB converter into USB port B2
(2nd priority) of Reiri for Home (Lite Version).
*NOTE: DHOS will offer USB/RS485 converter CH341-S as an optional accessory.
Affiliates may purchase this converter from DHOS or source locally.

DHOS-CS-IM-2107004D 6
Part 2 –Reiri Controller Setup
3. Reiri Controller Setup
Reiri controller will need to be activated and configured before user can utilize the application. The
controller setup will be performed in the following steps.
1) Hardware preparation for the controller –Chapter 3.1
2) Set up and activate controller using Reiri Setup Tool app –Chapter 3.2
3) Connection settings for compatible devices. –Chapter 3.3
Perform hardware settings on devices and settings to connect the devices to Reiri controller.
4) Customise the point attributes for the projects. –Chapter 3.4
Please ensure that the following ports are opened before setting up Reiri controller: 80 / 52000 /
52001 / 52010 / 123.
3.1 Hardware Preparation
Reiri controller will require connection to router with internet access for activation.
Connect Reiri controller to router as shown below:
Connect the one end of LAN cable to LAN port, the other end to the router.
A -RJ45 LAN Port
B- CAT 5/5e/6 LAN cable
C–Router (connecting to the internet)
Connect the provided USB A to the Micro USB power cable to the power adaptor and switch
on the power.

DHOS-CS-IM-2107004D 7
3.2 Controller Setup
Setting up of controller requires the Reiri Setup Tool app. Download Reiri Setup Tool from
Google Play Store or Apple Store. Use the app to activate and setup the controller (user
accounts, name of controller, network access, date, and time).
QR code link to download app:
a) Connect the smartphone by WiFi to the router with internet access.
b) Launch the app.
c) Reiri Setup Tool start up page will show up. Tap on target controller to login. If the
controller is not shown, check the following:
•Wait for controller to fully boot up (approximately 2 minutes)
•Ensure router and network are working
•Ensure Smartphone is connected to the correct WiFi network
Tap “Find Controller” after checks are done to refresh the controller list. *
Tap to reveal controller list.

DHOS-CS-IM-2107004D 8
If the controller is not shown in the list, tap ‘Search in network’ again to refresh.
d) Login to the Reiri controller with username and password. For first time login, use
“setup” as username and no password. This special account will disappear once a user
account is created.
e) Tap “User Account Management” then “+” to create first admin account.
Controller List. Tap on controller
details to login.
Enter “setup” in username.
Tap “Login” to continue.

DHOS-CS-IM-2107004D 9
f) Enter new admin username and password. Save and return to previous page.
*NOTE: Create at least 2 admin accounts. One for engineer to setup and maintain the
controller. The other is for customer use. The engineer’s admin account can be used to save
the customer’s account should the customer forget the password.
g) Logout of Reiri Setup tool and login again using newly created admin account.
h) Controller settings is important for the setting the identification of this controller in Reiri
user app. Tap “Controller Settings” in the main menu after login. Refer to “Chapter 3.5.2
Controller Settings” for details.
Tap “Save” to save changes.
Enter Password and re-enter to
verify
Enter choice of “Username”
(Limited to characters a-z, A-Z,
numbers 0-9, “_”)
Tap “Back” to return
to previous page.
Tap “Logout” to logout.
Password at least 10
characters.
A mixture of uppercase,
lowercase, numbers and
special characters.
Minimum 2 types.
Do not use / , “ ‘ ;
Select “Admin”
Tap “Login” to continue.
Enter new admin
account username
and password

DHOS-CS-IM-2107004D 10
i) Time and Date settings are important to ensure that the time zone, time and date are
correctly set for time-based information such as history, scheduling, etc. Tap on “Time &
Date” to enter. Refer to “Chapter 3.5.3 Time and Date” for details.
Set Controller Name, Location
and Floor Size for identification
of this controller.
Tap to set the Time zone matching the region
this controller is installed. This will ensure
the internet time is adjusted correctly.

DHOS-CS-IM-2107004D 12
k) In case optional function is used, this step is necessary. Tap on “Activate Optional
Function” to enter. Refer to “Chapter 3.5.4 Activate Optional Function” for details.
*NOTE: If internet connection cannot be prepared at customer’s site, “Chapter 3.5.4
Activate Optional Function” can be done at other locations where access to internet is
available. Bring controller back to customer site after completion of “Chapter 3.5.4
Activate Optional Function” setup.
l) Controller basic setup is about to complete. Proceed to “Chapter 3.3 Connection Settings
for Compatible Devices” for compatible devices to learn about the Reiri connection with
external devices.

DHOS-CS-IM-2107004D 13
3.3 Connection Settings for Compatible Devices
Reiri controller can connect to various devices and each device will need to be paired with
Reiri to work. Device Connection Settings will enable devices to pair to Reiri (based on the
device type).
*NOTE: Connect any USB adaptors in order of priority listed. If USB adaptor is unplugged in
any instance, save any processes and power off the Reiri controller. Plug the USB adaptor
back and power back the controller.
For Reiri for Home (Lite Version), these are the connectable devices:
1. DCPA01 / DTA116A51 for DIII-Net enabled air-conditioning Systems.
2. NetPro Dual for alternative Daikin commercial air-conditioning system via Modbus.
3. Daikin Mobile Adaptor for WiFi control of Daikin residential / SkyAir series air-
conditioner.
4. Network Adaptor for alternate WiFi control of Daikin residential / SkyAir series air-
conditioner.
After device connection settings have been completed, reboot the controller and proceed to
customise point attributes.

DHOS-CS-IM-2107004D 14
3.4 Customise Point Attributes
Management points are information that can be used by Reiri for display and/or operational
uses. Different devices provide various types of information forming the points. Points will
need to be customised to identify the use easily. “Chapter 3.7 Point Settings” will explain the
point attributes for customisation.
After the points settings have been completed, the setup of the controller has completed.
All changes will be reflected after a reboot of the controller.

DHOS-CS-IM-2107004D 15
3.5 Reiri Setup Tool Functions
3.5.1 User Administration
Register New User
This function creates new accounts for users to access Reiri. There are 2 account classes that
can be created in Reiri Setup Tool –Admin and Connection.
Admin class is administrator for the controller. Account holder can login to app to use all
functions and points.
Connection class is used when other Reiri controller access Reiri for Home using “Reiri
Controller” function.
*NOTE: Admin account can also be created in the user app.
Connection Class Settings
3. Enter Password and
re-enter to verify
5. Tap “Save” to save
changes
Password at least 10
characters.
A mixture of uppercase,
lowercase, numbers and
special characters.
Minimum 2 types.
Do not use / , “ ‘ ;
1. Tap “+””
2. Enter Username
(Limited to characters
a-z, A-Z, numbers 0-9,
“_”)
4. Select “Admin” or
“Connection”.
4.1 Tap on “+” to
select point name(s)
to be assigned to the
connection account.
Tap on point name(s)
to unselect.

DHOS-CS-IM-2107004D 16
Delete User Account
Remove users that are no longer need access to the Reiri controller.
Change Own Password
Only logged in user can change the account password.
1. Tap on username to delete.”
Password at least 10 characters.
A mixture of uppercase, lowercase, numbers and special
characters.
Minimum 2 types.
Do not use / , “ ‘ ;
2. Tap on “Delete” to delete.
3. Confirm when prompt pops up.
1. Type in new password in
“Password”.”
2. Tap “Save” to save changes.

DHOS-CS-IM-2107004D 17
3.5.2 Controller Settings
Cloud connection
When enabled, Reiri for Home app can connect this controller from anywhere through the
internet. If Cloud connection is disabled –app connects to this controller by Local Area
Network (LAN). Recommend to enable.
This setting will only take effect after a reboot.
*NOTE: Internet access MUST always be available on the connected network for Cloud
Connection to be activated and for continual use.
1. Tap to enable. (Slider point on the right side).
Tap again to disable (Slider point on the left side).
This manual suits for next models
1
Table of contents
Other Daikin Home Automation manuals
Popular Home Automation manuals by other brands

alre
alre b@home gate MGCBB-064.360 quick start guide

LAMILUX
LAMILUX Smart Home operating manual

G-Homa
G-Homa EMW302WF quick start guide

Duemmegi
Duemmegi Domino DFRHT quick start guide

Swidget
Swidget R1015SWA quick start guide

HomeMatic
HomeMatic KeyMatic HM-Sec-Key Mounting instruction and operating manual