Danby DRC14A1BD User manual

DANBY PRODUCTS LIMITED, ONTARIO, CANADA N1H 6Z9
DANBY PRODUCTS INC., FINDLAY, OHIO, USA 45840
OWNER’S MANUAL
MANUEL DU PROPRIÉTAIRE
MANUAL DEL PROPIETARIO
www.Danby.com
*
*
CERAMIC COOKTOP
Owner’s Manual.............................1 - 10
TABLE DE CUISSON EN CÉRAMIQUE
Manuel du propriétaire.................11 - 20
ENCIMERA DE CERÁMICA
Manual del propietario.................21 - 30
MODEL •MODÈLE •MODELO
DRC14A1BD
2021.10.14

Important Safety Instructions
• Read these instructions carefully before installing
or using the appliance. Install the appliance
according to these instructions to avoid hazard.
• Do not place combustible material or products
on this appliance at any time.
• This appliance must be properly installed and
grounded by a suitably qualified person.
• This appliance should be connected to a circuit
which incorporates an isolating switch providing
full disconnection from the power supply.
• Failure to install the appliance correctly could
invalidate any warranty or liability claims.
• Never leave the appliance unattended when
in use. Boil over causes smoking and greasy
spillovers that may ignite.
• Never use this appliance as a work or storage
surface.
• Never leave any objects or utensils on the
appliance.
• Never use the appliance to warm or heat the
room.
• Ensure the appliance is turned off after use.
• Do not allow children to sit, stand, climb on or
play with the appliance.
• Do not store items of interest to children in
cabinets above the appliance. Children climbing
on the cooktop could be seriously injured.
• This appliance is not intended for use by persons
(including children) whose physical, sensory or
mental capabilities may be different or reduced,
or who lack experience or knowledge, unless
such persons receive supervision or training to
operate the appliance by a person responsible
for their safety.
• This appliance can be used by children aged
8 years and above and persons with reduced
physical, sensory or mental capabilities or lack
of experience and knowledge if they have been
given supervision or instruction concerning use
of the appliance in a safe way and understand
the hazards involved.
Important Safety Information
READ AND FOLLOW ALL SAFETY INSTRUCTIONS
SAVE THESE INSTRUCTIONS!
• Do not repair or replace any part of the
appliance unless specifically recommended in
the manual. All other servicing should be done
by a qualified technician.
• Do not use a steam cleaner to clean the cooktop.
• Do not place or drop heavy objects on the
cooktop.
• Do not stand on the cooktop.
• Do not use pans with jagged edges or drag
pans across the glass surface as this can
damage the glass.
• Do not use scouring pads or any other harsh
abrasive cleaning agents to clean the cooktop
as this can damage the glass. Only use cleaning
products especially made for ceramic glass.
• If the power supply cord is damaged, it must be
replaced by the manufacturer, its service agent
or similar qualified person in order to avoid
hazard.
• This appliance is intended to be used in
household and similar applications such as:
staff kitchen areas in shops, offices and other
working environments; farm houses and by
clients in hotels, motels and other residential
type environments; bed and breakfast type
environments; catering and similar non-retail
applications.
• This appliance is not intended to be operated by
means of an external timer or separate remote
control system.
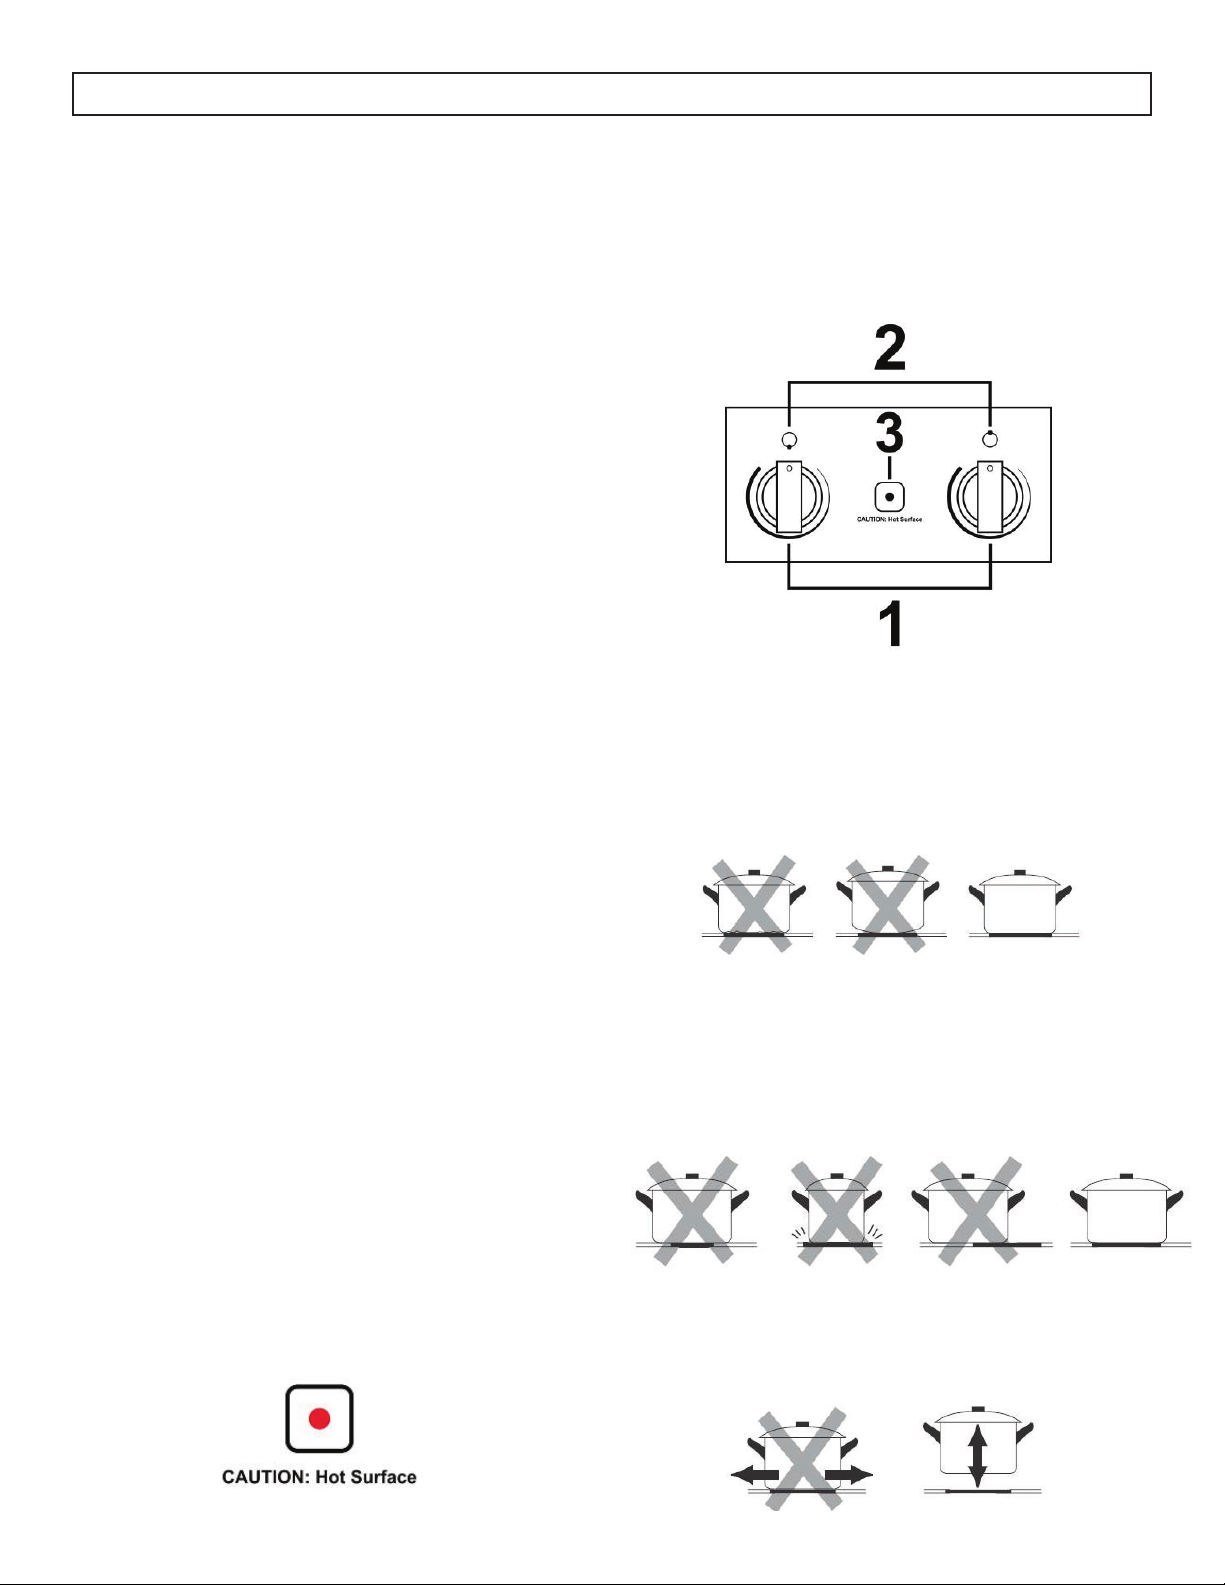
• The surface of the cooktop may still be hot even
if the hot surface indicator is turned off. Extreme
care should be taken to avoid injury.
• Loose fitting or hanging garments should never
be worn when using the appliance.
• Do not use water on grease fires. Smother fire
or flame or use dry chemical or foam type fire
extinguisher.
• Only use dry pot holders. Moist or damp pot
holders on hot surfaces may result in burns
from steam. Do not let the pot holder touch the
heating elements. Do not use a towel or other
bulky item.

• Use proper pan size. This appliance is equipped
with one or more surface burners of different
sizes. Select utensils having flat bottoms large
enough to cover the surface of the heating
element. The use of undersized utensils will
expose a portion of the heating element to direct
contact and may result in ignition of clothing.
Proper relationship of utensil to burner will also
improve efficiency.
• Only certain types of glass, glass/ceramic,
ceramic, earthenware or other glazed utensils
are suitable for rage top use without breaking
due to sudden changes in temperature.
• Utensil handles should be turned inward and
not extend over adjacent elements. To reduce
the risk of burns, ignition of flammable materials
and spillage due to unintentional contact with
the utensil, the handle of a utensil should be
positioned so that it is turned inward and does
not extend over adjacent elements.
• Clean the cooktop with caution. if a wet sponge
or cloth is used to wipe spills on a hot cooking
area be care to avoid steam burn. Some
cleaners can produce noxious fumes if applied
to a hot surface.
Cut Hazard
• Take care - panel edges are sharp.
• Failure to use caution could result in injury or
cuts.
• The razor sharp blade of a cooktop scraper is
exposed when the safety cover is retracted. Use
with extreme care and always store safely and
out of reach of children.
Important Safety Information
READ AND FOLLOW ALL SAFETY INSTRUCTIONS
SAVE THESE INSTRUCTIONS!
Electrical Shock Hazard
• Disconnect the appliance from the power supply
before carrying out any work or maintenance
on it.
• Connection to a good earth wiring system is
essential and mandatory.
• Alterations to the domestic wiring system must
only be made by a qualified electrician.
• Failure to follow this advice may result in
electrical shock or death.
• Proper installation - ensure the appliance is
properly installed and grounded by a qualified
technician.
• Do not cook on a broken or cracked cooktop. If
the cooktop surface breaks or cracks, switch the
appliance off immediately at the main power
supply and contact a qualified technician.
Health Hazard
• This appliance complies with electromagnetic
safety standards.
Hot Surface Hazard
• Accessible parts of the appliance will become
hot enough to cause burns during use.
• Do not let your body, clothing or any item
other than suitable cookware to touch the glass
induction surface is cool.
• Metallic objects such as knives, forks, spoons
and lids should not be placed on the cooktop
surface as they can get hot.
• Keep children away.
• Handles of saucepans may be hot to the touch.
Check that saucepan handles do not overhang
other cooking zones that are in use. Keep
handles out of reach of children.
• Failure to follow this advice could result in burns
and scalds.

INSTALLATION INSTRUCTIONS
INSTALLATION
To eliminate the risk of buns or fire by reaching over heated surfaces, cabinet storage space located above
the cooktop should be avoided. If cabinet storage is being provided, the risk can be reduced by installing a
range hood that projects horizontally a minimum of 5 inches beyond the bottom of the cabinets.
Cut out the work surface according to the sizes shown in the drawing and chart below. For the purpose
of installation and use, a minimum of 5 cm of space should be preserved around the hole. Be sure
the thickness of the work surface is at least 3 cm. Please select a heat-resistant work surface to avoid
deformation caused by heat radiation.
Make sure the cooktop is well ventilated. The air inlet and outlet must not be blocked under any
circumstances.
WDHA B C X
Inch 14.25 23.2 3.9 10.8 20.3 3.7 2.6
CM 36.2 59 9.9 27.6 51.6 9.5 6.7
4

INSTALLATION INSTRUCTIONS
Note: 30 inches of clearance is required between the top of the cooking surface and the bottom of an
unprotected wood or metal cabinet. 24 inches of clearance is required when the bottom of a wood or
metal cabinet is protected by not less than 1/4” thick flame retardant mill board covered with not less than
No. 25 MSG sheet steel, 0.015” thick stainless steel, 0.024” thick aluminum or 0.02” thick copper.
ABCD E
Inch 30 2 1.8 air intake air exit 0.39
CM 76.2 5.1 3 air intake 1
5

INSTALLATION INSTRUCTIONS
FIXING BRACKETS
1. Place the unit on a stable, smooth surface. Do not apply force onto any protruding controls.
2. Secure the cooktop to the work surface by screwing the four brackets on the bottom of the cooktop.
A
B
C
D
6
CAUTIONS
1. The cooktop must be installed by qualified
personnel or technicians.
2. The cooktop must not be installed next to cooling
equipment, dishwashers or dryers.
3. The cooktop must be installed such that better
heat radiation can be ensured to enhance its
reliability.
4. The wall and induced heating zone above the
work surface shall withstand heat.
5. To avoid damage, the sandwich layer and the
adhesive must be resistant to heat.
6. A steam cleaner must not be used.
CONNECTING TO MAIN POWER SUPPLY
A 3 wire, single phase, 120 V, 60 Hz., AC only
electrical supply is required on a separate, 20 amp
circuit, fused on both sides of the line.
The cooktop should be connected directly to the
junction box through flexible, armored or non-
metallic sheathed, copper cable. The flexible,
armored cable extending from the fuse box or
circuit breaker box should be connected directly to
the junction box.
Locate the junction box to allow as much slack as
possible between the junction box and the cooktop
so that the cooktop can be moved if servicing
becomes necessary in the future.
Do not cut the circuit. The length of conduit provided
is for serviceability of the cooktop.
A UL listed or CSA approved conduit connector
must be provided at each end of the power supply
cable at the cooktop and at the junction box.
A. Screw
B. Retaining bracket
C. Screw hole
D. Bottom case

INSTALLATION INSTRUCTIONS
ELECTRICAL CONNECTION
1. Disconnect power.
2. Remove junction box cover if it is present.
3. Connect the flexible cable conduit from the
cooktop to the junction box using a UL listed or
CSA approved conduit connector.
4. Tighten screws on conduit connector if present.
IMPORTANT: Use the 3 wire cable from home
power supply where local codes permit a 3 wire
connection.
1. Connect the 2 ground wires (A) together using a
UL listed wire connector.
2. Connect the white (neutral) cooktop cable wire
(B) to the white (neutral) wire (C) in the junction
box using a UL listed wire connector.
3. Connect the 2 lives wires (D) together using a UL
listed wire connector.
4. Install the junction box cover.
A
B
C
D
COMPLETE INSTALLATION
1. Check that all parts are installed. If there is an extra part, go back through the steps to find which step
was skipped.
2. Check that you have all tools.
3. Dispose of or recycle all packaging materials.
4. Use a mild solution of liquid household cleaner and warm water to clean the cooktop before use. Dry
thoroughly with a soft cloth. For more information see the cleaning section.
5. Read the entire manual before using the cooktop.
6. Reconnect power.
Note: If the cooktop does not work after turning on the power check that a circuit breaker has not tripped
or that a household fuse has not blown.
7

OPERATING INSTRUCTIONS
8
BEFORE FIRST USE
• Read this guide, taking special note of the
“safety instructions” section.
• Remove any packaging, protective films or
warning sticker that may be on the cooktop.
• Wipe the cooktop with a soft, dry cloth to
remove any dust.
WORKING PRINCIPLE
The cooking area controls are called “infinite”
controls. This type of control has an infinite selection
of heat settings. The control settings begin at high
and decrease heat output by cycling the heating
elements between “off” and “on” as you turn the
knob clockwise. The heating elements will stay “off”
for longer periods and “on” for shorter periods as
you turn the knob clockwise, thus reducing the heat
output.
For your safety, we have incorporated a “HOT”
indicator light. When lit, this light indicates that
some part of the glass ceramic cooktop is too warm
to touch or place articles upon. Do not place articles
other than cookware on the cooking surface while
this light is glowing.
HOT SURFACE INDICATOR
• The hot surface indicator will light up when the
appliance is turned on and the temperature of
the cooktop is high.
• The light will stay after the appliance it turned
off and the cooktop is still hot.
• The cooktop may still be hot after the hot surface
indicator has turned out. Use caution and ensure
the cooktop is completely cool before cleaning
or maintenance.
COOKWARE
Do not use cookware with jagged edges or a
curved base.
Make sure the base of the pan is smooth, sits
flat against the glass and is the same size as the
cooking element. Always center the pan on the
element.
Always lift pans off the ceramic surface. Do not
slide as they may scratch the glass.
CONTROL PANEL
1. Control knobs
2. Heating element indicators
3. Hot surface warning indicator

OPERATING INSTRUCTIONS
9
CARE & MAINTENANCE
CLEANING
For everyday cleaning of marks, fingerprints and
non- sugary spillovers, apply a ceramic cooktop
cleaning product. Rinse and wipe dry with a clean
cloth or paper towel.
For boil overs, melts and hot sugary spills on the
cooktop, remove the spill or food item immediately
with a ceramic cooktop razer but beware hot
cooking surfaces. Hold the razer at a 45-degree
angle and scrape the spilled food to a cool area
of the cooktop, then clean it up with a dish cloth
or paper towel. Large spills should be removed
immediately to ensure they do not bake onto the
surface of the cooktop.
Use a soft cloth to clean the control knobs. The
control knobs are not removable.
For a burned-on residue…
Let the cooktop cool, then, spread a few drops of
ceramic cooktop cleaning product on all the burned
residue area. Rub this area with a non-scratching
cleaning pad and if some residue remains, repeat
these steps.
For a heavy burned on residue…
Let the cooktop cool, then use a ceramic cooktop
razer at a 45-degree angle and scrape to remove
the residue. After scraping the heavy residue, ,
spread a few drops of ceramic cooktop cleaning
product on all the burned residue area. Rub this
area with a non-scratching cleaning pad.
TROUBLESHOOTING
Appliance will not operate
• Blown fuse or circuit breaker
Some pans make crackling or clicking noises
• This may be caused by the construction of the
cookware, different layers of metal may be
heating at different rates; this is normal.
The cooktop is scratched
• This may be caused by dragging uneven or
rough edged cookware across the surface of the
cooktop.
• This may be caused by using unsuitable or
abrasive cleaning products.
TO START COOKING
Place a suitable pan on the cooking element. Ensure
the bottom of the pan and the surface of the cooktop
are clean and dry.
1. Press the control knob inward.
2. Turn to the desired setting.
• Do not leave food unattended while the cooktop
is turned on. Boil overs and spills can cause
smoke and catch fire.
• When you have finished cooking, ensure the
control knob is turned to the “OFF” position.
Other manuals for DRC14A1BD
1
Table of contents
Other Danby Cooktop manuals