Dante DN1125A4 User manual

DN1125, DN1126, DN1129
1/3” H.264/MPEG4/MJPEG
550TVL Day/Night IP amera
Installation and Operations Manual
Model Numbers: DN1125A4, DN1125B4
DN1126A4, DN1126B4
DN1129A4, DN1129B4
Description: .264/MPEG4/MJPEG IP Box Camera
Dual Configurable Video Streams
with duplex Audio, Data, Alarms, POE
QUICK GUIDE FOR UPDATING Series DN1125, DN1126, DN1129 IP CAMERAS
1. Factory default settings are set as follows:
• IP address: 192.168.xx.yy (refer to 2.3 Serial Number / MAC Address)
• Mask: 255.255.0.0
• Gateway: 192.168.0.1
• User ID: root
• Password: pass
xx yy xx yy
MAC address = 00-13-23-01-23-45 → IP address = 192.168.35.69
To Convert exadecimal numbers to Decimal numbers, use PC calculator.
In Calculator Menu:
1. Click View and select Scientific version
2. Next select ex to convert digits xx - use keypad input number ex: 23
3. Next select Dec and get result = 35
4. Repeat for digits yy – select ex, input number ex: 45
5. Next select Dec and get result = 69
2. To change default IP settings to IP address compatible with your Network:
1. Go to Control Panel of you PC and click on Network and Internet Connections
2. Next click on Network Connections
3. Next right click on Local Area Connection and select Properties
4. Next Scroll down to Internet Protocol TCP/IP, select and click on Properties
5. Next Select “Use the following IP Address and if the default address is:
192.168.35.65 input into the box:
IP address 192.168.35.100 (last numbers higher than default)
Subnet Mask 255.255.0.0
Default Gateway 192.168.1.1
6. Next Click OK and wait 2 minutes for your PC to take on new IP address
7. Next go to Start and click on Run and type cmd
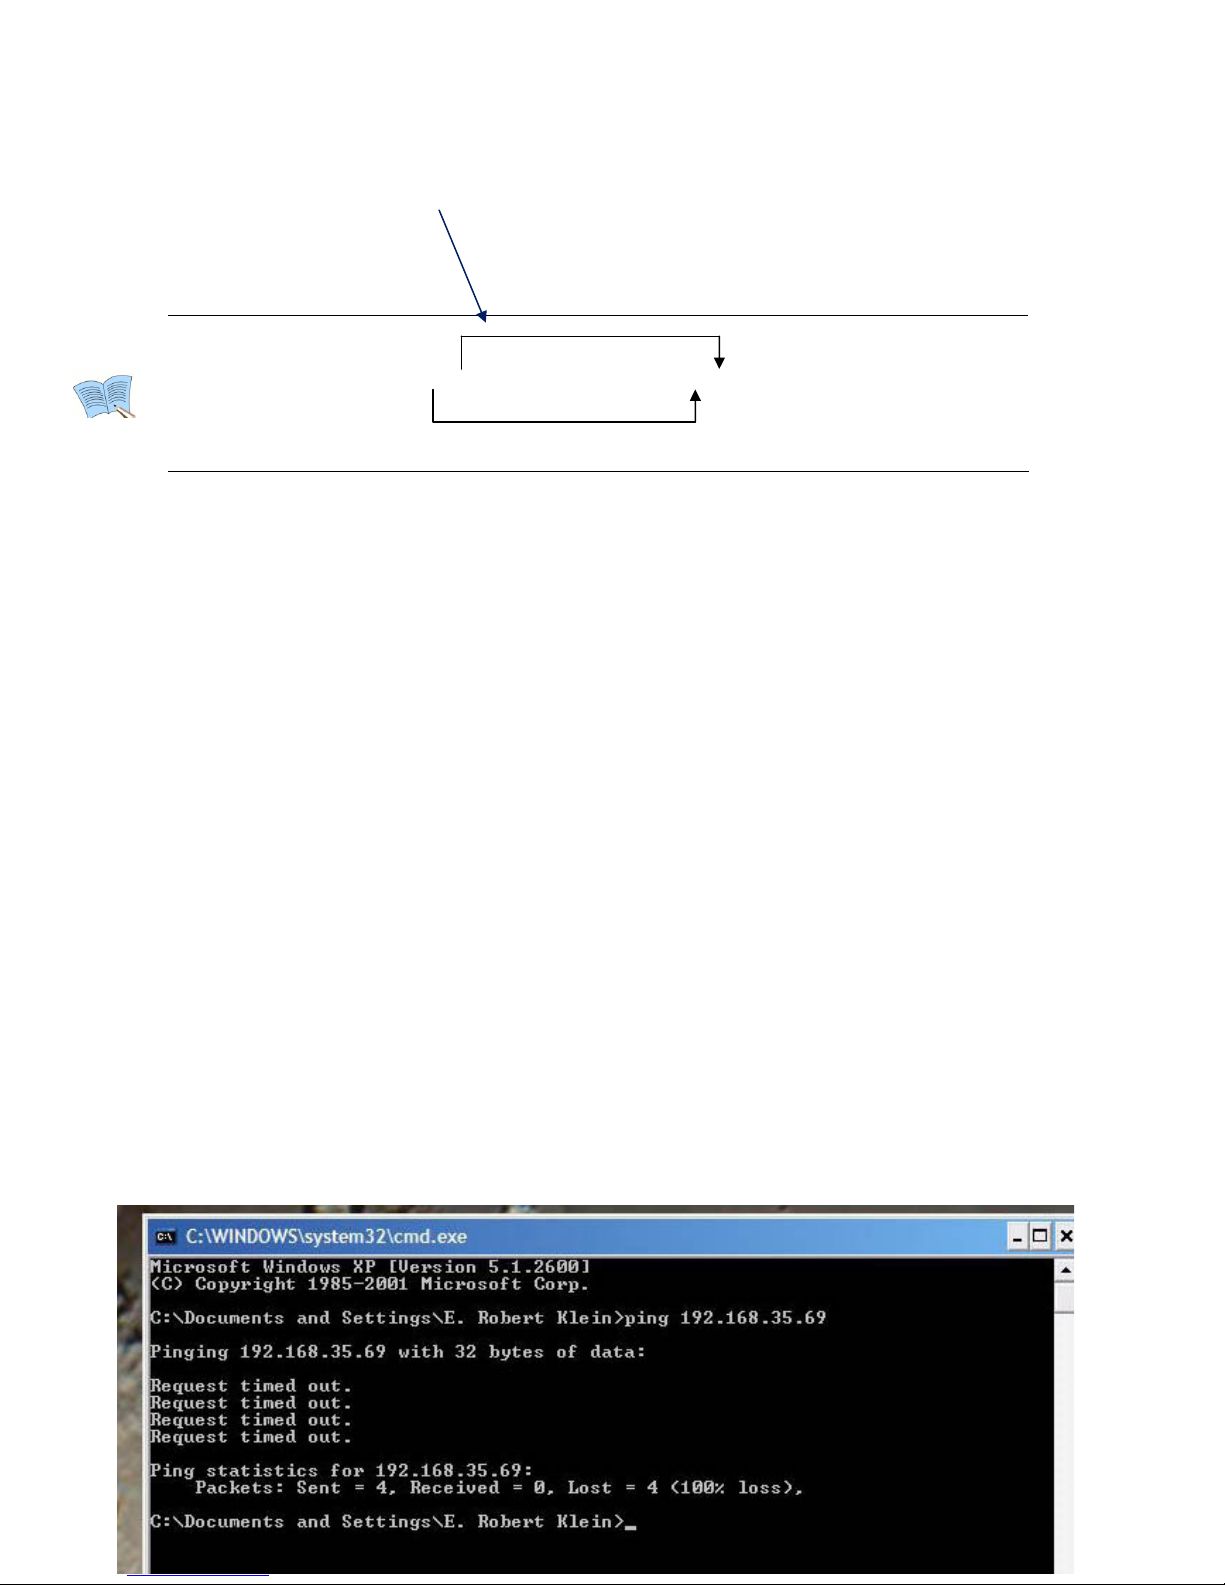
8. Next user must ping device to see that it reponds
9. In cmd prompt enter ping 192.168.35.69 (default IP address of DN1125)
If not detected in Network a screen apperas as (Request timed out:
10.
Convert the exadecimal number to Decimal
number
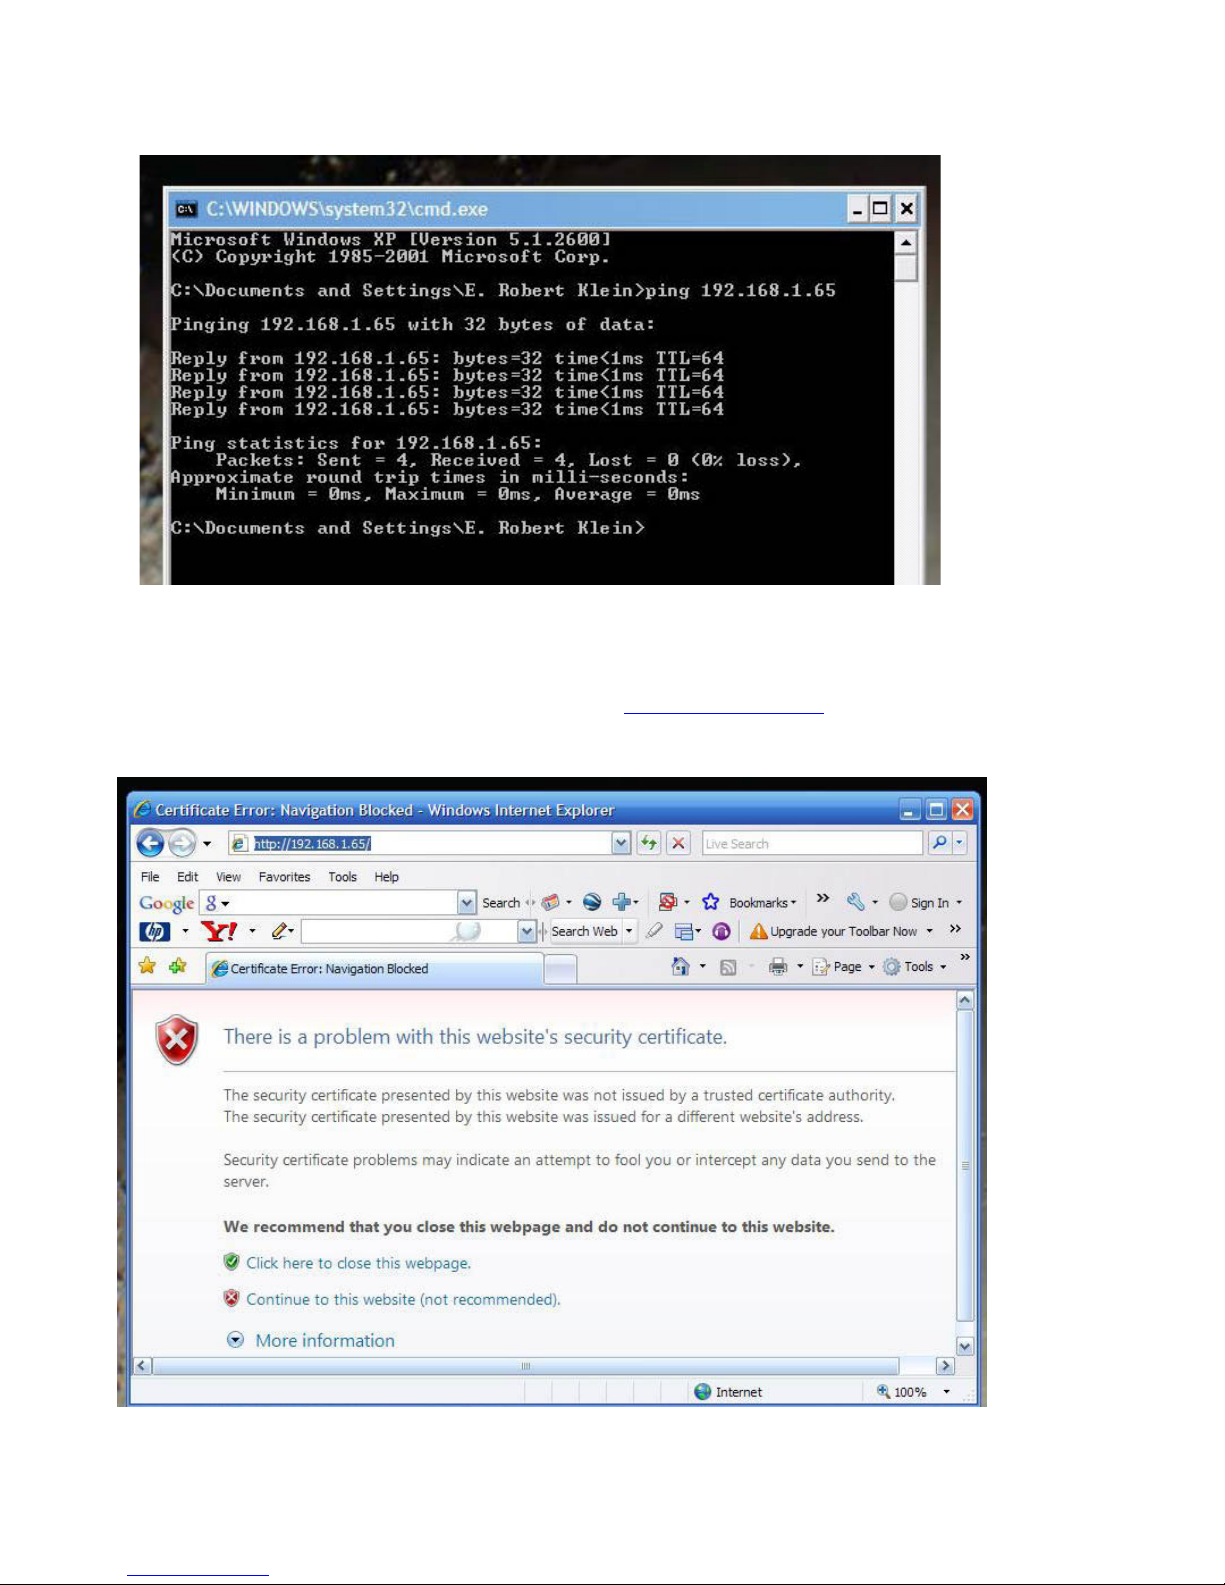
10. If detected in Network a screen appears as Reply from IP address – using example with
192.168.1.65
11. Return to Control Panel and follow procedures 1, 2, 3 and 4
12. Next Select “Obtain an IP address automatically
13. Next Click OK and wait 2 minutes for your PC to take on new IP address
14. Use may open Internet explorer and type http://192.168.1.65/
15. Screen appears to indicate that the security of your PC is at risk
16. Select Continue to this website; open web browser of DN1125 Encoder
17. Click on Setup user name: root password: pass
18. If image vertical is jumping, select Video, Audio select Video-In
19. In Video-In select NTSC or PAL and click on Apply, wait 3 minutes

20. Next go to System Options to change the IP Address of Encoder
21. Select TCP/IP and input new IP address, click Apply, wait 3 minutes
22. Next ping device as in procedure # 9, if successful then
23. Use may open Internet explorer and type in new IP address selected
24. Screen appears to indicate that the security of your PC is at risk; Select Continue to this
website; open web browser of DN1120 Series IP Cameras

Dante Security
02A.00 4
INFORMATION TO USER
CAUTION
RISK OF ELECTRIC SHOCK,
DO NOT OPEN
!
CAUTION: TO REDUCE THE RISK OF ELECTRIC SHOCK,
DO NOT REMOVE COVER (OR BACK).
NO USER SERVICEABLE PARTS INSIDE.
REFER SERVICING TO QUALIFIED SEERIVCE PERSONEL.
This symbol is intended to alert the user to the presence of un-insulated
“dangerous voltage”within the product’s enclosure that may be of sufficient
magnitude to constitute a risk of electric shock to persons.
!
This symbol is intended to alert the user to the presence of important
operating and maintenance (servicing) instructions in the literature
accompanying the appliance.

27
26
26
26
25
24
23
23
22
21
21
20
20
20
18
18
18
18
17
15
15
12
12
12
9
9
9
8
7
Dante Security
02A.00 4
Table of Contents
FEATURES.................................................................................................................
PACKAGE CONTENTS ................................................................................................
PART NAMES............................................................................................................
Rear View .................................................................................................................................
Bottom View..............................................................................................................................
INSTALLATION........................................................................................................
Installing a C/CS Mounting lens ..............................................................................................
Installing an Auto IRIS lens ......................................................................................................
CONNECTIONS........................................................................................................
9 pin terminal block.................................................................................................................
Power Adaptor Connector (DC 12V) .......................................................................................
CONFIGURATION....................................................................................................
Set up network environment ..................................................................................................
View video on web page .........................................................................................................
View video using IPAdmin Tool...........................................................................................
View video using IP address................................................................................................
Reset........................................................................................................................................
Factory Default........................................................................................................................
APPENDIX (A): SPECIFICATIONS ..............................................................................
Summary .................................................................................................................................
VCA (Video Content Analysis) .................................................................................................
Electrical Characteristics .........................................................................................................
Environment Condition ...........................................................................................................
APPENDIX (B): DIMENSIONS ...................................................................................
APPENDIX (C): ACCESSORIES...................................................................................
APPENDIX (D): TROUBLE SHOOTING .......................................................................
Checking your Firmware .........................................................................................................
Support....................................................................................................................................
REVISION HISTORY .................................................................................................

DN1120 Installation GuideDN1120 Series
Dante Security
02A.00 6
FEATURES
Camera
Box type IP Camera
Sony 1/3” Super HAD CCD & High Quality SS-HQ1 Full Kit Chip Set
Sony 1/3" Vertical Double Density Color CCD (Optional)
True Day / Night (ICR) and WDR (Optional)
Streaming
Dual streaming mode (such as different codec/resolution/bit rate and so on.)
De-interlacing on DSP
Burnt-in text supported
Unicast/Multicast supported
Video/Audio
Video compression: H.264/MPEG/MJPEG, 25/30FPS@D1(PAL/NTSC)
Audio compression: G.711(µLaw, aLaw)/PCM
Analog video out for external monitors
Video Motion Detection supported
2-way mono audio supported
Network
RTSP/ HTTP protocol supported
10/100 Base-T Ethernet
Additional Features
RS-485 supported
USB 2.0 supported (External storage, Wireless LAN)
Micro SD memory card supported
PoE supported (Optional)
Built-in Video Content Analysis
OSD supported
SDK (Software Development Kit) provided
VCA (Video Content Analysis)
VCA Presence (Included as basic)
VCA Surveillance (Optional)

Dante Security
DN1120 Series DN1120 Installation Guide
02A.00 7
PACKAGE CONTENTS
Unpack carefully and handle the equipment with care. The packaging contains:
IPE1100 DC power adaptor
Mount ring 9 Pin terminal block
Rubber cap (for protecting CCD) Hexa wrench driver
Adaptor for mounting the camera DC Jack Adaptor Cable
Quick Installation Guide Screws

Dante Security
DN1120 Installation GuideDN1120 Series
02A.00 8
PART NAMES
Rear View
Bottom View
⑥
⑤
③
①
①②
④
①
⑧
⑦
ETHERNET
Micro SD
RESET
LOOP OUT
RS-485 DO DI AUDIO
-+C1C1Out In
⑨
Dante Security
DN1120 needs a DC12V for power s
Reset switch is used for restarting DN1120 or resetting DN1120 as Factory Default (FD).
DN1120 Installation GuideDN1120 Series
02A.00 9
○
1Analog video out
It is an analog video output port.
○
2Reset Switch (Reset)
○
3USB connector
Insert a USB storage device or Wi-Fi devices. (Only Ralink RT73 chipsets based wireless devices
are available.)
○
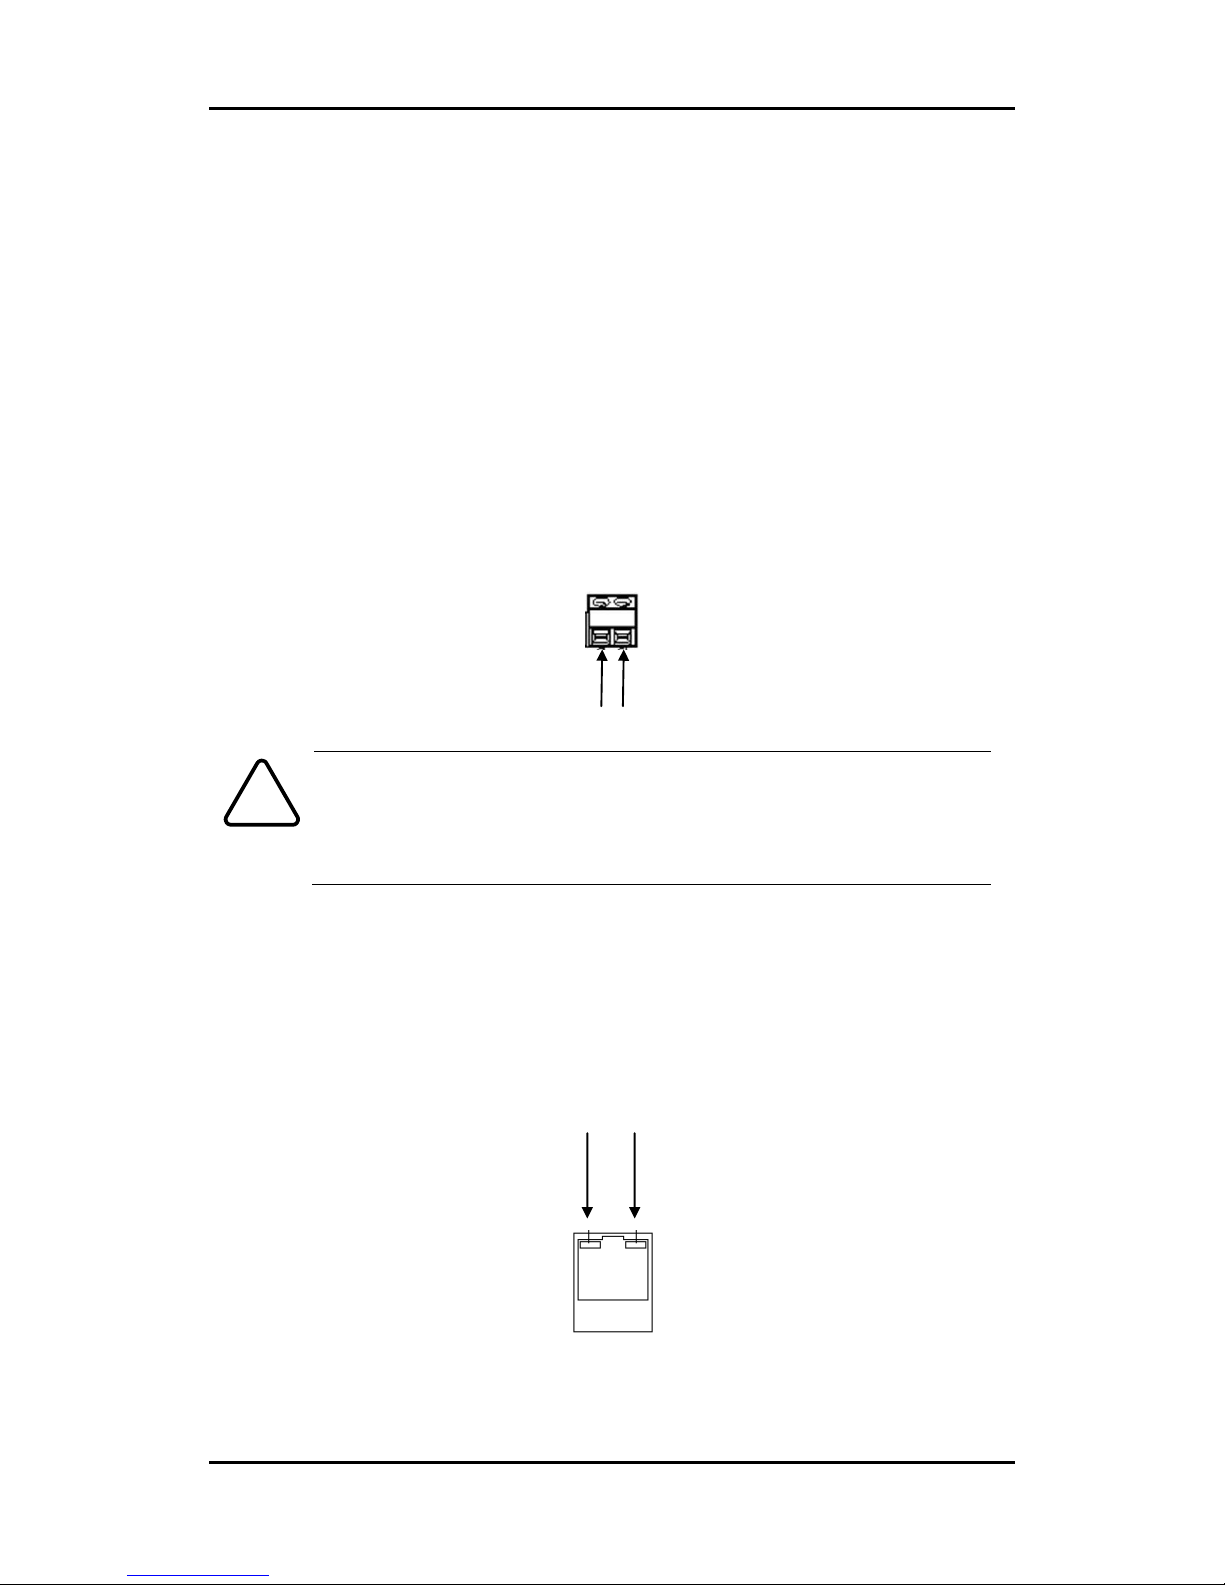
49 pin terminal block for D/I, D/O, audio, and serial communication
○
5Power Adaptor Connector (DC 12V)
upply.
Caution
!
Make sure the polarity is correct. Incorrect connection may cause malfunction
or damage to the IP device.
○
6Micro SD Card socket
It is a memory card slot for external storage.
○
7LAN Connector (Ethernet)
This is a RJ45 LAN connector for 10/100 Base-T Ethernet.
+
-
Status LED Network LED
This manual suits for next models
5
Table of contents
Other Dante Security Camera manuals

Dante
Dante DLM1971 User manual
 User manual")
Dante
Dante DLM1772(Y) User manual

Dante
Dante DLV1331WA35-21V User manual

Dante
Dante DLM1762 User manual

Dante
Dante DLF1323AP User manual

Dante
Dante DNA1991YM User manual

Dante
Dante DNZ1880YM2 Mounting instructions

Dante
Dante DNA1990 User manual

Dante
Dante DN1126 User manual

Dante
Dante DLF1328A User manual

Dante
Dante DLM1771 User manual

Dante
Dante DLF1330A User manual

Dante
Dante DLV1420W User manual

Dante
Dante DLS1798LA3Q9 User manual

Dante
Dante DLF1330V User manual

Dante
Dante DLI1971 User manual

Dante
Dante DNA1425T User manual

Dante
Dante DLI1972 User manual

Dante
Dante DNA1982 User manual

Dante
Dante DLF1329WPV User manual


