Nova MENTOR 6 LIGHT User manual

Manual
_DE _EN

_41 _EN_40
NOVA offers
comprehensive
guarantees and
services. To claim
or use these
services, you must
register your wing
at our myNOVA
web site within 14
days of purchase
(invoice date).
Thank you for your trust
Many thanks for choosing a NOVA wing. NOVA stands for innovative,
technically sophisticated, high quality products. Your paraglider was
developed using modern design and simulation software, it was inten-
sively tested and during and after production it underwent stringent
quality control procedures.
This manual contains important information on using your paraglider.
We recommend reading it carefully in advance of your first flight with
the wing. Please contact us or your NOVA partner with any queries or
suggestions.
Further information on this wing and other products can be found at
www.nova.eu.
We wish you great flights and safe landings.
Your NOVA development team
Philipp Medicus
Chief designer
MY
MENTOR 6 Light –
Less weight, zero limits

_43 _EN_42
The starting point
of our mission is to
build paragliders
which are safe and
simultaneously
high performance.
Performance and
safety, or rather the
correct ratio bet-
ween the two, make
for lots of flying fun
– and that is what it
is all about!
Thank you for your trust 41
About NOVA 43
Quality 44
Flying and nature 45
The MENTOR 6 Light 46
Introduction 46
Technical summary 47
MENTOR 6 Light technologies 48
MENTOR 6 Light target group 50
General information 50
Recommendations 50
Operating limits 51
On receiving your paraglider 52
Initial flight 52
Registration 52
Accessories included 52
Glider modification 52
Suitable harnesses 53
Weight range 53
Speed-system additional line set
assembly 54
Flying the MENTOR 6 Light 54
Take off 54
Normal flight 57
Accelerated flight 58
Turning 59
Landing 60
Rapid descent techniques 60
Collapses 63
Stalls 65
Cravats 66
Care and maintenance 68
Packing the glider 68
Storage 70
Cleaning 70
Repair 70
Disposal 70
Service and guarantee 71
myNOVA 71
Our services 71
Particulars and exceptions 75
Technical data 76
Overview risers 77
Overview glider 78
Line plan 79
Contents
_ GERMAN MANUAL 3
Version 1.0 | May 2019
The respective current and valid manual can be found
on our website: www.nova.eu
About NOVA
Driven by the idea of creating better wings, we founded NOVA in
1989. The company quickly grew into a significant manufacturer.
We rapidly consolidated and expanded our market position.
Our headquarters are in Terfens, near Innsbruck. Thanks to this loca-
tion we are 20 minutes from our local flying site, the Rofan. Due to its
proximity to lake Achensee, it is ideal for glider testing. Alternatively,
the Zillertal, the Stubaital or the southern Alps are close by.
As a paragliding manufacturer, being close to mountains is essential.
Firstly we need appropriate terrain for good development work.
Secondly, we need to have our finger on the pulse and need to be
closely connected to our customers. In Tyrol and the surrounding areas
paragliding is more than a sport. This positive attitude translates into
our products, which assists us to keep making better paragliders.
NOVA has a highly qualified staff team, nearly all of whom share the
same passion for flight as the pilots who choose to fly NOVA wings.
This passion and our know-how are the drivers of our innovation. For
example, it lead us to being pioneers in the area of flow simulation,
where we can reasonably accurately predict many of the characteri-
stics of a new wing design on a computer.

_45 _EN_44
Acceptance of our
sport depends on
the good behaviour
of every pilot. Please
make your contribu-
tion to the positive
image of the para-
gliding community.
!
Flying and nature
Ontheonehand,flyingmeansexperiencingaparticularformoffreedom.
On the other, there is a requirement to follow laws and ethical ground-
rules. Please show respect to your fellow pilots, but also consider the
interests of landowners (both take-off and landing), air law and your
impact on the environment.
For the sake of our sport and our environment, we ask you to undertake
paragliding in an environmentally-friendly way. Please do not litter and
please avoid scaring animals by flying too close to them. Especially in
winter, this stress can be life-threatening for wild animals.
Being considerate to the needs of animals is your contribution to the
preservation of their habitat. At the same time, respectful behaviour
also avoids conflict with other interest groups like landowners, whose
income is reliant on healthy numbers of wild and domesticated ani-
mals.
Quality
When discussing quality in paragliding, often the focus is on externally
visible issues: seams, fabric or symmetry. These are all important indi-
cators for us too, but at NOVA we feel the term quality encompasses
more.
Quality means a cycle of processes which beginswith the right idea and
ends in comprehensive customer service. In between lies responsible
development and testing; serial production with routine inspection
and a network of responsible dealers and approved service centres.
We don‘t just want to offer you a good wing – we want to give you the
right one. Our highest priority is earning and maintaining the long-term
trust of our customers. We equate quality with the satisfaction of our
customers. If we matched your expectations, then we have provided a
quality service.

_47 _EN_46
The MENTOR 6 Light
was developed in
co-operation with the
cross-country pilots in
the NOVA Pilots Team.
themselves.Insteadof»Spaghetti-straps«weusenewaerodynamically
slim risers, whose design was based on the Speedbrake Riser. These
ensure optimal C-steering and even at the launch lie comfortably in
the hand. This means the MENTOR 6 Light is easy to inflate and the
weight-optimised canopy climbs even more easily than the normal
version.
Simply honest
The MENTOR 6 Light’s performance is easily accessible and is there-
fore suitable for local soaring as well as being perfect for ambitious
FAI triangles, hike & fly and vol biv. In strong thermals it convinces with
its relaxed and comfortable flying characteristics and, for its class, a
very high level of passive safety (flat aspect ratio: 5.43). Especially for
pilots who like to climb mountains on foot, the combined low weight
and small packing size makes the MENTOR 6 Light an all-rounder:
light on the back and as enthusiastic about going XC as you are.
Technical summary
The MENTOR 6 Light is an EN B wing with 59 cells and a flat aspect
ratio of 5,43. The MENTOR 6 Light is a wing made from very light sail
cloth. Care should be taken when handling the wing. The shelf life is
less than that of conventional paragliders fabric.
All technical data can be found on page 76.
The MENTOR 6 Light
Introduction
At home in the B class and travelling the world – the MENTOR 6 Light
in size S is a hefty 850 grams lighter than its big brother, but offers
the same ingenious new developments like Zig-Zag 3D-Shaping,
the innovative Mini-Rib Vector Tape, Double-B Splits and new risers.
Sometimes during hike & fly you might encounter turbulent conditions,
so the MENTOR 6 Light is trimmed for extra comfort, as well as high
performance. This makes it the perfect companion for anyone who
would like to cover big distances – both on the ground and in the air –
with as little baggage as possible.
Little weight & packing volume
The MENTOR 6 Light mainly differentiates itself from the MENTOR 6
in terms of weight. We chose weight-optimised Skytex 27 cloth on the
upper and lower surface. Nice to know: We offerthe same guarantee for
this cloth as we do for our regular sail cloths. Why? It is very important
to us that you can enjoy your NOVA wing for a long time. Despite its
lightweight design, we use the most durable materials possible and on
the wing nose we have additionally used robust 30D cloth.
No compromises in comfort
Apart from the gallery lines, all lines are sheathed and nearly sort

_49 _EN_48
MENTOR 6 Light
technologies
Under pressure
NOVA Air Scoop is an optimised air intake, which increases the
internal wing pressure. NOVA’s Air Scoop principle is similar to
the ram-air inlet duct on a sports car: increased airflow produces
higher pressure. Higher internal pressure in a paraglider means
improved performance through increased structural stability and
collapse resistance.
Mini-Rib Vector Tape
A vector tape near the trailing edge has various advantages.
Firstly, this tape reduces the crease in the upper surface that is
created when braking. Secondly, the wing is more compact, i.e.
the wing deforms less during glides in moving air. To maximise both
these advantages, it was necessary to locate this vector tape very
far back in the area of the mini-ribs.
Zig-Zag 3D-Shaping
Zig-Zag 3D-Shaping is the next step to an even smoother wing
nose. As well as Double 3D-Shaping, two parallel seams which
stretch the entire length of the upper surface span, each cell
located at the nose has a further diagonal 3D-Shaping seam. This
forms a striking zig-zag pattern. This means the seam runs more
cleanly and is more aerodynamically advantageous.
Comfort on the ground
All NOVA paragliders are made to be easy to use. For packing you
can use a concertina bag, but it is not essential. Our extensive
experience with rods has taught us that the packing method has
little influence on the durability of the wing. Bent rods quickly
spring back into their original shape.
More compact
The aspect ratio of a glider is not the only factor in passive
safety, but still a very important one. A high aspect ratio
favours cravats after asymmetric collapses, generally shortens
brake travel and normally makes wings more difficult to fly.
Nova‘s analytical tools permit us to build performance wings
even with a low or moderate aspect ratio.
Light as a feather and robust
Very light but still durable: light weight NOVA wings weigh
little but are still robust enough to withstand the hard conditions of
the mountains. The profiles are made out of durable cloth,
so that this highly-stressed component does not deform – like
it can with ultra-light material. This means we are able to guarantee
consistent flying characteristics.

_51 _EN_50
After buying a new wing we
recommend undertaking an
SIV/pilotage course. On this
course we recommend prac-
tising the manoeuvres which
simulate the incidents which
most commonly occur during
everyday flying – in particular
asymmetric and frontal col-
lapses.
Furthermore we recommend regular flying, ground handling, as well
as further theoretical training. We advise that you continuously study
flight theory and practice and that you also study the particulars of
your chosen flying equipment. As the owner of your equipment it is your
responsibility to comply with checking and maintenance requirements.
More information on this in the »Care and maintenance« section.
Operating limits
The following flying conditions and situations are outside the permit-
ted operating limits of the wing:
• Flying with precipitation (rain, snow, hail) must be avoided at all costs.
Precipitation has a negative impact on the flying characteristics of
the wing. Amongst other things, the stall point and parachutal stall
behaviour changes.
• Low temperatures combined with high humidity can lead to icing,
which also has a negative impact on the wing’s flying characteristics
(parachutal/deep stall, shortening of the brake travel).
• Operating the paraglider is only permissible within the recommended
weight range. The weight range can be found in the technical data.
• Sand, dirt and snow (especially in large quantities) have a very nega-
tive effect on the flying behaviour of the wing. Before each launch,
check your glider for foreign matter and execute a proper pre-flight
checking sequence.
• This paraglider was not designed for aerobatics.
MENTOR 6 Light target group
The MENTOR 6 Light is a paraglider with impressive performance
which has, in the hands of an experienced pilot, very uncomplicated
handling and manageable extreme flight behaviour.
General information
As an aircraft, paragliders must conform to applicable air law.
Depending on your country of origin, instruction may be compulsory.
Additionally, there are statutory requirements (for example air law)
which must be adhered to.
The MENTOR 6 Light is designed and certified to carry one pilot. It
may not be used as a tandem wing.
Paraglider pilots must be able to prove that they have the valid licen-
ces and must have insurance as is required by their country of origin.
Pilots must be capable of judging meteorological conditions correctly.
Depending on a country‘s applicable regulations, the use of a helmet
and back protector, as well as carrying a parachute, is mandatory and
highly advisable.
Pilots must accept responsibility for the risk inherent in participating
in the sport. Paragliding is an adventure sport and can lead to severe
injuries and death.
We recommend that inexperienced pilots and those with a heightened
desire for safety should undertake paragliding under the auspices an
accredited school or instructor. Many of our NOVA Partners can offer
this service.
Recommendations
We advise pilots to choose their wings conservatively: it is preferable
to fly a lower class wing than to overstretch yourself. One can only get
the full potential from a wing if it feels comfortable. If the wing is too
demanding, this does not lead to increased performance and it can
increase the risks.
Flying the
MENTOR 6 Light
does require a level of
skill. The MENTOR 6
Light is not suitable
for beginners or
occasional flyers.
For queries about the
suitability of the wing
for you, your NOVA
dealer will be happy
to assist!
!

_53 _EN_52
• The free play of the brake has an effect on extreme flight incidents.
If the brake line length is modified, this can influence the reaction of
the glider.
Suitable harnesses
Your paraglider is certified for use with a harness classified as
GH (without cross-bracing).
This group contains nearly all currently
available harnesses. The certification sticker on your harness
provides information on its classification.
Some harnesses allow particularly effective weight-shift, but at the
same time turbulence is directly fed back to the pilot. Other harnesses
aremoredampedandthereforemorecomfortable–butthedisadvantage
is that they are less agile. Every pilot must decide for themselves
which set-up is suitable for him/herself.
NOVA wings are designed and tested using NOVA harnesses. There-
fore we recommend flying our wings in combination with our harness-
es.
Weight range
Your paraglider is certified for a stipulated weight range. If you fly
the glider outside this range, you are outside the operating limits of
the equipment. Therefore the paraglider does not conform to the fly-
ing characteristics determined during the certification process – this
means your certification is no longer valid.
It is a question of personal preference whether you wish to fly at
the upper, lower or middle of the stipulated weight range. Low wing
loading brings the advantages of, for example, high damping, a less
dynamic feel and a great climb rate. The disadvantage is less speed,
less agility and reduced internal wing pressure. On the other hand,
high wing loading means more speed, a more taut canopy and more
agility, which has increased dynamics as a consequence.
The choice of
harness has a
major influence
on the flying
characteristics of
your paraglider.
We do not wish to
make a statement
like: »A wing must
be flown at the
upper weight limit«.
Which size is most
appropriate is
more a question of
individual taste and
the wing’s intended
purpose. While
flatland fliers prefer
less loaded wings,
in the Alps highly
loaded wings can be
an advantage.
On receiving your paraglider
Initial flight
Before sale, every NOVA wing is checked and flown by a NOVA dealer.
The name of the pilot and date of this first flight must written on the
paraglider’s information label. Generally this will be situated in the
centre cell (at the profile rib).
Registration
In order to take advantage of the full guarantee and services, for
example NOVA Protect, you must register the paraglider at our web
site: my.nova.eu ↗
Accessories included
Your MENTOR 6 Light will be delivered with a glider bag (rucksack),
inner bag, riser bag, windsock, manual, self-adhesive repair tape,
additional speed system cords (Size XS, S, and M) and stickers.
Glider modification
At delivery, the specifications of a new paraglider conform to those
used during the certification process. Any user modification (for
example, change of the line length, modification of the riser) means
the glider no longer conforms to its certification. We recommend
consulting NOVA before any modification.
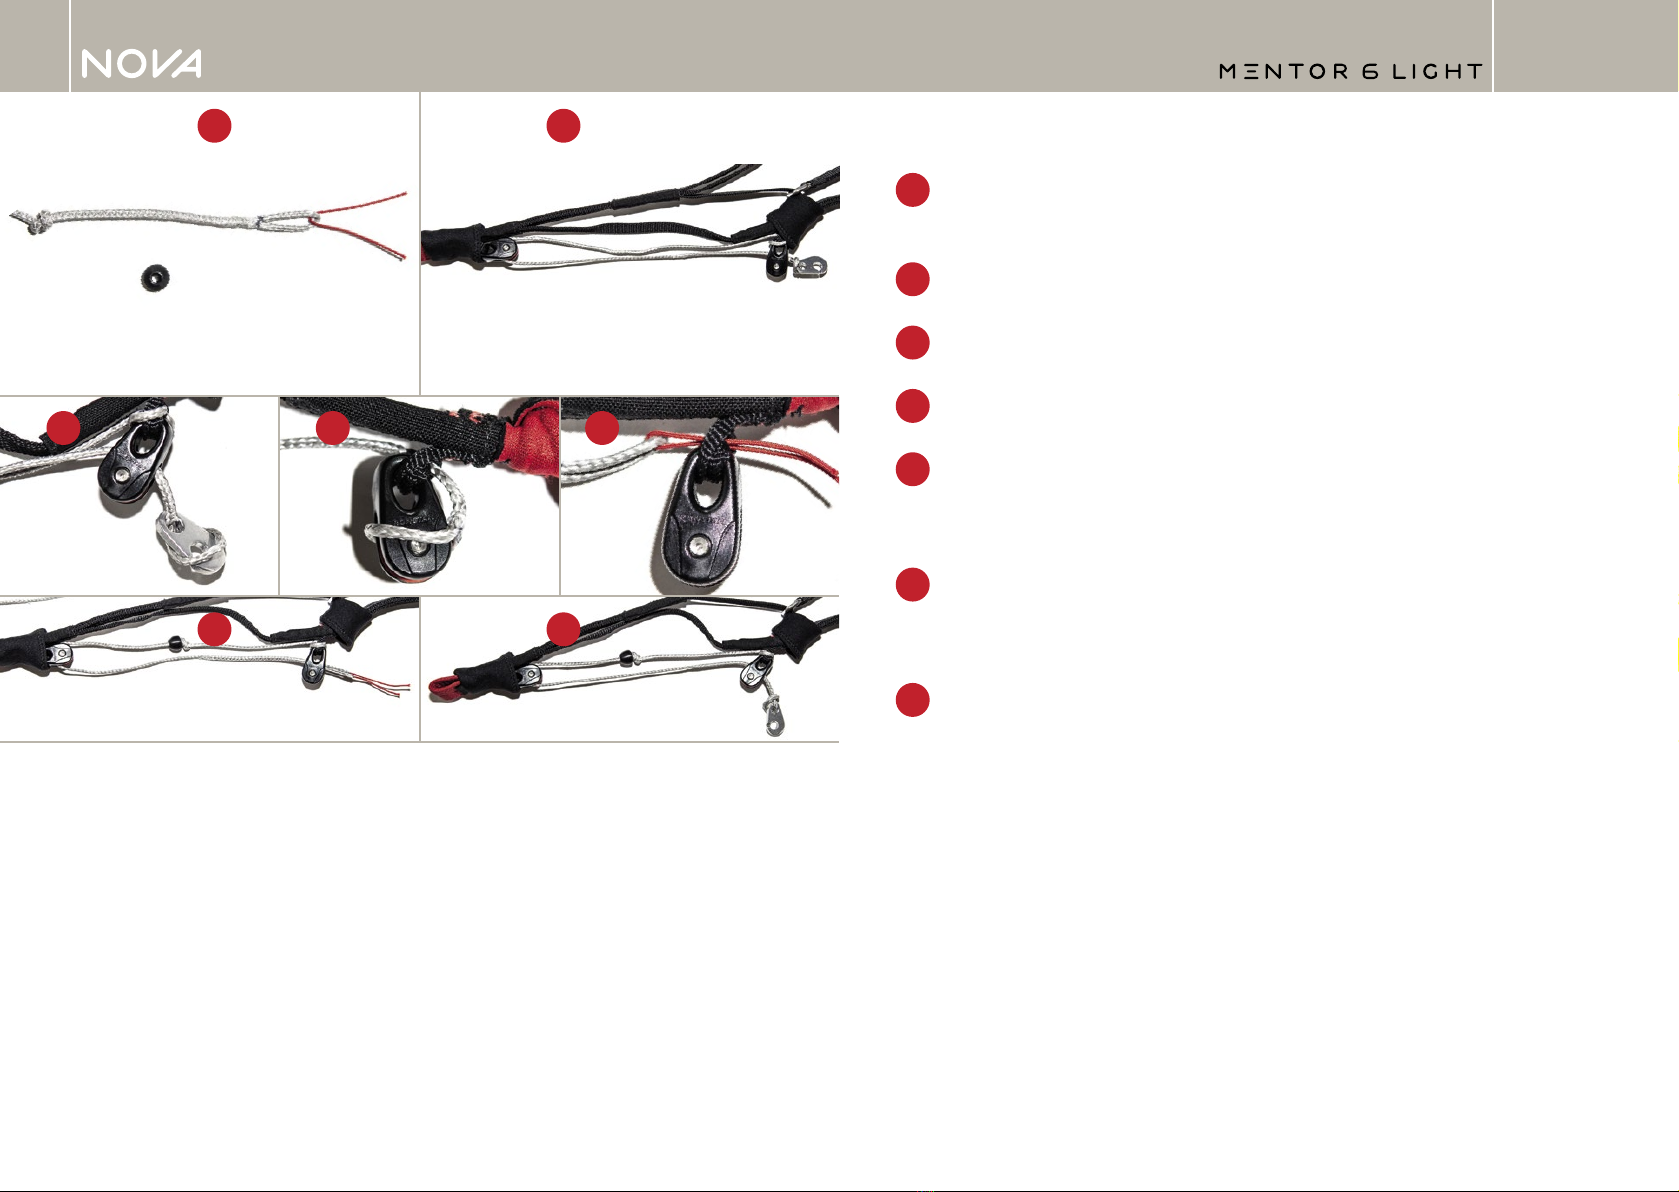
Care should be taken when modifying the brake line length: in the
factory, the brake line is set so there is 10 to 15 centimetres free play.
This is essential for two reasons:
• Ifthespeedsystemisengaged,thebrakeline travelis reduced.Abrake
line modified to achieve shorter travelwould mean that the wingwould
be automatically braked when accelerated. Firstly, this would reduce
the effectiveness of the speed system and secondly this could
induce a stall.
This registration
must be completed
within 14 days of
purchase (invoice
date).
?
MY

_55 _DE_54
Speed-system additional line set assembly
(Size XS, S and M):
The MENTOR 6 Light has comparatively long speed-system travel. To
reach full speed, the speed-bar must therefore be pushed a long way.
This is not possible with some harnesses.
The additional speed-system cords supplied with the glider will allow
you to reduce/adapt the length of travel. This means full speed can be
reached without having to push the bar to the maximum.
1 The additional speed-bar set comprises two additional cords, two
beads and a red cord to facilitate assembly.
2First, push back the neoprene covers from the pulleys.
3Undo the Brummel hooks. Now pull the line through both pulleys.
4Unthread the the line from the upper pulley.
5Using the red cord to assist, thread the new line into the upper
pulley. Make sure you thread in the loop which is closest to the knot.
Push the line loop over the pulley- in the opposite way to step 4 above.
6Push the bead (using the red cord to assist) over the line until it
is located at the knot. Thread the line first through the lower, then the
upper pulley.
7Attach the Brummel hook - in the opposite way to step 3 above.
Check that the line is running as shown in in the illustration.
The location of the knot and bead can be set as required:
if the knot in the picture is moved to the right, then the bead will block
the lower pulley only when close to full speed. The speed-bar travel is
only marginally reduced.
If the knot is moved left, the bead will block the pulley sooner.
The speed-bar travel is reduced more, but the force needed to engage
the system is increased.
1
6
3 4 5
2
7

_57 _EN_56
Tow launch
When towing, the MENTOR 6 Light displays no peculiarities. Please
note that it is important to climb away from the ground at a shallow
angle.
We recommend the use of a tow adapter. This adapter is connected to
the main carabiners and links them with the tow release.
Normal flight
The MENTOR 6 Light has its best glide performance at trim speed, i.e.
when the brakes are fully released. In calm air, the wing will travel the
greatest distance over a given height.
With headwind or a sinking airmass, maximum glide can be achieved
by using the speed system. During accelerated flight in turbulent air,
attention should be paid to the dynamic reaction of the wing in case of
a collapse. Lots of height above the ground is advisable.
In strong turbulence it is advisable to gently pull both brakes to increa-
se stability. The brakes provide feedback about the surrounding air,
which is needed for active flying.
By active flying we mean the constant control and correction of the
angle of attack in turbulent air. For example, if a pilot flies from an area
of lift to an area of sink, if there is no pilot input, the angle of attack will
be reduced and the wing will pitch forward. Reduced brake pressure
will indicate the start of this pitch movement to the pilot.
The correct reaction is to increase the brake input to prevent the
forward pitch.
Overall, the launch
behaviour is very
simple. The wing
forgives errors. No
special skills are
needed to launch
the wing.
Cases of an
escalation of a
collapse can be
prevented by
active flying.
Flying the MENTOR 6 Light
We recommend completing your first flights with your new wing in
calm conditions. This will give you the opportunity to get to know your
glider. Launches and ground handling on a training hill will also help to
familiarise yourself with the paraglider.
Take off
General
The pilot has the responsibility to check that their entire equipment is
in full working order. In particular, the wing, harness and the parachute.
Immediately before launch we recommend the following pre-flight
check, which should be conscientiously performed before every take
off. Sadly, many launch accidents result from an omitted pre-flight
check.
1. Buckled-up: leg and chest straps are connected, chin strap on the
helmet is closed
2. Clipped-in:risersarenottwisted,speedsystemiscorrectlyconnected,
carabiners are locked
3. Lines: A-lines are on top, all lines are sorted and free of knots, brake
lines run cleanly through the pulleys
4. Canopy: wing is laid out on launch in an arc with leading edge open
5. Wind and air space: wind is suitable for take off, air space is clear
The MENTOR 6 Light distinguishes itself by its easy inflation behavi-
our (both during forward and reverse launch) and without wanting to
hang back. The wing climbs cleanly and directly without a tendency to
overshoot.
Confident launches can only be learnt by practise – there is only a
limited knowledge to be gained from books and descriptions. So here
is a tip: Use every opportunity on a training hill to perfect your launch
technique. Ideally, have an experienced colleague or instructor with
you to provide feedback.
!
For an optimal inflation during
launch, we recommend holding
both A-risers at the maillons,
rather than holding the webbing
below the maillons.
TIP

_59 _EN_58
A
B
C
Speedbrake Riser Function
The MENTOR 6 Light is fitted
with the Speedbrake Riser Func-
tion as standard. This is a tie strap
which allows the pilot to »decele-
rate« the wing. If the pilot pulls the
C-riser back and downwards in a
radius (with the maillon as the centre of
rotation), the B-riser is also reduced in
length. The result is that the wing flies
slower and without creases. More
specific information can be
found here:
www.nova.eu/speedbrake
Important:If the Speed-
brake is pulled too much or
too suddenly when the wing
is already pitched back there
is the risk of stall. Please practise
using the Speedbrake Riser slowly, incrementally
and in calm conditions.
Speed system geometrical data
If the entire speed range is utilised, the
A-riserswillbeshortenedbyapproximately
18 cm, the A2-risers will be shortened
by approximately 15 cm and the B-riser
by about 13 cm (sizes XS, S, M and L). XXS: the A-risers will be
shortened by 14 cm, the A2-risers by 12 cm and the B-riser by 10 cm.
Turning
Turning a wing is the combination of inner brake, outer brake and
weight-shift. The key is the correct dose of each element. One of the
features of the MENTOR 6 Light is its sensitive handling. Small brake
inputs are sufficient to fly precise turns.
Some of the required techniques can be practised during ground hand-
ling, for example, by attempting to keep the wing flying above your
head without looking at it. This exercise is also useful for successful
forward launches.
Accelerated flight
Fitting the speed system
The majority of harnesses are fitted with two pulleys per side. Some
(lightweight) harnesses instead have two simple rings or loops. The
two speed bar cords are pulled from top to bottom through both
pulleys/rings and fitted to the foot bar.
The correct length adjustment is important. If it is too short, there is
the danger that the wing is constantly accelerated, which should be
avoided at all costs. If the cords are too short there is the risk that the
speed bar is unreachable.
If the cords are set too long, it is not possible to accelerate the wing to
its maximum speed.
We recommend setting the cords a little too long when first fitting the
speed system, so that the free play can be judged during flight. Then
the slack can be taken up if necessary. Brummel hooks with three
holes assist with the simple adjustment of the cord length.
Using the speed system
Before take off or on connecting the risers to the harness, the Brummel
hooks on the speed system must to attached to those on the harness.
Pleasemakeitpartofyourpre-flightroutinetoconnectthespeedsystem
– it is important for your safety.
The MENTOR 6 Light is fitted with a very effective and smooth-run-
ning speed system. Up to the maximum speed, the glide performance
remains very high. Pitch correction, i.e. active flying, in accelerated
flight should not be performed through the brakes, but using the speed
system. Therefore if the wing pitches forward, the pilot should not
brake, but reduce the acceleration.
Inacceleratedflight,steeringshouldbeperformedeitherbyweight-shift
or through asymmetrical speed bar use (by increasing the acceleration
on the left side, the wing will turn right).
Please note: using
the brakes during
accelerated flight is
not only detrimental
to performance,
but (in comparison
to non-accelerated
flight) it increased
to likelihood of
collapses!
!
The NOVA Speed-
brake Riser is the first
three-liner riser which
permits the glider to
be accelerated as
well as decelerated. It
brings an end to pul-
ling the C-lines, which
killed performance.

_61 _EN_60
2) B-line stall
A B-line stall is instigated by symmetrically pulling both B-risers
(approximately 15 centimetres). It is recommended – for maximum
grip as well as safely executing the manoeuvre – to grab the risers at
the top. i.e. at the maillon.
Immediately afterpulling the risers, thewingwill lose its forward speed
and after a short oscillation will descend in a stable parachutal stall.
If the B-risers are pulled too far (markedly more than 15 centimetres),
the wing will slowly begin to rotate around its vertical axis. It is also
possible (particularly in turbulent air) that the wing horseshoes. This
means that the wing deforms and the wing tips go forwards. The
tendency to horseshoe can be reduced by gripping the B-risers from
the inside and then pulling them towards the body, as well as down-
wards. When executing a B-line stall, we recommend watching your
canopy – whilst always keeping an eye on your height above ground, so
that you are able to exit the manoeuvre at the correct time.
The B-line stall is released by simultaneously raising your B-risers
back to their normal flying position. If they are released too slowly, an
unintended consequence can be a parachutal stall (see the section on
parachutal stall).
The brakes should remain in your hands the entire duration of the
manoeuvre and no additional wrap should be taken. When exiting the
B-line stall it is important that the brake is completely free so that the
wing can fully accelerate to trim speed.
3) Spiral dive
The spiral dive is the most demanding descent technique and should
be learned at great height, preferably during an SIV/pilotage course.
The manoeuvre has two phases:
First the pilot weight-shifts into the turn and then uses the inner
brake to induce an ever tightening turn (note: do not jerk the brake, but
pull it smoothly and continuously). With increasing acceleration, there
will be a moment where the G-forces rapidly increase and the nose
of the glider begins to point to the ground until (during a successfully
performed spiral dive) the nose is nearly parallel with the ground. At
this point the wing will reach sink rates of 20 meters per second (m/s)
or more.
In thermals, in addition to the inner brake, we recommend lightly
braking on the outside as well – this helps to control bank and speed
of rotation, i.e. you get better feedback from the wing. Additionally
this increases the stability of the wing tip. Tight, controlled turns and
smooth direction changes need practise but should be a skill all pilots
have mastered.
Please note:if the paraglider is no longer steerable using the brake
lines (for example if they have become tangled) then the wing has
limited steering capacity through the C-risers.
This, in combination with weight-shift, still allows reasonable turn
correction. Using this technique also permits a safe landing. The
C-risers should not be pulled so hard that they cause the wing to stall.
Landing
Landing the MENTOR 6 Light is very simple. In turbulent conditions
it is advisable to make your approach whilst pulling a little brake in
order to increase stability and to increase the feeling for the wing‘s
movement.
Immediately before touchdown the brakes should be pulled hard –
even to the point of stall.
Rapid descent techniques
To quickly lose height, we recommend three possible manoeuvres.
We have ordered these by degree of difficulty:
1) Big ears
To use big ears, both outer A-lines (fitted on a separate riser – split
A-risers) should be pulled down simultaneously. The brake handles
(without an additional wrap) remain in your hands. As long as the lines
are held down the wingtips remain folded and this increases the sink
rate.
If the speed bar is used as well, this increases sink and speed. This
also equalises the higher angle of attack caused by the increased drag
of the ears. With »big« big ears (if the A3 line is pulled further), it is
necessary to use the speed-bar to avoid the angle of attack becoming
critically high.
To release the ears, release the A-lines fully and allow them to return to
their normal flying position. If the ears do not open automatically, the
pilot can use a quick, sharp tug on the brakes to assist the opening.
Please note: a full stall
– if initiated too early –
can lead to heavy lan-
dings or even serious
accidents. Therefore
the brakes should
only be pulled fully
immediately before
touching the ground
(<0.5 meters).
!

_63 _EN_62
In conclusion: it is essential to practise this manoeuvre gently and in
stages. The exit must be controlled. Important safety information:
• if the pilot wishes to reduce the spiral or rotational movement, it is
recommended that the first action is to pull the outside brake, rather
than to release the inside brake;
• the pilot must be aware of the physical demands of rotation (vertigo)
and acceleration (g-forces).
• if the pilot weight-shifts to the inside of the rotation, the wing may
lock into the spiral;
• because of the fast descent rate, the pilot must constantly monitor
the height above ground and exit the spiral in good time.
C-line stall
This manoeuvre is occasionally recommended as a descent technique.
It is instigated by symmetrically pulling the C-risers. The wing loses its
forward momentum and begins to descend.This manoeuvre is basically
possible, but should only be practised with a qualified instructor.
Collapses
Asymmetric collapses
When flying into strong turbulence, one side of the paraglider may
collapse. This happens because the turbulence causes the angle
The acceleration can be more than three times gravitational force
(>3g). The pilot must be aware of these forces.
Before learning to spiral, pilots should practise controlled exits from
steep turns. These exits are performed by using the outer brake, whilst
the inner brake initially remains in the same position. The outer brake
is pulled until the rotational movement slows. To achieve a smooth exit
without pitching forward, the outer brake must be released more as
soon as the wing starts to level, i.e. as soon as the wing is no longer
horizontal.
The actual spiral dive – as outlined above – only occurs after the above
described transition phase, i.e. the diving of the wing. At this moment
the pilot is pushed outwards in his harness. The pilot should release
the pressure to avoid the wing locking into the spiral.
Then the sink rate can be varied using the inner and outer brake.
If the pilot’s weight remains on the outside, releasing the inner brake is
sufficient to continuously slow the rotational movement of the glider.
Exiting the spiral is then performed as described above.
If the pilot strongly weight-shifts to the centre, the glider may lock into
the spiral, regardless whether the brakes have been released. In this
case symmetrical braking or braking on the outside may help, as well
as weight-shifting to the outside.
These physical
demands can be
simulated in a g-force
trainer. We recom-
mend such g-force
training to all pilots.

_65 _EN_64
collapse the wing tips as well. This is only pertinent to non-accelerated
frontal collapses. Due to the increased energy in accelerated frontal
collapses, the wing tips usually fold themselves inwards. This means
an induced, accelerated frontal collapse is easier to manage than a
frontal collapse at trim speed. Generally a quick, symmetrical pull of
the brakes, which are immediately released, will hasten the reinflation
of the collapse.
Stalls
Spin
If the pilot brakes one side of the glider too much, a spin will result.
In a conventional turn, the axis of rotation is remote from the wing.
When a wing spins, the axis of rotation moves within the wing span.
The over-braked side of the wing slides back.
The correct pilot reaction is to immediately release both brakes. Occa-
sionally it is necessary to stop the canopy pitching forward.
Full stall
If both brakes are symmetrically pulled too far, a full stall will result. This
means that the wing loses its forward momentum, whilst the pilot con-
tinues to travel forwards. From the pilot’s perspective it feels like the
wing falls backwards. At this moment it is essential that the brakes are
not fully released as there is a risk that the wing will dive – potentially
underneath the pilot.
The available brake travel up to the stall point depends on the size of
the wing:
• 57 cm
for the
MENTOR 6 Light XXS
• 61 cm
for the
MENTOR 6 Light XS
• 63 cm
for the
MENTOR 6 Light S
• 67 cm
for the
MENTOR 6 Light M
These figures give a rough indication. Their inclusion in this manual is
required by EN 926. In turbulent air, a stall may occur markedly sooner
or later than these figures indicate. Therefore these figures only have
limited significance.
of attack on that side to decrease to the extent that lift is no longer
generated, the lines de-pressure and the wing collapses.
Such a collapse normally only affects a small part of the whole span
and the wing will not react significantly. During larger collapses which
affect 50 percent or more of the span, the wing will clearly react: due
to the increased drag of the collapsed side, the glider will begin to turn
towards that side. Simultaneously the wing will pitch forward because
of the reduced area carrying the wing loading, i.e. because this causes
that side of the wing to accelerate.
The pilot can prevent this turn and forward pitch by braking the un-
collapsed side of the wing. Braking the uncollapsed side is essential,
especially near the ground. This manoeuvre should be practised with
induced collapsed at height, preferably during an SIV/pilotage course.
Frontal collapse
A frontal collapse is also a consequence of turbulence. Unlike an
asymmetric collapse, during a frontal collapse the whole leading edge
folds downwards.
All our paragliders open automatically after frontal, as well as asym-
metric collapses (as stipulated in the certification standards).To speed
up the re-inflation of the leading edge after a frontal collapse, we
recommend a very short stab of both brakes. It is important to then
release both brakes completely. During an induced frontal collapse
using the A-risers it is difficult to also collapse the wing tips because
the outermost A-attachment points are fitted to the stabilo line or the
B-riser (see line plan, page 79). Only the centre of the wing collapses
and the wing tips continue flying. In an extreme case this could lead
to a cravat. If this behaviour is observed (i.e. that the wing tips do not
collapse and fly forwards), this can be resolved easily with a quick
symmetrical pull on the brakes. As mentioned above, it is very import-
ant to immediately release the brake again.
This wing behaviour only affects frontal collapses induced by pulling
the A-risers. To avoid this behaviour during induced collapses, we
recommend not just pulling the A-risers diagonally downwards,
but pulling them simultaneously inwards. This makes it possible to
A full stall is a
complex manoeuvre
and an explanation of
its correct execution
is beyond the scope
of this manual.
Anyone wishing to
learn this manoeuvre
should undertake an
SIV/pilotage course.
If the open side is
braked too much the
glider may spin – see
the section on spins.
!
!

_67 _EN_66
dive which either requires great effort or in some cases it is actually
impossible to exit. It is essential to prevent this rotation.
2. Open the cravat by pumping the brake: A hearty pull of the brake
on the tangled side may release the cravat. A timid pull of the brake
rarely works.
3. Pull the stabilo line: If a pull of the brake line is unsuccessful, pulling
the stabilo line may work. The stabilo line is the outermost line on
the B-riser and is green in colour.
4. Collapse the cravatted side: Collapsing the tangled side by pulling
the A-risers may be effective.
5. Full stall: A pilot who has mastered the full stall manoeuvre has an
effective method of releasing a cravat.
6. Parachute: Throw your reserve parachute without delay if you have
lost control of your wing and you are unsure whether you have suffi-
cient height for further recovery attempts. If possible, stabilise the
wing by using opposite brake until the parachute is fully open.
Make a habit of mentally rehearsing throwing your parachute by, for
example, practising putting your hand on the parachute handle during
flight. This is useful preparation should the worst happen.
Many clubs or schools offer an opportunity to practise throwing your
reserve parachute on a zip line. The most effective practise is obviously
actually throwing the parachute during an SIV/pilotage training.
Parachutal/deep stall
A parachutal or deep stall is defined as flight without forward
momentum and with a large sink rate. All our paragliders automatically
recover from a parachutal stall so long as the brakes are released, the
wing is in an airworthy condition and the pilot flies within the operating
limits of the glider.
If the wing is porous or its lines have been altered to the extent that it
is no longer airworthy, then the risk of deep stall is increased. A wet or
icy canopy also carries an increased risk of deep stall.
If a danger situation occurs (for example, unexpected rain) then any
manoeuvre with a high angle of attack should be strictly avoided. This
includes big ears (without speed bar), B-line stall as well as using a
lot of brake. If the flying conditions permit, using a little speed bar is
advisable.
In the case of a deep stall, the speed bar should be utilised. The wing
shouldthenreturn tonormalflight.Ifthis isnotthecase,werecommend
pushing the A-risers forward.
Alternatively, it is possible to recover from a deep stall with a quick,
symmetrical tug on the brakes which allows the canopy to pitch back-
wards. The subsequent forward pitching returns the wing to normal flight.
During a parachutal stall close to the ground it is important to judge
whether there is sufficient height for the wing to recover from this
oscillation. In this case, a (hard) landing in parachutal stall is preferable
to landing while the wing is still in pitching forwards or backwards.
Cravats
If a part of the wing is so tangled in the lines that it cannot free itself
(possibly after a collapse), it is referred to as a cravat. This occurrence
cannot be discounted on any model of paraglider.
In the case of a cravat, we recommend the following:
1. Brake on the opposite side: In the same way as during an asymmetric
collapse, the wing will try to turn in the direction of the cravatted
side. If the pilot does not use the opposite brake (on the open side),
then the rotation of the wing can quickly turn into a locked-in spiral
Please note: if the
brakes are pulled for
longer than a quick
tug, the wing will go
into a full stall!
!
Many pilots hesitate
too long to throw
their parachutes or
they fail to use it
completely. Utilising
your rescue para-
chute is preferable
to being under an
uncontrollable wing.
!

_69 _EN_68
Care and maintenance
With care and careful handling, a paraglider can remain in a technically
perfectstateformanyyears–evenifusedintensively.Anexceptiontothis
are lightweight paragliders which degrade more rapidly with intensive
use. We recommend the following:
• The wing should not be unnecessarily exposed to UV radiation, for
example if left for a long time in direct sunlight on take-off or landing.
• When folding the glider it is advisable not to bend the rods in the
leading edge.
• If the wing is wet or even only damp when being packed, it should be
fully dried as soon as possible. Storing the glider damp can lead to
permanent damage.
• When landing or groundhandling, try to avoid hitting the leading edge
hard on the ground. This can lead to damage.
• The lines should be protected from dirt and sharp rocks. Never step
on the lines if on stony ground.
• Over a period of time, dampness in combination with dirt can lead to
lines shrinking and the glider going out of trim.
• Salt water (including sweat) and sand damage lines and sail cloth.
This has a negative effect on their durability and strength.
• Do not drag your wing across the ground – particularly not the rods
in the leading edge.
Packing the glider
Keep it simple! NOVA paragliders can be stored in a concertina bag,
but it is not essential (we haven‘t found that concertina bags prolong
the life of the wing). If in a hurry, they can be stuffed into the inner bag
(but please don’t store them like this in the long-term!).
To us, paragliding
means freedom.
And freedom means
not having to deal
with complicated
equipment.
We use the conventional packing method for our own wings: lay the
wing flat with lines on top and then fold towards the middle. The cell
openings should be in line and can then be used as a reference. Then
fold, rather than roll, the glider as this improves the comfort when
carrying it in the glider bag. When folding the wing, please ensure that
the rods in the leading edge are not bent. This simple and comfortable
packing method is made possible by our conservative use of rods –
they are only used in the profile nose.

_71 _EN_70
Storage
It is best to store paragliders in a dry place, away from direct sunlight.
Permanently storing the wing at high temperatures (for example, in a
car during summer) should be avoided. The wing should not be tightly
packed when stored for long periods. It is preferable to leave it more
loosely packed in the inner bag.
Cleaning
To clean the canopy, use only water and a soft cloth/sponge (no deter-
gents!).
Remove sand, dirt or little stones from the inside of the canopy. Sand
is abrasive and this accelerates the aging of the wing. To remove dirt
from the trailing edge, we have fitted Velcro to the ends of the wing
tips. Open this to shake out unwanted dust/dirt.
Repair
Repairs should only be performed by the manufacturer or authorised
service centres. A list of authorised service centres can be found at
our web site at:
nova.eu/en/try-buy/
Exceptions are replacing lines, the repair of small tears (up to 5 centi-
metres which do not require stitching) or holes in the sail cloth which
can be fixed with original NOVA repair tape (supplied with the glider).
Spare parts, like additional repair tape or replacement lines, are
available from authorised service centres or directly from NOVA.
Disposal
The synthetic materials used in the construction of a paraglider should
be responsibly disposed of. When you wish to dispose of your glider,
please return it to NOVA or to your local NOVA partner, where it will
be dismantled into its individual components and properly disposed of.
Service and guarantee1
After purchase, please register your wing within 14 days in our data-
base: my.nova.eu ↗
Registration is required if you wish to take advantage of our extended
warranties and guarantees. More information on our warranty and gu-
arantee terms and conditions can be seen here:
www.nova.eu/en/guarantee-conditions/
Our services
Optimise your wing.
Through use, paraglider lines shrink or stretch. Generally, A and
B-lines stretch, whereas C-lines shrink. As a result the wing flies
slower and the handling is less agile. All lines are subject to
shrinkage – regardless of which material they are made from or which
manufacturer produced them.To ensure your complete flying fun and
your safety, we developed NOVA Trim Tuning (NTT)2with the help of
paragliding instructor and mathematician Ralf Antz.
After 15 to 20 Operating hours this stretching or shrinking is basic-
ally complete. We recommend that you then immediately send
the wing to us or an authorised partner.
We will measure all the lines, analyse the trimming using special
software and then put your wing back to its optimal flying condition.
If you take the opportunity of this service, you will benefit from the
3 Years No Full Service Required:after the NTT your wing only needs
to be checked again three years after the date
of purchase (provided you do not exceed the number of
Operating hours stated in the manual).
1The guarantee and service provision is limited, subject to conditions and not offered to
the same extent in all countries. Detailed information is available can
be seen here: www.nova.eu/en/guarantee-conditions/
2The warranty is only included in the purchase price in selected countries and,
if included, may only be redeemed in the country of purchase.
MY

_73 _EN_72
Full four year warranty.
For additional peace of mind, we guarantee your paraglider for a
further three years as standard. This guarantee covers
material as well as workmanship.
If your NOVA Trim Tuning and a NOVA Full Service was completed by
an authorised NOVA partner, 4 Years On Materials comes into effect
and this extends the guarantee to four years.
If we are unable to repair the problem, we will deduct the current
value when you purchase a new NOVA paraglider.
More than a check.
When it comes to checks we are very particular – that’s why we don’t
just call it a check, but a NOVA Full Service. We check all the details
of the paraglider: porosity, line lengths, correct trimming, etc.
With our in-house developed software package, the Quality
Assurance Database (NOVA QAD), the person servicing the wing can
view previous checks. You too can view your glider’s service history
– which is obviously protected by a password.
Like during the NOVA Trim Tuning, the person servicing the glider will
measure all the lines and feeds the data automatically into the
diagnostic software. Using the measurements, the software
calculates the sail trim and suggests possible trim corrections.
These are evaluated by the person servicing the glider and
then implemented through loops at the carabiners.
All measurement and check data is held centrally and we can
download and analyse this data at any time. This allows us to
determine how, in what distribution and to what extent the lines go
out of trim. Using this data we can draw conclusions and
improve our know-how on lines for future gliders.
As a technical and innovative company we are always concerned
with further development and safety.
Complete protection included.
NOVA Protect offers complete protection for your paraglider: your
wing is covered once for accidental damage during one year after
registering the glider at myNOVA (please note: there is a 50 euro
+VAT excess3). We will repair tears, replace lines or panels.
If your wing is irreparably damaged, we will deduct the current value
when purchasing a new NOVA paraglider.
This means we offer a unique service which gives you the security
that– if the worst should happen – the anguish over a damaged new
wing is reduced. Every new NOVA wing is covered by NOVA Protect.
The only condition is the one-off product registration at myNova.
3This service covers damage incurred because of an accident while flying. Damage in
other circumstances, personal injury, theft or other loss are excluded from this policy.
The three-year-no-worry offer.
Imagine two years have passed and you have to do your 2 year check.
Then fly a wing from NOVA! If your wing has had the NOVA Trim
Tuning, then we will extend the period until the next service check
from two to three years (from date of purchase) – provided you do not
exceed the number of Operating hours before a service is needed, as
stated in this manual. The extension of the interval before the next
service is due allows you to concentrate on what you enjoy: the flying.
We at NOVA wish you great flights!

_75 _EN_74
Everything available, anytime.
To us, a paraglider is more than just a few kilograms of plastic. We
breathe digital life into it. Registration at MyNOVA is its birth certifi-
cate; and the service data for its entire life is collected in our Quality
Assurance Database. For the following two reasons our long-run-
ning system is not only practical, it is also vital for continuing quality
assurance:
Firstly, thanks to a user account our clients have unlimited access to
all their important data – for example, the NOVA Full Service log, Trim
Tuning data or even a change of owner.
Secondly, we gain a deeper insight into the durability of the material
and lines through the collection of this data. This helps us inform our
clients quickly in case of problems. Also, it helped/helps us to decide
which materials are most suitable for everyday paragliding. It assists
us to keep producing better paragliders.
NOVA approved service centres also have access to the database.
The person responsible for the service can gain information on the
wing before even opening it up. The Quality Assurance Database
therefore improves the knowledge transfer – in the interest of our
customers.
All the service and
guarantee conditions
are linked to terms
and conditions.
Details on our ser-
vices are available at:
www.nova.eu/en/gua-
rantee-conditions/
Particulars and exceptions
Subsequent check intervals are two years unless the checker
specifies one year due to the questionable condition of the glider.
We also recommend annual checks if the glider is used in areas where
it is exposed to a lot of stress/adverse conditions: in very sandy or
rocky areas, salty sea air and if the wing has been in contact with
salt water. Anyone who regularly flies aerobatics should submit their
glider for an annual check. In this case, there is an even greater
responsibility on the pilot to regularly check the wing for damage.
Regardless of the above specified deadlines, the paraglider must be
inspected no later than 100 flying hours or 200 launches, whichever
comes first.
The NOVA Full Service is confirmed with an official stamp. Failure to
comply invalidates the airworthiness. You can find authorised service
partners on our website:
www.nova.eu/en/try-buy/
Gliders used for
commercial purposes
(school gliders,
tandems) must be
checked annually.

_77 _DE _EN_76
Technische Daten | Technical data
TYP TYPE XXS XS S M
Anzahl Zellen Cells m 59 59 59 59
Projizierte Spannweite Proj. wingspan m 8,5 8,9 9,4 9,8
Projizierte Fläche Proj. surface area m218,2 20,2 22,2 24,2
Projizierte Streckung Proj. aspect ratio 3,9 3,9 3,9 3,9
Ausgelegte Spannweite Flat wingspan m 10,8 11,4 11,9 12,4
Ausgelegte Fläche Flat surface area m221,5 23,8 26,2 28,5
Ausgelegte Streckung Flat aspect 5,43 5,43 5,43 5,43
Leinendurchmesser Line diameter mm 0,5/0,7/0,8/0,9/0,95/1,2
Leinenlänge Line length m 6,4 6,7 7,1 7,4
Max. Profiltiefe Max. profile depth m 2,46 2,59 2,71 2,83
Gewicht Weight kg 3,55 3,90 4,20 4,50
Zulässiges Startgewicht* Certified take off weight* kg 60-80 70 - 90 80 - 100 90 - 110
Zulassung (EN/LTF) Certification (EN/LTF) B B B B
*) Pilot inkl. Ausrüstung und Flügel | Pilot incl. equipment and wing
Technische Änderungen vorbehalten | Subject to change without notice
A1-Gurt/riser
A2-Gurt (Ohren anlegen)
A2-Riser (ears)
B-Gurt/riser (B-Stall)
C-Gurt/riser
Einhängeschlaufe
Main suspension loop
Leinenschloss/maillon
Bremsgriff/Brake handle
Übersicht Tragegurt
Overview risers
Brummelhaken/Brummel hooks
Other manuals for MENTOR 6 LIGHT
1
This manual suits for next models
1
Table of contents
Other Nova Aircraft manuals