Davis & Waddell DES0558 User manual

1
essentials
Electric Compact Slow Juicer
DES0558
davisandwaddell.com.au
Thank you for choosing the Davis & Waddell
Electric Compact Slow Juicer. To ensure
proper operation and to maintain the
lifespan of your appliance, please read
these instructions carefully before use.
Features and Parts:
Rating: 220-240~50-60Hz, 130W
1. Feeding Pipe
2. Stainless-Steel Juicing Filter
3. Auger
4. Juicing Cup
5. Juice Extractor
6. Food Residue Extractor
7. Juicer Base
8. Food Pusher
9. 600ml Juice Container
10. 450ml Food Residue Container
11. Cleaning Brush
Important Safeguard:
• Before using the electrical appliance, the
following basic precautions should always
be followed:
• The appliance is designed for household
use only.
• This appliance is not intended for use by
persons (including children) with reduced
physical, sensory, or mental capabilities,
or lack of experience and knowledge,
unless they have been given supervision
or instructions concerning the use of this
appliance by a person responsible for
their safety.
• Read all instructions first.
• Children should be supervised to ensure
they do not play with the appliance.
• Do not operate any appliance with a
damaged cord or plug, after the appliance
malfunctions, after it has been dropped, or
after it gets damaged in any manner.
• To protect against the risk of electrical
shock, do not immerse the appliance in
water or any other liquid.
• Do not let the cord hang over the edge of a
table or counter or touch any hot surfaces.
• If the supply cord is damaged, it must be
replaced by the manufacturer, its service
agent or similarly qualified persons in order
to avoid a hazard.
• To reduce the risk of electric shock, never
operate this appliance with wet hands, spill
liquid on the base, or submerge the base in
water or any other liquid.
• Never leave the appliance unattended
during operation.
• Do not place the appliance on or near gas,
or on a heated oven.
• Do not use outdoors. Intended for indoor
household use only.
• Unplug from the outlet when not in use,
while assembling or disassembling and
before cleaning.
• Never use any attachments that are not
listed in the Instruction Manual and supplied
in the appliance’s box.
• Do not touch or move any moving parts
during the operation of this appliance.
1
2
3
45
11
8
9
7
6
10

2
• Do not use fingers, a spoon, or chopsticks to
push fruits and vegetables into the chute of
the appliance. Only the Pusher is allowed.
• Do not open the appliance when it is
operating.
• If parts of this appliance structure are found
to be damaged (especially the safety device
and power cord), please stop using and send
it to a service centre to be repaired by a
qualified technician.
Packaging and Recycling:
The materials used for this appliance’s
packaging can be reused, recycled, and
disposed of through specific waste streams.
• REUSE: Keep packaging to safely store
or transport your appliance, preventing
damage.
• RECYCLE: Look for recycling symbols on
packaging components to identify if they are
recyclable. Check with your local authorities
to find out what materials are accepted for
recycling in your area.
• DISPOSE: Look for symbols on packaging
components and dispose of materials
accordingly.
Operating Your Electrical Compact
Slow Juicer:
Before first use, ensure all parts have been
cleaned and are thoroughly dry following the
Care Instructions.
NOTE: DO NOT IMMERSE THE JUICER BASE
IN WATER.
Assembly Instruction:
1. Please make sure the appliance is not
plugged in and the switch is turned to the
(O) setting, prior to assembling.
2. Position the Juicing Cup onto the Juicer
Base, aligning both extractors and the axle.
3. Push the Auger firmly into the center of the
Bowl, making sure it touches the bottom.
4. Position the Feeding Pipe onto the Juicing
Cup to align with the setting, and twist
clockwise until it clicks the safety lock.
Please make sure that the arrow is
on the setting.
5. Place the Juice Container under the Juice
Extractor (the one with a cover), and Food
Residue Container under the Food Residue
Extractor (the one without a cover).
Operation Instructions:
1. Connect the appliance to the power outlet.
2. Check and make sure all parts are well
assembled and in correct position.
3. Make sure the appliance is o (O position).
4. Ensure the Juice and Food Residue
Containers are in position.
5. Make sure the Juice Extractor Cover
is closed.
6. Prepare your fruits or vegetables and cut
into pieces. Max: 5cm x 2cm strips, or 3cm x
3cm cubes.
7. Put the fruit or vegetable strips/cubes into
the Feeding Pipe.
8. Press the switch to Setting (-) to start the
juicing operation.
9. Push the food down with the Pusher only.
10.
In case of food getting stuck inside the
Juicing Cup, please switch to the (R)
reverse function immediately.
11. If mixed juices are to be made, please begin
with harder fruits, followed by softer fruits.
12. Please allow the appliance to run for 30
seconds after the last ingredient is fed.
ATTENTION:
1. This appliance is not suitable for juicing
hard, fibrous, or starchy fruits and
vegetables, such as sugar cane. Remove
hard pits or seeds prior to pressing,
preventing possible damage to the Auger.
There are some fruits and vegetables which
contain too much starch to juice, such as:
avocados, bananas, figs, mangos, papayas,
dragon fruit, strawberries, grapes without
seeds, etc. They will clog up the Stainless-
Steel Filter.

3
2. Please do not use the appliance
continuously for longer than 15 minutes.
–If the appliance gets overheated, it will turn
o automatically to protect the machine. In
this case, please turn the appliance o (O).
Wait 10 minutes to let the appliance cool
down before turning it on again.
Care Instruction
(Cleaning and Maintenance):
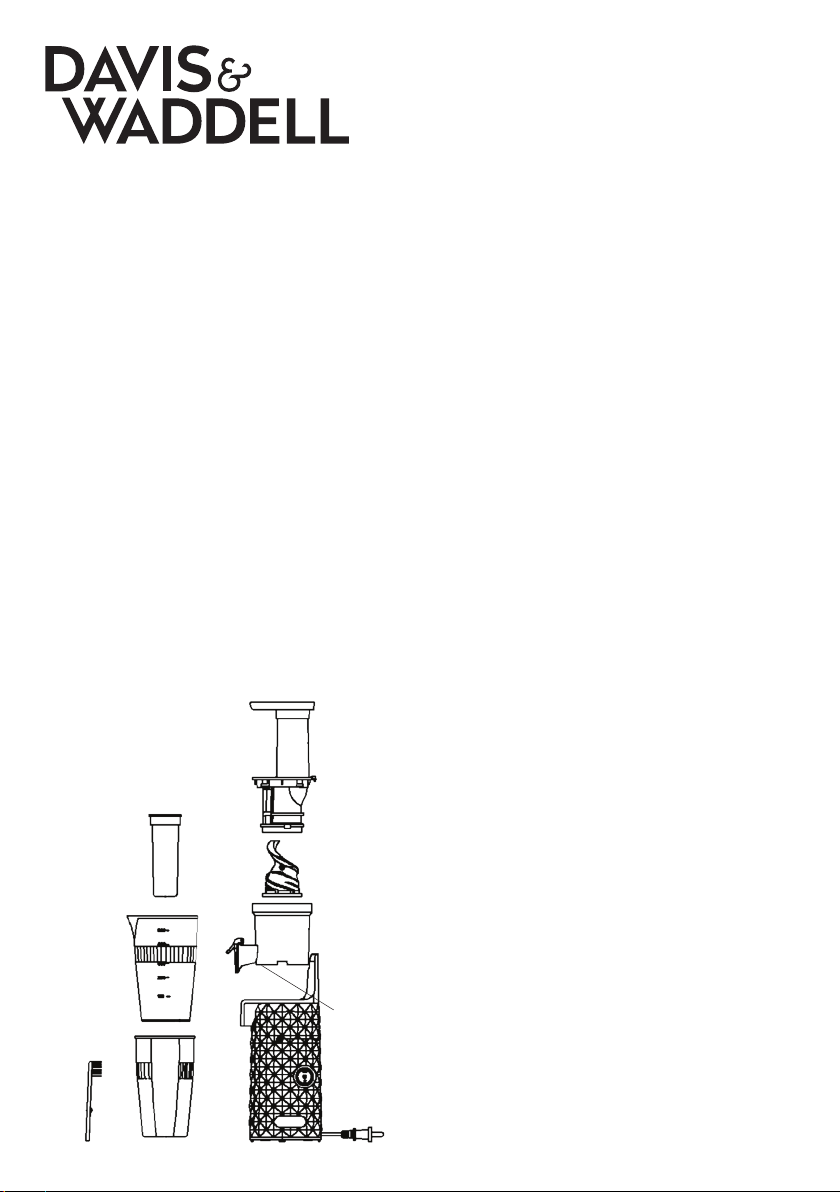
IMPORTANT: Please wash all parts
immediately after each use, otherwise
residue might stick tightly to the Juicing Cup
and Auger. This will aect the disassembly,
cleaning, and juicing performance. Do not
use an iron wire brush, abrasive, or sharp
object tool to clean the appliance. Please do
not use water above 40°C.
1. Switch o and unplug the appliance. Wash
the disassembled parts with water. If the
filter is clogged, please use the provided
cleaning brush to remove.
2. In case there is any residue remaining in
the mouth of the Residue Extractor, please
turn the Juice Cup upside down, pull out
the Silicone Valve, and clean under running
water. Press the Silicone Valve to close
properly and tightly after cleaning.
3. To clean the Seal Ring in the center of the
Juice Cup, please follow these steps:
a) Turn the Juice Cup upside down for easier
handling and push the Seal Ring out with
your thumbs. Clean with water.
b) After cleaning, please put the Seal Ring
back into the center hole. The small, ribbed
surface should be facing upwards. Make sure
the groove of the Seal Ring fits into the Juice
Cup.
c) The flat/big side of the Seal Ring will be
inside while the ribbed/small side is outside
the Juicing Cup.
4. Do not put the power base into water for
cleaning. Wipe with a damp cloth only.
5. After cleaning, please dry all parts
thoroughly and store in a dry, cool place.
Our 12-Month Guarantee
In Australia, our goods come with guarantees
that cannot be excluded under the Australian
Consumer Law. You are entitled to a
replacement or refund for a major failure
and compensation for any other reasonably
foreseeable losses or damage. You are also
entitled to have the goods repaired if the
goods fail to be of acceptable quality and
the failure does not amount to
a major failure.
The benefits of this guarantee are in addition
to any rights and remedies imposed by the
Australian Consumer Law. Our guarantee
excludes normal wear and tear and instances
where care and use instructions have not
been followed.
What IsAlbi Will Do:
During this guarantee period, IsAlbi will
repair, replace, or refund any defective
product. If identical product is not available
for replacement, a similar product may be
oered. IsAlbi asks you to cover the cost
of postage/transit if the product needs to
be sent back to us for inspection. If IsAlbi
deems the product is defective, we will
reimburse your postage/transit expenses.
IsAlbi will be responsible for the postage/
transit of the repaired/replacement product
back to you.
What To Do:
If a fault/defect is identified, cease using
the product immediately. To make a claim
on this guarantee, take the product, proof
of purchase, and full details of the alleged
defect to the retailer from whom the product
was purchased. If you cannot access the
retailer or are unsatisfied with the solution
oered by the retailer, contact IsAlbi via the
details below.
IsAlbi
87 Chifley Drive, Preston, Victoria 3072
P: +61 (03) 9474 1300
E: [email protected]om.au
isalbi.com.au

4
Receipes
Lemon Lime Ginger
Ingredients:
• 1 apple, cored and sliced
• ½ inch fresh ginger (less if you find the taste
too strong)
• 1/2 lime
• 1/4 lemon
• sparkling mineral water
Directions:
Remove the grapes from the stem. Juice the
apple and ginger together, then juice the rest
of the fruit. Pour the juice in a large glass and
fill to the top with sparkling water and serve
with ice.
Carrot Juice
Ingredients:
• 500g carrots
• 3cm ginger
• 3 large oranges
• 1 cup water
Directions:
Run your juicer and add the carrots, ginger,
and organs to the chute. Collect the juice
from the juice extractor on your juicer.
Service it immediately.
Green Juice
Ingredients:
• 4 large apples
• 6 celery stalks
• 2 kale leaves
Directions:
Core the apples, de-stem kale leaves. Juice
them in the juicer together with celery stalks,
that have been cut into smaller pieces.
Collect the juice from the juice extractor on
your juicer. Service it immediately.