manuals.online logo
Brands
  1. Home
  2. •
  3. Brands
  4. •
  5. DAVIS
  6. •
  7. Boating Equipment
  8. •
  9. DAVIS Mark 3 User manual

DAVIS Mark 3 User manual

Other DAVIS Boating Equipment manuals

DAVIS Wheel-a-Weigh 1482 Standart User manual

DAVIS

DAVIS Wheel-a-Weigh 1482 Standart User manual

DAVIS Wheel-a-Weigh 1465 User manual

DAVIS

DAVIS Wheel-a-Weigh 1465 User manual

Popular Boating Equipment manuals by other brands

SureShade RTX Installation instructions manual

SureShade

SureShade RTX Installation instructions manual

Ideal Windlass CWM Installation, operation & maintenance instructions

Ideal Windlass

Ideal Windlass CWM Installation, operation & maintenance instructions

Access BIMINI Assembly instructions

Access

Access BIMINI Assembly instructions

Floe VSD 6000 Assembly instructions

Floe

Floe VSD 6000 Assembly instructions

Exalto 240BS manual

Exalto

Exalto 240BS manual

Faun C40 Trackway user manual

Faun

Faun C40 Trackway user manual

Humphree HCS-5 installation manual

Humphree

Humphree HCS-5 installation manual

Vetus BOW4512D Operation manual and installation instructions

Vetus

Vetus BOW4512D Operation manual and installation instructions

Dock Doctors SLIDING BOARDING STEP Assembly instructions

Dock Doctors

Dock Doctors SLIDING BOARDING STEP Assembly instructions

Mastervolt Mass Combi 12/2000-100 Quick installation

Mastervolt

Mastervolt Mass Combi 12/2000-100 Quick installation

SeaView PM5-FMD-8 installation instructions

SeaView

SeaView PM5-FMD-8 installation instructions

Hobie Mirage 360 manual

Hobie

Hobie Mirage 360 manual

Zattini Group bamar BOXTRON E14S Use and maintenance instruction manual

Zattini Group

Zattini Group bamar BOXTRON E14S Use and maintenance instruction manual

Hobie Getaway Hatch instructions

Hobie

Hobie Getaway Hatch instructions

NUCANOE 3005 Assembly instructions

NUCANOE

NUCANOE 3005 Assembly instructions

Floe V1600 PWC Assembly instructions

Floe

Floe V1600 PWC Assembly instructions

Westland T-Top Console Cover installation manual

Westland

Westland T-Top Console Cover installation manual

Furuno TZTL12F installation manual

Furuno

Furuno TZTL12F installation manual

manuals.online logo
manuals.online logoBrands
  • About & Mission
  • Contact us
  • Privacy Policy
  • Terms and Conditions

Copyright 2025 Manuals.Online. All Rights Reserved.

Mark 3 Sextant User’s Guide
00011.220, Rev. E
October 2008
Total pages 20
Trim to 5.5 x 8.
Black ink only
Page 1 (front cover)
EDITED BY ROBERT B. KLEID
© 2008 Davis Instruments Corp.
How to Find Your Position
with the Mark 3 Sextant
STANDARD
MARK 3
#011
Mark 3 Sextant User’s Guide
Product #011
© 2008 Davis Instruments Corp. All rights reserved.
00011.220, Rev. E October 2008
INDEX SHADES
HORIZON
MIRROR
INDEX ARM
INDEX MIRROR
ADJUSTMENT
SCREWS
HORIZON
SHADES
EYE
PIECE
OPTIONAL PROTECTIVE CASE
Contact your local dealer or Davis Instruments to
order.
R014A Sextant Case
R014B Foam Set for case
Page 1
HOW TO FIND YOUR POSITION WITH A SEXTANT
This booklet has been written as an introduction to your new Davis sextant. By
studying its pages, you will learn how to operate your sextant, how to find the alti-
tude of the sun, and how to use your readings to calculate location. The meridian
transit method of navigation described is both easily learned and simply
applied. When you finish reading, the mystery surrounding celestial navigation
and sextant use should disappear. Before becoming an accomplished navigator,
however, you will need to study those aspects of navigation which are beyond the
scope of this booklet.
HOW TO READ THE VERNIER
There are two scales on the sextant. The scale on the frame is called the “arc,”
while the scale on the index arm is the “vernier.” Each division of the arc equals
one degree. Each division of the vernier equals two minutes (2'). To read the num-
ber of degrees, find the lines on the arc which are closest to the zero mark on the
vernier. The zero mark is usually somewhere between two lines. The correct arc
reading is always that of the lower value, i.e., the line to the right of the zero mark.
To read fractions of a degree, find the division of the vernier which is in alignment
with a division of the arc.
To get a clear picture of how this works, set the zero on the vernier exactly
beneath any whole degree mark on the arc—let’s say 30°. Now move the index
arm very slightly to the left until the first vernier mark to the right of the zero lines
up exactly with a mark on the arc. Since the marks on the vernier are 2' apart,
you have actually moved the index arm 2' beyond 30°; your sextant reads 30° 02'.
Now, move the index arm slightly further to the left so that the next division of the
vernier comes into alignment with a division of the arc. Your sextant now reads
30° 04' (Fig. 1).
As you continue moving the index arm, successive divisions of the vernier will
come into alignment with a division of the arc. When the last mark on the vernier
(60') is in alignment with a division of the arc, the sextant will read 31°. In figure 2
below, the sextant reads 43° 26'.
Figure 2
Figure 1
Page 2
MARK 3 SEXTANT ADJUSTMENT
Adjusting your Mark 3 Sextant is easy and should be done each time it is used.
All adjustments are made with the index mirror, the large movable mirror at the
pivot of the index arm (it is not necessary to adjust the small horizon mirror, as
the unit construction makes it impossible to be very much in error). On a correctly
adjusted sextant, the index mirror is perpendicular to the frame and becomes par-
allel to the horizon mirror when the sextant reads zero.
First, adjust the index mirror for “side error” by making it perpendicular to the
frame. Holding the sextant in your right hand, raise the instrument to your eye.
Look at any horizontal straight edge (the sea horizon, for example, or the roof of a
building al least one mile away) and move the index arm back and forth. The real
horizon will remain still while the mirror horizon will appear only when the scales
read close to zero. Line up the mirror horizon and the real horizon so that both
appear as a single straight line (fig. 3).
Now do a vertical adjustment. Without changing the setting, look through the
sextant at any vertical line (a flag pole, for example, or the edge of a building) and
swing the instrument back and forth across the vertical line. If the index mirror is
not perpendicular to the frame, the line will seem to jump to one side as the mirror
passes it. To correct this, slowly tighten or loosen the screw closest to the frame at
the back of the index mirror until the vertical line no longer appears to jump (fig. 4).
Figure 4
Mirror horizon is not aligned with
the real horizon—index arm is not
in proper position.
Index mirror screw
too tight.
Index mirror screw
correctly adjusted.
Index mirror screw
too loose.
Mirror horizon and real horizon
form a single straight line—index
arm is properly positioned.
Figure 3
Page 3
Finally, remove the index error. Set the sextant at zero and look at the horizon.
With the sextant still held to your eye, turn the screw that is furthest from the
frame at the back of the index mirror until the two horizons move together and
form one straight line. The index mirror is now parallel to the horizon mirror (Fig. 5).
While you should know how to adjust your sextant for index error, it is not neces-
sary to remove it entirely. It is standard practice to simply note the error and then
correct one’s reading for this amount each time the sextant is used (as much as 6'
index error is allowable). To check for index error, hold the sextant in your right
hand and look at the sea horizon. By moving the index arm, line up the real and
mirror horizons so that both appear as a single straight line. Now, look at the
scale. If it reads zero, there is no index error. If the scale reads anything but zero,
there is an index error which must be added to or subtracted from each reading.
For example, if the scale reads +6' when the horizons are aligned, the 6’ is sub-
tracted. If the reading is below the zero mark, for example –6', the 6' is added
(Note: for an index error of –6', the scale actually reads 54').
MEASURING THE SUN’S ALTITUDE
When looking at the sun through the sextant, be sure to use a sufficient num-
ber of shades to protect your eyes from the direct rays of the sun. Choose
the combination of index and horizon shades that gives you a clear image of the
sun without glare.
On a correctly adjusted sextant, the real and mirror horizons remain in a single
line when the instrument is rocked from side to side (Fig. 6).
Index mirror not parallel to
horizon mirror.
Index mirror parallel to
horizon mirror.
Figure 5
Figure 6
Page 4
To measure the sun’s altitude, stand facing the sun with the sextant in your right
hand. With your left hand on the index arm, look through the eye piece at the hori-
zon and move the index arm until the sun is visible through the two mirrors and
index shades. Rock the entire sextant from side to side so that the sun’s image
travels in a half-arc. Now, adjust the index arm to bring the sun’s image down to
just touch the horizon (Fig. 7).
Being careful not to disturb the setting, read the sun’s altitude from the scales on
the sextant. Since all calculations in the Navigation Tables use the center of the
sun or moon, this lower limb reading must be adjusted for semi-diameter correc-
tion, shown later.
HEIGHT OF EYE
When measuring the altitude of the sun, we want to measure the angle formed by
a ray from the sun and a plane tangent to the earth at the point where the observ-
er is standing. Due to the height of the eye of the observer, however, the visible
horizon actually falls below this theoretical plane (Fig. 8).
Figure 7
Figure 8
The sun’s image travels
in a short arc which just
touches the horizon.
Due to the height of the eye of the observer, the
visible horizon (H) falls below the plane (P) tan-
gent to the earth at the point where the observer
is standing.
To correct for the height of
the eye, one must apply a
“dip correction.” Dip correc-
tion increases as the eye is
raised further above the sur-
face of the water (Table 1)
and must always be subtract-
ed from the sextant reading.
Table 1
Height of Eye Correction
Feet Meters Dip
5 1.5 2'
10 3.0 3'
15 4.5 4'
25 7.5 5'
40 12.0 6'
Page 5
A nautical mile is equal to one minute of arc of a great circle. Since latitude is
measured north or south from the equator, it is measured along a meridian
(a great circle). One minute of latitude equals one nautical mile anywhere on the
earth. Since longitude is measured east or west from the prime meridian (zero
degrees) at Greenwich, England, it is measured along a parallel of latitude
(a small circle). One minute of longitude equals one nautical mile only at the
equator. Approaching the poles, one minute of longitude equals less and less of
a nautical mile (Fig. 10).
LATITUDE, LONGITUDE, and the NAUTICAL MILE
A great circle is a circle on the surface of the earth, the plane of which passes
through the center of the earth. A small circle is a circle whose plane does NOT
pass through the center of the earth. The equator and the meridians are great cir-
cles, while parallels of latitude are small circles which become progressively
smaller as the distance form the equator increases. At the poles (90° N or S), they
are but single points (Fig. 9).
The plane of a meridian (a great
circle) divides the earth into two
equal halves.
The plane of a parallel of latitude
(a small circle) divides the earth
into two unequal parts.
Figure 9
Figure 10
Note that the nautical mile is about
15% longer than the statute mile:
Nautical Mile Statute Mile
6076 feet 5280 feet
1852 meters 1609 meters
The earth measures 21,600 nautical
miles in circumference (24,856 statute
miles).
Page 6
DECLINATION
Every star and planet, including the sun, has a ground position, i.e., the spot on
the earth directly beneath it. Standing at the sun’s ground position (G.P.), you
would have to look straight up to see the sun; if you were to measure its altitude
with a sextant, you would find the altitude was 90°.
From the earth, the sun seems to move across the sky in an arc from east to
west. During certain times of the year, it is “moving” around the earth directly
above the equator or, in other words, the sun’s G.P. is running along the equator.
Declination of the sun at this time is zero. However, the sun’s G.P. does not stay at
the equator throughout the year. It moves north to a maximum of 231/2° N in the
summer of the northern hemisphere, and south to a maximum of 231/2° S in the
winter. The distance of the sun’s G.P. from the equator, expressed in degrees
north or south, is known as the declination of the sun (Fig. 11).
In like manner, each star has a ground position and a declination. The decli-
nation of Polaris is 89° 05' N; it is nearly directly above the North Pole. In the
northern hemisphere, you can find your approximate position by taking a sight on
Polaris. The reading will vary depending upon the time of night but will never be
more than 55 miles off. This is a useful check each evening; the altitude of Polaris
will be your approximate latitude without adding or subtracting anything. If you
were to find the altitude of Polaris in the evening and again at dawn, your true lati-
tude would be between the two measurements,
providing you did not change latitude between the
two sights. It is, of course, possible to calculate
one’s exact latitude from Polaris with the aid of the
Nautical Almanac, but such a discussion is beyond
the scope of this booklet.
To find POlaris, locate the pointers of the Big
Dipper (Fig. 12). Find a point in line with the point-
ers and five times the distance between them.
There, shining alone, is Polaris. The Big Dipper
revolves around Polaris, so be prepared to see the
diagram in any position. Figure 12
Figure 11
Page 7
FINDING LOCAL NOON & THE SUN’S ALTITUDE
AT MERIDIAN PASSAGE
A meridian is an imaginary line drawn on the earth’s surface from pole to pole; a
local meridian is one which passes through the position of an observer. When the
sun crosses the local meridian, it is at its highest point. It is said to be in meridian
passage and the time is local noon. Local noon may vary a half an hour (and in
daylight savings time, one and one-half hours) from the noon shown on the clock,
due to both the equation of time (to be discussed later) and the fact that our
clocks are set to zone time. All clocks in a zone 15° wide show the same time.
To find local noon, follow the sun up with a series of sights, starting about half an
hour before estimated local noon. Note the time and the sextant reading carefully.
Take a sight about every three minutes until the sun’s altitude is no longer
increasing. During meridian passage, the sun will seem to “hang” in the sky for a
short period at its highest point, going neither up nor down. Carefully note the
sextant reading. This is the sun’s altitude at meridian passage. To determine
the exact time of local noon, set your sextant at the same altitude as your first
sight. Wait for the sun to drop to this altitude, and note the time again. The time of
local noon is exactly half way between the times of the two sights.
Record the local time and the sextant reading when the sun was at the highest
point. These two readings will serve to locate your position. The time is used to
determine longitude and the sextant reading to determine latitude.
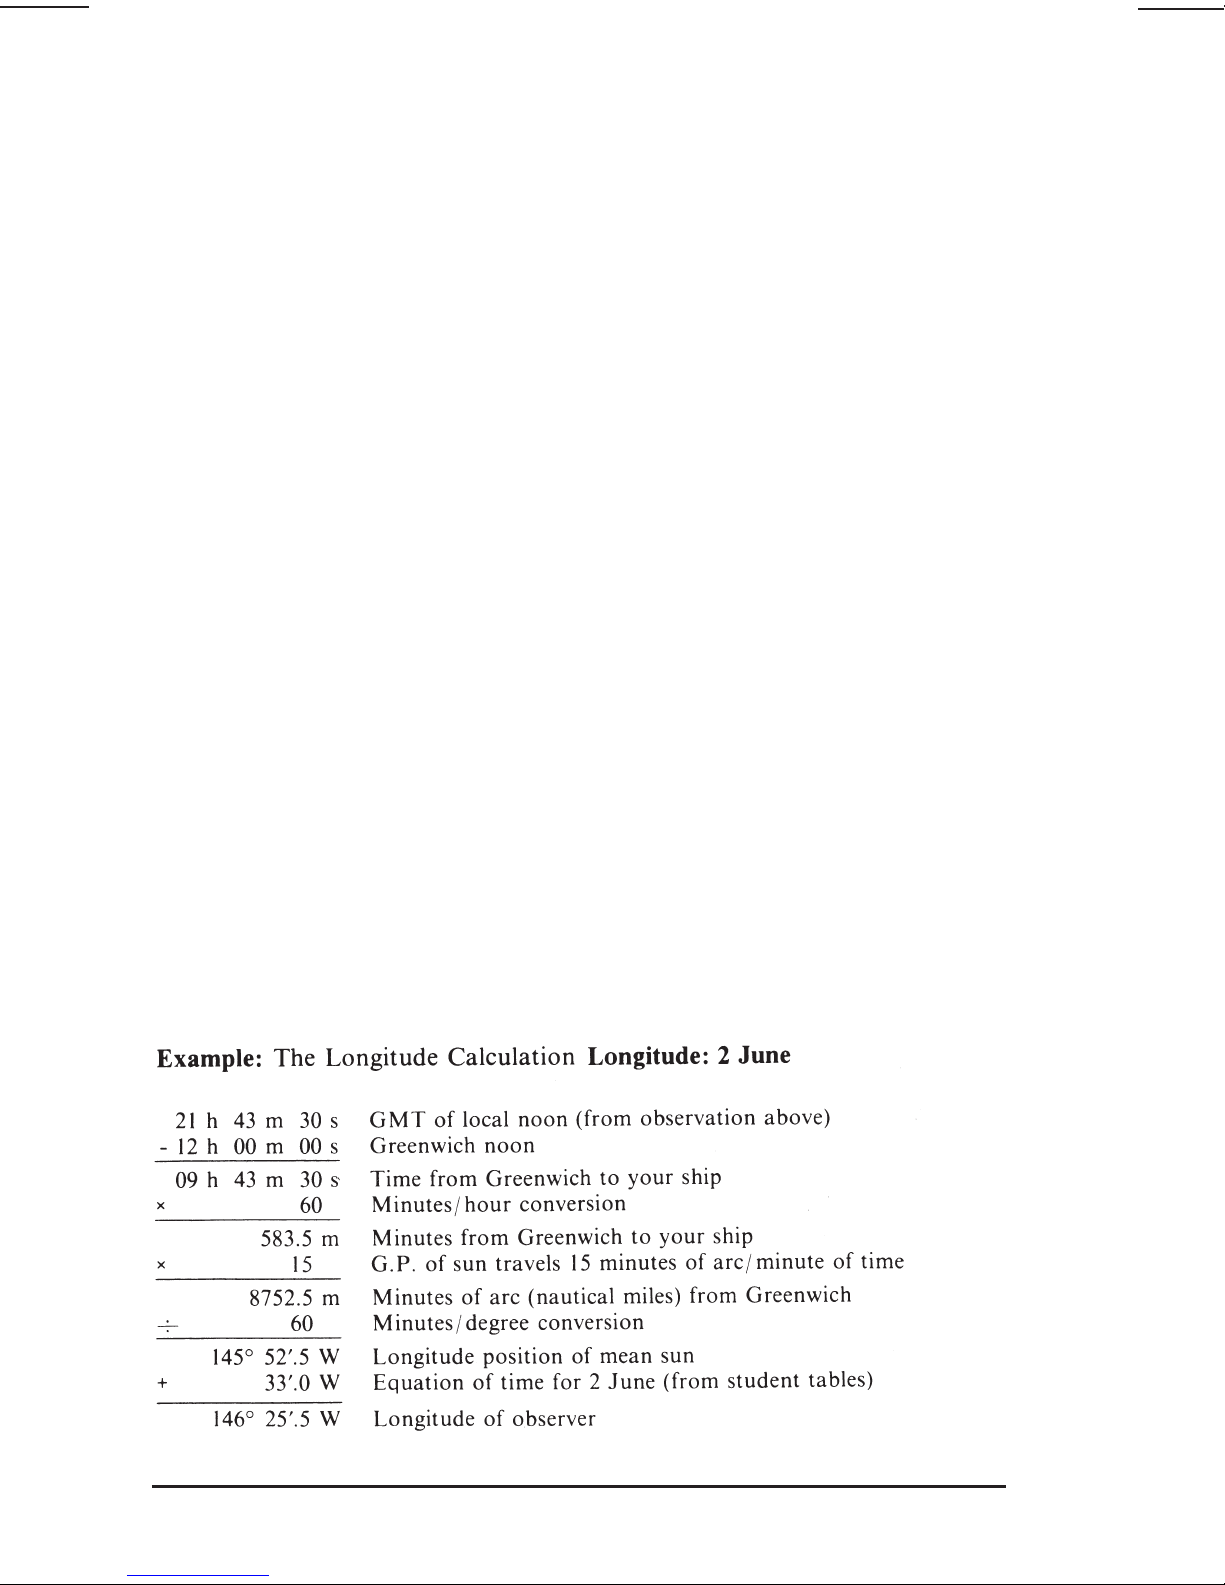
AN EXAMPLE OF A COMPLETE SIGHT
Let us assume for this example that your ship is sailing from San Francisco to
Hawaii and you have been using the sun to find your position each day. To allow
plenty of time to follow the sun up to its highest point, you make sure that you
have completed all your preparations by 10:00 a.m. local time. Your chart shows
yesterday’s position. From this position, you draw a line in the direction you are
traveling equal in length to the estimated number of miles to be traveled by noon
today. This is your “dead reckoning position” (D.R.), which will be compared with
your “noon sight.”
You note that you are standing on deck with your eye ten feet above the water (for
Dip correction) and that the index error of your sextant is +5'.
At about 11:20 a.m., you begin taking sights. At 11:23:30, your first sextant read-
ing is 82° 56'. You continue recording the sun’s altitude approximately every three
minutes until the sun seems to “hang” in the sky, dropping to a lower altitude at
your next sight. The maximum altitude of the sun, 84° 56', is the altitude of the
sun at meridian passage. You continue taking sights until 12:03:30, when the sun
has dropped to your original reading of 82° 56'. You know that the sun reached its
Page 8
FINDING LONGITUDE
Meridians of longitude are measured east or west from the prime meridian (zero
degrees) at Greenwich, England. Because the ground position of the sun moves
around the earth at an average speed of 15° per hour (15 nautical miles per
minute), longitude may be calculated by comparing local noon with
Greenwich Mean Time. For example, if local noon occurred at 2:00 GMT, your
longitude is approximately 30° west of Greenwich (2 hours x 15°/hour = 30°).
To determine one’s exact position, the equation of time must be applied. The
earth in its orbit around the sun does not travel at a constant speed. Clocks and
watches, therefore, keep the time of a fictitious or mean sun which travels at the
same average speed throughout the year, and the position of the true sun (as
seen from the northern half of the earth) is not always due south or 180° true at
noon by the clock. The difference in time between the true sun and the mean sun
is call the “equation of time.” The equation of time for any given day may be found
in a Nautical Almanac; its approximate value may be found in the student tables at
the end of this booklet.
See figure 13 for a diagram based on this example.
meridian at 11:43:30 (exactly half the time between 11:23:30 and 12:03:30). Next,
you find the Greenwich Mean Time (GMT) of your local noon by listening to the
radio time signal, correcting any error your watch may have had. In this example,
you tune in the time signal and find that GMT is now 22:10:00. Your watch reads
12:10:00, so it has no error. You know that your local noon occurred at GMT
21:43:30 (26 minutes 30 seconds ago).
You now have enough facts to work out your noon sight: the date, the time of
meridian passage (local noon), the altitude of the sun at meridian passage, the
height of your eye above the surface of the sea, and the index error of the sextant
you are using.