DC-Connex Leisure TOUR DCX-L101 User manual

Ver.10720DCCI
USER'S MANUAL FOR
Leisure TOUR
Themost optimizedwirelesssolution foractive
interaction.
Full-duplex discussion and communication
between the leader and a guest.
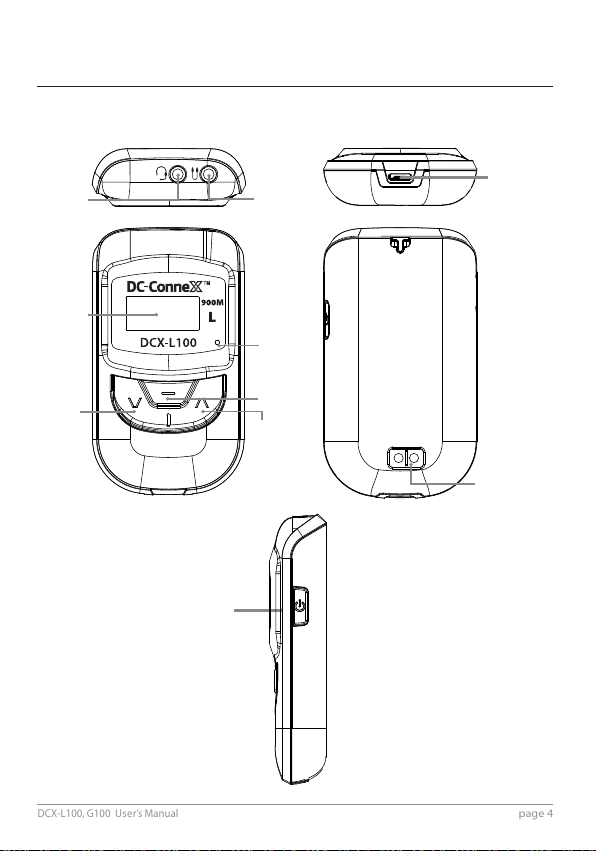
2. Controls and Indicators
page 4
DCX-L100, G100 User’s Manual
Power
On/O
Line In
Ear set
Boom
Microphone
input
LED
indicator
LCD
UP
Down
Mode
(MUTE
On/O )
2.1 DCX-L101
USB port
(only, Firmware
upgrade)
Label
The Label can be seen
when the battery cover and
battery are removed.

page 6
DCX-L100, G100 User’s Manual
Power Button
Press and hold the Power button for a second to turn the device
power On/O.
Mode Button
Up Button
Increase Volume Level, Channel number, MIC gain and Side tone On/O.
Go to setting mode. (Press Up/Down buttons together).
Down Button
Decrease Volume Level, Channel number, MIC gain and Side tone On/O.
Go to setting mode. (Press Up/Down buttons together)
USB Jack
Headset Jack
3.5mm headset contact
LCD
Indicate current status and setting.
MuteOn/Off
Talkis ON while pressingthe button,Moveto the next
setting article.
Type-C USB portforrmwareupgrade (No USB charging function)

2.3 LCD
page 7
DCX-L100, G100 User’s Manual
Signal Strength
Volume
Channel
Battery Status
Current Setting
TALK State
Set as Leader
Set as Guest

3. How to Use
page 8
DCX-L100, G100 User’s Manual
3.1 Set-up in 3 easy steps
- Step 1, Plug In
- Step 2, Turn On
Turn on the power and adjust the volume to the level you desire.
PRESS
Plugin the Single ear headset with boom Micand plug-in Earphone
w/inline Microphone

Mute will be enabled/ disabled with a quick press of Mode
button ( ).
Mute on ; icon disappears from the display screen and the
Guests cannot listen to the Leader.
Mute o ; icon appears on the display screen and all the
Guests can listen to the Leader.
This function toggles each time when short press the Mode
button( ).
3.2 Mute On/O
page 9
DCX-L100, G100 User’s Manual
- Step 3, Set Channel Number
PRESS
Setthe same channel number between the by press
" " and " " button.
3.2.1 Leader
There are 2 modes in operation mode, normal mode and setting
mode. The default mode is normal when turn on the power.
Press “ ”and ” ” buttons together for few seconds to go to
setting mode.
page 10
DCX-L100, G100 User’s Manual
3.3 Audio Alert
The Mode button is a push to talk (PTT);
Can talk only when pushing, and connection to talk is very fast.
When PTT is activated, the display shows and a single beep
occurs.
PTT is activated only when pressing the Mode button( ) and
automatically deactivated when release the button.
If another guest presses PTT rst and is on a talk, double beep
occurs as alert when you press PTT and the microphone icon does
not appear.
Low battery
Out of link
; Short & repetitive tone occurs every 2 min.
; Tone continuously repeats every 2 min when the device
is out of link.
At this time, RSSI signal bar icon disappears from the
display screen.
Setting values are shown in the order of Channel-> MIC GAIN ->
SIDE TONE as shown in Figure 1.
Can see the setting modes in order when short press the Mode
button.
3.4 Power On/O
Press and hold the "Power" button for a second to turn the device
power On/O.
3.5 Functions
3.2.2 Guest

Figure 1
page 11
DCX-L100, G100 User’s Manual
SIDE TONE
SO / SF
Channel
CH
MIC GAIN
C1~C5
3.6 Volume Adjustment
Volume adjustment function to let the user to change the volume
when needed.
Volume Level appears on the top of the LCD screen when turn on the
power.
In normal mode, adjust the volume to the desired level by pressing
“ ” or ” ” button on the front of the device.
Volume can be set from 0 ~ 10. [Default Level: 3]
After selecting the desired mode, wait for few seconds or long press
“ ” and ” ” buttons together to nish the setting.
-Leader

page 12
DCX-L100, G100 User’s Manual
3.7 Channel Selection
Channel setting function to let the user to change the Channel when
needed.
Turn on the power of the device.
Long press “ ”and ” ” buttons then the LCD screen becomes
SETTING mode and blinks.
Press “ ”or ” ” buttons on the front of the device to set the
desired Channel.
-Guest
-Leader

page 13
DCX-L100, G100 User’s Manual
3.8 Microphone Sensitivity Level Selection
MIC gain Level can be adjusted when using.
Turn on the power of the device.
Long press “ ” and ” ” buttons then the LCD screen becomes
setting mode. Then press Mode button () once.
Short press Mode button () to go to MIC gain level setting
screen.
Adjust the MIC gain setting by“ ” or ” ” buttons.
MIC gain level can be set from 1~5.
~
-Guest
After selectingthe desiredchannel,waitforfewsecondsor long
press“ ” and ” ” buttonstogetherto nish the setting.
-Leader

page 14
DCX-L100, G100 User’s Manual
3.9 Side Tone Selection
Side Tone can be turned On/O.
Turn on the power of the device.
Long press “ ” and ” ” buttons then the LCD screen becomes
setting mode.
Short press Mode button ( ) to go to Side Tone setting screen.
The user can turn Side Tone level On (SO) or O (SF) by “ ” or
”” buttons.
After selecting, wait for few seconds or long press“ ” and ” ”
buttons together to nish the setting.
After adjusting to the desired level, wait for few seconds or long
press “ ” and ” ” buttons together to nish the setting.
~
-Guest
-Leader
-Guest
page 15
DCX-L100, G100 User’s Manual
or
3.11 Battery
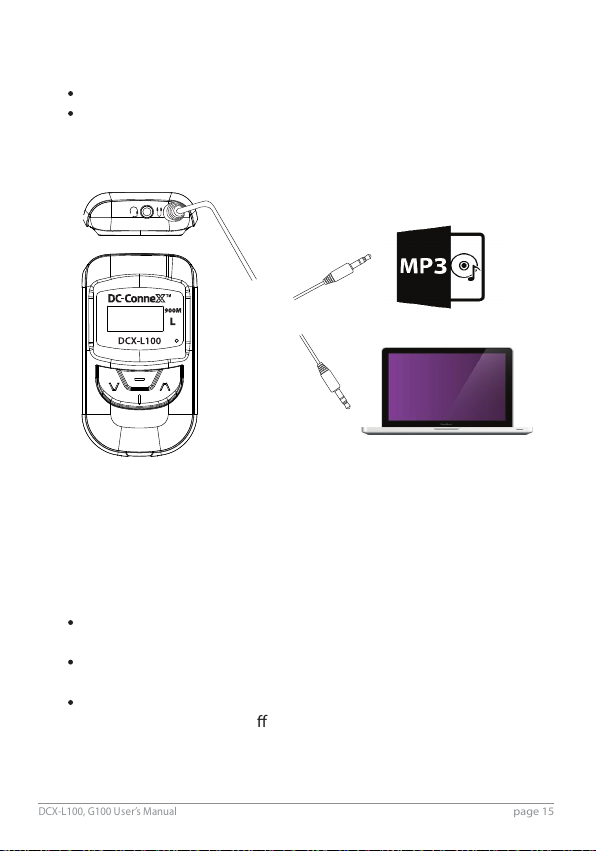
3.10 Line -In
It is availableto publish with backgroundmusic.
Connect the cable between Line-In and externalaudio source
by using the optional Line-Incable and adjust to the desired
volumelevelof music.
Note)TheLine-Incable mightnot be working
depending on the wirediagramof externalaudio source.
Pleasecheck the wirediagramof the externalaudio source
and matchit to the wirediagramof the Line-In.
TherechargeableLi-Ion battery3.7V,1,100mAh is equipped in each
device.
When the battery is discharged, it is used by replacing the charged
battery through the charging cradle case.

Dimension
58 x 88 x 17.4 mm
Radio Frequency
Frequency Bandwidth
500 kHz
Tx Output Power
Frequency response
50~8,000Hz
Rx Sensitivity
- 95 dBm
Channel spacing
4. Specication
page 16
DCX-L100, G100 User’s Manual
;902.5MHz~927MHz
;863.4MHz~864.6MHz
;2,407MHz~2,476MHz
Operating Temperature
-10 ~ +50
DCX-L101
DCX-L102
DCX-L103
; 100 mW
; 10 mW
; 100 mW
;500KHz
; 100KHz
;500KHz
DCX-L101
DCX-L102
DCX-L103
DCX-L101
DCX-L102
DCX-L103
Distance(Line of sight)
150meters(typical)

; 50 CH
; 8 CH
; 40 CH
Voice latency(typical)
30ms
Number of simultaneous listeners
Unlimited
Number of group
Hours of operation(typical)
10 hours for Leader / 15 hours for Guest
Number of simultaneous transmitters
2
Battery Type
Li-ion Battery @3.7V/ 1,100 mA
Antenna
Internal
page 17
DCX-L100, G100 User’s Manual
DCX-L101
DCX-L102
DCX-L103
Replaceable battery
If an equipment is provided with a replaceable battery, and if replacement by an
incorrect type could result in an explosion (for example, with some lithium batteries),
the following:
- if the battery is placed in an OPERATOR ACCESS AREA, there shall be a marking
close to the battery or a statement in both the operating and the servicing instructions;
- if the battery is placed elsewhere in the equipment, there shall be a marking close to
the battery or a statement in the servicing instructions.
This marking or statement shall include the following or similar text:
CAUTION
RISK OF EXPLOSION IF BATTERY IS REPLACED BY AN INCORRECT TYPE.
DISPOSE OF USED BATTERIES ACCORDING TO THE INSTRUCTIONS.
This product has been certified with t
he following antennas, and may only be used with the same or
less antenna gain.
Antenna
Max. Gain
Chip
Antenna
-
1.
0
dBi
This equipment complies with the essential requirements of EC Directive 2014/35/EU, 2014/30/EC
and 2014/53/EU, as applicable. Declarations are available from your local representative.
CAUTION
Users are recommended to wear the necklace of this device, and to reduce communication
interference, it is recommended that the front face be seperated by at lest 10mm.
This manual suits for next models
2
Table of contents
Other DC-Connex Conference System manuals


Popular Conference System manuals by other brands


Honeywell
Honeywell THALES MCS-4200 Installation and maintenance manual

Aethra
Aethra vega X5 Technical specifications

Polycom
Polycom MGC-100 Solution guide

Yamaha
Yamaha CS-700 Series quick start guide

Intesis
Intesis IN485UNI001I1 Series Installation sheet

Prentke Romich Company
Prentke Romich Company Accent 800 Getting started


