DeDietrich DTE758X Manual

FR GUIDE D’INSTALLATION ET D’UTILISATION
GB DIRECTION FOR USE
ES MODO DE EMPLEO
DE GEBRAUCHSANWEISUNG
IT ISTRUZIONI PER L’USO
DK BRUGSANVISNING
PT MODO DE UTILIZACÃO
PL INSTRUKCJI
Friteuse DTE758X
Fryer DTE758X
Freidora DTE758X
Friteuse DTE758X
Friggitrice DTE758X
Friture DTE758X
Fritadeira DTE758X
Frytkownica DTE758X

- 13 -
GB EDITO
Dear Client,
You have just acquired a DE DIETRICH fryer; thank you for your
purchase.
Our research teams have designed a new generation of appliances with
you in mind. Their quality, design and state-of-the-art technology
incorporate our unique know-how that makes these products
exceptional.
DE DIETRICH products include a wide range of ovens, microwave
ovens, glass-ceramic cook tops, vented hoods, built-in dishwashers and
refrigerators that you can match to your new DE DIETRICH fryer.
Our consumer department is of course at your service, because we want
to do our best to meet your expectations with regard to our products. We
will be happy to respond to your questions or suggestions. (Please see
the form for coordinating your questions at the end of this booklet).
www.dedietrich-electromenager.com
These "new valuables" serve as landmarks in our daily lives – DE
DIETRICH, a reference for excellence, extends an invitation to join a new
art of living.
The DE DIETRICH trademark.

- 14 -
GB INDEX
PAGE
1 / INSTALLATION INSTRUCTIONS 15
2 / FITTING 17
3 / PUTTING INTO SERVICE 18
4 / STAINLESS STEEL ANTI-EMULSION TANK 19
5 / IMPORTANT RECOMMENDATIONS 21
6 / SOME HINTS 22
7 / MAINTENANCE 23
Disposal of old electrical appliances
The European Directive 2002/96/EC on Waste Electrical and
Electronic Equipment (WEEE), requires that old household electrical
appliances must not be disposed of in the normal unsorted municipal
waste stream. Old appliances must be collected separately in order to
optimise the recovery and recycling of the materials they contain and
reduce the impact on human health and the environment.
The crossed out “wheeled bin” symbol on the product reminds you of
your obligation, that when you dispose of the appliance it must be
separately collected.
Consumers should contact their local authority or retailer for
information concerning the correct disposal of their old appliance.

- 15 -
GB 1 / INSTALLATION INSTRUCTIONS
xIt is necessary to provide a bipolar cut-off device in the power
supply circuit, where the opening of the contacts is more than 3
mm.
xThe plug must be accessible after installation.
xIf the supply lead is damaged, it must be replaced by an
equivalent lead (H05RNF 3x1mm²) available from the after-sales
department.
xA 16-ampere fuse is necessary
xYour fryer uses 2,200 watts. It is therefore necessary that your
supply can provide this power without danger. IT IS VITAL that
your fryer be connected to earth.
IT IS ABSOLUTELY IMPERATIVE TO LEAVE A SPACE OF AT
LEAST 5 CM BETWEEN THE BOTTOM OF THE FRYER AND
THE FIRST SHELF OF THE KITCHEN UNIT

- 16 -
xElectrical connection:
Minut. 15 minutes timer
Commut. Bipolar switch
Th. Com. Command thermostat (80-200°C)
Th. Séc. Security thermostat (250°C)
T1 Heating warming light
T2 ON/OFF warning light
R1 Heating element 2200W

- 17 -
GB 2 / FITTING
This fryer is built into a work surface or kitchen unit by simply cutting
a hole the corresponding shape.
Any support may be suitable: brickwork, timber, metal, granite,
laminate, etc.
Dimensions of appliance: 520 x 380 mm
Dimensions of hole cut in work surface: 490 x 340 mm

- 18 -
GB 3 / PUTTING INTO SERVICE
xParticular precautions:
This appliance is exclusively intended for domestic use. Any other
use will nullify the guarantee.
Do not forget that the electric grill reaches very high temperatures
when operational.
Never leave the appliance in operation without supervision.
Do not allow children to operate the appliance.
No guarantee will be given for damage caused by non-observance
of this document.
This appliance complies with the EN 60335-2-13 standard with
regard to the heating of cabinets.
xInstallation:
The fitting plate is fixed into the work surface. It is then ready to
accept, in order:
1. the anti-emulsion oil tank;
2. the element, which you pivot on its hinge towards the bottom, in
order to position it in the tank;
3. the basket;

- 19 -
GB 4 / STAINLESS STEEL ANTI-EMULSION TANK
The stainless steel tank constitutes a major component of your cool
zone fryer. The very special shape has been specifically devised
and computer designed, to maximise use of the characteristics of
the cool zone and to offer a maximum of safety, by avoiding any
overflow during use of the fryer. This exclusive model has been
registered.
All the aesthetic characteristics which give the tank its unique
appearance (curves, slopes, and differences of level) in fact
correspond to technical requirements: the principal objective was
to overcome bubbles of emulsion which occur on the sudden
introduction of particles of ice or water into the oil bath. This
sometimes occurs when cooking products which are frozen or which
contain too much water.
There are 5 zones in this tank:
The bottom of the tank
All around the perimeter of the bottom of the tank, an 11 mm
channel has been inset, in order to gather and store debris. This
particular shape permits a reduction of 0.4 litre in the volume of
oil in the cool zone. Furthermore, the channel gives the tank
excellent stability when taken out.
The cool zone
The layer of oil located below the element is not affected by any
movement. Using all the heating power, the temperature reaches
70ºC in the debris-collection channel.
The hot zone
The hot volume of approximately 3 litres of oil, permanently
stirred by convection movement, enables 750 grams of pommes
frites to be held at a single time without any major cooling.

- 20 -
GB 4 / STAINLESS STEEL ANTI-EMULSION TANK
The emulsion zone
With a volume of approximately 5 litres, it allows emulsions,
which are produced with the use of frozen products or food which
is too full of water, to develop without risk of overflow. The balls
of emulsion are broken up on the edge of the latter zone, thus
avoiding the disasters which the emulsion of boiling oil might
otherwise cause.
The drainage and recovery zone
It is here that all the splashes are recovered which sometimes
arise during cooking. This zone, with its sloping curves, drains all
the small drops back into the frying bath.
OVERHEAT PREVENTION
The safety thermostat is a second temperature measure. In the
event of a problem, it automatically cuts off the supply of electricity
to the fryer. Reconnection is not automatic. It must be carried out
manually by an approved engineer. He must likewise make a
complete change of the frying bath.
TIMER
The left knob operates the timer, which has a sound alarm. It
enables you to avoid forgetting something cooking.
The timer must be set on at least 2’.
To stop the sound alarm, switch to position 0.

- 21 -
GB 5 / IMPORTANT RECOMMENDATIONS
1. The level to which the tank is filled must be between the
minimum (3 litres) and maximum (3,5 litres) marks engraved on
the vertical side wall of the tank.
2. The element of the cool zone fryer may not be operated in the
open air: it must always be submerged in oil or fat.
Consequently, blocks of fat may never by melted directly on the
element.
WARNING: IF YOU USE SOLID VEGETABLE OR ANIMAL
FAT, IT IS VITAL TO MELT IT IN ADVANCE BEFORE
POURING IT INTO THE TANK.
You thus avoid burning out the element.
3. If you use fat and not oil in your fryer, it is recommended that
(with the aid of a knife or a fork) you break up the fat before
switching on the fryer. This will prevent splashes if an air bubble
should become trapped. Proceed carefully in order not to strike
the probes fitted to the heating element.
4. The appliance is not intended for use by young children or
infirm persons without supervision.
Young children should be supervised to ensure that they do
not play with the appliance.
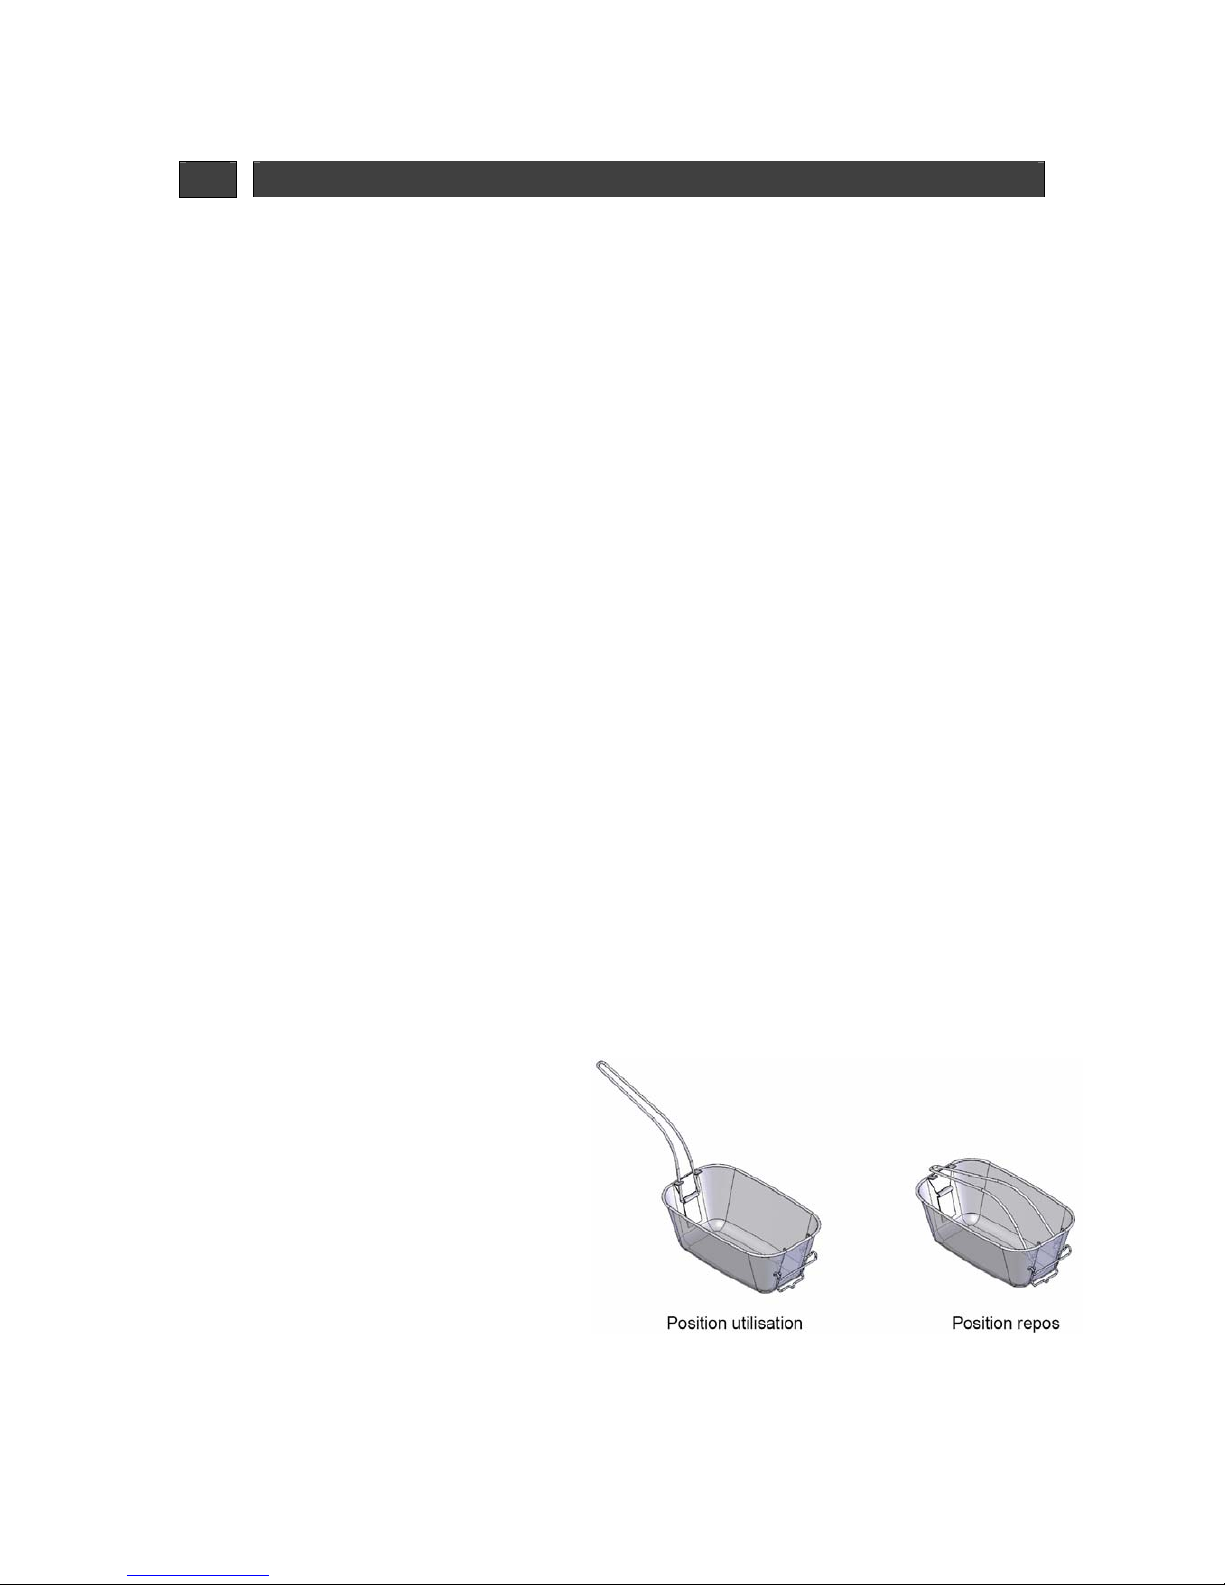
5. There are 2 different positions for the fryer basket: one position
during use and another
position at rest whereby the
handle does not remain in
the oil. In order to go from
one position to another, you
should unfasten the handle
from its housing and attach
it to the hooks provided for
this purpose.
6. Your fryer must be unplugged from the power supply before any
intervention.

- 22 -
GB 6 / SOME HINTS
The ideal temperature of the fryer is between 140ºC and 180ºC.
Beyond these temperatures, the oil rapidly deteriorates.
If you use a temperature which is too low, food surfaces are not
sealed, and fat penetrates.
It goes without saying that the thicker the pieces to be cooked the
longer they must stay in the frying bath. It is necessary therefore to
select a cooking temperature which allows the food to be cooked
through without burning the outside.
The temperature which you have chosen is reached when the red
light goes out.
The position of the knob is indicative, according to the type of food to be cooked. It
may vary in relation to the quantity used, and the personal taste of the consumer.
THERMOSTAT
POSITION
PREPARATION
140ºC Pommes frites (blanching)
160ºC Chicken legs and wings
170ºC fritters, fish
180ºC Croquettes
180ºC Pommes frites (frying)
To stop cooking, switch to position 0.

- 23 -
GB 7 / MAINTENANCE
Before any maintenance, disconnect the apparatus and leave it to
cool.
The fryer can be completely dismantled (proceed in the reverse
order to that for assembly). All the pieces may be simply
maintained. A « drainer » position has been devised, to permit the
heating element to be secured during cleaning.
Aluminium hinge:
The aluminium hinge which permits the turning of the element
during maintenance is fitted with a stainless steel securing bolt.
This piece runs to the right and secures the element, which is held
“suspended” above the bowl during the time necessary for
disposing of the fat..
The 3 possible positions of the heating element are the
following:
1) position for use
2) position for draining
3) position for removing the bowl

- 24 -
GB 7 / MAINTENANCE
The glass panel: clean it regularly with a damp cloth on which you
may spray a little of a product intended for glass-cleaning. Do not
spray cleaning products directly above the oil bath !
The tank and the basket: are treated like all kitchenware. Do not
hesistate to place them in the dish-washer.
The element: clean it with a damp cloth.
The stainless steel cover: clean it with products intended for the
maintenance of stainless steel. If you wish to keep its good
appearance, avoid scourers and abrasive detergents. Do not
hesistate to place them in the dish-washer.
Table of contents
Other DeDietrich Fryer manuals
Popular Fryer manuals by other brands

Professional Series
Professional Series PS75911 instruction manual

Royal Catering
Royal Catering RCBG 18 H user manual

Henny Penny
Henny Penny Evolution Elite Assembly

Virtus
Virtus 70/40 FRE8+8 Installation - use - maintenance

Dash
Dash Tasti-Crisp DFAF755 Instruction manual and recipe guide

Silvercrest
Silvercrest SEF3 2000 B1 operating instructions