DEEPELEC NanoVNA-Fairy User manual

产品说明书
Handheld Vector Network Analyzer Manual
登录官网www.deepelec.com获取最新版本说明书
Visit www.deepelec.com for the latest version of the manual
使用前请仔细阅读说明书,并妥善保管
Please read this manual carefully before use and keep it in a safe place

HANGZHOU MINGHONG ELECTRONIC TECHNOLOGY CO., LTD. 杭州冥鸿电子科技有限公司 www.deepelec.com
- 1 -
产品介绍
NanoVNA-F“便携式矢量网络分析仪”是基于NanoVNA开源项目的产品
(https://ttrf.tk/kit/nanovna)。我们设计了NanoVNA-F硬件,该硬
件基于STM32F103 Cortex-M3处理器,并具有更大,更亮的4.3英寸高
分辨率IPS显示屏,大容量电池,金属机身,全套配件等等。
同时,我们将edy555的开源软件移植到FreeRTOS系统中。 该项目的当
前开源地址为:https://github.com/flyoob/NanoVNA-F。每个爱好
者都可以查看和学习编译固件。
注意
l 该图像适用于具有按键开关硬件的设备。
l 该图像不适用于具有拨轮开关硬件的设备。请访问
www.deepelec.com以了解外观的其他版本。
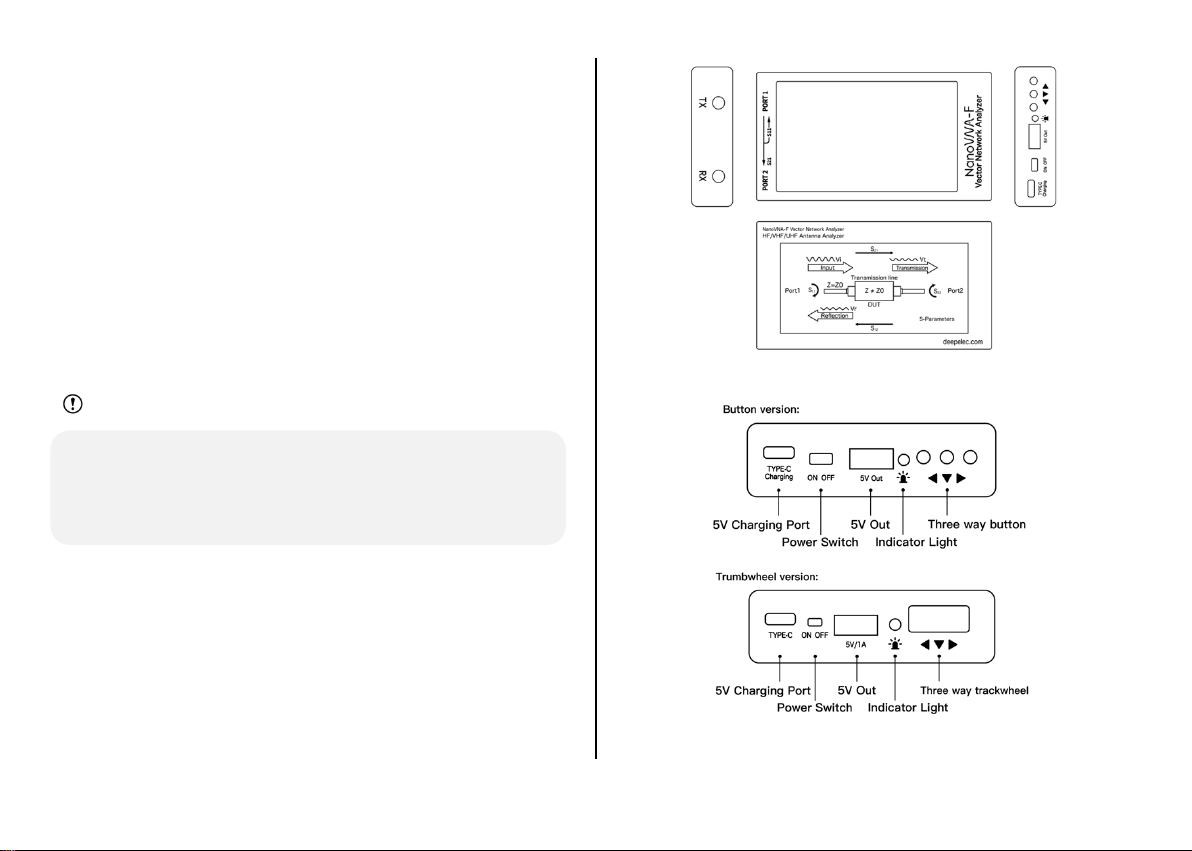
操作面板

HANGZHOU MINGHONG ELECTRONIC TECHNOLOGY CO., LTD. 杭州冥鸿电子科技有限公司 www.deepelec.com
- 2 -
图标/图标名称
介绍
Type-c
用于充电
Power Switch
开启或关闭设备
5V Out
5V/1A 输出
红色闪烁:充电中
红色常亮:充满电
蓝色常亮:放电中
蓝色闪烁:低电量
三向按钮(在硬件V2.2中是拨轮)
配件
NanoVNA-F 主机 4.3 寸屏(带屏幕保护膜) x 1
USB Type-C 数据线 x1
20cm SMA 公对公 RG316 射频电缆 x2
SMA 公校准件 – 开路 x1
SMA 公校准件 – 短路 x1
SMA 公校准件 – 负载 x1
SMA-JJ 公对公连接器 x1
SMA-KK 母对母连接器 x1
SMA-JKW 公对母直角连接器 x1
产品说明书 ×1
快速入门指南 ×1
基本操作
开始测量
1. 设置频率范围 (频率设置→
起始
/终止 或中心/扫宽)
2. 校准 (根据实际需要,请参考下一章)!
3. 选择显示格式和频道(显示→格式/通道)!
4. 保存参数以进行下一次测量. (校准→保存→0/1/2/3/4)
您可以随时更改显示格式和通道选择。 在正常测试模式下,点击屏幕的
右侧区域或按下多功能开关中键以调出菜单。 点击屏幕或按下多功能开
关选择菜单项。
选择显示轨迹和显示格式/通道
菜单 显示→迹线 选项可以选择打开(激活)或关闭相应的显示曲线。
当曲线名称的背景颜色与曲线颜色一致时,表示该曲线处于活动状态。选
项格式、刻度和通道 仅对该曲线有效。显示→
刻度
可以调整刻度,
显示→
通道
可以选择被测端口。
设定频率范围
通道的频率范围可以由三组参数表示:起始频率,中心频率和终止频率。
如果任何一个参数发生变化,其他参数将自动调整以确保它们之间的耦合
HANGZHOU MINGHONG ELECTRONIC TECHNOLOGY CO., LTD. 杭州冥鸿电子科技有限公司 www.deepelec.com
- 3 -
关系。!
!
!"#$"%&" #!
'$(%$ $ !
'$)*%&'
!
'*(# " ( !
'$)* ) !
'$(%$
!
'*(#
是扫宽。
示例 1:
通过菜单频率设置→
中心
设置当前屏幕的中心频率点,并分别在网格底
部的左侧和右侧显示中心频率和扫描范围的值。在弹出的“设置值”屏幕
的右下角,单击以弹出软键盘,然后通过软键盘输入频率值。
请注意以下几点:当扫宽恒定时,开始和停止频率会随中心频率的变化而
变化。在“零扫宽”中,起始频率,终止频率和中心频率始终设置为相同的
值。现在,您可以将PORT1用作固定输出幅度的信号源,但是需要注意的
是,本机使用时钟信号发生器Si5351作为信号源,输出信号为方波,包
含较大的奇次谐波。
示例 2:
通过菜单频率设置→
扫宽
设置频率范围,在网格的左侧和右侧显示中心
频率和扫描范围值,然后单击弹出式设置值屏幕的右下角以弹出软键盘并
通过软键盘输入频率值。
请注意以下几点:当中心频率恒定时,启动和停止频率会随着扫宽而变
化。当扫宽设置为最大时,分析仪进入全扫宽模式。在“零扫宽”中,起始
频率,终止频率和中心频率始终设置为相同的值。
示例 3:
通过菜单频率设置→
起始
设置起始频率,并分别在网格的左侧和右侧显
示起始频率和终止频率值。单击弹出式设置屏幕的右下角以弹出软键盘,
并通过软键盘输入频率值。
请注意以下几点:当扫宽未达到最小值时,扫宽和中心频率会随起始频率
而变化(参数随扫宽而变化,请参见“扫宽”);在“零扫宽”中,起始频
率,终止频率和中心频率始终是相同的值。
通过菜单频率设置→
终止
设置终止频率,在弹出的“设置”屏幕的右下
角,分别在网格的左侧和右侧分别显示起始频率和终止频率值,单击以弹
出软键盘,并通过软键盘输入频率值。请注意以下几点:扫宽和中心频
率随停止频率而变化。扫宽的更改将影响其他系统参数。有关更多详细
信息,请参阅“扫宽”。
在“零扫宽”中,起始频率,终止频率和中心频率始终是相同的值。有关
更多测试示例,请访问www.deepelec.com。
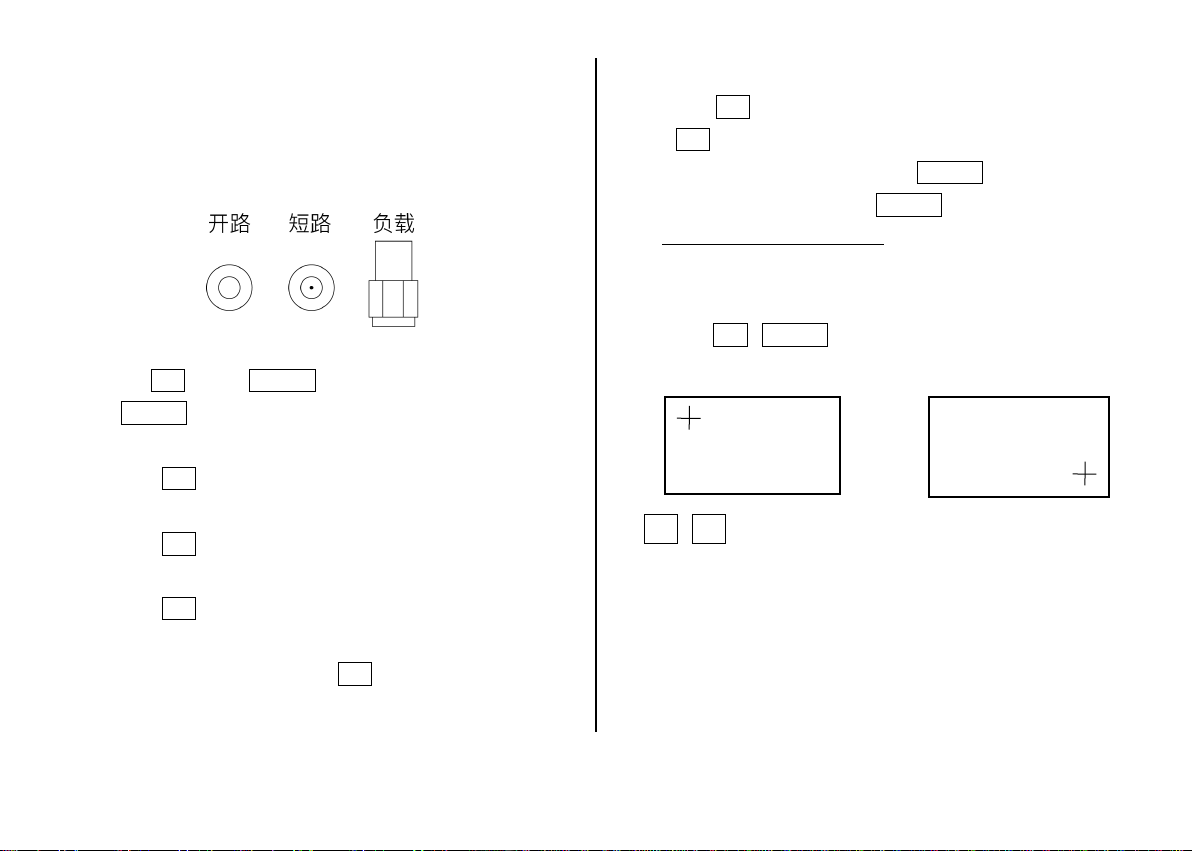
校准
校准和归一化
VNA主机是一种可在恶劣的测试环境中运行的现场便携式设备。为了确保
测量准确性,必须在现场进行测量之前执行RF校准(SOLT)。使用指定
的机械校准进行校准需要三个校准部分:开路,短路和匹配(负载)和一
HANGZHOU MINGHONG ELECTRONIC TECHNOLOGY CO., LTD. 杭州冥鸿电子科技有限公司 www.deepelec.com
- 4 -
根RG316 RF电缆。 校准数据将另存为用户校准数据。 它可以保存为状
态0/1/2/3/4,它将在下次启动时自动加载,也可以通过RECALL菜单加
载。
下图显示了NanoVNA-F标配的开路,短路和负载校准组件。
NanoVNA-F校准步骤的简要概述:
1) 打开菜单 校准 ,点击 重置校准!
2) 打开 开始校准 菜单
3) 将SMA开路器连接到PORT1等待3秒钟以上(等待屏幕波形稳
定),然后按开路
4) 将SMA短路器 连接至PORT1等待3秒钟以上(等待屏幕波形稳
定),然后按短路
5) 将SMA负载 连接到PORT1,等待3秒钟以上(等待屏幕波形稳
定),然后按负载
6) 将SMA负载 连接到PORT1,将第二个负载连接到PORT2,等待3秒
钟以上(等待屏幕波形稳定),然后按隔离
注意:如果没有第二个负载,只需将PORT2保持空置状态即可。
7) 将RF电缆从PORT1连接到PORT2,等待3秒钟以上(等待屏幕波形稳
定),然后按直通!
8) 点击完成,保存到0/1/2/3/4 其中一个.
注意:如果已经保存了校准数据,请先按“重置校准”以清除校准数据,
然后进行校准!如果输入有误,请从重置校准重新开始!
详见: www.deepelec.com/support
校准触摸屏
1) 进入菜单 设置→触屏校准。
2) 使用牙签或其他尖锐物体依次点击出现的十字的中心。
3) 设置→保存.
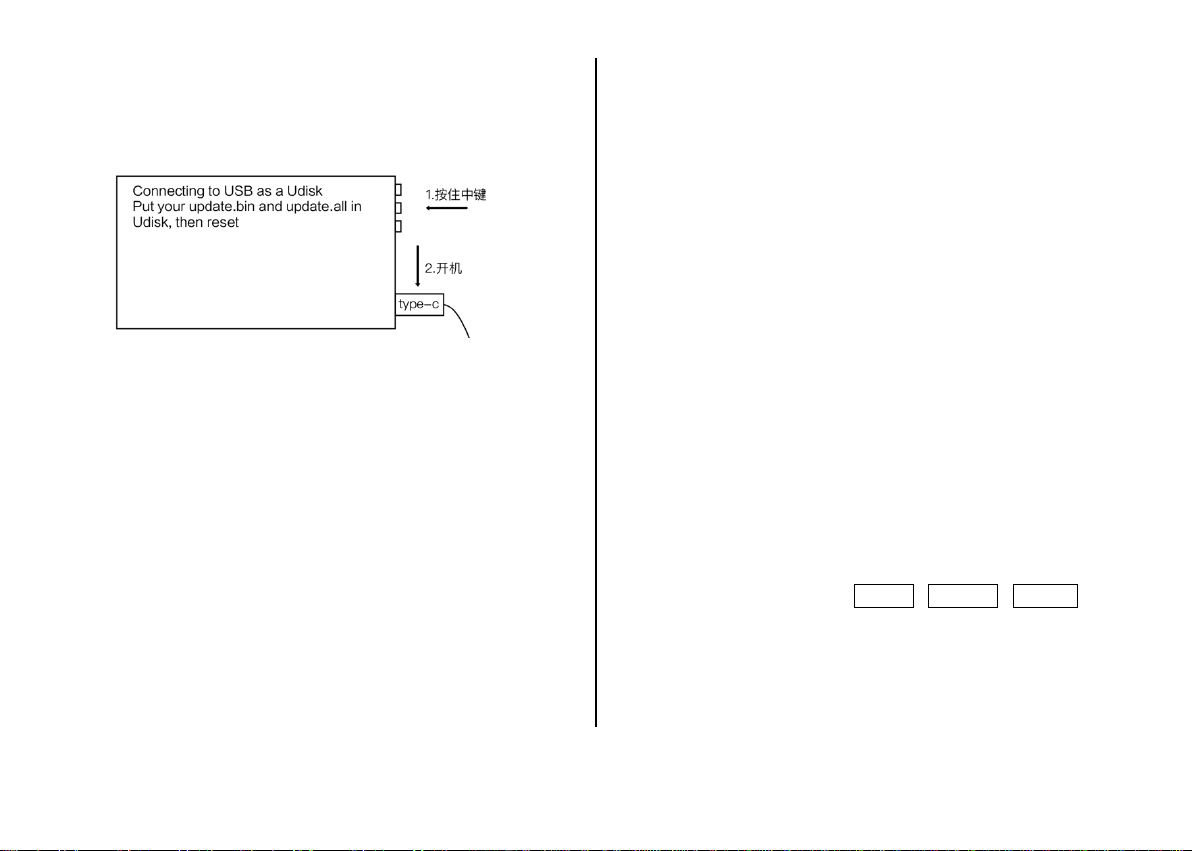
升级固件
下载固件: https://github.com/flyoob/NanoVNA-F/releases!
升级说明: https://github.com/flyoob/NanoVNA-F_Boot!
0) 下载并解压缩固件。得到文件:update.bin和update.all.
HANGZHOU MINGHONG ELECTRONIC TECHNOLOGY CO., LTD. 杭州冥鸿电子科技有限公司 www.deepelec.com
- 5 -
1) 使用设备上的Type-C USB插座将NanoVNA-F连接到PC的USB端
口。先按下三相按钮中键并保持不放,随后打开设备电源。液晶显示屏
显示以下提示,说明引导加载程序处于活动状态。
2) 在PC端,该设备将充当磁盘驱动器,该驱动器应出现在“文件资源管
理器”中。将新的“ update.bin”和”update.all”复制到该磁盘的根目录
中。
3) 关闭并重新打开设备电源,引导加载程序将自动运行,并更新
NanoVNA-F。重新上电以正常运行。
加入呼号
1) 使用 Type-C 将NanoVNA-F 连接到电脑的 USB,先按下选择器开关
并保持不放,随后打开设备电源。 液晶显示屏显示以下提示,说明引导
加载程序处于活动状态。
2) 然后在PC端,该设备将充当磁盘驱动器,该驱动器应出现在“文件资
源管理器”中。将您的callsign.txt复制到该磁盘的根目录中,关闭设备并
为设备重新通电。
安装驱动和使用电脑软件
http://deepelec.com/files/en.stsw-stm32102.zip!
安装对应的32或64位驱动程序。 打开设备,连接到计算机的USB端口,
然后等待计算机给出“正在安装驱动程序”消息,等待直到完成。
我们目前尚未发布官方PC软件,建议您使用功能强大的NanoVNA PC软件
nanovna-saver(由Rune B. Broberg提供)。
https://github.com/mihtjel/nanovna-saver
切换语言
如果你收到的 NanoVNA-F 是英文菜单,或者不小心切换至英文菜单。
1) 按照以下步骤切换回中文菜单 CONFIG→LANGSET→CHINESE

HANGZHOU MINGHONG ELECTRONIC TECHNOLOGY CO., LTD. 杭州冥鸿电子科技有限公司 www.deepelec.com
- 6 -
Product introduction
NanoVNA-F "Handheld Vector Network Analyzer" is a product based on the
Open Source Project of NanoVNA (https://ttrf.tk/kit/nanovna).!We designed
the NanoVNA-F hardware, which is based on the STM32F103 Cortex-M3
processor and has a larger and brighter 4.3-inch high resolution IPS
display, a large-capacity battery, a metal body, a full set of accessories, and
more.
At the same time, we have transplanted the open source software of
edy555 to FreeRTOS system. The current open source address of this
project is: https://github.com/flyoob/NanoVNA-F. Every enthusiast can
view and learn to compile the firmware.
Caution
l This image apply to machines with Push-button Hardware.
l This image does not apply to machines with Trackwheel
Hardware. Visit www.deepelec.com to know other version of
appearance.
Operation panel

HANGZHOU MINGHONG ELECTRONIC TECHNOLOGY CO., LTD. 杭州冥鸿电子科技有限公司 www.deepelec.com
- 7 -
Icon/icon name
Description
Type-c
Use for charging
Power Switch
Power On or Off
5V Out
5V/1A Output
Red Blink : Charging
Red : Full charged
Blue : Discharge
Blue Blink : Low battery
Three way button(In Hardware V2.2 it’s
wheel)
Accessory
NanoVNA-F host 4.3 inch (with screen protective film) x 1
USB Type-C data cable x1
20cm SMA male to male RG316 RF cable x2
SMA male calibration kit - OPEN x1
SMA male calibration kit - SHORT x1
SMA male calibration kit - LOAD x1
SMA-JJ male to male connector x1
SMA-KK female to female connector x1
SMA-JKW male to female right angle connector x1
Incomplete Manual ×1
Quick Start Guide ×1
Basic operations
Start a measurement
1. Set the frequency range (STIMULUS→START/STOP or CENTER /
SPAN)
2. Calibration (According to actual needs, refer to the next
chapter)!
3. Select display format and channel
(DISPLAY→FORMAT/CHANNEL)!
4. Save the parameters for the next measurement.
(CAL→SAVE→0/1/2/3/4)
You can change the display format and channel selection at any
time. In the normal test mode, tap the right area of the screen or
press the multifunctional switch to call up the menu. Tap the
screen or turn the multifunctional switch to select a menu item.
Select the display trace and display
format/channel
The menu DISPLAY →TRACE item can choose to open (activate)
or close the corresponding display curve. When the background
color of the curve name is consistent with the curve color, it
HANGZHOU MINGHONG ELECTRONIC TECHNOLOGY CO., LTD. 杭州冥鸿电子科技有限公司 www.deepelec.com
- 8 -
indicates that the curve is active. The items FORMAT, SCALE, and
CHANNEL are only valid for this curve.!DISPLAY→SCALE can
adjust the scale, DISPLAY→CHANNELcan select the measured
port.
Setting the frequency range
The frequency range of a channel can be expressed by three
groups of parameters:!Start Frequency, Center Frequency and
Stop Frequency. If any of the parameters change, the others will
be adjusted automatically in order to ensure the coupling
relationship among them.!
!
!"#$"%&" #!
'$(%$ $ !
'$)*%&'
!
'*(# " ( !
'$)* ) !
'$(%$
Where
!
'*(#
is the SPAN.
Usage 1:
Set the center frequency point of the current screen through the
STIMULUS→CENTER of the menu, and display the values of the
center frequency and sweep span, respectively, to the left and
right of the bottom of the grid.!In the lower-right corner of the
pop-up Settings value screen, click to eject the soft keyboard
and enter the frequency value via the soft keyboard.
Please pay attention to the following points:!The start and stop
frequencies will vary with changes to the center frequency when
the span is constant.!In Zero Span, the start frequency, stop
frequency and center frequency are always set to the same
value. Now, you can use PORT1 as a signal source for a fixed
output amplitude, but it is important to note that this machine
uses the clock signal generator Si5351 as the signal source, the
output signal is square wave, contains a larger odd harmonic.
Usage 2:
Set the frequency range through the STIMULUS→SPAN of the
menu, display the center frequency and sweep span values on
the left and right sides of the grid, and click on the lower right
corner of the pop-up settings value screen to eject the soft
keyboard and enter the frequency values through the soft
keyboard.
Please pay attention to the following points:!The start and stop
frequency vary with the span when the center frequency is
constant.!When the span is set to the maximum, the analyzer
enters full span mode.!In Zero Span, the start frequency, stop
frequency and center frequency are always set to the same
value.
Usage 3:
Set the start frequency through the STIMULUS→START of the
menu and display the start frequency and stop frequency values
on the left and right sides of the grid, respectively. Click on the
bottom right corner of the pop-up settings screen to eject the
HANGZHOU MINGHONG ELECTRONIC TECHNOLOGY CO., LTD. 杭州冥鸿电子科技有限公司 www.deepelec.com
- 9 -
soft keyboard and enter the frequency value through the
soft!keyboard.
Please pay attention to the following points:!The span and
center frequency vary with the start frequency when the span
does not reach the minimum (The parameters vary with the
span, please refer to “Span”);!In Zero Span, the start frequency,
stop frequency and center frequency are always the same value.
Set the stop frequency through the STIMULUS→STOP of the
menu, and display the start frequency and stop frequency values
on the left and right sides of the grid, respectively, in the lower
right corner of the pop-up Settings screen, click to eject the soft
keyboard and enter the frequency value through the
soft!keyboard. Please pay attention to the following points: The
span and center frequency vary with the stop frequency. The
change of the span will affect other system parameters. For
more details, please refer to “Span”.
In Zero Span, the start frequency, stop frequency and center
frequency are always the same value. For more test examples,
please visit www.deepelec.com .
Calibration
Calibration and Normalization
The VNA Master is a field portable unit operating in the rigors of
the test environment. In order to ensure measurement accuracy,
RF calibration (SOLT) must be performed prior to making a
measurement in the field. Calibrating with the specified
mechanical calibration requires three calibration parts: open,
short, and match(load) and one RG316 RF cable. Calibration data
is saved as user calibration data. It can be saved to status
0/1/2/3/4, which will be automatically loaded at the next boot
and can be also be loaded via the RECALL menu.
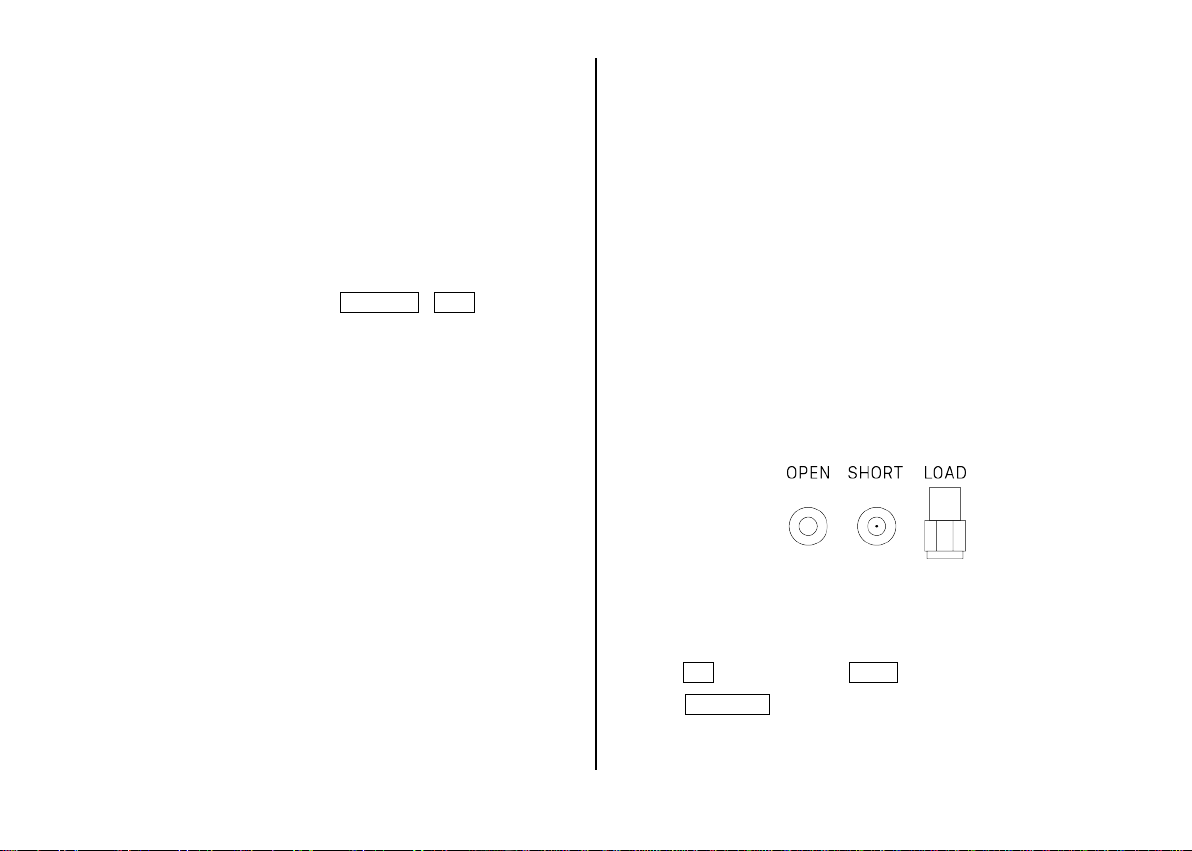
The figure below shows the OPEN, SHORT, and LOAD calibration
components that are standard with the NanoVNA-F.
Brief summary of NanoVNA-F calibration steps:
1) Open CAL menu and press RESET!
2) Open CALIBRATE menu!

HANGZHOU MINGHONG ELECTRONIC TECHNOLOGY CO., LTD. 杭州冥鸿电子科技有限公司 www.deepelec.com
- 10 -
3) Connect SMA Open to PORT1 wait more than 3 seconds (wait
for the screen to stabilize) and press OPEN
4) Connect SMA Short to PORT1 wait more than 3 seconds (wait
for the screen to stabilize) and press SHORT
5) Connect SMA Load to PORT1 wait more than 3 seconds (wait
for the screen to stabilize) and press LOAD
6) Connect SMA Load to PORT1, connect second Load to PORT2,
wait more than 3 seconds (wait for the screen to stabilize) and
press ISOLN
Note: if you don't have second Load, just leave PORT2 open.!
7) Connect RF cable from PORT1 to PORT2 wait more than 3
seconds (wait for the screen to stabilize) and press THRU!
8) Press DONE, save to 0/1/2/3/4 one of them.
Note: If there is already saved calibration data, first press RESET to
clear the calibration data and then calibrate!
!
If you make a
mistake, start again with RESET!
See more: www.deepelec.com/support
calibrate the touch screen
1) Enter menu CONFIG→TOUCH CAL
2) Use a toothpick or other sharp object to click the center of the
cross that appears in order.
3) CONFIG→SAVE .
Upgrade the firmware
Download: https://github.com/flyoob/NanoVNA-F/releases!
Points to: https://github.com/flyoob/NanoVNA-F_Boot!
0) Download and unzip the update. You should have a file
update.bin and update.all.

HANGZHOU MINGHONG ELECTRONIC TECHNOLOGY CO., LTD. 杭州冥鸿电子科技有限公司 www.deepelec.com
- 11 -
1) Connect your NanoVNA-F to a PC's USB port using Type-C USB
socket on the device. Press the middle of the three way buttons
and keep it down, while powering up the device. The LCD
displays the following prompt, indicating that the boot-loader is
active.
2) Then at PC side, the device will act as a disk drive, which
should appear in File Explorer. Copy you new “update.bin”and
“update.bin” into the root directory of that disk.
3) Power the device off and on, and the boot-loader will run
automatically, and update your NanoVNA-F. Re-power for normal
operation.
Add call sign display
1) Connect your NanoVNA-F to a PC's USB port using Type-C USB socket
on the device. Press the selector switch and keep it down, while powering
up the device. The LCD displays the following prompt, indicating that the
boot-loader is active.
2) Then at PC side, the device will act as a disk drive, which should appear
in File Explorer. Copy your callsign.txt into the root directory of that disk,
then re-power the device.
Use PC software and install drivers
http://deepelec.com/files/en.stsw-stm32102.zip!
Install the appropriate 32 or 64bit driver.!Turn ON the nano, attach to any
USB port, and wait for the computer to give the "Installing driver"
message. Wait until it completes.
We haven't released official PC software at this time, we recommend using
nanovna-saver(by Rune B. Broberg), a powerful NanoVNA PC software.
https://github.com/mihtjel/nanovna-saver
Change Language
If you received NanoVNA-F with or switched to Chinese language.
1) You can follow these steps as figure to change the language to English.
设置→语言→英文
HANGZHOU MINGHONG ELECTRONIC TECHNOLOGY CO., LTD. 杭州冥鸿电子科技有限公司 www.deepelec.com
- 12 -
其他产品 / Other Product :
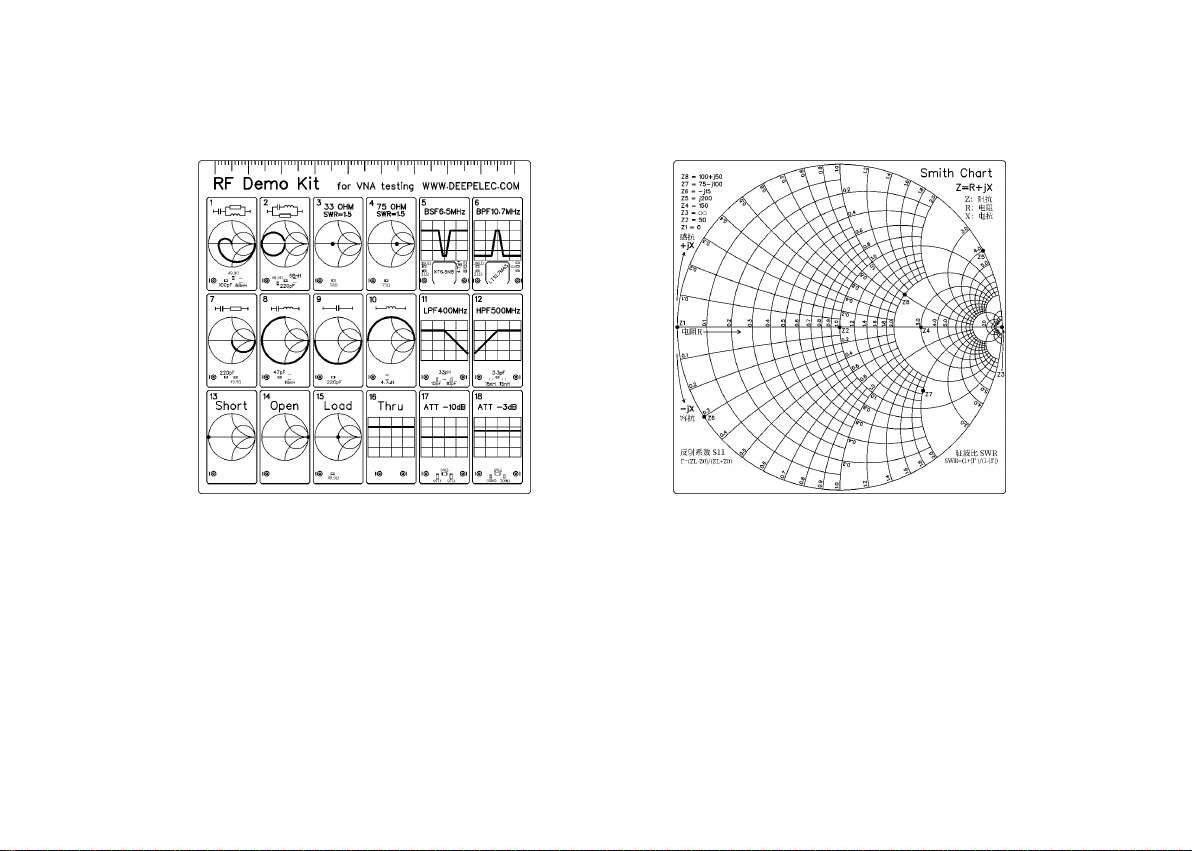
RF Demo Kit
RF Demo Kit 是由 BH5HNU 自主设计的 NanoVNA 射频测试板,尺寸 10*10CM,用于学习矢量网络分析仪使用。
背面印刷了史密斯圆图,可以用于学习识读史密斯圆图,学习阻抗匹配基本原理。
测试板有18 种电路。了解更多:deepelec.com/rf-demo-kit
The RF Demo Kit is a NanoVNA RF test board independently designed by BH5HNU, with a size of 10 * 10CM. It is used to learn the use of a
vector network analyzer.
The Smith chart is printed on the back, which can be used to learn to read the Smith chart and learn the basic principles of impedance
matching.
The test board has 18 kinds of circuit. More visit : deepelec.com/rf-demo-kit

HANGZHOU MINGHONG ELECTRONIC TECHNOLOGY CO., LTD. 杭州冥鸿电子科技有限公司 www.deepelec.com
- 13 -

杭州冥鸿电子科技有限公司
HANGZHOU MINGHONG ELECTRONIC TECHNOLOGY CO., LTD.
Version : 2.1
Website : www.deepelec.com
Support : support@deepelec.com
Facebook Group : NanoVNA-F (Need to answer Membership Questions)
Groups.io : https://groups.io/g/nanovna-f
QQ 群 : 522796745
注:产品若有技术改进,会编进新版电子手册中,恕不另行通知,请访问官方网站查询。产品外观、颜色如有改动,以实物为准。
Note : If there are technical improvements to the product, it will be compiled into the new version of the electronic manual without
notice. Please visit the official website for inquires. If the appearance and color of the product are changed, the actual product shall
govern.
Other manuals for NanoVNA-Fairy
1
Table of contents
Other DEEPELEC Measuring Instrument manuals


