DeeZee Running Board User manual

DeeZeeRunningBoardInstallationInstructions
CongratulationsonyourpurchaseofaqualityDeeZeeproduct.DeeZeeis
recognizedashavingthehighestqualityrunningboardsandaccessorieson
themarkettoday.Wehaveearnedthisreputationbyofferingourcustomers
aproducttheycanbeproudtoplaceontheirvehicles.DeeZeemeetsall
thecriteriaofmanufacturingacustom-fitproductwhichguaranteesitto
betheeasiestproducttoinstall.
Note:Pleasetaketimetoreadalloftheinstructionsbeforebeginningthisinstallation.
Warning!Pleasecheckforwiringorotherobstructionsbeforedrillinganyholesinto
thevehicle.Ifitisnecessarytodrillanyholesintothevehicle,DeeZeerecommends
puttingasealantorrustinhibitoraroundallholesdrilledintothebodyofthevehicle.
Warning!Itisthesoleresponsibilityofthevehicleownertocheckfortireclearance.
Warning!Itisunlawfulanddangeroustorideonrunningboardsorsideboxboards
whilethevehicleisinmotion.
CleaningInstructions:TomaintainthebrightfinishofyourDeeZeerunningboards,
cleanwithamilddetergent.Forourstainlesssteelproductsandaccessories,the
applicationofahighgradeautomotivetypewaxisrecommended.
Ifyoushouldhappentohaveanyquestionswiththisproductoryouhavean
installationquestion,pleasefeelfreetocallusat:
1-800-779-8222
IfyouwouldliketofindoutmoreinformationonDeeZee’sproductsplease
feelfreetovisitourwebsiteat:
WWW.DEEZEE.COM
DZ1020.PDF12/09/02
DeeZeeBritetreadRunningBoardInstallationInstruction
DZ1020
(1988-1998)ChevyExtendedCabPickup
B
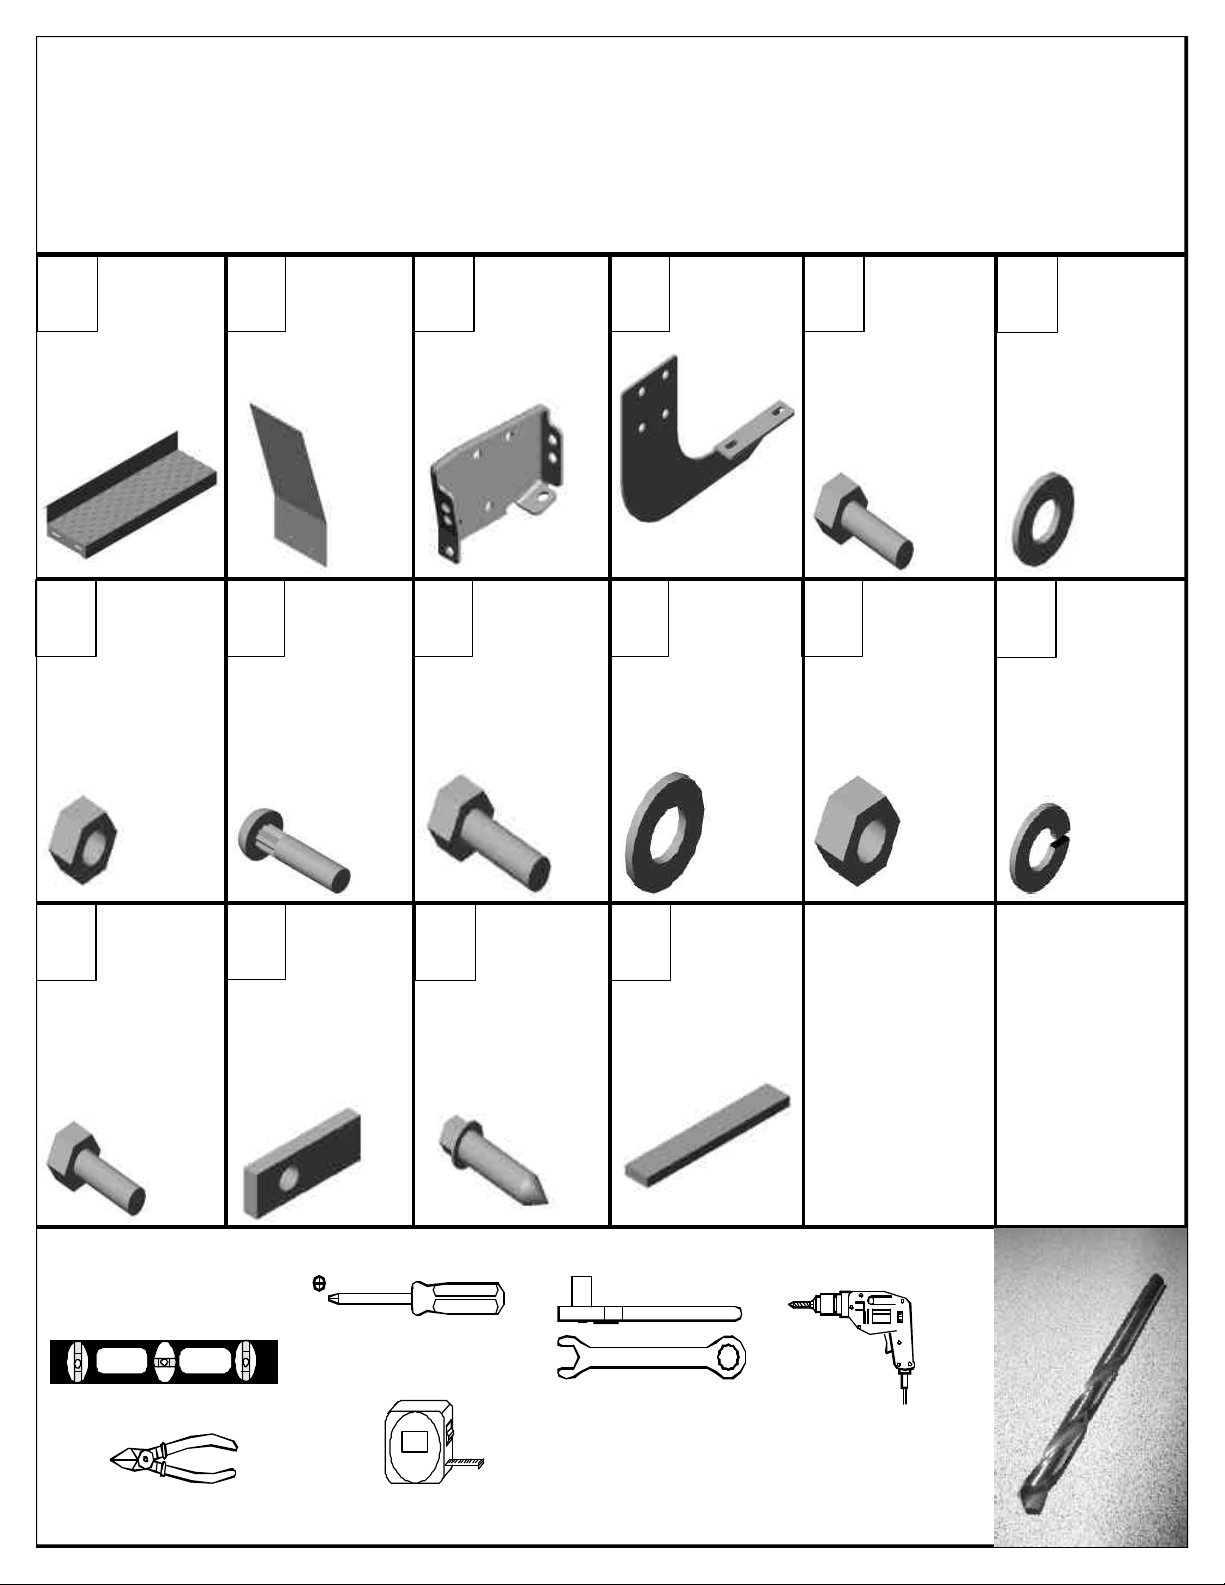
ToolsRequired:
OutilsNécessaires:
ABritetread
Running
Board
X2
F
H
GIJKL
3/8x1“Hex
HeadBolt
X30 X12
M
1/4“Flat
Washer
N
1/4“HexNut
PhillipsHead
Screwdriver
Tin-snips TapeMeasure
Ratchet/Wrench
Sizes:3/8“
7/16“
9/16"
E
X26
X4
Britetread
Mudflap
Level
Running
Board
Bracket
Rocker
Panel
Bracket
X22 X12
5/16“FlatWasher 3/8“HexNut
X6
C D
3/8"Lock
Washer
X18
Drill
1/4”Needed
3/8“Offset
ThreadedPlate
1/4x1”Ribneck
CarriageHead
Bolt
X6
3/8x11/4”Hex
HeadBolt
X2 X6 X6
1/4x3/4”
HexHead
Bolt
X18
O
1/4x1”Sheet
MetalScrew
X4
3/16”Needed
P
FoamTape
1EA.

1
B
A
G
F
EF
Securebritetreadmudflap(B)tobritetreadrunningboard(A)using1/4x3/4”hexheadbolts(E),
1/4”flatwashers(F),and1/4”hexnuts(G).Tightenintoplaceusinga7/16”wrench/orsocket.
Placefoamgasket(P)ontothebacklipofbritetreadrunningboard(A)andtrimflushwiththe
britetreadmudflap(B)andtheendofbritetreadrunningboard(A).
Asegureelmudflapdelbritetread(b)alatarjetacorrientedelbritetread(a)usandolospernosdel
apistadelatuercahexagonalde1/4delx3/4"(e),lasarandelasdel1/4"(f),ylastuercas1/4"de
tuercahexagonalplanas(g).Aprieteenlugarusandounallavedel7/16"/oelsocket.Coloquela
juntadeespuma(p)sobreelbacklipdelatarjetacorrientedelbritetread(a)ycortearasdel
mudflapdelbritetread(b)ydelextremodelatarjetacorrientedelbritetread(a).
7/16“Wrench
orSocket
P
Britetread
RunningBoard

Locatetheplasticplugscoveringtheexistingholesinthevehiclerockerpanelatthelocationsshownbelow.Remove
themfromthevehicle.
Localisezlesprisesdeplastiquecouvrantlestrousexistantsdanslepanneaudeculbuteurdevéhiculeaux
emplacementsmontrésci-dessous.Retirez-lesduvéhicule.
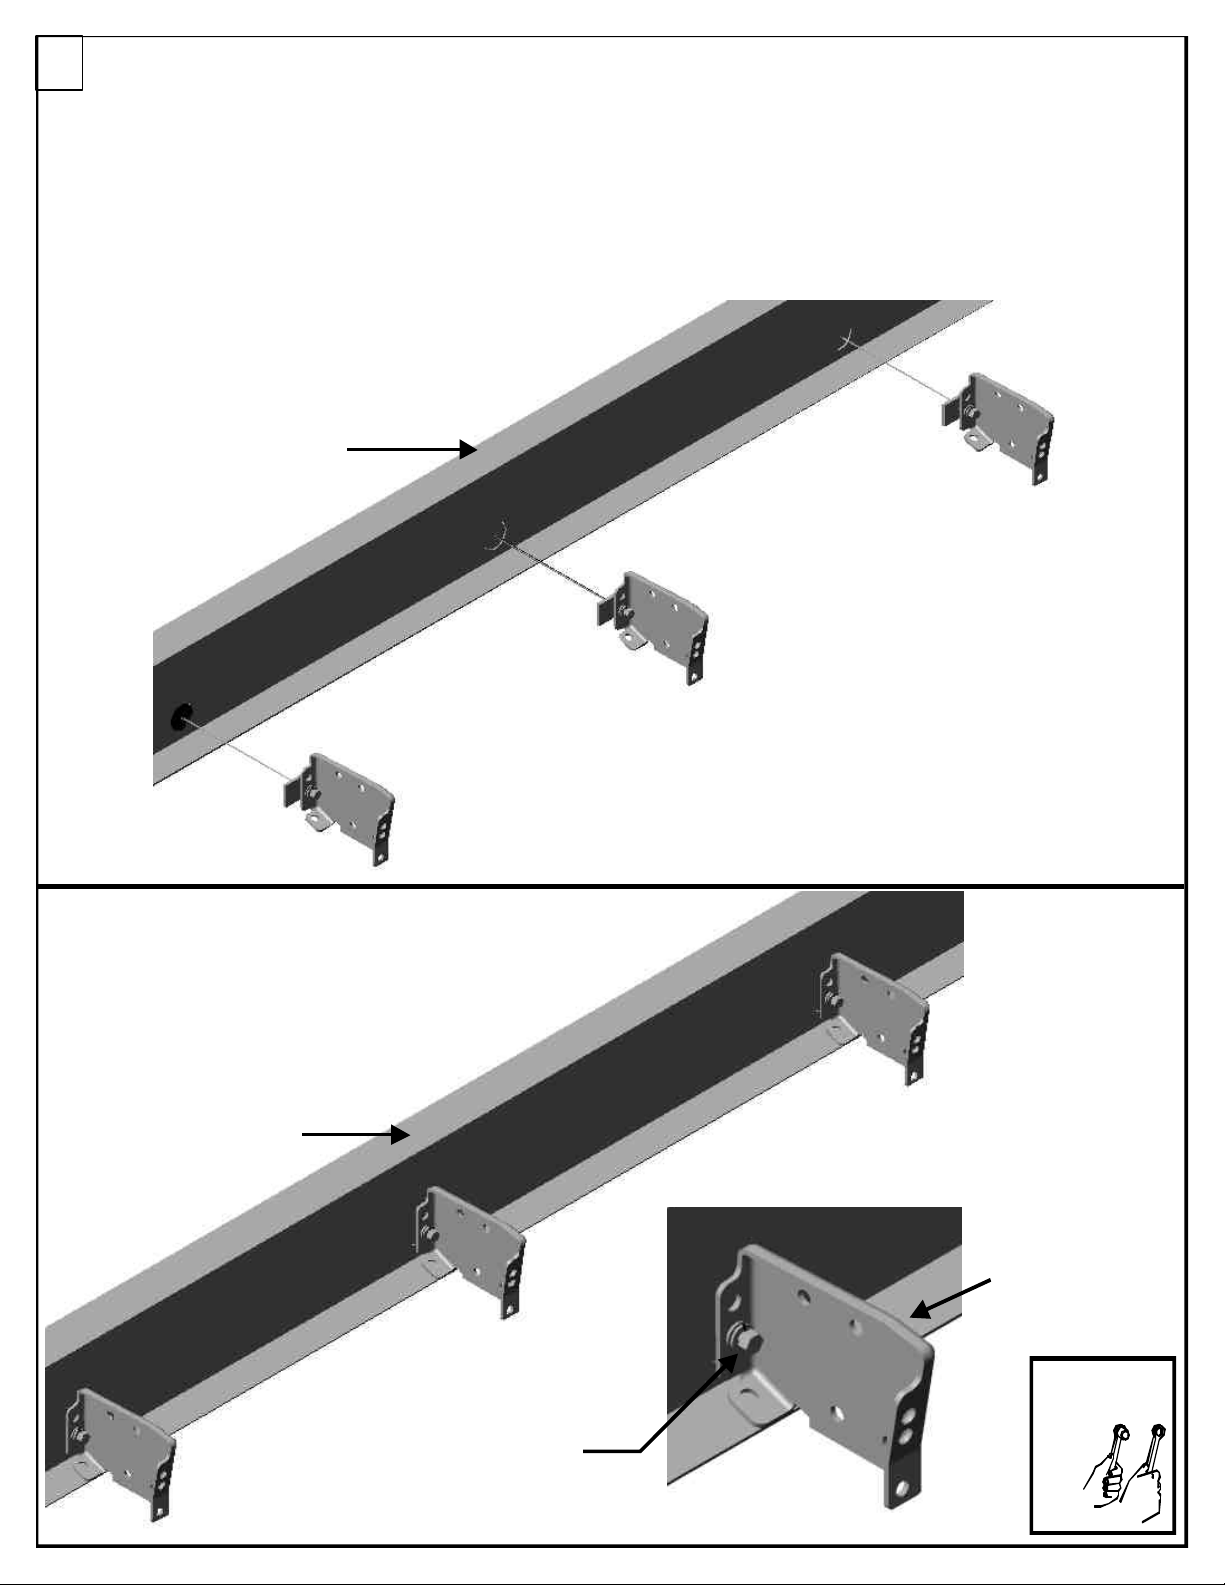
2
Placea3/8x11/4”hexheadbolt(M),3/8”lockwasher(L),and5/16”flatwasher(J)throughrockerpanelbracket(C)as
shownbelow.Threada3/8”largethreadedplate(N)ontothe3/8x11/4”hexheadbolt(M)acoupleofturns.
Placezdes3/8x11/4"boulonsprincipauxd'hexa(m),unerondelledefreinagede3/8"(l),etunerondelleplatede5/16"(j)
parlaparenthèsedepanneaudeculbuteur(c)commemontréci-dessous.
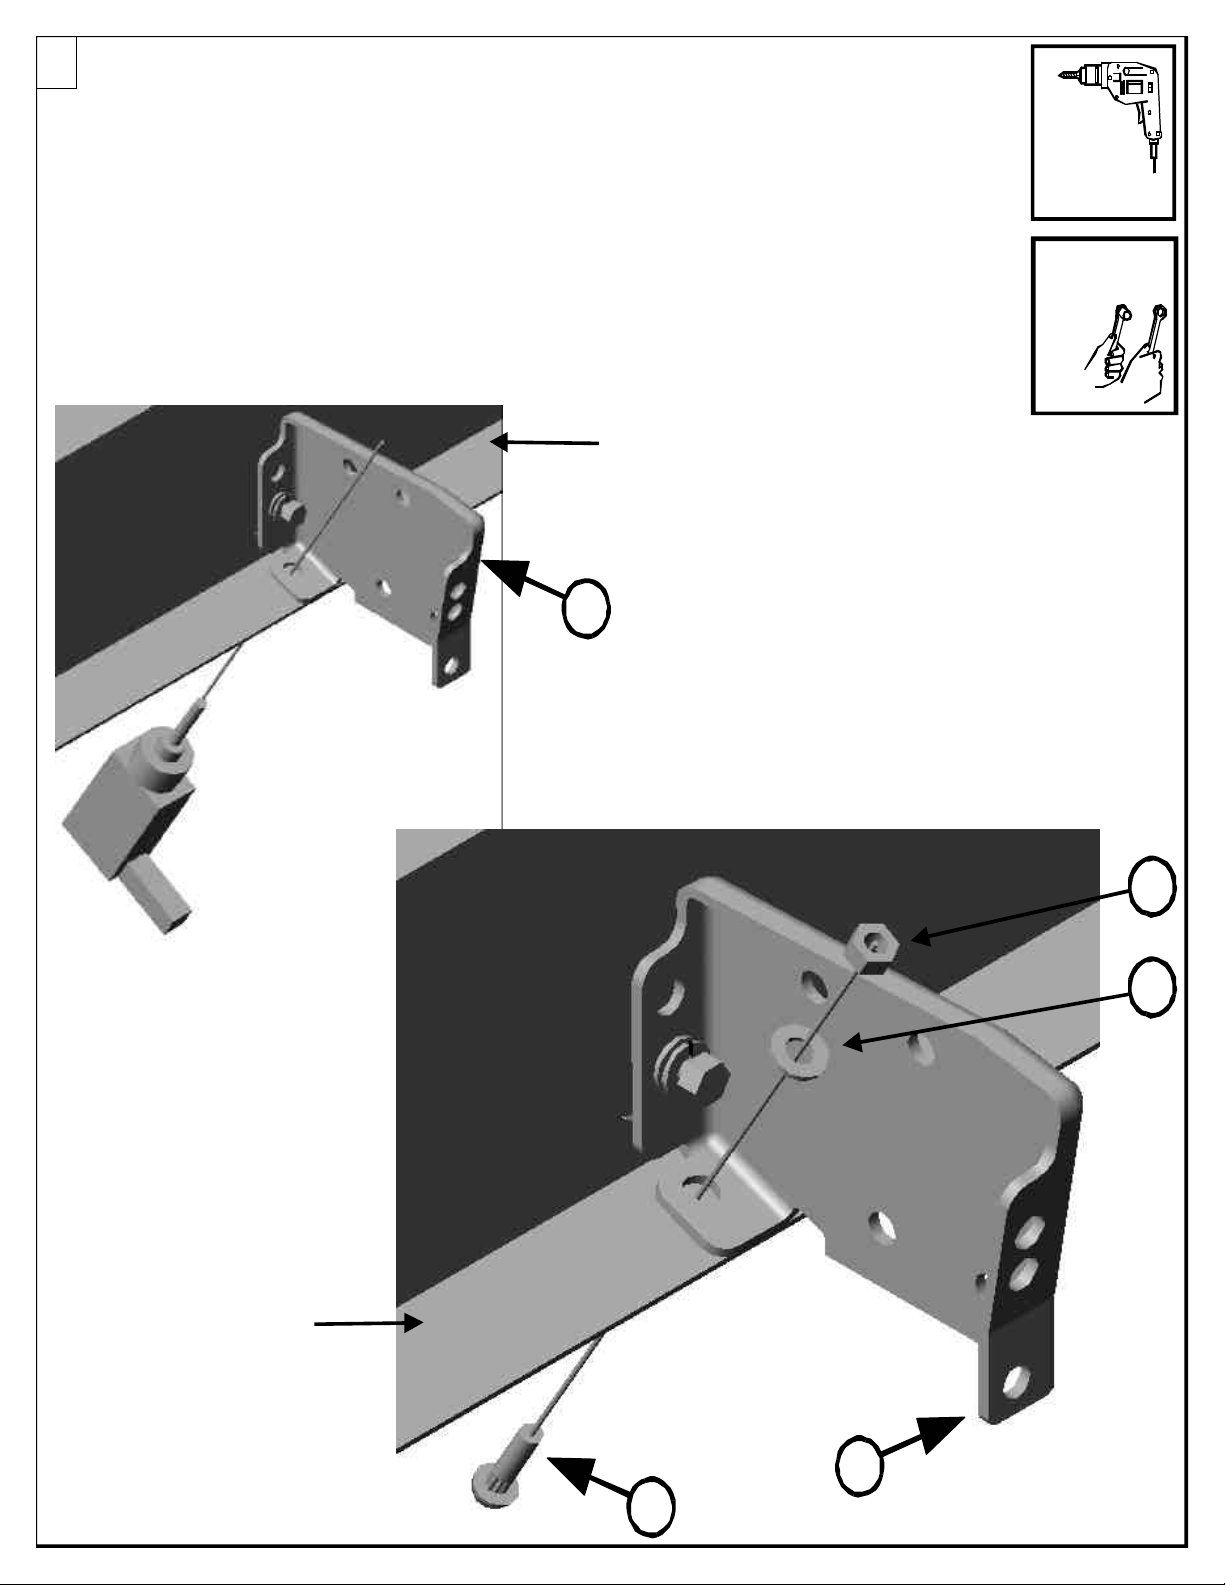
3
N
C
J
LM
Assembled
Plastic
Plug
Plastic
Plug
15”
381/8”
ApproximateHoleLocationsonVehicle
Frontof
Rocker
Panel
733/8”
Usingthedrawingsbelowasaguide,placethethreadedplateonthebraceassemblyintotheexistingholesinthe
vehiclepanel.Thebraceassemblyshouldbesnugagainstthebottomoftherockerpanelonthevehicle.Nowtighten
the3/8x11/4”hexheadboltonthebraceassemblyuntilsnugusinga9/16”wrench/orsocket.
Enutilisantlesschémasci-dessouscommeguide,placezleplatfiletésurlecroisillondanslestrousexistantsdansle
panneaudevéhicule.Lecroisillondevraitêtreconfortablecontrelebasdupanneaudeculbuteursurlevéhicule.Serrez
maintenantle3/8x11/4”;boulon principald'hexaducroisillonjusqu'àutiliserdouillettementun9/16”;clé/ouplot.
4
Brace
Assembly
Brace
Assembly
VehicleRocker
Panel
VehicleRocker
Panel
Brace
Assembly
Brace
Assembly
9/16“Wrench
orSocket
Brace
Assembly
3/8x11/4”Hex
HeadBolt
Brace
Assembly
Brace
Assembly
Usingthebottomholeintheflangeonrockerpanelbracket(C)asaguide,drilla1/4”holethroughthe
vehiclerockerpanel.Securethebottomflangeonrockerpanelbracket(C)tothevehiclerockerpanel
using1/4x1”ribneckcarriageheadbolt(H),1/4”flatwasher(F),and1/4”hexnut(G)asshownbelow.
Tightenintoplaceusinga7/16”wrench/orsocket.
Enutilisantletrouinférieurdanslabridesurlaparenthèsedepanneaudeculbuteur(c)commeguide,
forezun1/4”;trouparlepanneaudeculbuteurdevéhicule.Fixezlabrideinférieuresurlaparenthèsede
panneaudeculbuteur(c)aupanneaudeculbuteurdevéhiculeenutilisant1/4x1”;boulondetêtede
chariotderibneck(h),1/4”;rondelleplate(f),et1/4”;écroud'hexa(G)commemontréci-dessous.Serrez
dansl'endroitenutilisantun7/16”;arrachez/ouplot.
5
7/16“Wrench
orSocket
Drillwitha
1/4”drillbit
Drillwitha
1/4”drillbit
C
VehicleRocker
Panel
H
VehicleRocker
Panel
C
F
G

6
CorrectHoleLocations
CorrectHoleLocations
Vehicle
Rocker
Panel
I
C
J
D
KL
KK
J
Usingthedrawingbelowasaguide,placerunningboardbracket(D)uptorockerpanelbracket(C).Securethe
holeinrunningboardbracket(D)totheholeintherockerpanelbracket(C)using3/8x1"hexheadbolt(I),
5/16"flatwashers(J),3/8"lockwasher(L),and3/8"hexnut(K).
Enutilisantleschémaci-dessouscommeguide,placezlaparenthèsecourantedepanneau(d)jusqu'àlaparenthèsede
panneaudeculbuteur(c).Fixezletroud'arrière-basdanslaparenthèsecourantedepanneau(d)autroudansla
parenthèsedepanneaudeculbuteur(c)àl'aideduboulondetêted'hexade3/8xde1"(i),desrondellesplatesde5/16"
(j),delarondelledefreinagede3/8"(l),etdel'écroud'hexade3/8"(k).Note:Voirlesdessinsci-dessouspour
l'identificationcorrectedetrou.
rear-bottom
Note:Seedrawingsbelowforcorrectholeidentification.

7
Rotatethebraceassemblytotheuprightpositionandsecureitintoplaceusinga3/8x1"hexheadbolt(I),3/8"lock
washer(L),5/16"flatwashers(J),and3/8"hexnuts(K)asshownbelow.
Tournezlecroisillonjusquàlapositiondroiteetfixez-ledansl'endroitàl'aided'unboulondetêted'hexade3/8xde1"
(i),delarondelledefreinagede3/8"(l),desrondellesplatesde5/16"(j),etdesécrousd'hexade3/8"(k)commemontré
ci-dessous.
9/16and7/16“
Wrenchor
Socket
D
L
K
I
J
J
Rotate
C
8
Placebritetreadrunningboard(A)uptotherunningboardbrackets(D)asshownbelow.Slidethebritetreadrunning
boarduptotherockerpanelsothatitisflushwiththevehiclerockerpanel.
Placezlepanneaucourantdebritetread(a)jusqu'auxparenthèsesdepanneaudefonctionnement(d)commemontré
ci-dessous.Glissezlepanneaucourantdebritetreadjusqu'aupanneaudeculbuteurdesortequ'ilsoitaffleurantdu
panneaudeculbuteurdevéhicule.
SideViewofrockerpanelbracket
andbritetreadrunningboardassembly.
RockerPanel
Bracket
RunningBoard
Bracket
BritetreadRunning
Board
Vehicle
Rocker
Panel
RockerPanel
Bracket
RunningBoard
Bracket
BritetreadRunning
Board

9
Usingthebottomholesintherunningboardbracket(D)asaguide,drill1/4”holesthroughthebritetread
runningboard.Securetherunningboardbracket(D)tothebritetreadrunningboardusing1/4x1”
ribneckcarriageheadbolts(H),1/4”flatwashers(F),and1/4”hexnuts(G).Tightenintoplaceusinga
7/16”wrench/orsocket.
Enutilisantlestrousdebasdanslepanneaucourantencadrez(d)commeguide,forentdestrousde
1/4"parlepanneaucourantdebritetread.Fixezlaparenthèsecourantedepanneau(d)aupanneau
courantdebritetreadenutilisantlesboulonsdetêtedechariotde ribneckde1/4xde1"(h),les
rondellesde1/4"(f),etlesécrous1/4"d'hexaplats(g).Serrezdansl'endroitàl'aided'unecléde7/16"/ou
duplot.
7/16“Wrench
orSocket
Drillwitha
1/4”drillbit
G
F
H
Drillwitha
1/4”Drillbit
Britetread
Running
Board
Britetread
Running
Board
D
D
10
3/8“Wrench
orSocket
Drillwitha
3/16”drillbit
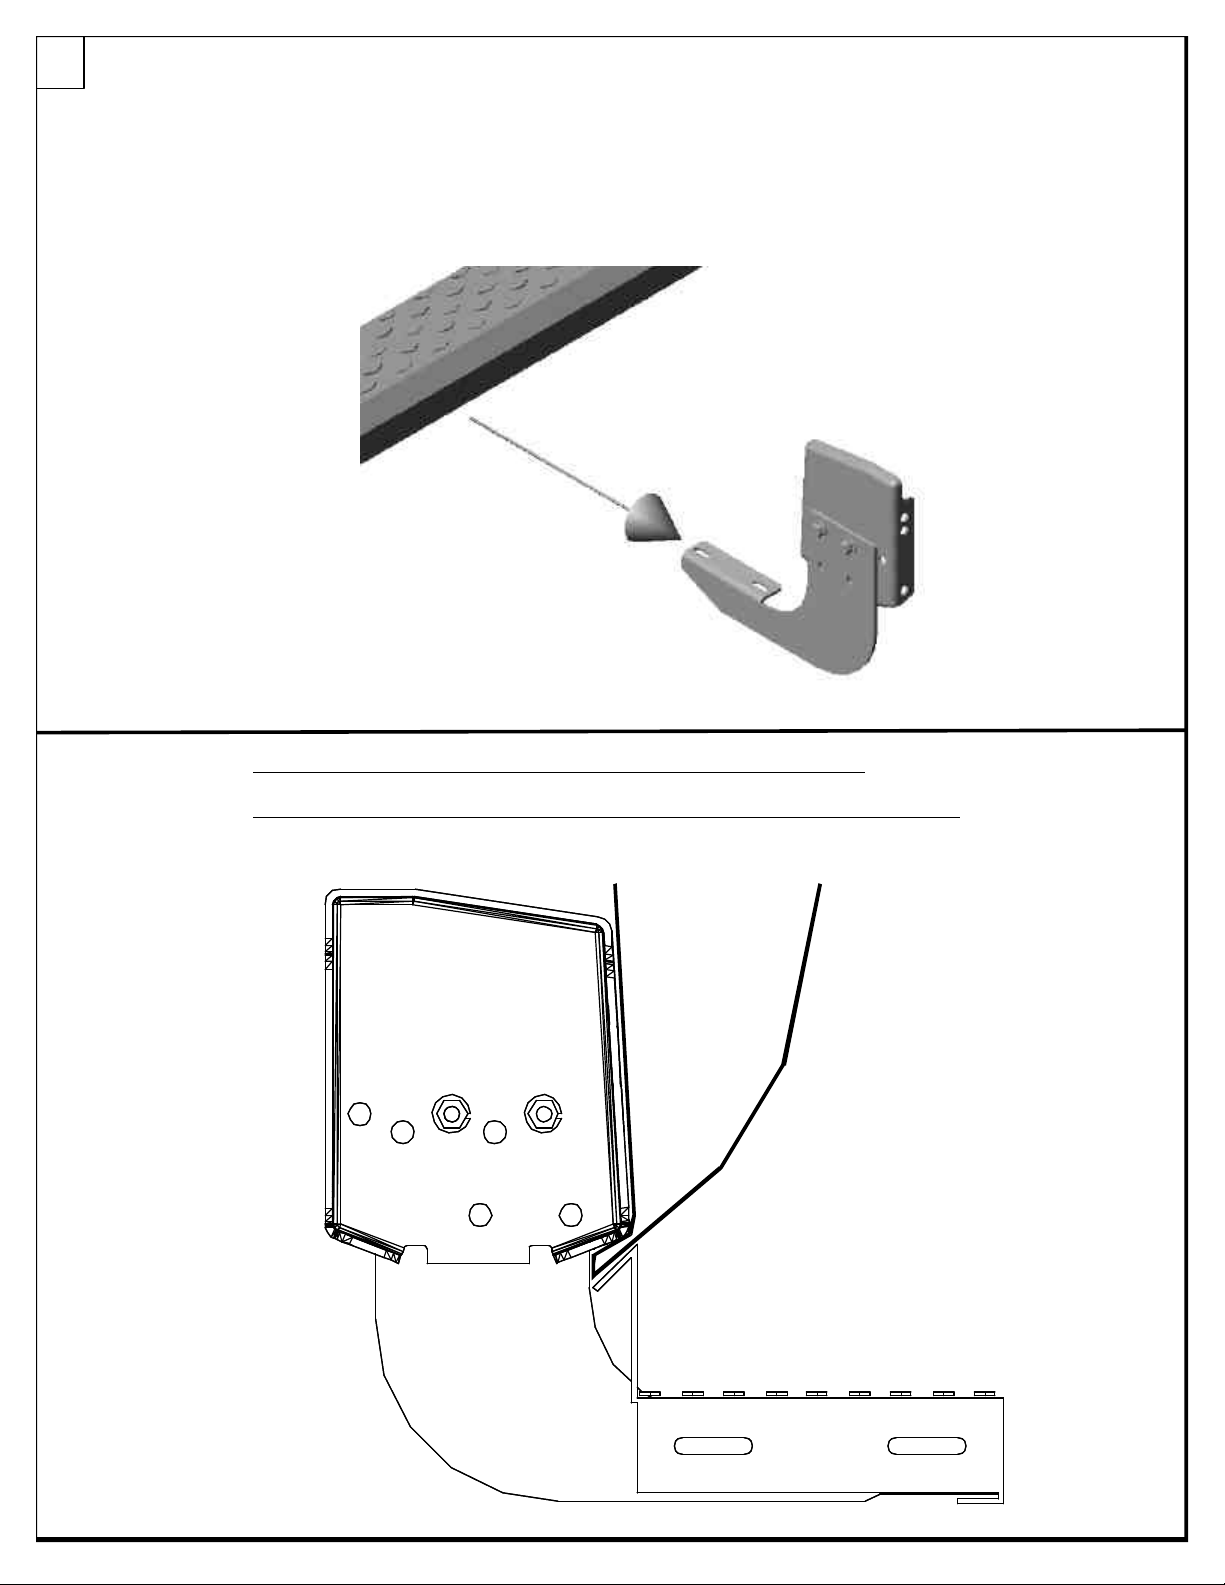
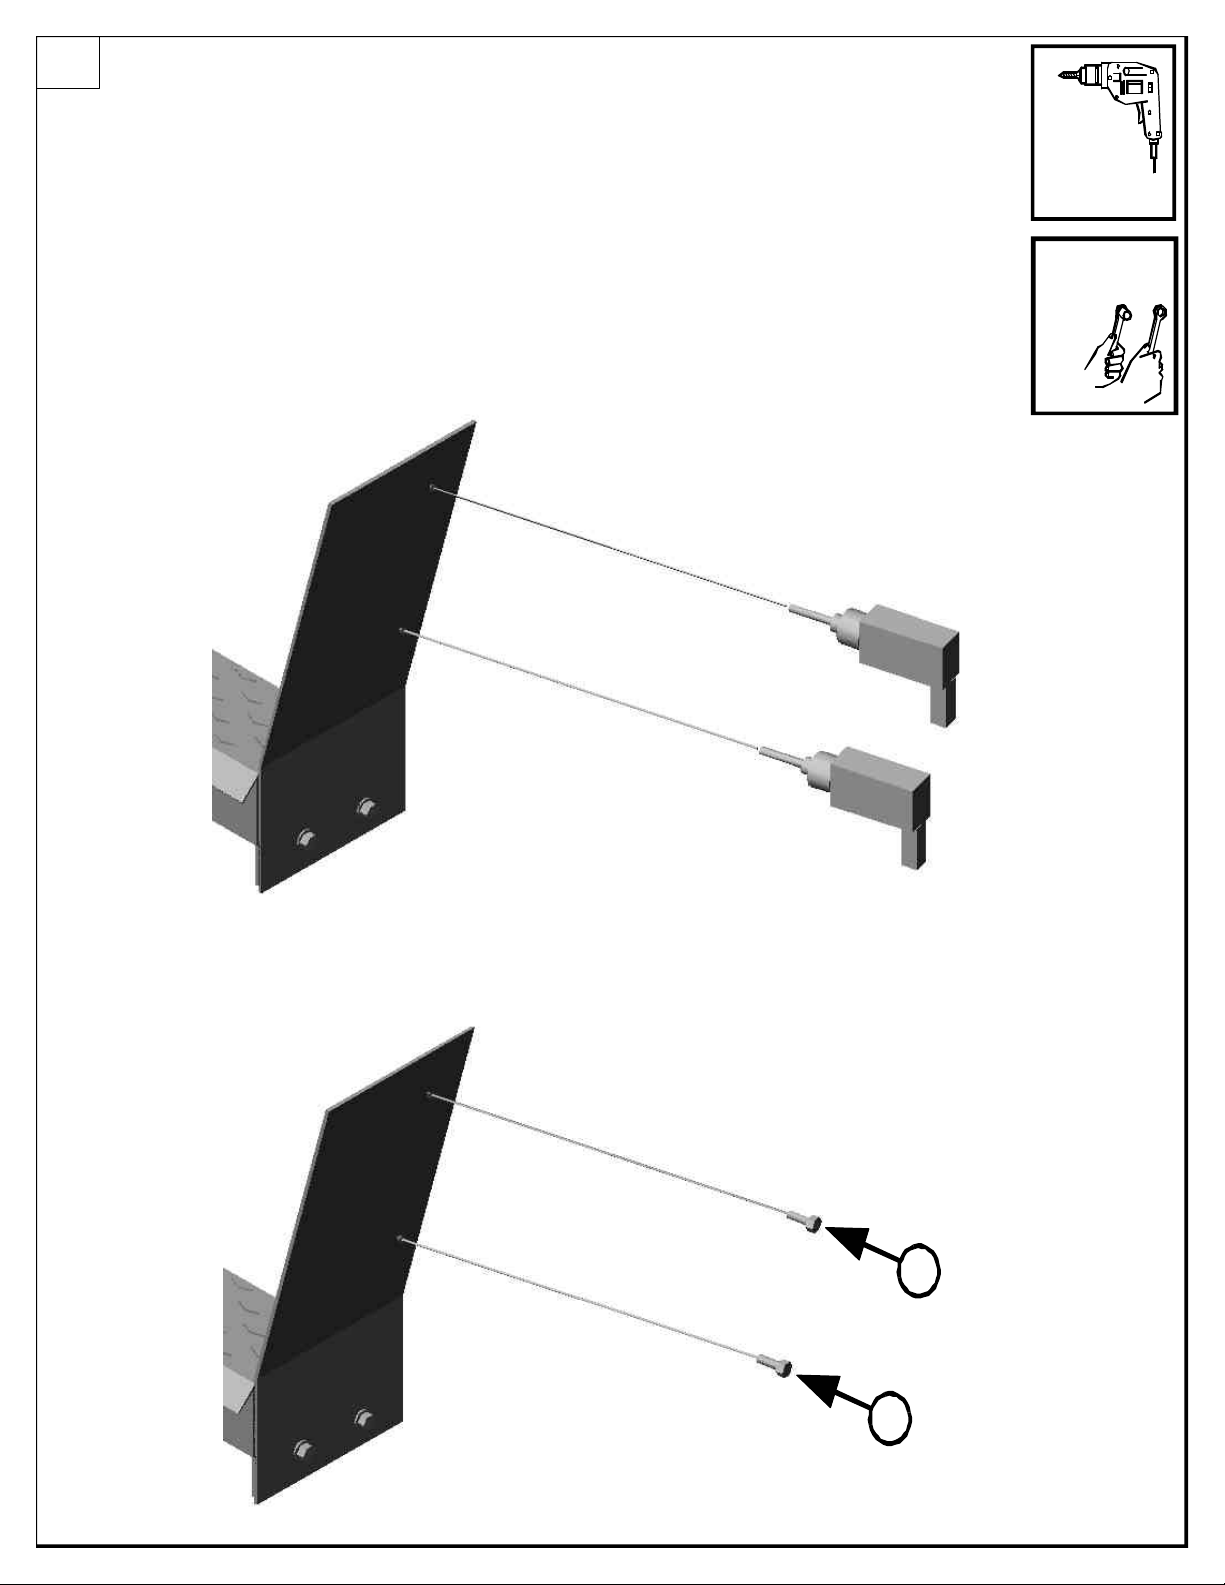
Drilltwoholesthroughthebritetreadmudflapandthesheetmetalofthevehicle
wheelwellopening.Securethebritetreadmudflaptothevehiclewheelwell
openingusing1/4x1”sheetmetalscrews(O).Tightenintoplaceusinga3/8”
wrench/orsocket.
Forezdeuxtrousparlemudflapdebritetreadetlemétaldefeuilledel'ouverture
desoutedetraindevéhicule.Fixezlemudflapdebritetreadàl'ouverturedesoute
detraindevéhiculeàl'aidedesvisenmétaldefeuillede1/4xde1"(o).Serrezdans
l'endroitàl'aided'unecléde3/8"/ouduplot.
O
O
Britetread
Mudflap
Britetread
Mudflap
Table of contents
Other DeeZee Automobile Accessories manuals


Popular Automobile Accessories manuals by other brands

Alpine
Alpine HCE-C105 - Rear View Camera System owner's manual

Feniex
Feniex FUSION-S 100 instruction manual

Xpresskit
Xpresskit DBALL2-HYUNDAI4 Installation and quick reference guide

REDBAT
REDBAT RX01 manual

Black Horse Off Road
Black Horse Off Road BA-JL01 installation instructions

Directed
Directed Xpresskit DBALL2 installation guide

Aldor Automotive
Aldor Automotive FOR1TRSU Assembly manual

IRONguard
IRONguard PowerTower Hitch Hauler Operators safety manual

NORTHMAN
NORTHMAN 2300 Series Installation & operating guide

Nav TV
Nav TV NTV-KIT899 installation manual

Metra Electronics
Metra Electronics 99-6525 installation instructions

APS
APS IB03DJJ7A manual


