manuals.online logo
Brands
  1. Home
  2. •
  3. Brands
  4. •
  5. APS
  6. •
  7. Automobile Accessories
  8. •
  9. APS IB03DJJ7A User manual

APS IB03DJJ7A User manual

IB(5”,4”)RUNNING BOARD
1999-2013 SILVERADO 1500/2500/3500 REGULAR CAB
Page 1of 4 10/21/15 (DP)
PARTS LIST:
Item
QTY
Description
Item
QTY
Description
#01
2
Running Board(use for left or right)
#09
4
10-1.50mm x 30mm Hex Bolts
#02
1
Driver/Left Front Mounting Bracket (DFM)
#10
6
10mm x 20mm OD x 2mm Flat Washers
#03
1
Driver/Left Front Support Bracket (DFS)
#11
4
10mm Lock Washers
#04
1
Passenger/Right Front Mounting Bracket(PFM)
#12
2
10mm Hex Nuts
#05
1
Passenger/Right Front Support Bracket(PFS)
#13
16
6-1.0mm x 20mm T-Bolts
#06
1
Driver/Left Rear Mounting Bracket(DRM)
#14
16
6mm x 22mm OD x 2mm Flat Washers
#07
1
Passenger/Right Rear Mounting Bracket(PRM)
#15
16
6mm Lock Nuts
#08
2
10mm Nut Plates
PROCEDURE:
REMOVE CONTENTS FROM BOX. VERIFY ALL PARTS ARE PRESENT. READ FACTORY BODY
BOLT REMOVAL INSTRUCTIONS AND INSTALLATION INSTRUCTIONS CAREFULLY BEFORE
STARTING INSTALLATION.
1. Start the installation under the passenger side of the vehicle. Remove the front body mount bolt,
(Figure 1). Do not remove rubber bushings.
2. Attach the passenger side front mounting Bracket to the body mount reusing the factory hex bolt,
(Figures 2 & 3). Do not tighten hardware at this time.
(2) Running Board
(example only)
Front
(2) 10mm Nut Plates
Passenger/right Front
Mounting Bracket
Driver/left Front
Mounting Bracket
Passenger/right
Front Support Bracket
Driver/left Front
Support Bracket
Passenger/right
Rear Mounting
Bracket
Driver/left Rear
Mounting
Bracket
IB(5”,4”)RUNNING BOARD
1999-2013 SILVERADO 1500/2500/3500 REGULAR CAB
Page 2of 4 10/21/15 (DP)
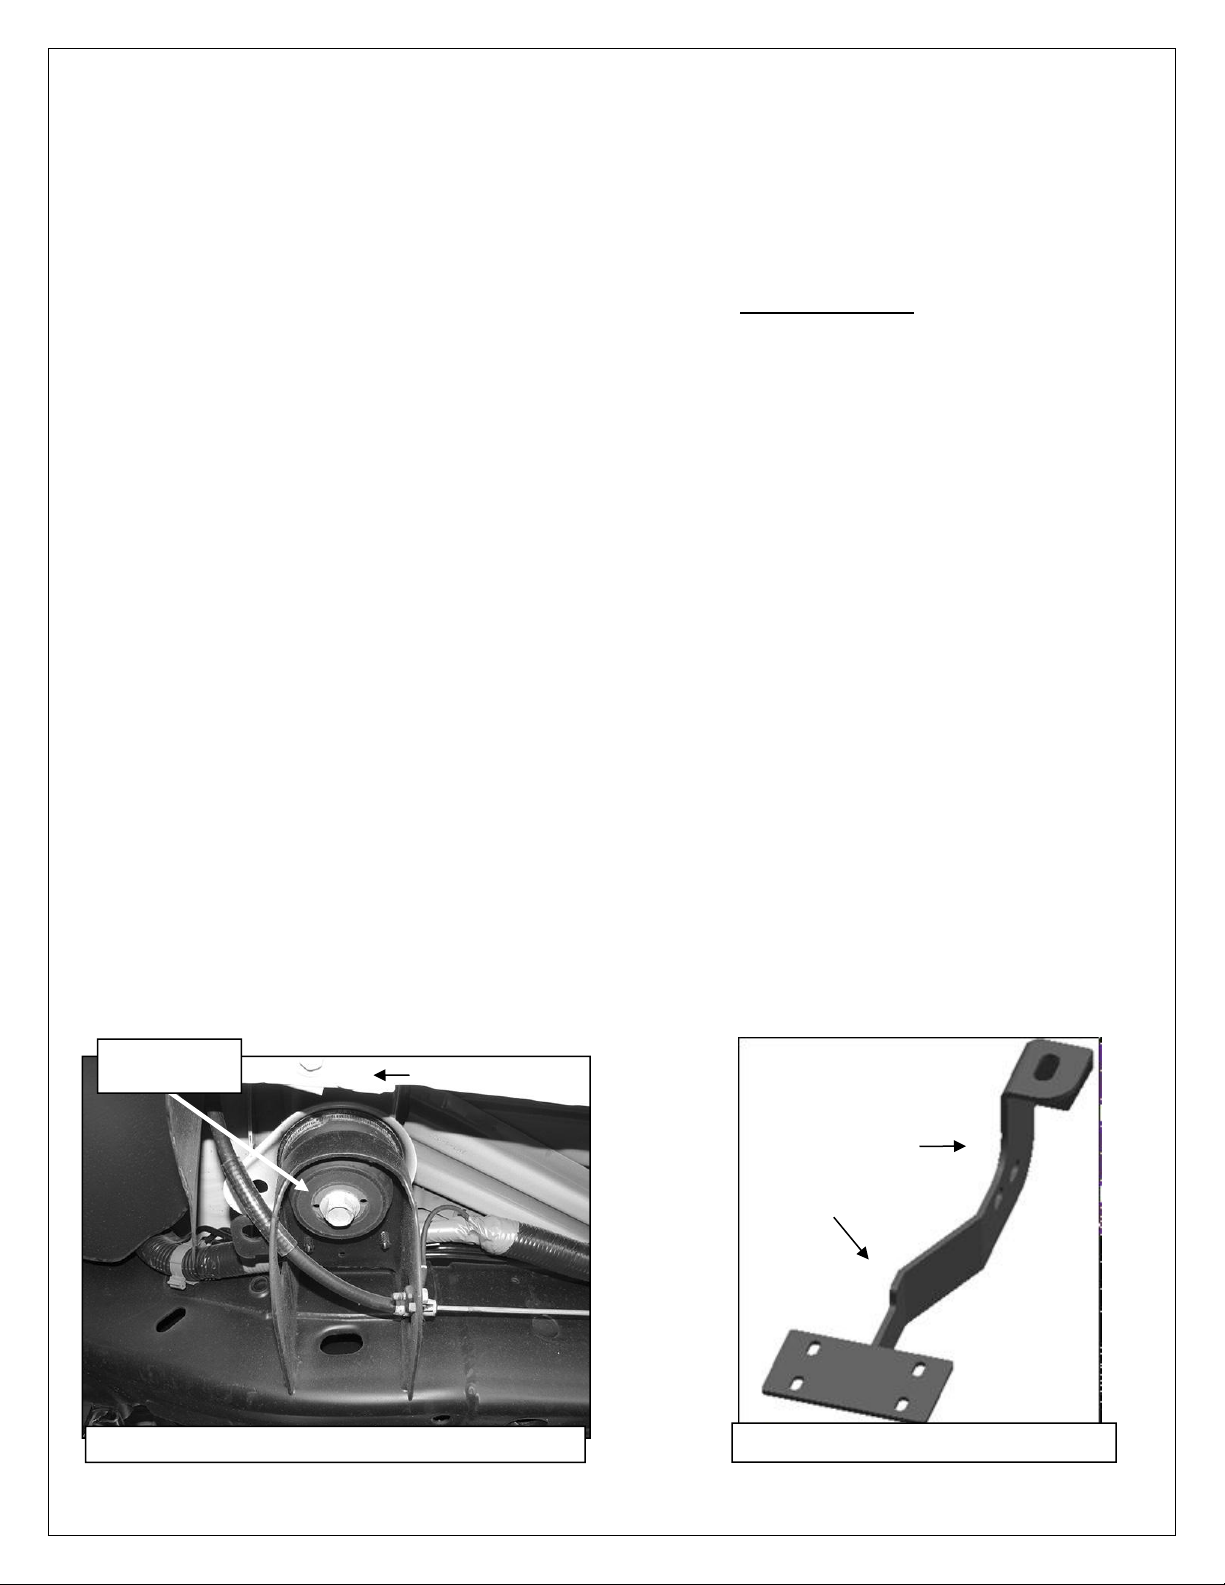
3. Locate the two factory holes in the bottom of the frame towards the front of the vehicle, (Figure 4).
Insert (1) 10mm Nut Plate, (Figure 5), into the oval hole and line up the threaded nut with the forward
round hole, (Figure 4).NOTE: Nut Plate and Support Brackets are not required on 2011-14 25-3500
models.
4. Attach the flat end of the passenger side front Support Bracket to the Nut Plate with (1) 10mm x 30mm
Hex Bolt, (1) 10mm Lock Washer and (1) 10mm Flat Washer, (Figures 6 & 7). Do not tighten hardware
at this time.
Up to 2010 25-3500 Models-Support Bracket not required on 2011-14 25-3500 Models:
Note that the Front Support Bracket will not reach up to the Mounting Bracket, (Figure 7). Tighten the
Support Bracket to the Nut Plate in the frame. Carefully push up on the Support Bracket until it reaches
the inside hole in the Mounting Bracket. Bolt the Support Bracket to the hole in the Mounting Bracket
with (1) 10mm x 30mm Hex Bolt, (2) 10mm Flat Washers, (1) 10mm Lock Washer and (1) 10mm Hex
Nut, (Figures 7 & 8). Do not tighten at this time.
5. Continue on to the rear body mount. Repeat Steps 1 & 2 to attach the passenger side rear Mounting
Bracket to the body mount, (Figure 9). Leave hardware loose at this time.
6. Select the Running Board. Slip (8) 6mm T-Bolts into each bottom channel (Figure 10).Carefully
position the Running Board onto the Mounting Brackets. Attach the Running Board to the Mounting
Brackets with (4) 6mm T-bolts,(4)6mm flat washers and (4)6mm lock nuts, (Figure 11). Do not tighten
hardware at this time.
7. Level and adjust the Running Board and fully tighten all hardware.
8. Repeat Steps 1—7 for driver side Running Board installation.
9. Do periodic inspections to the installation to make sure that all hardware is secure and tight.
To protect your investment, wax this product after installing. Regular waxing is recommended to add a protective layer
over the finish. Do not use any type of polish or wax that may contain abrasives that could damage the finish.
For Polished Finishes: Aluminum polish may be used to polish small scratches and scuffs on the finish. Mild soap may
be used also to clean the Running Board.
For Black Finishes: Mild soap may be used to clean the Running Board.
Passenger Side Installation Pictured
(Fig 1) Driver side front mounting bracket pictured
Front
Factory Body
Mount Bolt
Front
(Fig 2) Passenger side front Brackets
Front
Bracket
IB(5”,4”)RUNNING BOARD
1999-2013 SILVERADO 1500/2500/3500 REGULAR CAB
Page 3of 4 10/21/15 (DP)
Insert 10mm
Nut Plate here...
10mm x 30mm Hex Bolt
(2) 10mm Flat Washers
10mm Lock Washer
10mm Hex Nut
(Fig 5) 10mm Nut Plate
(Fig 6) Passenger side 1500 Model Front
Support Bracket Installation Pictured
IMPORTANT NOTE:
Bend Support Bracket up by hand to meet the
inner hole in the Front Mounting Bracket
NOTE: Support Bracket not required on 2011-14
25-3500 Models
Front
(Fig 7) Driver side, 25-3500 Model
Front Support Bracket Installation
...line up Nut
Plate here
NOTE: Support Brackets not
required on 2011-14 25-3500 Models
NOTE: Support Brackets not
required on 2011-14 25-3500 Models
(Fig 4) Bottom of frame on passenger side
Front
Front
10mm x 30mm Hex Bolt
10mm Lock Washer
10mm Flat Washer
(Fig 3) Passenger/right front Bracket installed
Factory Body
Mount Bolt
10mm x 30mm Hex Bolt
10mm Lock Washer
10mm Flat Washer
(Fig 6) Passenger side 1500 Model Front
Support Bracket Installation Pictured
IB(5”,4”)RUNNING BOARD
1999-2013 SILVERADO 1500/2500/3500 REGULAR CAB
Page 4of 4 10/21/15 (DP)
10mm x 30mm Hex Bolt
(2) 10mm Flat Washers
10mm Lock Washer
10mm Hex Nut
Front
(Fig 8) Passenger side Front Bracket Installation
(Fig 9) Passenger side Rear Bracket Installation
Rear
(Fig 11) Passenger side Bracket Installation
(Fig 10) Slip 6mm T-bolts
into the bottom channel
(4)6mmT-bolts
(4)6mm Flat Washers
(4)6mmLock nuts

Other APS Automobile Accessories manuals

APS iBoard IB-R934 User manual

APS

APS iBoard IB-R934 User manual

APS iBoard IB-019&020A-B User manual

APS

APS iBoard IB-019&020A-B User manual

APS iBoard IB-R905 User manual

APS

APS iBoard IB-R905 User manual

APS iArmor User manual

APS

APS iArmor User manual

APS iBoard IB-R062 User manual

APS

APS iBoard IB-R062 User manual

APS iBoard IB-R296 User manual

APS

APS iBoard IB-R296 User manual

APS iBoard IB-R001 User manual

APS

APS iBoard IB-R001 User manual

APS IA06SIB6B User manual

APS

APS IA06SIB6B User manual

APS ELM205-V10 User manual

APS

APS ELM205-V10 User manual

APS iArmor User manual

APS

APS iArmor User manual

APS GR18HEC11A User manual

APS

APS GR18HEC11A User manual

APS IB14DBB5B User manual

APS

APS IB14DBB5B User manual

APS IB04EDJ2B User manual

APS

APS IB04EDJ2B User manual

APS IA04SBE8B User manual

APS

APS IA04SBE8B User manual

APS IA06SAG5B User manual

APS

APS IA06SAG5B User manual

APS GR18GEC00U User manual

APS

APS GR18GEC00U User manual

APS iBoard IB-014A-B User manual

APS

APS iBoard IB-014A-B User manual

APS iBoard IB-R922 User manual

APS

APS iBoard IB-R922 User manual

APS IA06SJD4B User manual

APS

APS IA06SJD4B User manual

APS iArmor IA-S159 User manual

APS

APS iArmor IA-S159 User manual

APS iArmor IA-S002H User manual

APS

APS iArmor IA-S002H User manual

APS iArmor User manual

APS

APS iArmor User manual

APS iBoard IB-R009 User manual

APS

APS iBoard IB-R009 User manual

APS IA10SAA1B User manual

APS

APS IA10SAA1B User manual

Popular Automobile Accessories manuals by other brands

Pyle PLPSC8 user manual

Pyle

Pyle PLPSC8 user manual

Rola TX-102 Instruction guide

Rola

Rola TX-102 Instruction guide

Midtronics DSS-5000 quick start guide

Midtronics

Midtronics DSS-5000 quick start guide

Atera SIGNO User information

Atera

Atera SIGNO User information

Yakima Diamondback quick start guide

Yakima

Yakima Diamondback quick start guide

Sealey BS3.V2 instructions

Sealey

Sealey BS3.V2 instructions

Becker BKRCD-HF installation guide

Becker

Becker BKRCD-HF installation guide

Rola PMX029 Fitting instructions

Rola

Rola PMX029 Fitting instructions

Fabtech FTS8002 installation instructions

Fabtech

Fabtech FTS8002 installation instructions

Bazzaz ZFi installation instructions

Bazzaz

Bazzaz ZFi installation instructions

M7 R56 installation guide

M7

M7 R56 installation guide

Rostra RearSight 250-8000 installation instructions

Rostra

Rostra RearSight 250-8000 installation instructions

iDataLink SUB9 install guide

iDataLink

iDataLink SUB9 install guide

Whispbar K839W Fitting instructions

Whispbar

Whispbar K839W Fitting instructions

Cequent Rola Pick-Up-Rack 59742 instructions

Cequent

Cequent Rola Pick-Up-Rack 59742 instructions

Phoenix Contact CHARX T2HBI 1AC32DC125 Series Installation notes for electricians

Phoenix Contact

Phoenix Contact CHARX T2HBI 1AC32DC125 Series Installation notes for electricians

Fiamma CARRY-BIKE AIRSTREAM Installation and usage instructions

Fiamma

Fiamma CARRY-BIKE AIRSTREAM Installation and usage instructions

aFe Power 440-401006-N instructions

aFe Power

aFe Power 440-401006-N instructions

manuals.online logo
manuals.online logoBrands
  • About & Mission
  • Contact us
  • Privacy Policy
  • Terms and Conditions

Copyright 2025 Manuals.Online. All Rights Reserved.