DeFelsko POSITECTOR RTR User manual

Quick Guide v. 1.3
Replica Tape Reader


With the Gage powered down...
1. Clean the probe with the included cleaning card. (pg. 5)
2. Power-up Gage by pressing the center navigation button.
3. Zero the probe. (pg. 6)
4. Verify Gage accuracy (pg. 5)
5. Measure the burnished replica tape (pg. 4)
Introduction
The PosiTector Replica Tape Reader (RTR) is a hand-held
electronic instrument that measures burnished Testex Press-O-
FilmTM replica tape to produce peak-to-valley surface profile height
measurements. It consists of a PosiTector body (Standard or
Advanced) and probe.
This Quick Guide summarizes the basic functions of the Gage.
Download the full instruction manual at: defelsko.com/manuals
Quick Start
The PosiTector RTR powers-up when the center navigation
button is pressed. To preserve battery life, the Gage powers
down after approximately 5 minutes of no activity. All settings are
retained.
To ensure best accuracy, the user will be prompted to zero
the probe every time the Gage is powered-up. It is therefore a
good idea to clean the probe regularly with the included cleaning
card. Cleaning is best performed when the Gage is powered down.
NOTE:
To navigate, use the Up and Down buttons to scroll vertically and
to SELECT.
Menu Operation
Gage functions are menu controlled. To access the Menu,
power-up the gage, then press the center navigation button.
Press the (+)button to switch
pages in a multipage menu.
Press the (
-
)button to return
to the previous menu or page.
Select Exit to exit from any menu.
Previous Page
(Exit) Up Next Page
Access the Menu
(Center/Select)
Down
1
2
Press-O-Film Replica Tape
Press-O-Film provides a simple way to obtain an impression of
a surface for analysis. It consists of a layer of crushable plastic
micro foam affixed to a 50.8 µm (2 mil) incompressible polyester
film. When compressed against a roughened surface, the foam
collapses and acquires an accurate impression, or reverse
replica, of the surface. It is available in
Coarse (C) and X-Coarse (XC) grades
to accommodate measurements in
different profile ranges.
Placing the compressed tape (replica) into the PosiTector RTR
gives a measure of the average maximum peak-to-valley height
of the surface roughness profile. The Gage automatically subtracts
the thickness of the polyester film from all measurements.
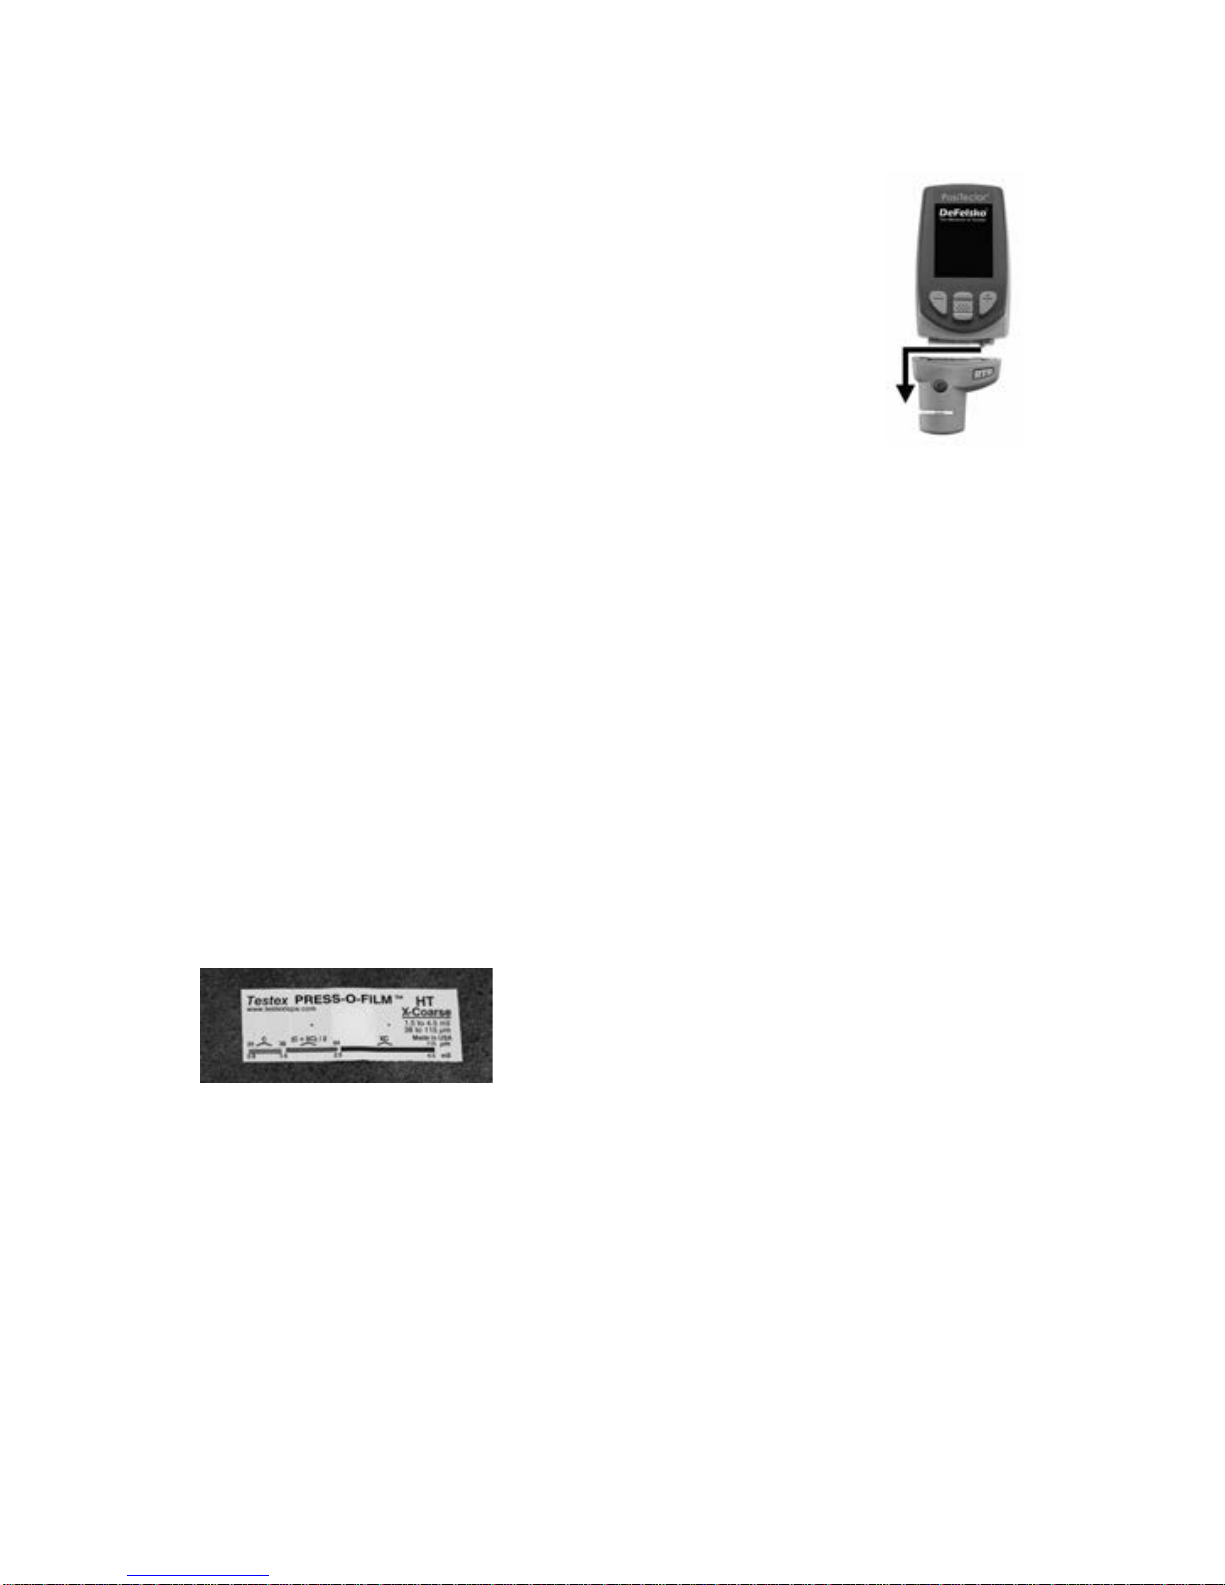
Probes
When powered-up, the PosiTector automatically
determines which probe is attached and does a self-
check.
To disconnect a probe from a body, slide the plastic
probe connector horizontally (in the direction of the
arrow) away from the body. Reverse these steps to
attach a different probe. It is not necessary to power-
down the Gage when switching probes.
The PosiTector gage body accepts a wide variety of
probe types including magnetic, eddy-current and
ultrasonic coating thickness, surface profile,
environmental, hardness, salt contamination and
ultrasonic wall thickness probes. See
www.defelsko.com/probes

3
How to Measure
Prepare the test surface
Burnish the replica tape (create a replica)
1. Prepare the test surface
2. Burnish the replica tape
3. Prepare the Gage
4. Measure
Locate a representative site for measurement. Clean
the surface to be tested. DeFelsko recommends the
use of the included putty to remove dust, debris, or
residual blast media from the surface.Firmly press the
putty onto the surface using your fingers, and remove.
Select the appropriate grade of replica
tape based on the target profile. See
tape instructions for assistance.
Pull a single adhesive-backed replica
tape free of its release paper. A “bull’s
eye” circle of paper should remain on
the release paper (it is not used for
measurement).
Apply replica tape to blasted surface. Press the adhesive-
backed ends of the tape to hold it firmly in place during the
burnishing process.
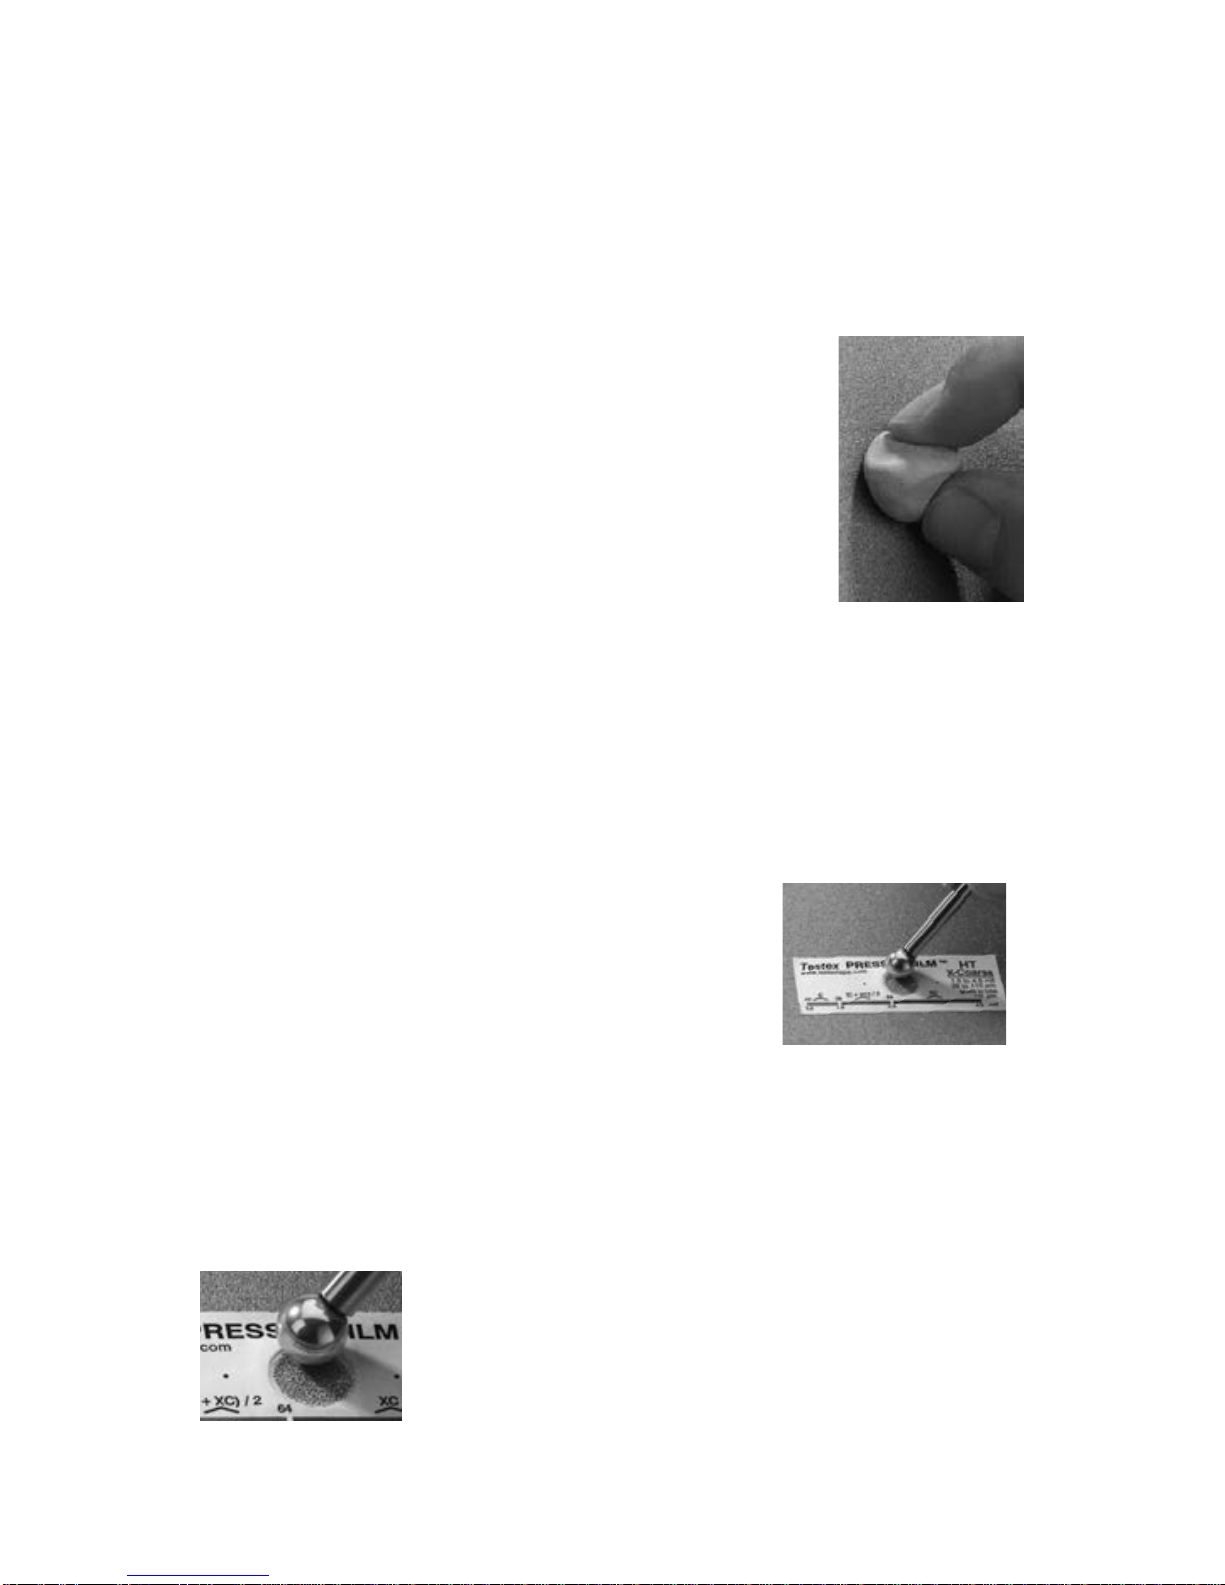
Firmly compress the foam using the rounded
end of the included stainless steel burnishing
tool. Apply sufficient pressure in a circular and
x-y rubbing motion to produce a
replica with a
uniform pebble grain appearance. Excessively
hard rubbing should be avoided because the polyester film
could become
distorted. It normally takes 30 to 60 seconds to
fully compress all parts of the foam on most surfaces. After
burnishing is complete, remove the replica tape from the surface.
Prepare the Gage
Measure
Power-up the Gage by pressing the center navigation button.
An image appears indicating that the probe requires zeroing.
Simultaneously press and hold both probe buttons
firmly until the Gage beeps and the arrows point
outward. Do not place anything in the
measurement opening during this procedure.
Measure the included check shim to verify accuracy (pg. 5).
Ensure the correct grade of replica tape, C or XC, is displayed in
the upper left corner of the gage display (pg. 6).
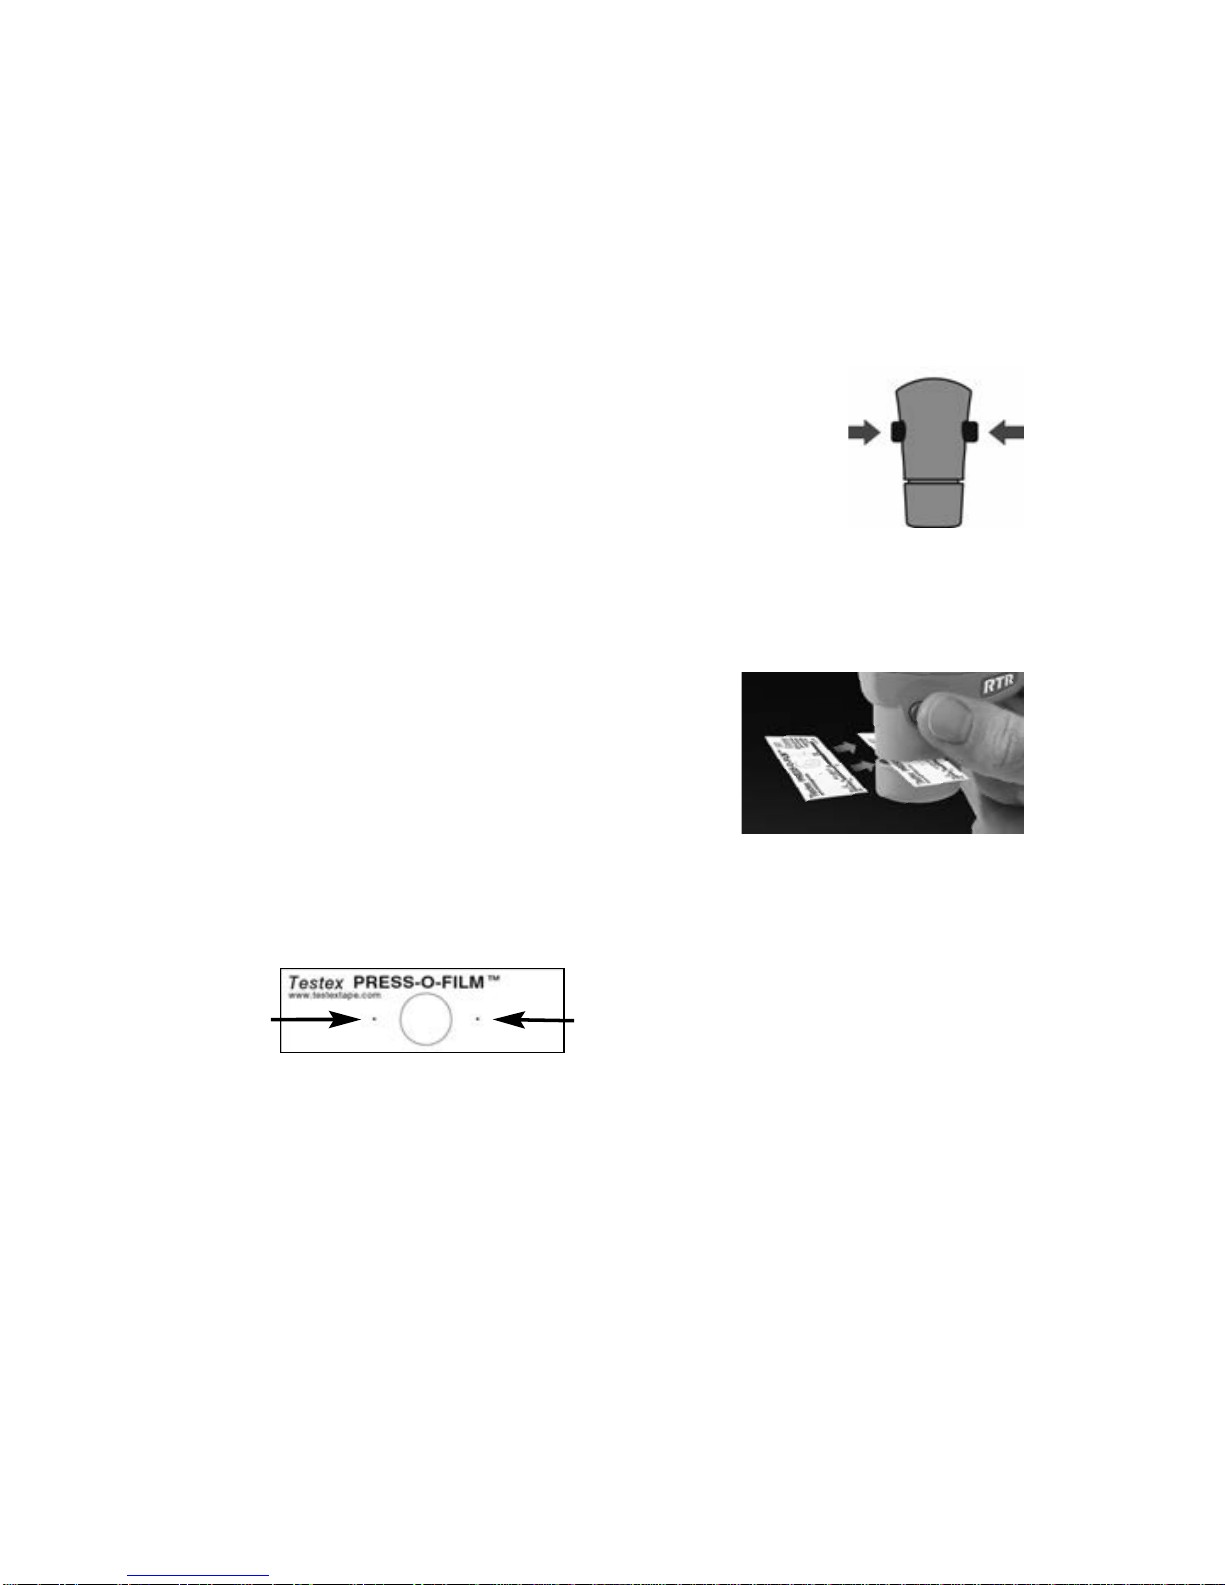
Insert the burnished replica tape into the
probe opening as far as it will go. Ensure
the tape is properly positioned so that the
burnished region is centered within the
opening with the adhesive (sticky) side down.
To position the tape, align the two dots (printed on replica tape)
with arrows on both sides of the measurement opening.
Align dots with arrows on probe
4
If you are using older tape that does not have the printed dots,
simply align by centering the tape within the measurement opening.
During measurement, a constant anvil pressure is applied to the
replica tape regardless of how hard the two buttons are pressed.
The Gage automatically subtracts the 50.8 µm (2 mil) of
incompressible polyester film. No further adjustments are required.
1. Ensure tape is properly positioned.
2. Firmly press both probe buttons simultaneously and hold until
the Gage beeps and the surface profile height ( )
measurement is displayed. The tape can now be safely
removed.
With the Gage powered-down, clean the measurement surfaces
using the included cleaning card. Swipe the card through the
probe opening a few times while firmly pressing both probe
buttons to remove dust particles and residual tape adhesive.

5
3.
The surface profile height ( ) measurement is immediately
displayed. The tape can now be removed.
The probe contains two measuring surfaces that can become
contaminated with dust particles and residual tape adhesive.
It is therefore a good idea to clean the probe regularly with the
included cleaning card. Cleaning is essential prior to performing
a probe Zero (pg. 6) or a verification of accuracy (pg. 5).
Cleaning is best performed when the Gage is powered off.
With the Gage powered-down, swipe the card through the probe
opening a few times while firmly pressing both probe buttons.
The card can also be used to clean the surfaces of analog spring
micrometers. Replacement cards are available from your dealer.
Cleaning Card
erification of Accuracy
Calibration
Gage calibration is typically performed by the manufacturer or
accredited lab. All PosiTector RTR probes include a Certificate
of Calibration.
Calibration & erification of Accuracy
Ensure that the probe has been cleaned with the included cleaning
card (pg.5) and that the probe has been zeroed (pg. 6).
erify accuracy of the peak height measuring system
Place the PosiTector RTR Check Shim into the probe opening.
The average of several measurements should be within the com-
bined tolerance of both the Gage and the shim. If not, the Gage
may need to be returned to your dealer for service.
The check shim is specifically intended for all PosiTector RTR
probes. The Gage is designed to measure burnished replica tape
within a limited measuring range and automatically subtracts 50.8
µm (2 mil) from height measurements to account for the incom-
pressible polyester film. Therefore plastic shims intended for other
instruments such as coating thickness gages will not be meas-
ured properly.
6
Tape Grade
Cal Settings Menu
The probe should be zeroed regularly to ensure best accuracy.
The user will be prompted to zero the probe every time the Gage
is powered-up. The
Zero
menu item allows the procedure to be
performed at more regular intervals. It is particularly useful during
long measurement sessions.
Important:
Clean the probe with the included cleaning card
(pg. 5) before performing a probe zero.
1. Select
Zero
from the
Cal Settings
menu
2. Simultaneously press and hold both probe buttons firmly until
the Gage beeps and the arrows point outward. Do not place
anything in the measurement opening during this procedure.
Zero
Selects a replica tape grade. Required when
Linearize
mode ( L)
is ON.
C - Coarse
XC - Extra Coarse (default)
Simultaneously press and hold both probe buttons
firmly until the Gage beeps and displays “0”. This can be
performed from the main measurement screen without having to
access the menu.
Coarse Minus and X-Coarse Plus grades are not
supported in Linearize mode since the only function of these two
grades is to improve upon the accuracy of C tape at its low end
and XC tape at its high end, something the
PosiTector
RTR will
automatically do when measuring L. When Linearize mode is
OFF, the
PosiTector
RTR will measure all grades of replica tape
just like a conventional spring micrometer.
NOTE:
S ORTCUT:

Linearize
This is the default measurement mode. Linearize mode is ON when
this box is ticked and the " L" appears on the display.
An undesirable characteristic of replica tape is that measurements
made with analog spring micrometers are most accurate near the
middle of each grade's range and least accurate at the outer ends
of each grade's range. That is why two other grades, Coarse Minus
and X-Coarse Plus, are used to check and, if necessary, adjust
measurements at the lower and upper ends of the primary range of
20-115µm (0.8-4.5 mils).
Inside the primary range, the upper end of Coarse grade’s range
and the lower end of X-Coarse grade’s range share a 38 - 64 µm
(1.5 - 2.5 mil) "overlap" region. Current Testex instructions describe
a relatively complicated and time consuming procedure (the
average of one reading using Coarse grade and one reading using
X-Coarse grade) that is used to knit the Coarse and X-Coarse sub-
ranges together to achieve reasonably accurate readings over the
primary range. This method is a compromise between accuracy and
ease of use.
When the Linearize box is NOT ticked, the PosiTector RTR
displays a height value of comparable to the value an analog
spring micrometer would display after the 50.8 µm (2 mil) of
incompressible polyester film has been subtracted. In other words,
it is the average of the maximum peak-to-valley distances obtained
by measuring the thickness of the replica tape without any
correction.
When the Linearize box IS ticked, the PosiTector RTR displays a
more accurate peak-to-valley height measurement Lthat has
been adjusted for the non-linearity of replica tape. There is no need
to average 2 or more replicas from different grades of tape AND
there is no need to subtract the 50.8 µm (2 mil) of incompressible
polyester film. Ensure the proper tape grade, C or XC, has been
selected (pg. 6) and appears in the upper left corner of the display.
During measurement, if the linearized measurement falls outside
of the selected tape grade's range, the Gage will suggest a more
suitable tape grade to perform the measurement.
7

Selects the type of batteries used in the Gage from a choice of
“Alkaline”, “Lithium”or“NiM ” (Nickel-metal hydride rechargeable).
If NiM is selected, the Gage will trickle charge the batteries while
connected via USB to a PC or optional AC charger. The battery
state indicator icon is calibrated for the selected battery type. No
damage will occur if the wrong battery type is selected. DeFelsko
recommends the use of eneloop (NiM ) rechargeable batteries.
Battery Type
A statistical summary will appear on the
display. Remove the last measurement by pressing the (–) button.
Press (+) to clear statistics.
Statistics
σStandard Deviation
Minimum Value
Average
Maximum Value
x
8
Reset
Reset (menu reset) restores factory settings and returns the Gage
to a known condition. The following occurs:
- All batches and stored datasets, batch names and screen
captures are erased.
- Menu settings are returned to the following:
Memory = OFF
Statistics = OFF
Memory Display = None
Bluetooth = OFF
WiFi = OFF
Date, Time and WiFi are not affected by either Reset.
Units = microns
Flip Display = Normal
Sound = ON
Language = English
Battery Type = Alkaline
Backlight = Normal
USB Drive = ON
Auto Sync = OFF
Setup Menu
Tape Grade = XC
Linearize = ON
NOTE:
Perform a more thorough Hard Reset as follows:
1 Power down the Gage and wait 5 seconds.
2 Simultaneously press and hold the (+) and center
buttons until the Reset symbol appears.
This returns the Gage to a known, “out-of-the-box” condition.
It performs the same function as a menu Reset with the addition of:
- Bluetooth Pairing info is cleared.
- Alarm settings are set to defaults.
- Menu settings are returned to the following:

9
Advanced models store 100,000 readings in up to 1,000 batches.
“New Batch” closes any currently opened batch and creates a
new batch name using the lowest available number. The icon
appears. New batches are date stamped when they are created.
Accessing Stored Measurement Data
DeFelsko offers the following free solutions for viewing, analyzing
and reporting data:
PosiSoft USB Drive - Connect the Gage to a PC/Mac using the
supplied USB cable. View and print readings and graphs using
universal PC/Mac web browsers or file explorers. No software or
internet connection required. USB Drive must be selected in the
Gage’s “Connect > USB” menu (pg. 10).
PosiSoft Desktop - Powerful desktop software (PC/Mac) for
downloading, viewing, printing and storing measurement data.
Includes a customizable, templated PDF Report Generator. No
internet connection required.
PosiSoft.net - Web-based application offering secure, centralized
storage of measurement data. Access your data from any web-
connected device.
PosiTector App - (Advanced model only, /n 784000+) App for
compatible iOS and Android smart devices. Permits users to create,
save and share professional PDF reports. Add images and notes
using the smart device’s camera and keyboard.
Create a new batch
(Advanced only)
The PosiTector RTR has internal memory storage for recording
measurement data. Stored measurements can be reviewed
on-screen or accessed via computers, tablets and smart phones.
Measurements are date and time-stamped.
Standard models store up to 250 readings in one batch.
This Quick Guide summarizes the basic functions of the
Gage. Download the full instruction manual at:
www.defelsko.com/manuals
Memory Management
NOTE:
Scroll through display
modes (Advanced only)
Delete last reading
Access the Menu
Restore brightness
after dimming

10
The above WiFi, USB and Bluetooth menus contain a Sync .net
Now option. When selected, the Gage immediately synchronizes
stored measurement data via its respective communication
method (internet connection required). Alternatively, select Auto
Sync .net from within the USB connect menu to automatically
synchroniz e upon connection to a PC. Additional measurements
added to memory while connected are synchronized only when the
USB cable is disconnected and reconnected, or when the Sync
.net Now option is selected. WiFi connected gages automatically
attempt synchronization upon power-up.
Sync .net Now
Connect Menu
Connect Menu
When USBDrive is checked , the PosiTector gage uses a
USB mass storage device class which provides users with a
simple interface to retrieve stored data in a manner similar to
USB flash drives, digital cameras and digital audio players.
USB Drive is also required to import stored measurements into
PosiSoft Desktop software (pg. 9).
When connected, power is supplied through the USB
cable. The batteries are not used and the body will not
automatically power down. If rechargeable (NiM ) batteries are
installed, the instrument will trickle charge the batteries.
Allows individual datasets to be sent to a computer, printer or
compatible device as they are taken using Bluetooth wireless
technology. See www.defelsko.com/bluetooth
Bluetooth (Advanced model only)
Allows connection to your local wireless network or mobile hot
spot. Ideal for using your network’s internet connection for
synchronizing stored measurements with PosiSoft.net (pg. 9).
See www.defelsko.com/wifi
WiFi (Advanced model only)
NOTE:
USB
PosiSoft Desktop is required when using a USB
connection to synchronize measurements with PosiSoft.net.
NOTE:
11
Determine if a software update is available for your Gage.
See www.defelsko.com/update
Transfers selected batches to the PosiTector App (useful
when switching between devices).
The Send Batches option is visible in the menu when the Gage
is connected to a smart device running the PosiTector App.
Sync Batches
Select batches to flag them for synchronization to the
PosiTector App. New batches created while Bluetooth Smart is
enabled are automatically selected.
With Bluetooth Smart enabled, select Sync Batches to transfer
selected batches to the PosiTector App. This is useful when
switching between smart devices, as only datasets and batches
that have yet to be synchronized with any smart device are
synchronized automatically.
The Gage will perform a Hard Reset (pg. 8) after
an update. All stored measurements will be erased from memory.
Updates
WARNING:
When Enabled , allows communication with a smart device
running the PosiTector App (pg. 9) via auto-pairing Bluetooth
Smart (BLE) wireless technology.
Bluetooth Smart
(Advanced model only, erial number 784000 and greater)
Send Batches
If Bluetooth Smart is disabled, data from batches
selected in the Sync Batches menu are held in a queue until
communication with the PosiTector App is re-established.
NOTE:

12
www.defelsko.com
© 2018 DeFelsko Corporation USA
All Rights Reserved
This manual is copyrighted with all rights reserved and may not be reproduced or transmitted, in whole or
part, by any means, without written permission from DeFelsko Corporation.
DeFelsko and PosiTector are trademarks of DeFelsko Corporation registered in the U.S. and in other countries.
Other brand or product names are trademarks or registered trademarks of their respective holders.
Every effort has been made to ensure that the information in this manual is accurate. DeFelsko is not
responsible for printing or clerical errors.
Limited Warranty, Sole Remedy
and Limited Liability
DeFelsko's sole warranty, remedy, and liability are the express
limited warranty, remedy, and limited liability that are set forth on
its website: www.defelsko.com/terms
Returning for Service
Before returning the Gage for service…
1.Install new or newly recharged batteries in the proper alignment
as shown within battery compartment
2.Clean the measurement opening using the cleaning card (pg. 5)
3.Perform a Hard Reset (pg. 8)
4.Verify accuracy (pg. 5)
5.If issue is not resolved, Update (pg. 11) your PosiTector gage
body and re-attempt measurements.
IMPORTANT:
If you must return the Gage for service, please fill out and
include the Service Form located at www.defelsko.com/support
with the Gage. Be sure to also include the probe, your company
name, company contact, telephone number and fax number or
email address.

Guía Rápida v. 1.0
Lector de cinta de réplica

Con el medidor apagado:
1. Limpie la sonda con la tarjeta de limpieza facilitada. (Pág. 5)
2. Encienda el medidor pulsando el botón central.
3. Ajuste a cero la sonda. (Pág. 6)
4. Mida la galga de comprobación suministrada para verificar la
exactitud (Pág. 5)
5. Mida el perfil de la cinta de réplica (Pág. 4)
1
Introducción
El
PosiTector
Replica Tape Reader (RTR) es un instrumento
eléctrico portátil que mide el perfil de la cinta de réplica Testex
Press-O-Film para producir mediciones del perfil de anclaje de
una superficie. Está formado por un cuerpo (Standard o
Advanced) y una sonda.
Esta guía rápida recoge las funciones básicas del medidor.
Descargue el manual de instrucciones en:
defelsko.com/manuals
Inicio rápido
El PosiTector RTR arrancará cuando se pulse el botón
central. Para ahorrar energía, el medidor se apagará tras unos 5
minutos de inactividad. Se conservarán todas las configuraciones.
Arriba
Abajo
Centro
Para desplazarse utilice los botones Arriba y
Abajo y para SELECCIONAR.
Seleccione Salir para salir de cualquier
menú.
Botón central
El botón central está rebajado a propósito para
evitar que se encienda de manera no intencionada.
Menú de operación
Las funciones del medidor se controlan con un menú. Para
acceder al menú, encienda el medidor y pulse el botón central.
NOTA:
Para garantizar una mayor precisión el usuario deberá
poner a cero la sonda cada vez que encienda el medidor. Por lo
tanto será deseable limpiar la sonda regularmente con la tarjeta
de limpieza incluida. La limpieza se realizará mejor cuando el
medidor esté apagado.
NOTA:

Sondas
2
Para desconectar una sonda de un cuerpo apague el
medidor y deslice el conector de plástico de la sonda en
sentido horizontal fuera del cuerpo (siguiendo la flecha).
Invierta los pasos para conectar una nueva sonda.
Una vez encendido, el PosiTector determinará
automáticamente el tipo de sonda conectado y
realizará una comprobación automática.
Cinta de réplica Press-O-Film
Además, el PosiTector acepta varios tipos de sonda incluyendo
sondas magnéticas para espesores de recubrimiento y por
corrientes de Foucault, para perfiles de superficie, ultrasónicas
para espesores de pared y ambientales.
Para obtener la información más reciente sobre la compatibilidad
de la sonda consulte www.defelsko.com/probes
Press-O-Film ofrece un método simple para obtener una
impresión de una superficie para su análisis. Se trata de una
lámina de plástico recubierta de microespuma plástica deformable
adherida a una película de 50.8 µm (2 mil) incompresible de
poliéster. Al comprimirse contra una superficie rugosa, la espuma
adquirirá una impresión precisa o réplica
inversa de la superficie. Se vende en
diferentes grados para acomodar las
medidas a diferentes rangos de perfil.
Al colocar la cinta comprimida (réplica) en el PosiTector RTR
dará una medida del promedio de la altura máxima entre pico y
valle del perfil rugoso de la superficie. El medidor sustraerá
automáticamente el espesor del sustrato de poliéster de todas
las mediciones.
3
Cómo medir
Preparación de la superficie de prueba
Creación de una réplica
1. Prepare la superficie del área de prueba
2. Perfile la cinta de réplica
3. Prepare el medidor
4. Realice la medición
Encuentre un lugar representativo para la
medición. Limpie la superficie que va a
comprobar. DeFelsko recomienda el empleo de la
masilla suministrada para retirar el polvo, la
suciedad o la granalla residual de la superficie.
Presione con fuerza la masilla sobre la superficie
utilizando los dedos y retírela.
Seleccione el grado apropiado de la cinta de réplica según el
perfil deseado. Consulte las instrucciones de la cinta.
Coloque una cinta de réplica autoadhesiva retirando su papel
protector. Un círculo de "ojo de buey" de papel deberá quedar
en el papel de protección (no se utiliza para la medición).
Aplique la cinta de réplica en la superficie.
Presione los extremos adhesivos del papel
para sujetarlo firmemente en su lugar
durante el proceso de perfilado.
Comprima firmemente la película de réplica utilizando el
extremo redondeado de la herramienta de pulido de acero
inoxidable. Aplique una presión suficiente en círculo y frote en
sentidos transversales para producir una réplica con un aspecto
de grano uniforme. Normalmente se requieren de 30 a 60
segundos para comprimir completamente todas las partes de la
película en la mayoría de las superficies.
En general, el exceso de compresión es más
seguro que demasiado poca. Una vez
finalizado el perfilado retire la cinta de réplica
de la superficie.

4
Preparación del medidor
Con el medidor apagado, limpie las superficies de medición
utilizando la tarjeta de limpieza facilitada. Deslice la tarjeta a
través de la ranura varias veces mientras presiona firmemente
los dos botones de la sonda para eliminar las partículas de polvo
y el adhesivo residual de la cinta.
Encienda el medidor pulsando el botón central. Aparecerá una
imagen que indica que la sonda requiere su puesta a cero.
Pulse y mantenga con firmeza simultáneamente ambos botones
de la sonda hasta que el medidor emita un pitido y las flechas
apunten hacia el exterior. No coloque nada en la ranura de
medición durante este procedimiento.
Mida la galga de comprobación suministrada para verificar la
exactitud (Pág. 5). Asegúrese de que el grado de la cinta de
réplica adecuado (C o XC) se muestra en la esquina superior
izquierda de la pantalla LCD (pág. 6).
Inserte la cinta de réplica pulida en la ranura
de medición. Asegúrese de que la cinta esté
colocada correctamente para que el área
pulida esté centrada en la ranura en la sonda.
Para colocar la cinta, alinee los dos puntos (impresos en la cinta de
réplica) con las flechas en ambos lados de la ranura de medición.
Alinee los puntos con
las flechas en la sonda
Si está utilizando una cinta antigua que no tiene los puntos impresos,
simplemente alinee centrando la cinta en la ranura de medición.
Una vez colocado, presione con firmeza simultáneamente los dos
botones de la sonda y mantenga la sonda hasta que el medidor
emita un pitido y muestre la medición. Durante la medición se
aplicará una presión constante en la cinta de réplica con
independencia de la aplicada en los botones. El medidor restará
automáticamente los 50.8 µm (2 mil) de la película incompresible de
poliéster. No se requieren ajustes adicionales.
Medición

5
Comprobación de la precisión
La precisión del medidor se verificará utilizando la galga de
comprobación suministrada. Asegúrese de que la sonda se ha
limpiado con la tarjeta de limpieza (arriba) y que se ha puesto a
cero la sonda (Pág. 6).
Coloque la galga de comprobación en la ranura de medición. La
media de varias mediciones debería encontrarse entre las
tolerancias combinadas del medidor y la galga. Si no, deberá
devolver su medidor a su distribuidor para reparación.
La galga de comprobación está diseñada de manera especial
para el PosiTector RTR. El medidor está diseñado para medir el
perfil de anclaje de una cinta de réplica en un rango limitado y
automáticamente sustraerá 50.8 µm (2 mil) del perfil para contar
con la película de poliéster incompresible. Por lo tanto las
galgas de plástico destinadas a otros instrumentos tales como
medidores de espesor de recubrimiento no medirán
correctamente.
Calibración
El fabricante o un laboratorio acreditado realizará normalmente
la calibración del medidor. Todas las sondas incluyen Certificado
de Calibración.
La sonda tiene dos superficies de medición que pueden
contaminarse con partículas de polvo y adhesivo residual de la
cinta. Por lo tanto será deseable limpiar la sonda regularmente
con la tarjeta de limpieza incluida. La limpieza es esencial antes
de poner a cero la sonda (Pág.6) o comprobar la precisión
(Pág.5). La limpieza se realizará mejor con el medidor apagado.
Con el medidor apagado, pase la tarjeta por la ranura un par de
veces mientras presiona firmemente los dos botones de la
sonda.
La tarjeta también podrá utilizarse para limpiar las superficies de
micrómetros analógicos de muelle. Su distribuidor dispone de
tarjetas de recambio.
Tarjeta de limpieza
Calibración y comprobación de la precisión
Other manuals for POSITECTOR RTR
2
Table of contents
Languages:
Other DeFelsko Card Reader manuals


