DEHACO DTS-100 User manual

User Manual
Floor stripper DTS100 EU
2020-04_v3.2_EN
Floor stripper
DTS100 EU (230V)

2Dehaco B.V. • Kruisbaak 25 • 2165 AJ Lisserbroek (NL) • ✆ +31 (0)88 - 20 20 600 • [email protected] • www.dehaco.nl
EC DECLARATION OF CONFORMITY
Translation of original user manual according to annex 1,
section 1.7.4. of Machinery Directive 2006/42/EC.
We, Dehaco B.V., hereby declare that the products listed below comply with the essential requirements
of the above-mentioned European Directive and the following harmonised standards:
Product: Floor stripper
Brand: Dehaco
Type designation: DTS100 (230V)
Manufacturer: Dehaco B.V.
Kruisbaak 25
2165 AJ Lisserbroek - NL
Directives: Machinery Directive, 2006/42/EG
Low Voltage Directive 2014/35/EU
EMC Directive 2014/30/EU
Standard(s) NEN-EN-ISO 12100 Risk Reduction
Place and date: Lisserbroek, 01-02-2020
Managing director: Jeroen Korporaal

3© 2021 Dehaco B.V. • User Manuak • Floor stripper DTS 100 UK (115V)_2021-06_v3.2_EN
Index
INDEX
EG-Declaration of conformity 2
1. Introduction 3
2. General description 4
3. Machine overview 5
4. Intended use 6
5. Specications 7
5.1 General 7
5.2 Wear parts 7
5.3 Noise emission 7
5.4 ibration hand arm system 8
6. Safety 9
7. Transport & Storage 11
8. Get started! 12
8.1 Setting up 12
8.2 Start working 13
8.3 Completing the work 14
8.4 Preparing for transport 14
8.5 Replacing a blade 14
9. Maintenance 15
9.1 Daily maintenance 15
9.2 Torques 15
10. Malfunctions 16
10.1 Green led does not light up 16
10.2 The driving components do not
function properly 16
10.3 Stripper does not function properly 17
10.4 Error code in the frequency controller 17
11. Warranty conditions 19
12. Repair 19
13. End of life span 20
14. Parts 20
© Copyright 2021, Dehaco B.V.
All rights reserved. No part of this publication may be reproduced, stored in a retrieval system, or transmitted in any form or by any means,
electronic, mechanical, photocopying, recording or otherwise, without express written permission from Dehaco B.V. This also applies to any
accompanying drawings and diagrams. Dehaco B.V. reserves the right to revise sections of this document at any time and without prior or direct
notice to the customer. The contents of this manual can also be changed without prior notice. For information regarding setting, maintenance
or repairs not included in this user manual, please contact your supplier’s technical department. This user manual has been prepared with the
utmost care, however Dehaco B.V. cannot accept responsibility for any errors in this user manual or the consequences thereof.
Dehaco B.V.
Kruisbaak 25
2165 AJ Lisserbroek - NL
T +31 (0) 88 20 20 800
I www.dehaco.nl
Dealer

4Dehaco B.V. • Kruisbaak 25 • 2165 AJ Lisserbroek (NL) • ✆ +31 (0)88 - 20 20 600 • [email protected] • www.dehaco.nl
1. Introduction | 2. General description
1. INTRODUCTION
Thank you for purchasing the DTS100 Floor stripper.
You are now in the possession of a machine that, if
used correctly, can be used without any malfunctions
for many years to come.
The objective of this user manual is to make you
familiar with the machine’s operation, give instructions
for working safely and provide guidelines for periodic
maintenance.
The manual was drawn up for all persons involved with
the machine’s use, operation and maintenance.
These persons must:
Ø
required for their task.
ØHave read and understood this user manual.
ØObserve all indicated safety instructions.
Ø
their disposal, if necessary.
This user manual, the type plate and the safety stickers
applied to the machine contain important safety
information and as such are an integral part of the
delivery.
Keep this manual in a safe place and pass it on to the
new owner when the machine is sold on.
When this user manual, the type plate or the safety
stickers are damaged, these should be applied or
made available again.
These components can also be provided by your
supplier afterwards.
WARNING!
Make sure you are familiar with the content of this
user manual before you start working with the
machine, so you are able to use all its possibilities
in an optimal and safe way!
At delivery, the DTS100 has been fully assembled
and tested and is ready for use.
The delivery comprises:
ØFloor stripper DTS100
ØCase with accessories:
§This manual,
§Hearing protection, safety goggles,
gloves
§Strip blades
§6 and 8 mm socket head wrench
§Extension cord
Immediately at delivery, check that the machine
is complete and undamaged. In case of missing
components or damage during transport, please
immediately contact your supplier.
2. GENERAL DESCRIPTION
The DTS100 Floor stripper was developed by Dehaco
for optimum use, great capacity and a long life span.
This was achieved by applying available technical
know-how to meet practical requirements.
A simple but constructively high quality Floor
stripper was designed, extensively tested in practice
and taken in production.
An -easily exchangeable- hard steel blade
suspended in vibration rubbers is made to vibrate
by means of a driven eccentric. By inserting this
blade under the carpet, the glue layer is “cut
through” by means of vibration. Depending on the
carpet’s weight and the glue used, the driving speed
can be variably adjusted, so that the maximum
capacity can be achieved for any situation.
In order to be able to turn around quickly, two
freewheels have been mounted that are pressed
Characteristic features:
- Very easy to operate
- Quickly exchangeable hard steel blade Drive
with maintenance free geared motor
- No lubrication points
- Removable extra counter-weight plates
- Low required power (220V – 16A)
- Extra freewheel set for quick turning,
positioning and transporting.

5© 2021 Dehaco B.V. • User Manuak • Floor stripper DTS 100 UK (115V)_2021-06_v3.2_EN
3. Machine overview
Blade holder
OF/OFF Strip motor
ON/RESET Press button
Drive motor
Hoisting point
Strip motor
Driven wheel
Clamping plate
Control panel
Thumb button for operating drive motor
Drive speed controller
Emergency stop button
Handle
Extension cord holder
Tiller
Side plate (counter-weight)
Front plate (counter-weight plate)
Plug tiller head
Plug power cord
Clamp screw tiller
Freewheel
3. MACHINE OVERVIEW

6
4. Intended use | 5. Specications
✆
4. INTENDED USE
The DTS100 Floor stripper is intended for:
- easy removal of carpet tiles, carpet and glue
residues,
- use with an accompanying hard steel blade,
-
- use by one person who is capable of doing this
type of work.
WARNING!
Any other use than described above shall exclude
Dehaco from any responsibility!
Use for other purposes has not (yet) been investigated.
For any other possible applications, please contact
your supplier IN ADVANCE to consult whether the
machine is suitable for such purpose.
WARNING!
The DTS100 Floor stripper does NOT comply with the
ATEX Directive and should therefore NOT be used on
locations with an increased re/explosion hazard!
5. SPECIFICATIONS
5.1 General
Weight: 100 kg
Supply voltage: 230V / 50 Hz
(check the type plate!)
Plug: CEE 3-pole, 16A
Frequency: 50 Hz
Strip blade motor: 0.55 kW
Drive motor: 0.25 kW
IP class: IP 54
V blade: 29 cm
5.2 Wear parts
SWear parts are components in the machine that
do not fall under the warranty conditions, due to
additional contact with the product.
The wear parts of this machine include:
- The strip blade.
- The clamping plate.
- The blade holder.
5.3 Noise emission
The noise level in the direct vicinity of the DTS100
at a test setup is approx. 76 dB. Due to additional
room in which the work is performed, wearing hearing
protection is expressly recommended. This is to
prevent hearing damage when used for a long period
of time!
THEM!
5.4 Vibration hand arm system
The measured value of the vibrations: 4,6 m/s2.
The deviation on this measurement is: 0.5 m/s2.
Usage time per day:
Limit value 2.5m/s2.5 hours
Limit value 5.0 m/s29 hours
These are values measured with a new machine and
depend on factors such as accessories, maintenance,
the surface to be treated and ambient temperature.
Measures in case of values above 2.5 m/s2:
-
- Use anti-vibration work gloves
- Take breaks, switch between jobs
- Ensure warm hands
- Keep the blade sharp!
- Ensure proper maintenance
- Periodically replace the vibration rubbers.

7© 2021 Dehaco B.V. • User Manuak • Floor stripper DTS 100 UK (115V)_2021-06_v3.2_EN
6. Safety
6. SAFETY
WARNING!
Almost all accidents are the result of:
lower concentration, negligence, inattentiveness
or incorrect assessments! Work steadily and stay
concentrated: You have been warned!
if necessary place additional (building) lighting to
All persons involved with assembly, commissioning,
operation, maintenance and repair must:
§Have the level of know-how and
§Have read and understood this user
manual.
§Observe all indicated safety instructions.
§
tools at their disposal, if necessary.
WARNING!
There is an immediate hazard of physical injury,
damage to machines and the environment in case of
inexperienced and inexpert use: Keep bystanders at
a safe distance from the work !
- Keep children and other persons at a distance
when using the machine. If you are distracted,
you could lose control of the tool.
- Stay alert, know what you are doing and use
common sense when using the machine. Do
not work with machines when you are tired
medication. A moment of inattentiveness when
using the tool could lead to serious injuries and
damage to the machine and the surrounding
- Remove all loose tools before switching on the
machine.
- Prevent an unbalanced body posture. Make
maintain your balance. In this way you are
better able to control the machine during
unexpected situations.
Carefully read the user manual prior to
starting the machine!
- Wear suitable clothes. Do not wear loose-
hanging clothes or jewellery. Keep hairs,
clothes and gloves away from moving parts.
Loose-hanging clothes, long hair and jewellery
could be taken along by moving parts.
-
power cord when adjusting the machine,
This precaution will prevent the machine from
being started unintentionally.
- Repair damaged parts prior to use or have
them repaired. Many accidents are caused by
poor maintenance.
- Keep cutting tool inserts sharp and clean.
Carefully maintained cutting tool inserts with
sharp cutting edges are less prone to getting
stuck and are easier to guide.
- In addition to the above-mentioned rules,
you should also familiarise yourself with local
working conditions and health and safety
rules.
CAUTION:
Structural preventive maintenance reduces the risk
of malfunctions during work!
WARNING!
Use personal protective equipment as obliged
nationally, locally and/or at the building site, but at
least use the following: safety helmet,
hearing protection, safety goggles, gloves, safety
shoes.

8Dehaco B.V. • Kruisbaak 25 • 2165 AJ Lisserbroek (NL) • ✆ +31 (0)88 - 20 20 600 • [email protected] • www.dehaco.nl
7. Transport & Storage | 8. Get started!
7. TRANSPORT & STORAGE
7.1 Transport
CAUTION!
ØRemove the blade from the stripper prior to
transport! Think of your safety.
- Due to the compact dimensions and low own
weight, it is possible to use a car trailer or van
to supply and remove the Floor stripper.
- Loading and unloading can be performed with
a ramp and the machine’s own drive.
- A crane hook has been provided for using
lifting tools.
- In order to save space, it is possible to remove
the handle (tiller head). Use the provided 8mm
socket head wrench for this.
7.2 Opslag
When decommissioning the DTS100 Floor stripper for
a longer period of time, it is recommended to perform
the following actions:
STORAGE!
ØDo NOT clean the Floor stripper with a high-
pressure cleaner! Cleaning with compressed air!
- Neatly clean the machine.
- Perform maintenance, see section 9.
- Store the machine in a dry, preferably
frost-free room.
- Cover the machine, if possible.
8. GET STARTED!
CAUTION!
Check in advance that there are NO bolts, screws or
threaded ends protruding from the oor. This could
damage the strip mechanism.
8.1 Get started
CAUTION!
ØBefore you connect a power cord, you must rst
check it for damages!
CAUTION!
ØThe Floor stripper can be moved manually by
tilting the machine backwards, so that it is
supported by the transport wheels.
CAUTION!
ØThe hard steel blades are very sharp!!
ØProceed carefully when installing and removing
the blade!
CAUTION!
ØCheck that the power supply and converter are
suitable for the machine!
- Check that the tiller and the plug of the tiller
head cord are properly fastened.
- Mount the counter-weight plates and fasten
them properly. The bolt heads should go in the
blind holes, so they do not protrude! Use the
provided 8 mm socket head wrench for this.
- Carefully select a strip blade type: see box to
the left. The correct strip blade that is suitable
for the work will save you a lot of time and
ensure a better end result!!
- Place a blade in the blade holder and properly
fasten the clamping plate using the 6 mm
socket head wrench.
- Insert the power cord in the counter plug on
the stripper.
The Floor stripper is now ready for use.
Guidelines for selecting the
correct strip blade:
-
the bevelled side of the blade at the
top.
- In case of a wooden (soft)
the blade around, due to the
adapted cutting angle.
-
15° angle
- In case of hard material, select a narrower
blade
- In case of carpet, for instance, select a U blade
to cut loose strips of material
- Use your experience and/or consult with your
supplier to determine which blade model is
most suitable for your application.

9© 2021 Dehaco B.V. • User Manuak • Floor stripper DTS 100 UK (115V)_2021-06_v3.2_EN
8. Get started!
8.2 Start working
CAUTION!
ØPrior to pressing the “on/reset” button, ALWAYS
due to the starting current!
- First set the strip motor to “0/OFF”.
- Set the rotary button for drive speed fully to
the left, to the zero position.
- Check that the emergency stop button is not
pressed in.
- Press the green “ON” button: the led in the
button should light now.
- Set the strip motor to “I / ON”.
- Operate the drive motor forwards or
backwards using the green thumb buttons on
the handle.
- Use the potentiometer on the tiller head to set
the forward drive speed, the reverse speed is
always maximum.
- Work in long lanes, do not repeatedly reverse.
- Turning around is easy by tilting the stripper
backwards and using the freewheels for
turning around.
CAUTION!
ØDo NOT stand on the stripper for extra weight!
- Also during the work, regularly check that all
bolts are still properly fastened.
-
Make sure there are no bolts, screws or
could damage the strip mechanism.
- Regularly remove stripped carpet from the
front of the machine.
- Do watch out for the power cords, to prevent
accidents.
8.3 Completing the work
- Set the strip motor switch to “0/OFF”.
- Remove the plug from the socket.
8.4 Preparing for transport
- Remove the plug from the socket.
- ALWAYS remove the blade prior to transport!
- Before departure, check that all tools,
components and PPE have been returned to
the provided case.
- Insert the plug in the socket again.
- Drive the DTS100 to the transport device by
means of its own power, or manually by means
of the freewheels.
- Store the power cords.
8.5 Replacing a blade
WARNING!
The strip blades are hardened and very sharp,
ALWAYS wear gloves when placing and replacing a
strip blade!
- Place a block under the blade holder, so
that the Floor stripper is somewhat tilted
backwards.
- Loosen the four bolts of the blade holder by a
few turns.
- Take the blunt blade from the blade holder,
store it so that no-one can injure themselves
with it.
- Slide the required strip blade between the
lower and upper piece of the blade holder,
making sure the recesses fall over the bolts.
- Properly tighten the blade holder bolts again,
replace the screws when they show signs of
wear!
- The Floor stripper is now ready for use again!

10 Dehaco B.V. • Kruisbaak 25 • 2165 AJ Lisserbroek (NL) • ✆ +31 (0)88 - 20 20 600 • [email protected] • www.dehaco.nl
9. Maintenance | 10. Malfunctions
9. MAINTENANCE
WARNING!
Always rst remove the plug from the socket before
performing inspection, maintenance or repairs!
The DTS100 Floor stripper is a simple, reliable
machine. Regularly maintenance is needed however,
to keep the machine in a good condition for optimum
results.
The indicated intervals are a guideline for normal use,
in case of more or less intensive use, these actions can
be performed more or less frequently!
The geared motor of the travel drive is maintenance
free!
9.1 Daily maintenance
- Regularly check the machine -visually- for leaks
and damages, this certainly also applies to the
power cord(s)!
- Repair damages immediately or have them
repaired. This also applies to minor damages.
span of your machine.
- Remove all loose material from the stripper
mechanism.
- Keep the machine clean! This reduces the
risk of accidents and makes your work easier.
convenient!
- Check that all bolts are properly fastened.
- Replace the bolts of the blade holder when the
heads show signs of wear.
CAUTION!
ØClean carefully! Do not spray clean with a
high-pressure cleaner!
9.2 Aanhaalmomenten
For 8.8 hexagon bolts, the following torques can be
observed. (Wurth):
M6x1,0-8.8 10 Nm.
M8x1,25-8.8 25 Nm.
M10x 1,5-8.8 50 Nm.
10. MALFUNCTIONS
This section provides general guidelines for
troubleshooting at the machine, it is not a step-by-step
search diagram.
The Floor stripper DTS100 is solidly built and will
function free from failures for a long period of time, if
used carefully within the stated standards of use.
WARNING!
Only have electrical failures repaired by qualied
and skilled personnel and only use original
replacement parts.
FIRST:
- Disconnect all other machines from the same
power group.
- Try the machine without extension cords, near
the power supply.
10.1 Green led does not light up
Error in the power supply, check the following:
- Is the emergency stop button not pressed
down?
- Are the plugs inserted properly?
- Have any fuses blown? No fuse has been
included in the DTS100 itself.
- Is the extension cord not damaged / broken?
10.2 The driving components do not
function properly
- Has the cord for the tiller head been connected
(properly)?
- Check the power cord, does the led in the reset
button light up??
- Check the tiller head cord for damages.
- Check that the wheel motor is working.
§Reset the frequency controller:
§Pull the power cord out of the stripper.
§Wait 30 seconds (=reset controller )
§Place the power cord back in the counter
plug.
§Restart the machine.

11© 2021 Dehaco B.V. • User Manuak • Floor stripper DTS 100 UK (115V)_2021-06_v3.2_EN
10. Malfunctions
10.3 Stripper does not function properly
-
- Has the driving speed been adjusted to the
blade load?
- Check the power cord, does the led in the reset
button light up?
- Is the blade still properly fastened in the blade
holder?
- Has a vibration rubber been torn?
- Is there a defective bearing (house)?
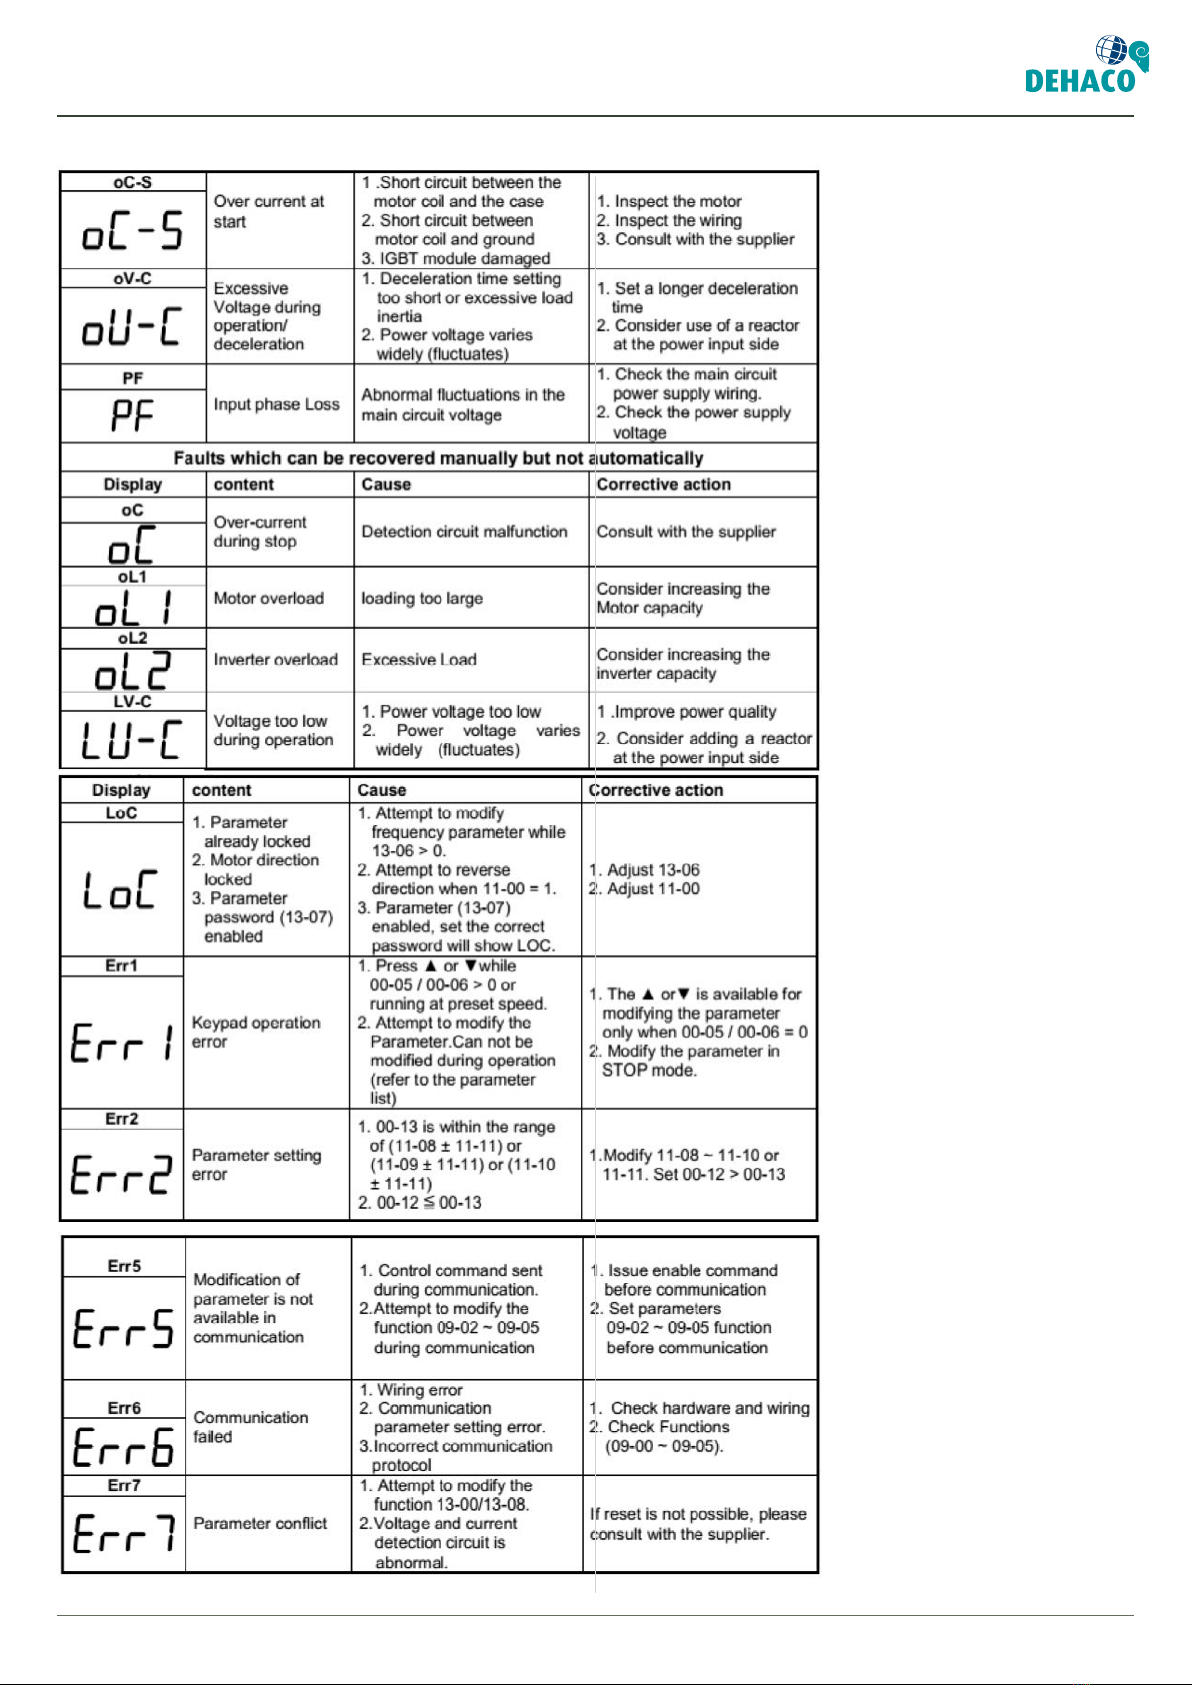
10.4 Error code in the frequency
controller
The DTS100 stripper has been provided with a
In case of a frequency controller error, a code is shown
in the display. These codes can be seen in the next
pages and have been taken from the English S2U
manual:
12 Dehaco B.V. • Kruisbaak 25 • 2165 AJ Lisserbroek (NL) • ✆ +31 (0)88 - 20 20 600 • [email protected] • www.dehaco.nl
10. Malfunctions

13© 2021 Dehaco B.V. • User Manuak • Floor stripper DTS 100 UK (115V)_2021-06_v3.2_EN
10. Malfunctions

14 Dehaco B.V. • Kruisbaak 25 • 2165 AJ Lisserbroek (NL) • ✆ +31 (0)88 - 20 20 600 • [email protected] • www.dehaco.nl
11. Warranty conditions - 14. Parts
11. WARRANTY CONDITIONS
A six month warranty period applies to this machine,
after delivery in accordance with the Metaalunie
conditions.
This means that within this period, only material and
manufacturing defects are repaired free from costs,
AFTER ASSESSMENT BY DEHACO. Transport and/or
travelling expenses must be paid by the customer.
NO WARRANTY is provided for defects that have been
caused when:
Øit can be proven that the machine has been
overloaded.
Øthe machine has been used for purposes for which
it has not been built.
Øit can be proven that maintenance performed has
been poor.
Øthe information in this manual has not been
observed properly.
Øthe machine has been used by unauthorised
persons.
Øthe machine has been repaired with non-original
parts.
Øthe machine has been adapted without written
permission from Dehaco.
NO WARRANTY is provided for wear parts, as stated in
section 5.
12. REPAIR
Dehaco expressly recommends that repairs are only
performed by skilled and experienced personnel.
No extensive repair descriptions have been included in
the manual, but you can always contact Dehaco if you
have any questions.
13. END OF LIFE SPAN
You must always meet the currently and locally
applicable requirements and directives for working
safely and responsible disposal!
If after being used for a long period of time, the
machine has reached its technical end, please proceed
as follows for responsible processing:
ØClean the machine.
ØDisassemble the electronic components. These
can be disposed of separately.
ØDisassemble the plastic parts, these can be
disposed of separately.
ØThe remaining components are made of steel and
can be scrapped.
14. PARTS
The parts list is provided as a separate document.
The machine is developed and built using partly
custom-made parts and partly standard components.
The standard components can be delivered in a short
period of time.
Please contact your supplier to place your order and
ask for the delivery time!!

15© 2021 Dehaco B.V. • User Manuak • Floor stripper DTS 100 UK (115V)_2021-06_v3.2_EN

cmd + shift + klik
16 Dehaco B.V. • Kruisbaak 25 • 2165 AJ Lisserbroek (NL) • ✆ +31 (0)88 - 20 20 600 • [email protected] • www.dehaco.nl
Dehaco B.V
Dehaco Lisserbroek
Kruisbaak 25, 2165 AJ
Lisserbroek, The Netherlands
Dehaco Raamsdonksveer
Steurweg 1, 4941 VP
Raamsdonksveer, The Netherlands
Phone
E-mail
www.dehaco.nl
+31 (0)88 20 20 600
Other manuals for DTS-100
1
Table of contents
Other DEHACO Floor Machine manuals


Popular Floor Machine manuals by other brands


Windsor
Windsor CVC24 operating instructions

Windsor
Windsor MB2000 Operator instructions

Hoover
Hoover FloorMate SpinScrub H3040RM owner's manual

Tennant
Tennant 5200 Operator and parts manual

American-Lincoln
American-Lincoln 4366XP 56516751 Instructions for use

Isoplam
Isoplam L010001 Use and maintenance manual