DEHAWK BKR23611 User manual

Battery Kit
Instruction Manual
- BKR23611 -
- BKR23615 -
- BKR23618 -
- BKR24811 -
- BKR24813 -
- BKR24816 -
Please read before use!
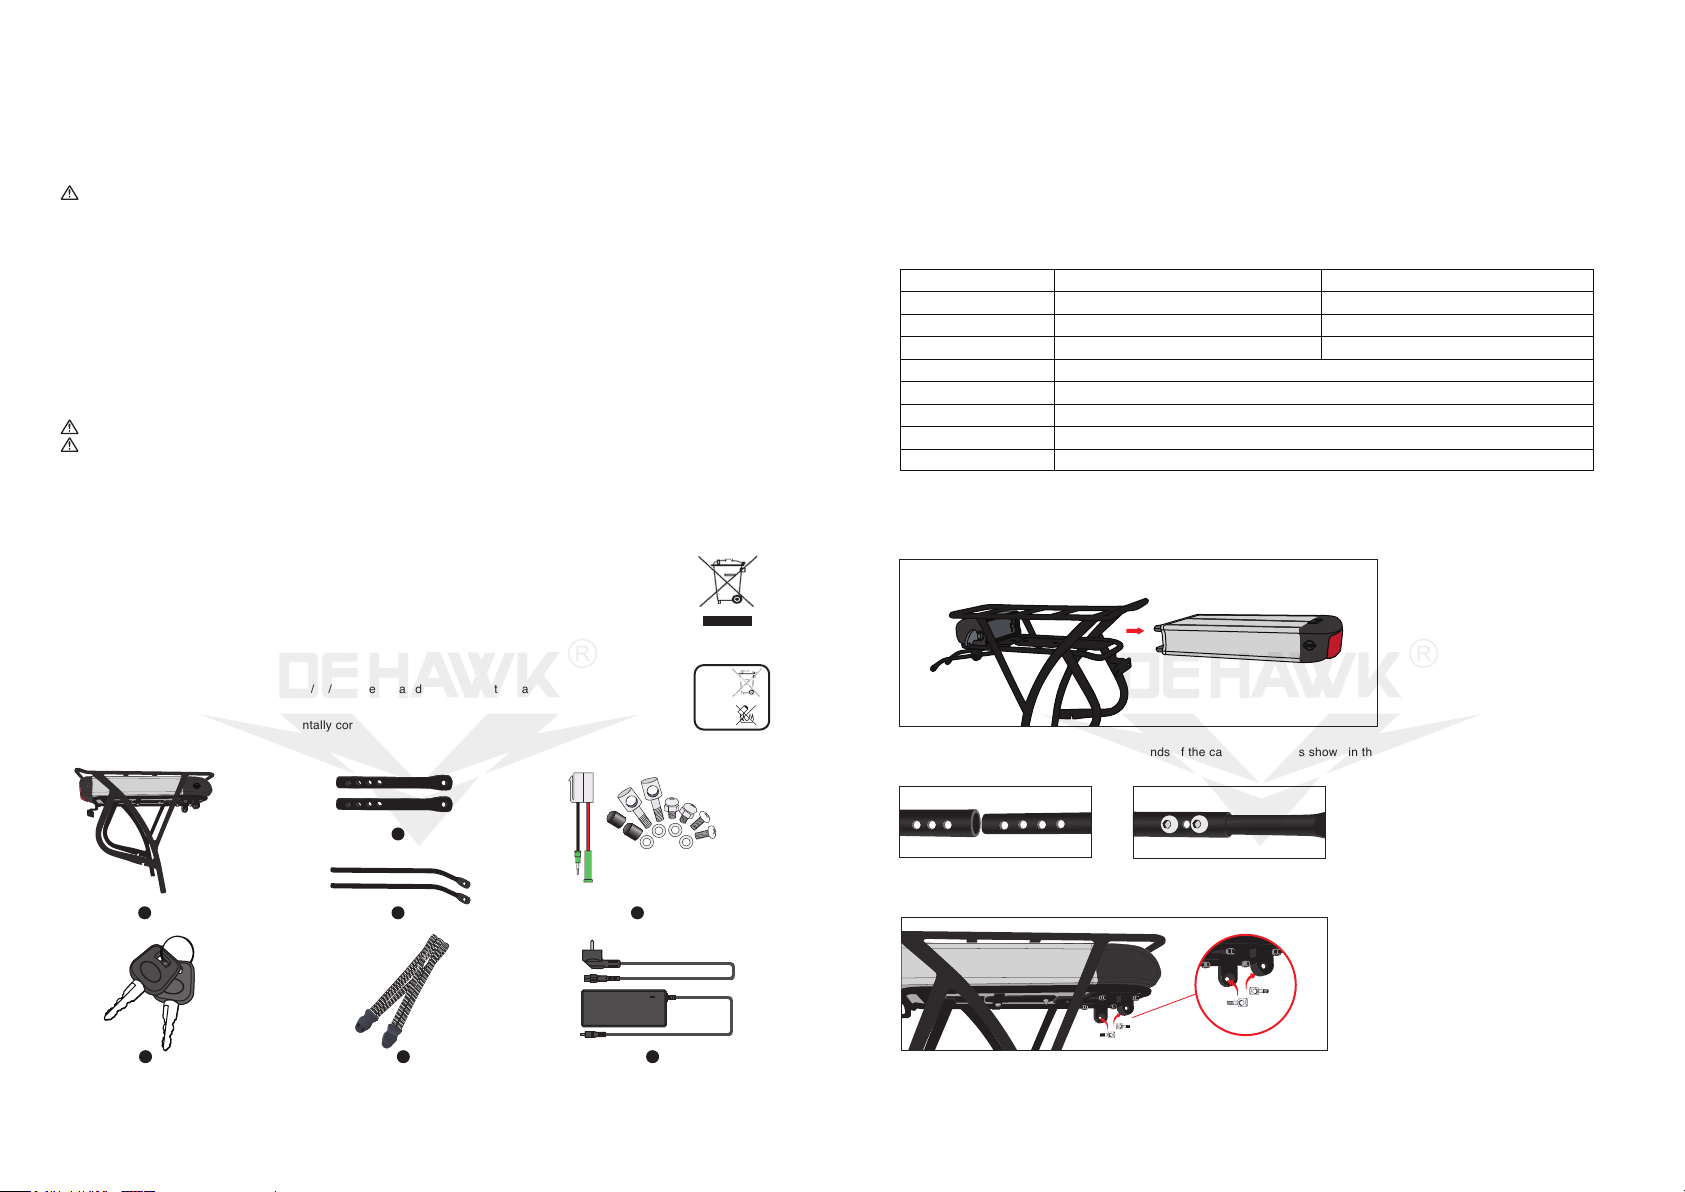
4. Install the carrier on the bike with the screws provided.
5. Insert the battery and lock it.
6. The power button is located at the side of the battery on the back end; it needs to be switched on before you start cycling.
7. Please switch off the power before charging.
Battery Indicator
Charge Indicator Charging Port
Power ButtonRear Light
14
V 2.0 10.05.2017
Transport
Please return battery packs that are no longer usable to an authorised bicycle dealer.
The batteries are subject to the Australian Dangerous Goods Code (ADG Code) requirements. Private users can transport
undamaged battery packs by road without further requirements.
When being transported by commercial users or third parties (e. g. air transport or forwarding agency), special requirements for
packaging and labelling must be observed (e. g. ADR regulations). If necessary, an expert for hazardous materials can be consulted
when preparing the item for shipping. Dispatch battery packs only when the housing is undamaged.
Tape or mask open contacts and pack up the battery pack in such a manner that it cannot move around in the packaging. Inform
your parcel service that the package contains dangerous goods. Please also be aware of the possibility of more detailed national
regulations.
In case of questions concerning the transport of batteries, please refer to an authorised dealer or contact us.
About Us
DeHawk designs and produces battery packs containing top quality, high density lithium-ion cells. We offer multiple down
tube-mounted designs as well as rear rack-mounted versions in 24V, 36V, and 48V configurations. Our chargers have several built-in
safety features to keep users safe and protect batteries from damage.
Please visit our website www.dehawk.com for more information.
1
2
3 4
5 6 7
Parts Included
1. Battery + Carrier + Rear Light
2. Bottom Extension Bars
3. Front Extension Bars
4. Connector Cable + Bolts
5. Keys
6. Bungee Cord
7. Charger
2. Insert the bottom extension bars into the ends of the carrier’s tubes as shown in the image below. The length can be adjusted to
suit the bike.
3. Insert the specially designed bolts (pictured below) into the holes which are located at the bottom of the front part of the carrier
and fasten with nuts, then insert the front extension bars into the bolts.
Technical Specifications
Installation and Charging
1. Use the key to “unlock” and take out the battery before you install the carrier on the bike.
36V
11 Ah (396 Wh) 15Ah (540 Wh) 18Ah (648 Wh) 11 Ah (528 Wh) 13 Ah (624 Wh) 16 Ah (768 Wh)
48V
31V
18A
3A
NMC-18650
up to 1000 charge/discharge cycles, >60% remaining capacity after 500 cycles
-5~35°C, relative humidity <75%
42V
42V 54.6V
Nominal Voltage
Max. Charge Voltage
Cut-off Voltage
Capacity
Max. Rated Current
Max. Charging Current
Cell Format
Cycle Life
Storage
2 3
For Your Safety
Thank you for purchasing a DeHawk battery kit. To prevent damage or injury to you or to others, please read the instruction manual
before use. Please keep this manual for your future reference.
WARNING:
● Keep the battery and charger away from water and heat sources.
● Do not connect positive and negative terminals.
● Do not short circuit the battery.
● Keep the battery away from children and pets.
● Use the charger only for the battery.
● Do not disassemble the battery or charger.
● Do not cover the battery or charger, place objects on top of them or rest objects against them.
● Do not expose the battery and charger to shocks (e.g. by dropping).
● Stop the charging procedure immediately if you notice anything unusual.
● In the unlikely event of the battery catching fire, DO NOT attempt to put it out with water. Use sand or another fire retardant instead
and call emergency services immediately.
● Avoid contact with the battery and charger during the charging procedure; the charger heats up considerably.
Please take note of the additional information on the rear of the battery case.
It is important to charge the battery every six months for one to two hours at the minimum. The battery should have at least two
LED lights (30%~40% charge) blinking before charging. Failing to maintain the minimum charge level can cause harm to the battery
and could result in the warranty of the battery becoming void.
Disposal Instructions
Battery packs, accessories and packaging should be sorted for environmental-friendly recycling. Do not dispose
of the battery packs into household waste! Tape or mask off the contact surfaces of the battery pack’s terminals
with adhesive tape before disposing of battery packs. Do not touch heavily damaged eBike batteries with your
bare hands. Electrolyte may escape and cause skin irritation. Store the battery in a safe location outdoors. Cover
the pins if necessary and inform your dealer. They will help you to dispose of it properly.
Only for EC countries
According to the European Guideline 2012/19/EU, electrical devices/tools that are no longer usable, and
according to the European Guideline 2006/66/EC, defective or used battery packs/batteries, must be collected
separately and disposed of in an environmentally correct manner.
Li-lon
Li
This manual suits for next models
5
Other DEHAWK Camera Accessories manuals


