Deif AMC 600 User manual

USER'S MANUAL
AMC 600
Getting started guide
4189341335A

1. About the Getting started guide
1.1 Symbols for general notes....................................................................................................................................................................................................4
1.2 Symbols for hazard statements......................................................................................................................................................................................... 4
1.3 Technical support .....................................................................................................................................................................................................................4
1.4 Legal information.......................................................................................................................................................................................................................5
2. Configure AMC 600
2.1 Software.......................................................................................................................................................................................................................................... 6
2.1.1 Download AMC 600 software....................................................................................................................................................................................... 6
2.1.2 System requirements........................................................................................................................................................................................................6
2.1.3 PC tools..................................................................................................................................................................................................................................6
2.2 Connection.................................................................................................................................................................................................................................... 7
2.2.1 Power connection...............................................................................................................................................................................................................7
2.3 Programming connection......................................................................................................................................................................................................7
2.3.1 Programming connection................................................................................................................................................................................................7
2.4 Access with Ethernet port.....................................................................................................................................................................................................7
2.4.1 Default IP configuration................................................................................................................................................................................................... 7
2.4.2 Default Hostname.............................................................................................................................................................................................................. 8
2.4.3 Default User and Password...........................................................................................................................................................................................8
2.4.4 Test connection................................................................................................................................................................................................................... 8
2.4.5 Test connection with Ping............................................................................................................................................................................................... 9
2.5 The system web page........................................................................................................................................................................................................... 10
2.5.1 Access to the System web page...............................................................................................................................................................................10
2.5.2 About the System web page.......................................................................................................................................................................................10
2.6 Menus.............................................................................................................................................................................................................................................11
2.6.1 View modules.................................................................................................................................................................................................................... 11
2.6.2 View System information..............................................................................................................................................................................................12
2.6.3 View Network configuration.........................................................................................................................................................................................13
3. Program AMC 600
3.1 IEC61131-3 (CODESYS) programming.........................................................................................................................................................................14
4. Additional configuration
4.1 Change advanced network configuration..................................................................................................................................................................15
4.1.1 Ports......................................................................................................................................................................................................................................15
4.1.2 Real-time mode................................................................................................................................................................................................................ 15
4.2 Extended user management............................................................................................................................................................................................. 16
4.2.1 User roles access rights............................................................................................................................................................................................... 16
4.3 Enable SSH (Secure Shell) access................................................................................................................................................................................ 17
4.3.1 Create connection with WinSCP...............................................................................................................................................................................17
4.3.2 Create connection with PuTTY..................................................................................................................................................................................20
4.3.3 Change network configuration with SSH...............................................................................................................................................................21
4.3.4 Change password........................................................................................................................................................................................................... 22
4.4 Setting to local date and time...........................................................................................................................................................................................23
5. Access with the Service port
5.1 Manual installation..................................................................................................................................................................................................................24
5.2 Create connection to the Service port.........................................................................................................................................................................24
5.3 View existing IP address..................................................................................................................................................................................................... 26
User's manual 4189341335A EN Page 2 of 33

6. Update firmware
6.1 View logs......................................................................................................................................................................................................................................29
6.2 Create factory reset................................................................................................................................................................................................................32
User's manual 4189341335A EN Page 3 of 33
1. About the Getting started guide
1.1 Symbols for general notes
NOTE This shows general information.
More information
This shows where you can find more information.
Example
This shows an example.
How to ...
This shows a link to a video for help and guidance.
1.2 Symbols for hazard statements
DANGER!
This shows dangerous situations.
If the guidelines are not followed, these situations will result in death, serious personal injury, and equipment damage or
destruction.
WARNING
This shows potentially dangerous situations.
If the guidelines are not followed, these situations could result in death, serious personal injury, and equipment damage
or destruction.
CAUTION
This shows low level risk situation.
If the guidelines are not followed, these situations could result in minor or moderate injury.
NOTICE
This shows an important notice
Make sure to read this information.
1.3 Technical support
Technical documentation
Download the technical documentation from the DEIF website: www.deif.com/documentation/
User's manual 4189341335A EN Page 4 of 33

Service and support
DEIF is committed to being available to our customers and partners 24 hours a day, seven days a week, to guarantee the highest
levels of service and support.
www.deif.com/support
Training
DEIF arranges training courses at DEIF offices worldwide.
www.deif.com/training
Additional service
DEIF offers service with design, commissioning, operating and optimisation.
www.deif.com/support/local-office
1.4 Legal information
Disclaimer
DEIF A/S reserves the right to change any of the contents of this document without prior notice.
The English version of this document always contains the most recent and up-to-date information about the product. DEIF does not
take responsibility for the accuracy of translations, and translations might not be updated at the same time as the English document.
If there is a discrepancy, the English version prevails.
Warranty
The rack may only be opened to remove, replace, and/or add a hardware module. The procedure in the Installation instructions
must be followed. If the rack is opened for any other reason, and/or the procedure is not followed, then the warranty is void.
Trademarks
DEIF, power in control and the DEIF logo are trademarks of DEIF A/S.
Bonjour® is a registered trademark of Apple Inc. in the United States and other countries.
CANopen® is a registered community trademark of CAN in Automation e.V. (CiA).
CODESYS® is a trademark of CODESYS GmbH.
Docker for windows® is a trademark of Docker Inc.
EtherCAT®, EtherCAT P®, Safety over EtherCAT®, are trademarks or registered trademarks, licensed by Beckhoff Automation
GmbH, Germany.
Google® and Google Chrome® are registered trademarks of Google LLC.
Linux® is a registered trademark of Linus Torvalds in the U.S. and other countries.
Mozilla® and Firefox® are registered trademarks of Mozilla corporation in the U.S. and other countries.
Modbus® is a registered trademark of Schneider Automation Inc.
Windows® is a registered trademark of Microsoft Corporation in the United States and other countries.
All trademarks are the properties of their respective owners.
Copyright
© Copyright DEIF A/S. All rights reserved.
User's manual 4189341335A EN Page 5 of 33

2. Configure AMC 600
2.1 Software
2.1.1 Download AMC 600 software
Download the AMC 600 software from https://www.deif.com/software.
Use the filter to select either AMC 600 or AWC 500 products to get the specific software packages for download.
CODESYS IDE
The CODESYS IDE is found under AMC 300 product
AMC 600
• AMC 600 CODESYS Target Support package.
• AMC 600 CODESYS run-time for PCM6.1.
This manual also applies to AWC 500 and the corresponding packages are located here:
AWC 500
• AWC 500 CODESYS Target Support package.
• AWC 500 CODESYS run-time for PCM5.2
2.1.2 System requirements
The requirements for the development PC to install the Development packages, PC tools and drivers are:
• Microsoft Windows 10 or later, 32 bit version.
• Microsoft Windows 10 or later, 64 bit version (Recommended).
As the AMC 600 supports SSH (Secure Shell) and SCP (Secure Copy) as basic communication protocols, it can be accessed from
any system supporting these protocols (if enabled).
Not all browsers are suitable for this software. We recommend to use Google Chrome or Mozilla Firefox.
2.1.3 PC tools
The tools WinSCP and PuTTY are used throughout the documentation for additional configuration of the AMC 600
Bonjour service – mDNS service
We recommend the tool Bonjour service as mDNS service.
Download Bonjour service from the official website: https://support.apple.com/kb/DL999?locale=en_US
PuTTY — SSH client (Linux command shell)
The free tool PuTTY for Linux command shell access (SSH communication).
Download PuTTY from the official website: http://www.chiark.greenend.org.uk/~sgtatham/putty/
WinSCP – SFTP client (for file transfer)
For secure file transfer (SFTP or SCP communication), for example for configuration and software updating, we recommend the free
tool WinSCP.
User's manual 4189341335A EN Page 6 of 33

Download WinSCP from the official web-site: https://winscp.net/eng/index.php
Windows PowerShell SSH and SCP are built-in features. Some of the more advanced cryptographic features require Linux, Docker
for Windows or WMware.
2.2 Connection
2.2.1 Power connection
The AMC 600 requires a 24 VDC power supply to the power supply terminals of the PDM6·1/PDM6·2 module.
More information
See the Data sheet for the technical specifications and the Installation instructions for how to wire the power supply.
The AMC 600 system software is operational for approx. 20 seconds from power on.
NOTICE
Sudden power off
The AMC 600 file system is tolerant to sudden power off, and parameters are automatically stored in the non-volatile
memory. No special shutdown procedure is required.
2.3 Programming connection
2.3.1 Programming connection
The AMC 600 is configured and programmed via the Ethernet ports on the PCM6·1 module, both for development (direct access)
and when installed on site (remote).
The configuration is typically made with the AMC 600 web page. Special configuration can be made by editing configuration files
stored in the AMC 600 file system, and accessed via the SSH (Linux command shell) or SFTP (file transfer).
For service purposes by DEIF or direct access to the PCM6.2 in special cases, the Service port is used for SSH (Linux command
shell) access via USB serial communication.
2.4 Access with Ethernet port
The PCM module must be connected to the development computer directly with an Ethernet cable or over an Ethernet network. By
default, the PCM only offers secure connections.
2.4.1 Default IP configuration
The AMC 600 is supplied with the following default network configuration (static IP address) on Ethernet port 1 (eth0):
IP 192.168.20.13
Mask 255.255.255.0
Gateway 192.168.20.12
Ethernet port 2 (eth1) is by default configured for DHCP.
User's manual 4189341335A EN Page 7 of 33
2.4.2 Default Hostname
Default hostname is:
pcm61-sn[<1>]
Where sn is the serial number of the PCM6.1 module.
A PC setup to IPv4 with a Link-local address and mDNS support can access the system web pages on:
https://[hostname]
2.4.3 Default User and Password
The AMC 600 is supplied by default with one user account (root):
Default username root
Default password deif7800
Additional user roles and passwords (Operator, Service, Administrator) can be added in the Users menu.
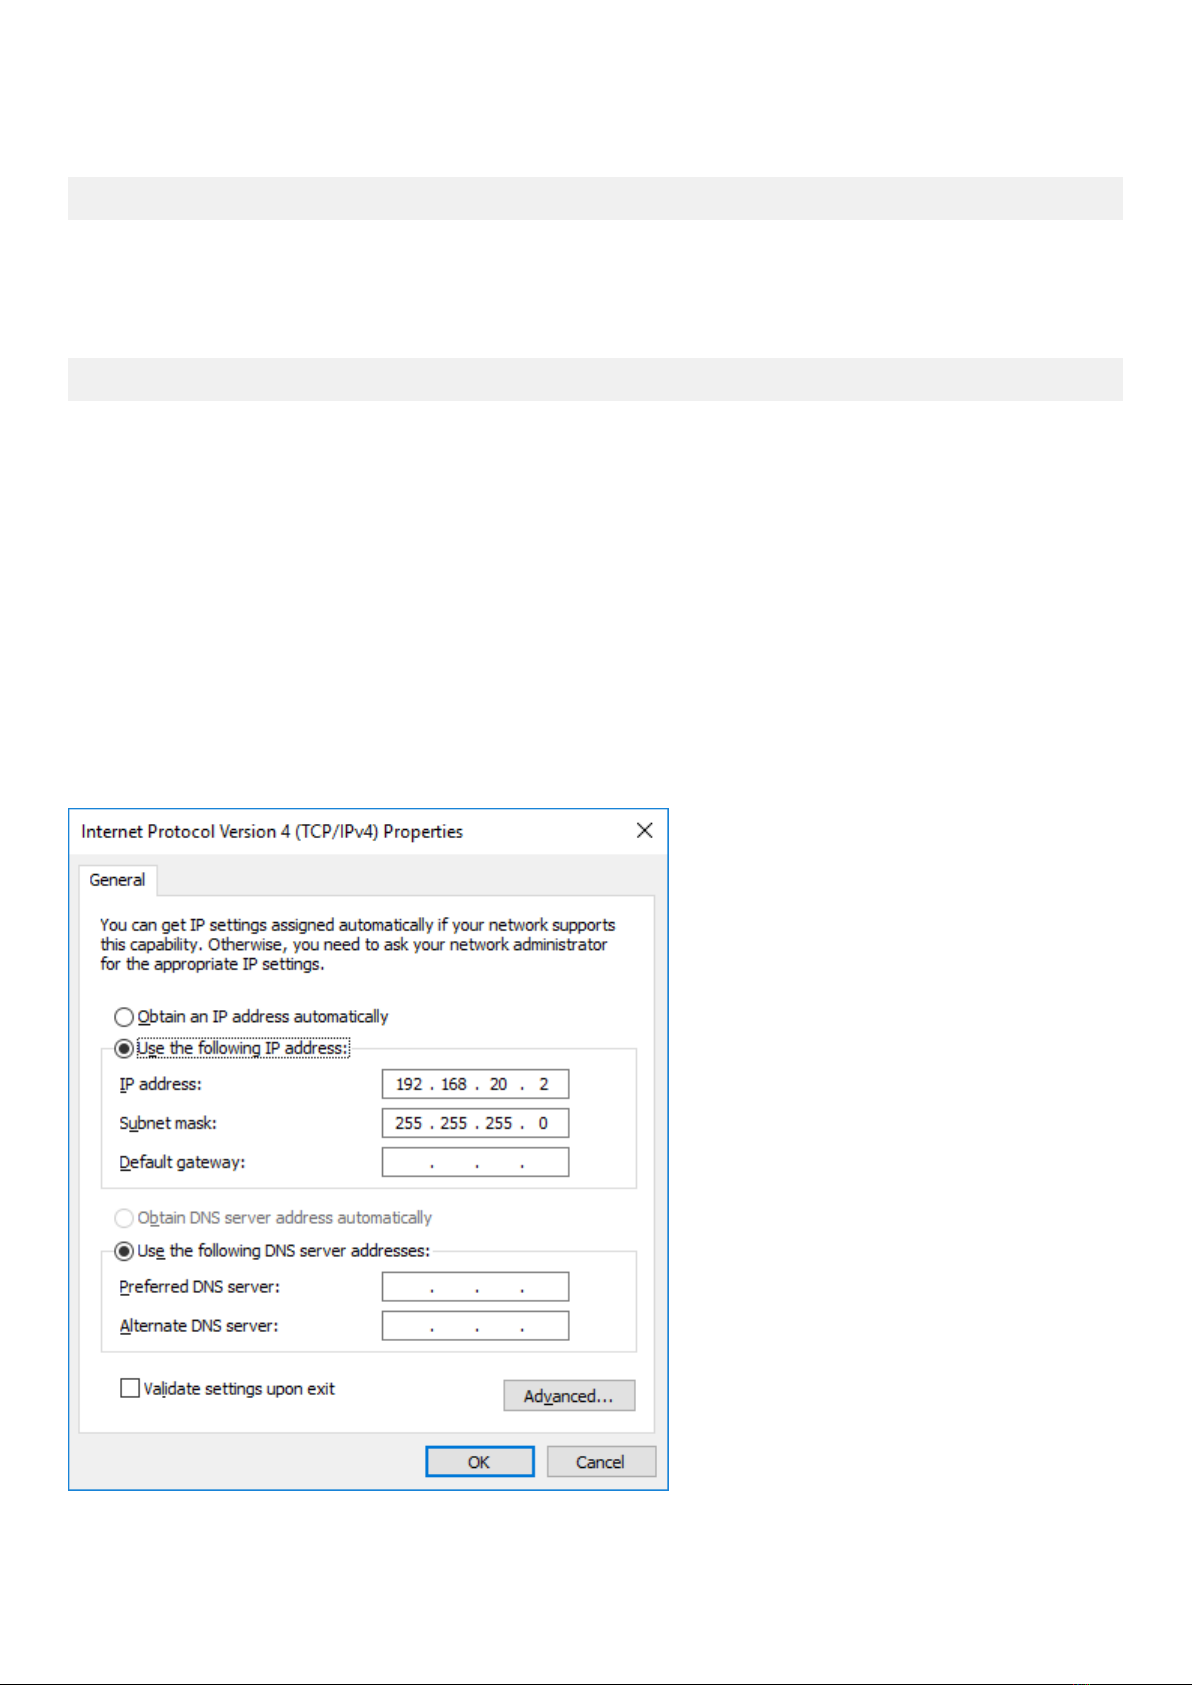
2.4.4 Test connection
Your PC must be setup to the same subnet range, that is to say, by giving your computer the IP 192.168.20.2:
User's manual 4189341335A EN Page 8 of 33

To test the connection open a web-browser and enter the IP (https://192.168.20.13) of the AMC 600. This will show the AMC 600
webpage.
2.4.5 Test connection with Ping
The connection can be tested by sending a ping to the AMC 600:
ping 192.168.20.13
If there is no connection:
• Check the Ethernet cable.
• Check the power to the AMC 600 (Green Power LED status of PDM6.x module or PDM5.1/PCM5.2 for AWC 500).
• Check your PC firewall settings.
• Check if the AMC 600 is configured with another IP address than the default.
More information
See Access with the Service port for how to view the existing IP address.
If the network settings are OK, then continue with the Programming.
Continue below to see how to make a connection to the AMC 600 with the SSH client (PuTTY) or the SFTP client (WinSCP).
User's manual 4189341335A EN Page 9 of 33

2.5 The system web page
2.5.1 Access to the System web page
To access the AMC 600 system page, open a browser and go to:
https://192.168.20.13
More information
See Test the connection if you cannot access the web page.
2.5.2 About the System web page
When you are logged in, you get an overview of the system:
No. Item Notes
1 Home This page.
2 Module Overview of the active module configuration.
3 Info System information.
4 Tools System tools - Logs and firmware updates.
5 Applications Control application execution.
User's manual 4189341335A EN Page 10 of 33

2.6 Menus
2.6.1 View modules
Select Modules to see an overview of the available modules:
User's manual 4189341335A EN Page 11 of 33

2.6.2 View System information
Select Info to see a summary of the System information:
User's manual 4189341335A EN Page 12 of 33


3. Program AMC 600
3.1 IEC61131-3 (CODESYS) programming
More information
See AMC 600 CODESYS Development package 4189340814 for a guide on how to install the AMC 600 CODESYS
development package and the first steps to get started with it.
User's manual 4189341335A EN Page 14 of 33
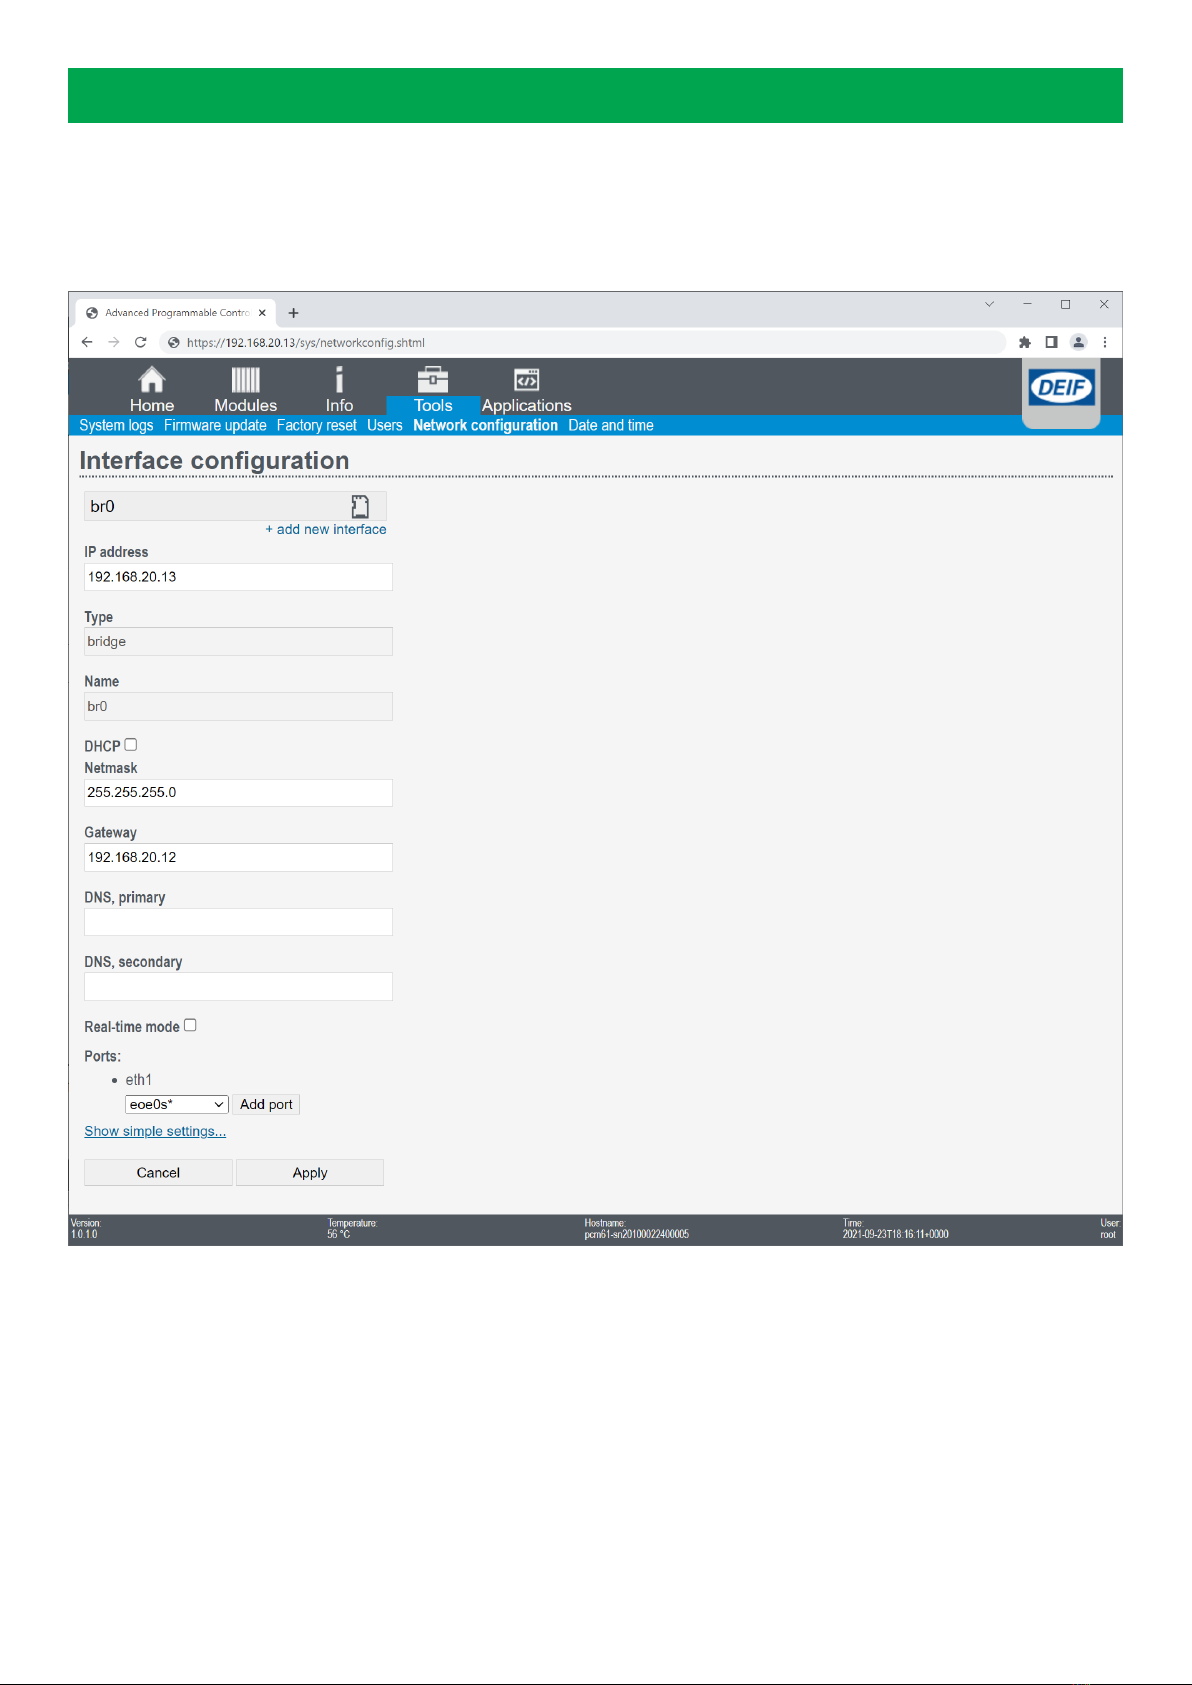
4. Additional configuration
4.1 Change advanced network configuration
Under Tools > Network configuration the network interface configurations for each port (eg. eth0 or eth1) or bridged
connections between ports (eg. br0) can be configured.
4.1.1 Ports
When configuring a bridge up, you can specify the Port that should be included in the bridge.
4.1.2 Real-time mode
When checking the box Real-time mode the priority of the Ethernet is raised to priority 50, but still below the real-time priorities in
CODESYS. This enables real-time communication to for example: Power converters.
User's manual 4189341335A EN Page 15 of 33

4.2 Extended user management
Under Tools > Users the additional users : Admin, Service and Operator user roles can be enabled with password.
Start by providing password for Admin. Once Admin password has been set, the root user is disabled. You can then extend with
Service and finally Operator user roles.
NOTICE
SSH user password
The SSH user password needs to be changed via the SSH access.
4.2.1 User roles access rights
View Default user Operator Service Admin Root
Home ● ● ● ● ●
Info ● ● ● ● ●
Tools ● ● ● ● ●
Tools > System log ● ● ● ● ●
Tools > System log > Download ● ● ● ●
Tools > Factory reset ● ●
Tools > Network view ● ● ● ● ●
Tools > Network change ● ● ●
User's manual 4189341335A EN Page 16 of 33

4.3 Enable SSH (Secure Shell) access
By default SSH access is enabled on the AMC 600.
4.3.1 Create connection with WinSCP
Launch WinSCP:
When using file transfer, make sure transfer to temporary filenames is disabled.
To disable file transfer to temporary filenames, go to Tools, select Preferences and Transfer > Endurance:
User's manual 4189341335A EN Page 17 of 33

Then disable transfer to temporary file:
Creating a session to AMC 600 go to Session and fill in Hostname, User name and password. Save (Save…) the session for later or
press Login:
User's manual 4189341335A EN Page 18 of 33

This will open a session:
User's manual 4189341335A EN Page 19 of 33

4.3.2 Create connection with PuTTY
Launch PuTTY:
In the PuTTY Configuration window enter IP address, ensure Connection type is SSH, and port is 22, then open:
This opens the Linux command shell, prompting for user name –first type "root" [ENTER] – followed by password – type "deif7800"
[ENTER] – to log in:
User's manual 4189341335A EN Page 20 of 33
Table of contents
Other Deif Industrial Equipment manuals


Popular Industrial Equipment manuals by other brands


GORTER CONTROLS
GORTER CONTROLS COCON 26 N-LP Operator's manual

Lasco
Lasco LA800HZ Operation and maintenance manual

Swiss Rotors
Swiss Rotors CA-2-27 Operation and maintenance

Betz
Betz FE 0400-1 Series instruction manual

Branick
Branick AH/RI-R Installation, Operation and Repair Parts Information

REICH
REICH TOK F2 Series operating instructions

ABB
ABB HT581623 Operation manual

Harbor
Harbor CENTRAL 60738 Owner's manual & safety instructions

ABB
ABB Relion REX610 quick start guide

Almeva
Almeva DNC Installation

environmental potentials
environmental potentials EP-2820 Installation and application manual

SCHUNK
SCHUNK ROTA NCK-S plus Assembly and operating manual