Deighton FORMATIC User manual

FORMATIC
Instruction Manual
Gibson Street, Leeds Road, Bradford
West Yorkshire, England. BD3 9TR
Telephone: +44 (0) 1274 668771 Fax: +44 (0) 1274 665214

FORMATIC
CONTENTS
1. Introduction
2. Technical Specification
3. Installation / Preparation for Production
4. Operating the Machine
5. Cleaning
6. Safety
7. Maintenance
8. Optional Extras;
•Hoppers
•Conveyors
•Auto Wire Clean
•Paper Attachment
10. Recommended Spares List
11. Wiring Diagrams

(1) INTRODUCTION
The Formatic range by Deighton Manufacturing (UK) Ltd guarantees accurate forming and
portioning of a wide variety of food mixtures and products.
Encompassing Retail, Commercial and Industrial sized models, the range has been designed to
accommodate the needs of both high and low volume producers.
Simplicity is the strength of the Formatic system. Suited to a variety of mixtures of numerous
textures and consistencies, the formatic uses synchronised paddles to gently press mixture into
the required form shape.
Assisted by the wire drum scraper, the formed product is then smoothly ejected onto the
conveyor, presenting it for packaging or further processing.

(2) TECHNICAL SPECIFICATION
Formatic
UL approved Formatics Only
Power requirements -
On UL approved machines use a 20 amp Class B GFCI (receptacle).

Retail Machine R1200 R2200 R3000
Size:
Length (A) 700 700 700
Width (B) 600 600 600
Height (C) 640 640 640
Weight:- 75 Kg 75 Kg 75 Kg
Product Output:- 1200/hr 2200/hr 3000/hr
Hopper Capacity:- 18 litres 18 litres 18 litres
Product Size (max):- 140mm x 120mm x 24mm thick (34mm deep drop)
Electrical Supply:- 220/240V 50 Hz AC
Power:- 550 Watt 550 Watt 750 Watt
It should be noted that on certain products it is possible to increase the product out put by
specifying a 180 degree machine. This enables a form to be place on each side of the drum and
effectively doubling product output.

Commercial Machine C2000 C4000
Size:
Length (A) 700 700
Width (B) 800 800
Height (C) 700 700
Weight:- 90 Kg 90 Kg
Product Output:- 2000/hr 4000/hr
Hopper Capacity:- 20 Kg 20 Kg
Product Size (max):- 135mm x 135mm x 24mm thick (34mm deep drop)
Electrical Supply:- 220/240V 50 Hz AC
Power:- 550 Watt 550 Watt
It should be noted that on certain products it is possible to increase the product out put by
specifying a 180 degree machine. This enables a form to be place on each side of the drum and
effectively doubling product output.

Industrial Machine I4000 IR4000 I4000/50
Size:
Length (A) 800 750 800
Width (B) 850 600 850
Height (C) 700 725 785
Weight:- 100 Kg 90 Kg 150 Kg
Product Output:- 4000/hr 4000/hr 4000/hr
Hopper Capacity:- 30 Kg 15 Kg 30 Kg
Product Size (max):- 150 x 150 x 24 125 x 118 x 50 150 x 150 x 50
Electrical Supply:- 220/240V 50 Hz AC
Power:- 1500 Watt 1500 Watt 1500 Watt
It should be noted that on certain products it is possible to increase the product out put by
specifying a 180 degree machine. This enables a form to be place on each side of the drum and
effectively doubling product output.

(3) INSTALLATION PROCEDURE
3.1 Check the Formatic for transport damage and report any immediately to Deighton
Manufacturing Ltd.
3.2 Before Operating the machine:-
Remove any packaging material
Position the Formatic relative to any other equipment it is to connect with. Connect the
machine to the correct supply.
3.3 Step 1; Locate the selected drum onto the drive shaft ensuring that the keyways
are aligned and push the drum completely home (if the form is not at the top you may
need to lift the ejector set over the cam). Fit the paper cam/guard over the drum on the
end of the shaft and secure with locking knob, cam cannot be removed without rotating
the hopper due to the safety pin located on each hopper (left hand thread).

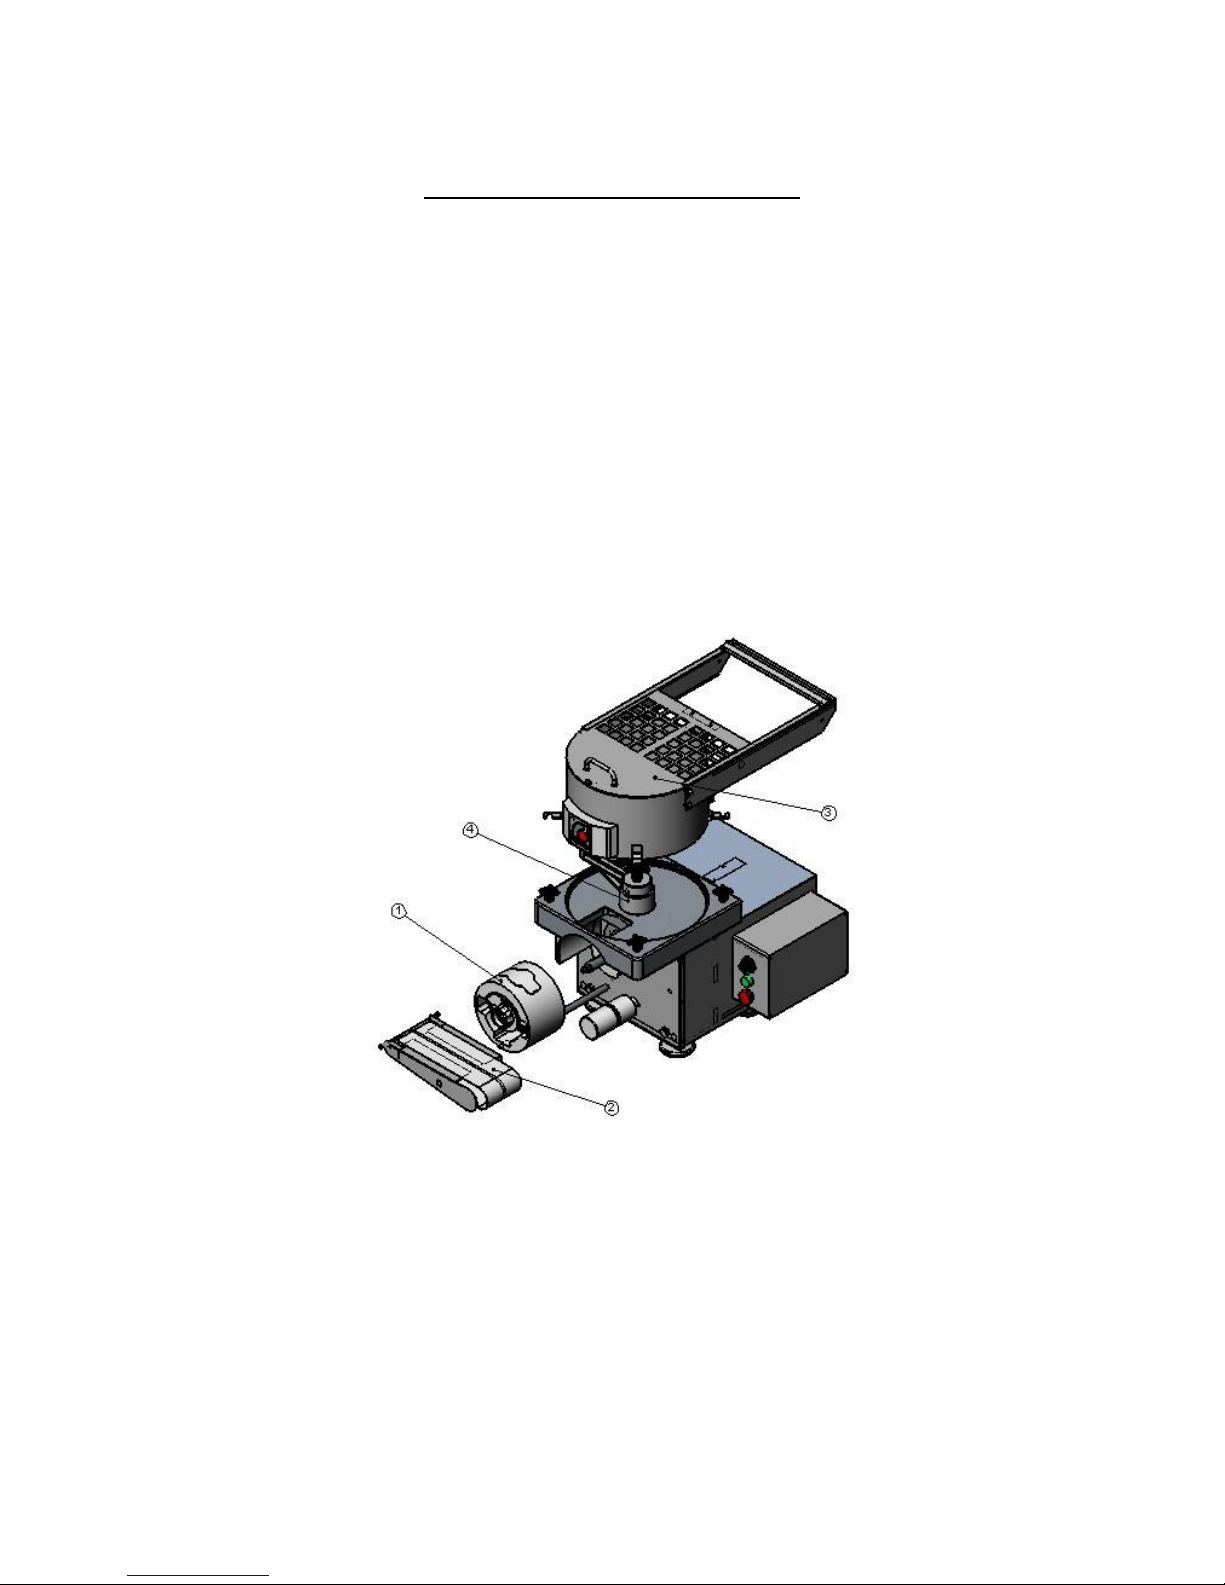
Step 2; Locate the conveyor platform onto the pivot shaft positioned to the bottom
left of the drum. Slip the conveyor belt onto the nylon drive roller and around the
platform nose roller, with the platform rotated to the 10 o’clock position. Set the platform
down so that it rest on the round conveyor stop and lock in place using the hand knob
provided. Fit the scraper wire assembly into the support brackets on the nose of the
conveyor and adjust the tension.
Step 3; Ensure the hopper sealing ring is pressed firmly into its retaining slot in
the machine top. Slacken the four hopper securing knobs on the top of the machine. Place
the hopper into the top machined recess on the hopper seal and rotate such that the hopper
securing lugs engage with the hand knob studs. Secure the hopper in place by tightening
the hand knobs.
Note: the hopper will only locate in one position with the hopper bars towards the front
right of the machine.
Always ensure the hopper is loaded correctly onto the seal in the hopper top.
Check the hopper bar is secure in the hopper. If it has been removed for any reason when
it is replaced use locktight to lock in position.
Step 4; Position the chosen paddles onto the paddle shaft at the top of the
machine, ensuring the keyways are aligned, and secure in place with paddle knob.
Step 5; The scraper shaft assembly (not shown) locates into the housing on the left
hand side of the drum. Before assembling the scraper shaft, ensure that the shaft locking
screw is clear of the housing bore. Push home the assembly so that the wire support bar
nearest the front of the machine engages in the housing slot. To ensure alignment in the
housing slot it will be necessary to rotate the housing clockwise with the aid of the
locking screw. When in position secure with locking screw.
The working position of the scraper, although factory set, can be adjusted with a grub
screw. This is located under a bung on the left hand side of the machine. The tension of
the scraper wire can be adjusted by rotating the front scraper bar hand knob.

(4) OPERATING THE MACHINE
Connect up to the supply and press the green start button. The form drum conveyor and hopper
paddles should rotate smoothly and quietly (if a foot switch is fitted this will need depressing to
operate).
If any safety interlock is not in place the machine will not operate. Relocate the interlock and
press the green start button to operate.
To stop the machine press the red stop button (or release foot switch if fitted).
If the machine will not operate check the following;
1. The machine power is switched on
2. The hopper guard micro switch is in place
3. There is nothing preventing the free rotation of paddles or drum
4. The stop button is not depressed
If, after carrying out these simple checks, you still do not get any rotation when the start button is
depressed, please contact your machine supplier or the manufacturer for further assistance.
Always clean the machine thoroughly prior to production (see cleaning).
When using an auto wire cleaning system always lubricate the metal shaft the scraper moves
along with the food lubrication spray provided prior to using the machine.
Initially practice starting and stopping the machine until you are able to stop the forming drum
with the mould at 90 degrees to the hopper, being positioned on the left hand side of the forming
drum when viewed from the front. This is the correct rest position and allows for simple removal
and replacement of the forming drum and also makes it easy to vary the depth of the form to set
the finished products weight.
Always make sure that there are no large pieces of bone or other hard items in the mix as they
can damage your machine.

To adjust the thickness and weight of the finished product (the variation available being between
6mm and 34mm, approximately 3 –8 oz) use the following routine.
•Approximately half fill the hopper with the mix to be used, checking it’s suitability
•Start the machine until two full forms are obtained
•Weigh the fully formed product and either increase or decrease the thickness until the
correct weight is achieved. This is done by removing the paper attachment cam/guard,
releasing the lock nut (item 1) and turning the spiral cam (item 2) the required amount.
•Re-tighten the lock nut and replace the paper attachment guard/cam and repeat procedure
until correct setting is achieved.
The machine is now ready to run.
Note; The scraper wire should be kept as clean as possible to aid the release of the product from
the drum. The manual scraping of the wire should be carried out in the part of the cycle when the
wire is away from the drum.

Generally the size of the paddles should balance with the size of the product being formed i.e.,
small paddle combination for a small product.
Deighton Manufacturing will supply the machine with a series of paddles suitable for the mix
being used and the form sizes being created however you can obtain various sizes and
combinations if problems occur with those supplied
With each mix you use for the first time start it with the smallest bottom paddle available with no
top paddle (In this case a top paddle spacer will have been supplied if deemed appropriate). If the
form will not fill, fit the smallest top paddle and if problems still occur continue to fit a larger
bottom then top paddle until the form is filled.

If a mix is sticking to the hopper a causing a ‘tunnelling’ effect a knockdown paddle can be
supplied to release the product from the hopper and push it into the path of the pressure paddles.
If, in the unlikely event, problems still occur in filling and forming it may be necessary to modify
the mix slightly to achieve the desired results.

(5) DISMANTLING AND CLEANING
Please ensure the machine is disconnected from the mains supply before proceeding to
clean.
Dismantle the machine in the reverse order to assembly.
Wash all parts with hot water (at a temperature no greater than 60 c) before the product has a
chance to dry. Do not use strong alkaline/acid based cleaners.
Parts should not be scraped with metal objects, a plastic scraper is an ideal cleaning aid.

(6) SAFETY
1. Always disconnect mains supply before servicing, cleaning or changing the drum
2. Disconnect mains supply when removing drum and guard
3. The machine should not be run when the drum guard is removed
4. During operation the hopper guard can be opened to refill. This will automatically stop
the machine
5. When replacing the scraper wire remove the assembly from the machine. The machine
must be disconnected from the mains supply before removing assembly.
6. No attempt should be made to override the safety switches or run the machine without the
guards in place
7. Use a 13 amp fuse in the plug
Ensure all operatives read these instructions and are fully conversant with the machines
operations and safety procedures
These machines are to be operated by one person, in the case where an open hopper is used
the machine is to be isolated before any attempt is made to put hands in the hopper. The
machine is not to be operated when anyone is reaching into the hopper whether for cleaning,
blockages or any other reasons.

(7) MAINTENANCE
The only maintenance that is required is a light oiling (food lube) of the form drum mechanism
and scraper shaft after cleaning. The most beneficial thing to extend the life of the machine is;
•Keep it clean and dry when not in use
•Ensure there are no large, hard objects within the mix
•Ensure lubricated air is used to supply cylinder (if fitted)
•Ensure how the operator knows how the machine works
GUARANTEE
The machine is guaranteed for twelve months against breakdown. The items not covered under
the guarantee are those which wear through normal operation. Replacements are readily
available from the manufacturer.

(8) OPTIONAL EXTRAS
Hoppers
As well as the standard hopper supplied with the machine several other hopper options are
available for all the range of Formatics.
Low Level Hopper
Generally used for delicate mixes where the product quality can deteriorate when over mixed by
the paddles. Requires more regular filling.
Extended Hopper
Used in situations where a large batch of products is being produced to reduce the frequency of
filling.

75 Litre Hopper
Used in large batch production to reduce the frequency of refilling
200 Litre Hopper
Again used in very large production to reduce frequency of refilling. Can be filled using a 200kg
bin lift.

We can also supply a ‘gooseneck’ or ‘funnel’ feeder for the standard, low level and extended
hoppers. These enable the machine to be continually filled whilst in operation.
Conveyors
The Formatic machines come supplied with a standard length conveyor (length varies depending
on model). Also available are extended and jointed conveyors.
Retail Formatic; Extended conveyors of 750mm and 1200mm long and a jointed
conveyor of 750mm long are available.
Commercial Formatic; Extended conveyors of 1000mm and 1500mm are available and a
jointed conveyor of 1000mm.
Industrial Formatic; Extended conveyors of 1000mm and 1500mm are available and a
jointed conveyor of 1000mm.

Auto Wire Clean
On the standard machine the scraper wire is cleaned manually at regular intervals to improve the
release of the formed product. On a lot of meat products it is essential to clean the wire after
every form.
This can be done automatically with the use of the Auto Wire Clean system. The system uses a
pneumatic cylinder and therefore requires a compressed air supply to the machine. A small silent
run compressor can also be supplied if required.
Maximum air pressure 145PSI (10Bar) (1MPa).
Minimum air pressure 101.5PSI (7Bar) (0.7MPa).
Food lubrication spray.
Paper Attachment
Mainly used in the meat industry when there is a requirement to put paper interleaves between
formed products. The papers (which can also be supplied by Deighton Manufacturing) are loaded
onto a cartridge and then released onto the base of the formed product before been ejected onto
the conveyor. Position of the paper relative to the form can be adjusted simply by rotating the
paper attachment cam.
Table of contents