Dell UltraSharp UP3218K User manual

Model: UP3218K
Regulatory model: UP3218Kt
Dell UltraSharp UP3218K
User’s Guide

NOTE: A NOTE indicates important information that helps you make better use of
your computer.
CAUTION: A CAUTION indicates potential damage to hardware or loss of data if
instructions are not followed.
WARNING: A WARNING indicates a potential for property damage, personal
injury, or death.
Copyright © 2017 Dell Inc. All rights reserved. This product is protected by U.S. and international
copyright and intellectual property laws.
Dell™ and the Dell logo are trademarks of Dell Inc. in the United States and/or other jurisdictions.
All other marks and names mentioned herein may be trademarks of their respective companies.
2017 – 03 Rev. A00

Contents
About Your Monitor ..................................... 5
Package Contents . . . . . . . . . . . . . . . . . . . . . . . . . . . . . . . . . . 5
Product Features . . . . . . . . . . . . . . . . . . . . . . . . . . . . . . . . . . . 6
Identifying Parts and Controls . . . . . . . . . . . . . . . . . . . . . . . . . . . 7
Monitor Specifications. . . . . . . . . . . . . . . . . . . . . . . . . . . . . . . 10
Plug-and-Play . . . . . . . . . . . . . . . . . . . . . . . . . . . . . . . . . . . . .17
LCD Monitor Quality and Pixel Policy. . . . . . . . . . . . . . . . . . . . . . .17
Setting Up the Monitor.................................. 18
Attaching the Stand . . . . . . . . . . . . . . . . . . . . . . . . . . . . . . . . 18
Using the Tilt, Swivel, and Vertical Extension . . . . . . . . . . . . . . . . . 19
Adjusting the Rotation Display Settings of Your System . . . . . . . . . . 20
Connecting Your Monitor. . . . . . . . . . . . . . . . . . . . . . . . . . . . . 20
Organizing Your Cables . . . . . . . . . . . . . . . . . . . . . . . . . . . . . . 24
Removing the Monitor Stand. . . . . . . . . . . . . . . . . . . . . . . . . . . 24
Wall Mounting (Optional) . . . . . . . . . . . . . . . . . . . . . . . . . . . . . 25
Operating the Monitor .................................. 26
Turning on the Monitor . . . . . . . . . . . . . . . . . . . . . . . . . . . . . . 26
Using the Front Panel Controls . . . . . . . . . . . . . . . . . . . . . . . . . 26
Using the On-Screen Display (OSD) Menu . . . . . . . . . . . . . . . . . . . 29
Troubleshooting .......................................42
Self-Test . . . . . . . . . . . . . . . . . . . . . . . . . . . . . . . . . . . . . . . 42
Contents | 3

4| Contents
Built-in Diagnostics . . . . . . . . . . . . . . . . . . . . . . . . . . . . . . . . 43
Common Problems. . . . . . . . . . . . . . . . . . . . . . . . . . . . . . . . . 44
Product Specific Problems . . . . . . . . . . . . . . . . . . . . . . . . . . . . 45
Appendix .............................................. 47
Safety Instructions . . . . . . . . . . . . . . . . . . . . . . . . . . . . . . . . . 47
FCC Notices (U.S. only) and Other Regulatory Information . . . . . . . . 47
Contacting Dell . . . . . . . . . . . . . . . . . . . . . . . . . . . . . . . . . . . 47
Setting Up Your Monitor . . . . . . . . . . . . . . . . . . . . . . . . . . . . . 48
Maintenance Guidelines. . . . . . . . . . . . . . . . . . . . . . . . . . . . . . 50

About Your Monitor | 5
About Your Monitor
Package Contents
Your monitor ships with the components shown below. Make sure that you have
received all the components and contact Dell if something is missing.
NOTE: Some items may be optional and may not ship with your monitor.
Somefeatures or media may not be available in certain countries.
Monitor
Stand
Power cable (varies by country)
DP cable (DP to DP)
x 2 pcs

6| About Your Monitor
USB 3.0 upstream cable (enables
the USB ports on the monitor)
Cleaning cloth
•Drivers and documentation media
•Quick Setup Guide
•Safety and Regulatory Information
•Factory Calibration Report
Product Features
The Dell UltraSharp UP3218K monitor has an active matrix, TFT-LCD (Color Active
Matrix Liquid Crystal Display with a (WLED) The matrix employs Oxide Thin Film
Transistor as the active element) and LED backlight. The monitor features include:
• 80.01 cm (31.5-inch) active area display (Measured diagonally) QUHD 7680 x 4320
resolution, plus full-screen support for lower resolutions.
• Wide viewing angles with Adobe RGB 100%, DCI 98% color.
• Tilt, swivel, pivot and vertical extension adjustment capabilities.
• Removable pedestal and Video Electronics Standards Association (VESA™) 100 mm
mounting holes for flexible mounting solutions.
• Ultra-thin bezel minimizes the bezel gap in multi-monitor usage, enabling easier
set up with an elegant viewing experience.
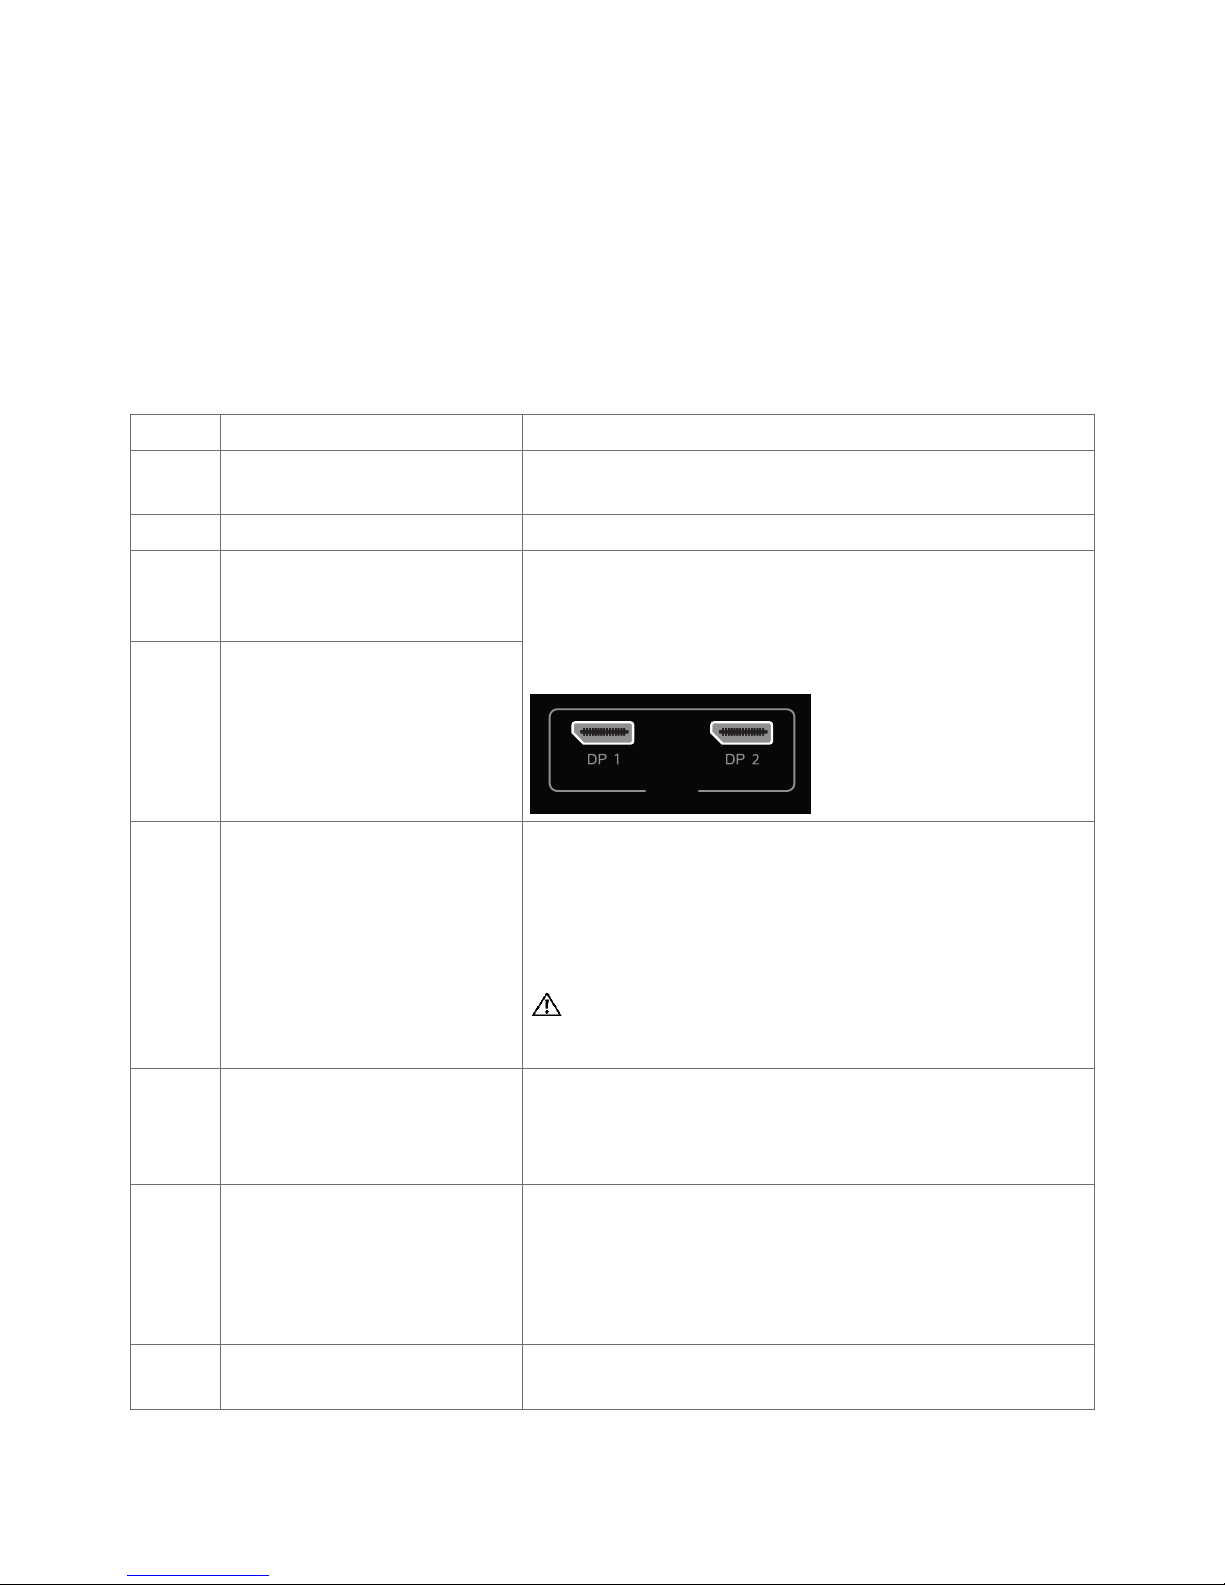
• Dual DP to support 7680 x 4320 @ 60Hz.
• Support for Displayport version DP1.4.
• Plug and play capability if supported by your system.
• On-Screen Display (OSD) adjustments for ease of set-up and screen optimization.
• Software and documentation media includes an information file (INF), Image
color Matching File (ICM), Dell Display Manager software application and product
documentation. Dell Display Manager included (comes in the CD attached with the
monitor).
• Security lock slot.
• Asset Management Capability.
• Energy Star Compliant.
• EPEAT Gold Compliant.
• RoHS compliant.
• BFR/PVC Free monitor (excluding cables).
• Arsenic-Free glass and Mercury Free for Panel only.
• Energy Gauge shows the energy level being consumed by the monitor in real time.
• 0.5 W standby power when in the sleep mode.

About Your Monitor | 7
Identifying Parts and Controls
Front view
Label Description
1Function buttons (For more information, see Operating the Monitor)
2Power on/off button (with LED indicator)

8| About Your Monitor
Back View
Label Description Use
1VESA mountiong holes (100 mm
x 100 mm-behind attached VESA
cover)
Wall mount monitor using VESA-
compatible wall mount kit (100 mm x 100
mm).
2Regulatory label Lists the regulatory approvals.
3Stand release button Release stand from monitor.
4Barcode, serial number, and Service
Tag label
Refer to this label if you need to contact
Dell for technical support.
5LED touch PAD Stand is fixed while DELL Logo light on.
6Cable management hole Use to organize cables by placing them
through the hole.

About Your Monitor | 9
Bottom View
Label Description Use
1Security lock slot Secures monitor with security cable lock (sold
separately).
2AC power connector To connect the monitor power cable.
3a DisplayPort in connector
1
Connect both connectors to your computer with a
pair of:
• DP to DP cables
for 8K4K (max.) resolution.
8K4K
(max)
3b DisplayPort in connector
2
4Audio line-out port Connect speakers to playback audio coming
through DP audio channels.
Only supports 2-channel audio.
NOTE: The audio line-out port does not support
headphones.
WARNING: Excessive sound pressure from
earphones or headphones can cause hearing
damage or loss.
5USB upstream port Connect the USB cable that comes with your
monitor to the computer. Once this cable is
connected, you can use the USB downstream
connectors on the monitor.
6a,6b USB downstream ports (4) Connect your USB devices. *
You can only use these connectors after you have
connected the USB cable to the computer and
USB upstream connector on the monitor.
(Port with battery icon is for BC 1.2).
7Stand lock Lock the stand to the monitor using a M3 x 6 mm
screw (screw not included).
* It is recommended to use either the port (6b) for your wireless USB device whenever
possible.

10 | About Your Monitor
Monitor Specifications
Flat Panel Specifications
Screen type Color Active Matrix Liquid Crystal Display with a
(WLED) - TFT LCD
Panel type In Plane Switching (IPS)
Viewable image
Diagonal 80.01 cm (31.5 inches)
Active Area
Horizontal 698.1 mm (27.48 inches)
Vertical 392.7 mm (15.46 inches)
Area 274143.9 mm2(424.84 inches2)
Pixel pitch 0.0303 mm x 0.0909 mm
Viewing angle
Horizontal 178° (typical)
Vertical 178° (typical)
Luminance output 400 cd/m² (Center 1 Point, typical)
Contrast ratio 1300 to 1 (typical)
Faceplate coating Anti-Reflective treatment of the front polarizer (2H)
Backlight LED
Response Time 8 ms (normal), 6 ms (fast)
Color depth 10-bit 1.07 Billion colors
Color gamut Adobe RGB 100%, sRGB 100%, REC709 100%, DCI
98%
Resolution Specifications
Horizontal scan range 30 kHz to 90 kHz
Vertical scan range 59 Hz to 61 Hz
Maximum preset resolution 7680 x 4320 at 60 Hz
Video display capabilities
(DP playback)
480i, 480p, 576i, 576p, 720p, 1080i, 1080p,
2160p, 4320p

About Your Monitor | 11
Preset Display Modes
Display Mode Horizontal
Frequency
(kHz)
Vertical
Frequency
(Hz)
Pixel Clock
(MHz)
Sync Polarity
(Horizontal/
Vertical)
720 x 400 31.5 70.0 28.3 -/+
640 x 480 31.5 60.0 25.2 -/-
640 x 480 37.5 75.0 31.5 -/-
800 x 600 37.9 60.0 40.0 +/+
800 x 600 46.9 75.0 49.5 +/+
1024 x 768 48.4 60.0 65.0 -/-
1024 x 768 60.0 75.0 78.8 +/+
1152 x 864 67.5 75.0 108.0 +/+
1280 x 800 49.3 60.0 71.0 +/+
1280 x 1024 64.0 60.0 108.0 +/+
1280 x 1024 80.0 75.0 135.0 +/+
1600 x 1200 75.0 60.0 162.0 +/+
1920 x 1080 67.5 60.0 193.5 +/+
2048 x 1080 26.3 24.0 26.3 +/-
2048 x 1080 66.7 60.0 66.6 +/-
2560 x 1440 88.8 60.0 241.5 +/-
3840 x 2160 133.3 60.0 533.3 +/-
7680 x 4320 266.6 60.0 2089.8 +/-
* To display 7680 x 4320 at 60 Hz, both DP1 and DP2 must be connected to the same
graphics card. DP source’s graphics card must be DP1.4 certified and Tile display
feature, capable of supporting resolution up to 7680 x 4320 at 60Hz and its driver
supports DisplayID v1.3.

12 | About Your Monitor
Electrical Specifications
Video input signals •Digital video signal for each dierential line
Per dierential line at 100 ohm impedance
•DP signal input support
Input voltage/ frequency/current 100-240 VAC / 50 or 60 Hz ± 3 Hz / 2.1 A
(maximum)
Inrush current 120 V: 40 A (Max.)
240 V: 80 A (Max.)
Physical Characteristics
Connector type •DP connector x 2
•Audio line-out
•USB 3.0 upstream port connector
•USB 3.0 downstream port connector x 4
(Port with battery icon is for BC 1.2)
Signal cable type DP to DP 1.8 M cable
USB 3.0 1.8 M cable
Dimensions (with stand)
Height (extended) 618.0 mm (24.33 inches)
Height (compressed) 498.4 mm (19.62 inches)
Width 720.5 mm (28.37 inches)
Depth 222.0 mm (8.74 inches)
Dimensions (without stand)
Height 421.2 mm (16.58 inches)
Width 720.5 mm (28.37 inches)
Depth 53.2 mm (2.10 inches)
Stand dimensions
Height (extended) 479.0 mm (18.85 inches)
Height (compressed) 441.4 mm(17.38 inches)
Width 333.4 mm (13.13 inches)
Depth 222.0 mm (8.74 inches)
Weight
Weight with packaging 17.0 kg (37.48 lb)
Weight with stand assembly
and cables 10.9 kg (24.03 lb)
Weight without stand assembly
(For wall mount or VESA mount
considerations - no cables)
6.9 kg (15.21 lb)

About Your Monitor | 13
Weight of stand assembly 3.6 kg (7.94 lb)
Environmental Characteristics
Temperature
Operating 0°C to 35°C (32°F to 95°F)
Non-operating –20°C to 60°C (–4°F to 140°F)
Humidity
Operating 10% to 80% (non-condensing)
Non-operating 5% to 90% (non-condensing)
Altitude
Operating 5,000 m (16,404 ft) (maximum)
Non-operating 12,192 m (40,000 ft) (maximum)
Thermal dissipation 426.7 BTU/hour (maximum)
296.8 BTU/hour (typical)

14 | About Your Monitor
Power Management Modes
If you have VESA’s DPM-compliant video card or software installed in your PC, the
monitor can automatically reduce its power consumption when not in use. This is
referred to as power save mode*. If the computer detects input from the keyboard,
mouse, or other input devices, the monitor automatically resumes functioning. The
following table shows the power consumption and signaling of this automatic power
saving feature.
VESA
Modes
Horizontal
Sync
Vertical
Sync
Video Power Indicator Power Consumption
Normal
operation
Active Active Active White 125 W (maximum)**
87 W (typical)
Active-off
mode
Inactive Inactive Off White
(blinking slowly)
Less than 0.5 W
Switch off - - - Off Less than 0.3 W
Energy Star Power Consumption
PON 105.2 W***
ETEC 325.45 kWh****
The OSD operates only in the normal operation mode. If you press any button in the
active-off mode, one of the following message is displayed:
Dell UltraSharp 32 Monitor
Press any key on the keyboard or move the mouse or wake it up.
If there is no display, press the monitor button again to select the correct
input source.
No DP 1 signal from your device.
UP3218K
*Zero power consumption in OFF mode can only be achieved by disconnecting
the AC mains cable from the monitor.
**Maximum power consumption with maximum luminance.
***Power consumption of on mode as defined in Energy Star 7.0 version.
****Total energy consumption in kWh as defined in Energy Star 7.0 version.
This document is informational only and reflects laboratory performance. Your product
may perform differently, depending on the software, components and peripherals you
ordered and shall have no obligation to update such information. Accordingly, the
customer should not rely upon this information in making decisions about electrical
tolerances or otherwise. No warranty as to accuracy or completeness is expressed or
implied.
Activate the computer and the monitor to gain access to the OSD.
NOTE: This monitor is ENERGY STAR -compliant.

About Your Monitor | 15
Pin Assignments
DP connector
Pin number 20-pin side of theconnected signal cable
1ML3(n)
2GND
3ML3(p)
4ML2(n)
5GND
6ML2(p)
7ML1(n)
8GND
9ML1(p)
10 ML0(n)
11 GND
12 ML0(p)
13 GND
14 GND
15 AUX CH (p)
16 GND
17 AUX CH (n)
18 Hot Plug Detect
19 Return
20 DP_PWR

16 | About Your Monitor
Universal Serial Bus (USB)
This section gives you information about the USB ports available on your monitor.
NOTE: Up to 2 A on USB downstream port (port with battery icon) with BC 1.2
compliance devices; up to 0.9 A on the other 3 USB downstream ports.
Your computer has the following USB ports:
• 1 upstream - bottom
• 4 downstream - 4 at bottom
Power Charging Port - the one on the left side (Port with battery icon);
supports fast current charging capability if the device is BC 1.2 compatible.
NOTE: The monitor’s USB ports work only when the monitor is on or in the power
save mode. If you turn off the monitor and then turn it on, the attached peripherals
may take a few seconds to resume normal functionality.
Transfer speed Data rate Power consumption
SuperSpeed 5 Gbps 4.5 W (Max., each port)
Hi-Speed 480 Mbps 2.5 W (Max., each port)
Full speed 12 Mbps 2.5 W (Max., each port)
USB upstream port USB downstreamport
Pin number Signal name Pin number Signal name
1 VBUS 1 VBUS
2D- 2D-
3D+ 3D+
4GND 4GND
5StdB_SSTX- 5StdA_SSRX-
6StdB_SSTX+ 6StdA_SSRX+
7GND_DRAIN 7GND_DRAIN
8StdB_SSRX- 8StdA_SSTX-
9StdB_SSRX+ 9StdA_SSTX+
Shell Shield Shell Shield

About Your Monitor | 17
Plug-and-Play
You can install the monitor in any Plug-and-Play-compatible system. The monitor
automatically provides the computer system with its extended display identification data
(EDID) using display data channel (DDC) protocols so the computer can configure itself
and optimize the monitor settings. Most monitor installations are automatic; you can
select different settings if desired. For more information about changing the monitor
settings, see Operating the Monitor.
LCD Monitor Quality and Pixel Policy
During the LCD monitor manufacturing process, it is not uncommon for one or more
pixels to become fixed in an unchanging state which are hard to see and do not affect
the display quality or usability. For more information on LCD Monitor Pixel Policy, see
Dell support site at: http://www.dell.com/support/monitors.

18 | Setting Up the Monitor
Setting Up the Monitor
Attaching the Stand
NOTE: The stand riser and stand base are detached when the monitor is shipped
from the factory.
NOTE: The procedure below is applicable for the default stand. If you purchased
any other stand, see the documentation shipped with the stand to set it up.
CAUTION: Place monitor of a flat, clean, and soft surface to avoid scratching the
display panel.
To attach the monitor stand:
1Remove the monitor protective cover and place the monitor with its front facing
downward on it.
2Insert the stand to the groove on the back of the monitor.
3Press the stand down till it snaps into its place.

Setting Up the Monitor | 19
Using the Tilt, Swivel, and Vertical Extension
NOTE: This is applicable for a monitor with a stand. If you purchased any other
stand, refer to the respective stand setup guide for set up instructions.
Tilt, Swivel and Vertical Extension
With the stand attached to the monitor, you can tilt the monitor for the most
comfortable viewing angle.
NOTE: The stand is detached when the monitor is shipped from the factory.
Rotating the Monitor
Before you rotate the monitor, your monitor should be fully vertically extended and fully
tilted up to avoid hitting the bottom edge of the monitor.

20 | Setting Up the Monitor
NOTE: To use the Display Rotation function (Landscape versus Portrait view) with
your Dell computer, you require an updated graphics driver that is not included with
this monitor. To download the graphics driver, go to www.dell.com/support and see
the Download section for Video Drivers for latest driver updates.
NOTE: When in the Portrait View Mode, you may experience performance
degradation in graphic-intensive applications (3D Gaming and etc.).
Adjusting the Rotation Display Settings of Your System
After you have rotated your monitor, you need to complete the procedure below to
adjust the Rotation Display Settings of your System.
NOTE: If you are using the monitor with a non-Dell computer, you need to go the
graphics driver website or your computer manufacturer website for information on
rotating the ’contents’ on your display.
To adjust the Rotation Display Settings:
1 Right-click on the desktop and click Properties.
2 Select the Settings tab and click Advanced.
3 If you have an AMD graphics card, select the Rotation tab and set the preferred
rotation.
4 If you have an nVidia graphics card, click the nVidia tab, in the left-hand column
select NVRotate, and then select the preferred rotation.
5 If you have an Intel®graphics card, select the Intel graphics tab, click Graphic
Properties, select the Rotation tab, and then set the preferred rotation.
NOTE: If you do not see the rotation option or it is not working correctly, go to
www.dell.com/support and download the latest driver for your graphics card.
Connecting Your Monitor
WARNING: Before you begin any of the procedures in this section, follow the
Safety Instructions.
To connect your monitor to the computer:
1Turn o your computer.
2 Connect the DP-DP/USB cable from your monitor to thecomputer. (Vertically
extend and tilt the monitor completely to rotate it for cable connection. See
Rotating the Monitor.)
3 Switch on your monitor.
4 Select the correct input source at Monitor OSD Menu and turn on your
computer.
NOTE: UP3218K default setting is DP 1.4. some older DP 1.2 Graphic card may not
display normally. Please refer to “product specific problems – No image when using
DP connection to the PC” to change default setting.
Other manuals for UltraSharp UP3218K
4
Table of contents
Other Dell Monitor manuals

Dell
Dell Crystal User manual

Dell
Dell S3222HN User manual

Dell
Dell UltraSharp U2715H User manual

Dell
Dell E2211H User manual

Dell
Dell AW2521Hb Instructions for use

Dell
Dell TORINITRON P1130 User manual

Dell
Dell SE2416HM User manual

Dell
Dell P2424HT User manual

Dell
Dell UltraSharp U4919DW User manual

Dell
Dell E152FP User manual

Dell
Dell UltraSharp 1909W AIO User manual

Dell
Dell SE198WFP - 19" LCD Monitor User manual

Dell
Dell E153FPc User manual

Dell
Dell 800F Series User manual

Dell
Dell 1909Wf User manual

Dell
Dell SP2309Wc User manual

Dell
Dell W2607C User manual

Dell
Dell Latitude 7490 Operation and maintenance manual

Dell
Dell E151FPp User manual

Dell
Dell D3216H User manual