DELLA 048-GM-48326 User manual
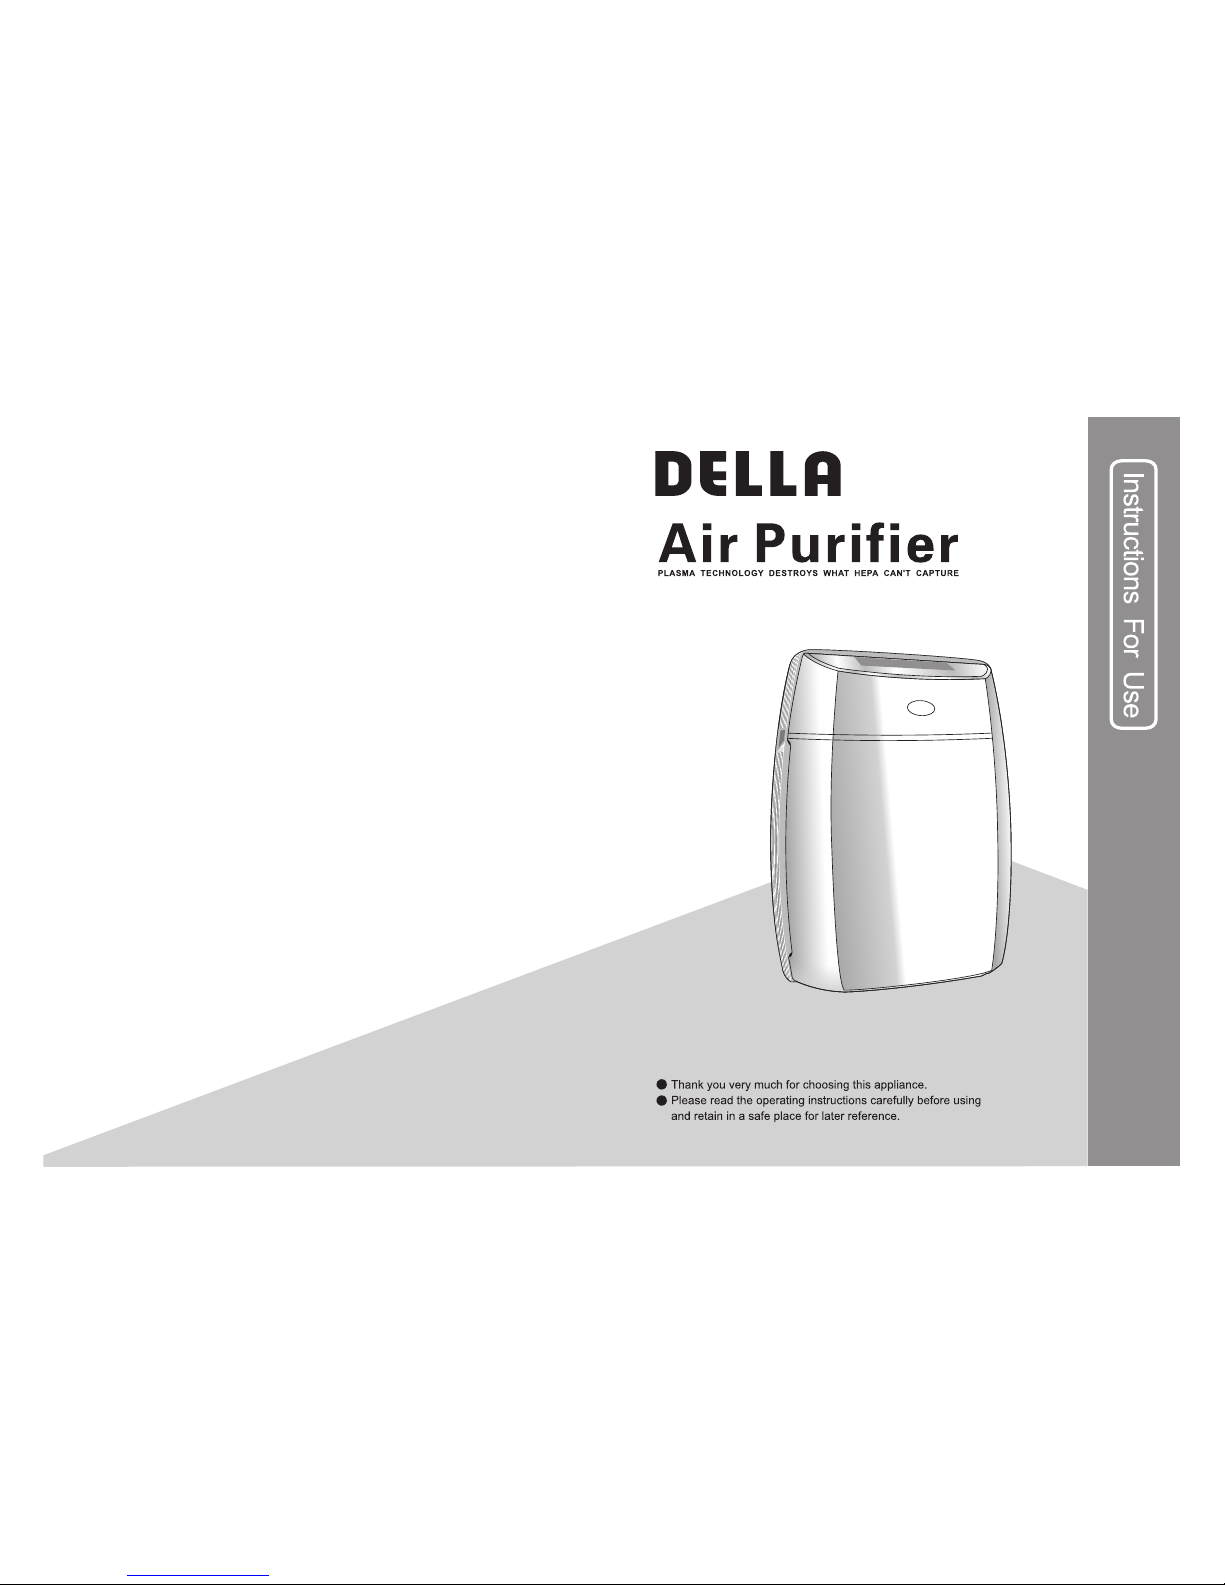
048-GM-48326
3
SAFETEY OPERATION
Please exercise caution when using this air purifier or any other electrical device! This manual describes
the safety precautions which should be observed in relation to your air purifier. Please review carefully
BEFORE using this product.
DESCRIPTION OF THE APPLIANCE
High performance DC fan, low energy consumption, durable use
Built-in smart gas and dust sensor, automatic sensing and adjust airflow speed
Sleep mode, quite and comforting
Dust collector cell, easy to clean, never needs to be replaced
Multiple air inlets design effective in purification coverage
Large volumes of air rapidly circulate and purify air
Convenient remote control, six operating modes for easy control
High performance filter effectively removes PM2.5 and extra fine particles of 0.1 – 0.3 microns
Excellent dust removal rate up to 99.97%
Effectively eliminate odor and smoke to freshen the air
UV LED and catalyst technology effectively sterilize and kill bacteria
Features
2
CAUTION
The voltage rating for air purifiers sold in the
USA, Japan and Canada is AC100-120V,
50/60Hz and in Europe is AC 230V, 50Hz.
Using the wrong current may result in unit
damage, electrical shock or fire.
Do NOT operate your air purifier while it’s
covered with fabric, plastic or other materials.
This can obstruct air flow, damage the unit
and may pose a fire hazard.
Do NOT attempt to dismantle, repair or
modify this device on your own. Doing so
could result in electrical shock or damage to
the unit. In the event of malfunction, contact
an authorized maintenance facility.
Do NOT operate your air purifier in places
where flammable, explosive or otherwise
combustible materials are stored.
Do NOT place the unit in direct sunlight or
near lit fireplaces, furnaces, ovens or other
high temperature objects. Doing so can
damage the air purifier and may pose a fire
hazard. Avoid operating the unit when the
air temperature exceeds 104 F/40 C.
Do NOT place foreign objects in air purifier
which can damage the unit or result in
electrical shock. To avoid machine damage ,
injury and accidents, Do Not allow children to
touch or play with this device.
To avoid distortion or interference, your air
purifier should be placed at least three (3)
feet from computers, televisions and radios.
For safety reason and to avoid the risk of
electrical shock and/or fire, unplug your air
purifier from the electrical outlet under each
of the following conditions
If the electric cord is damaged in any way, it
must be replaced by the manufacturer or a
qualified service center. NEVER operate a
unit with a damaged electric cord. Doing so
presents a serious risk of fire and/or electrical
shock.
Clean sign
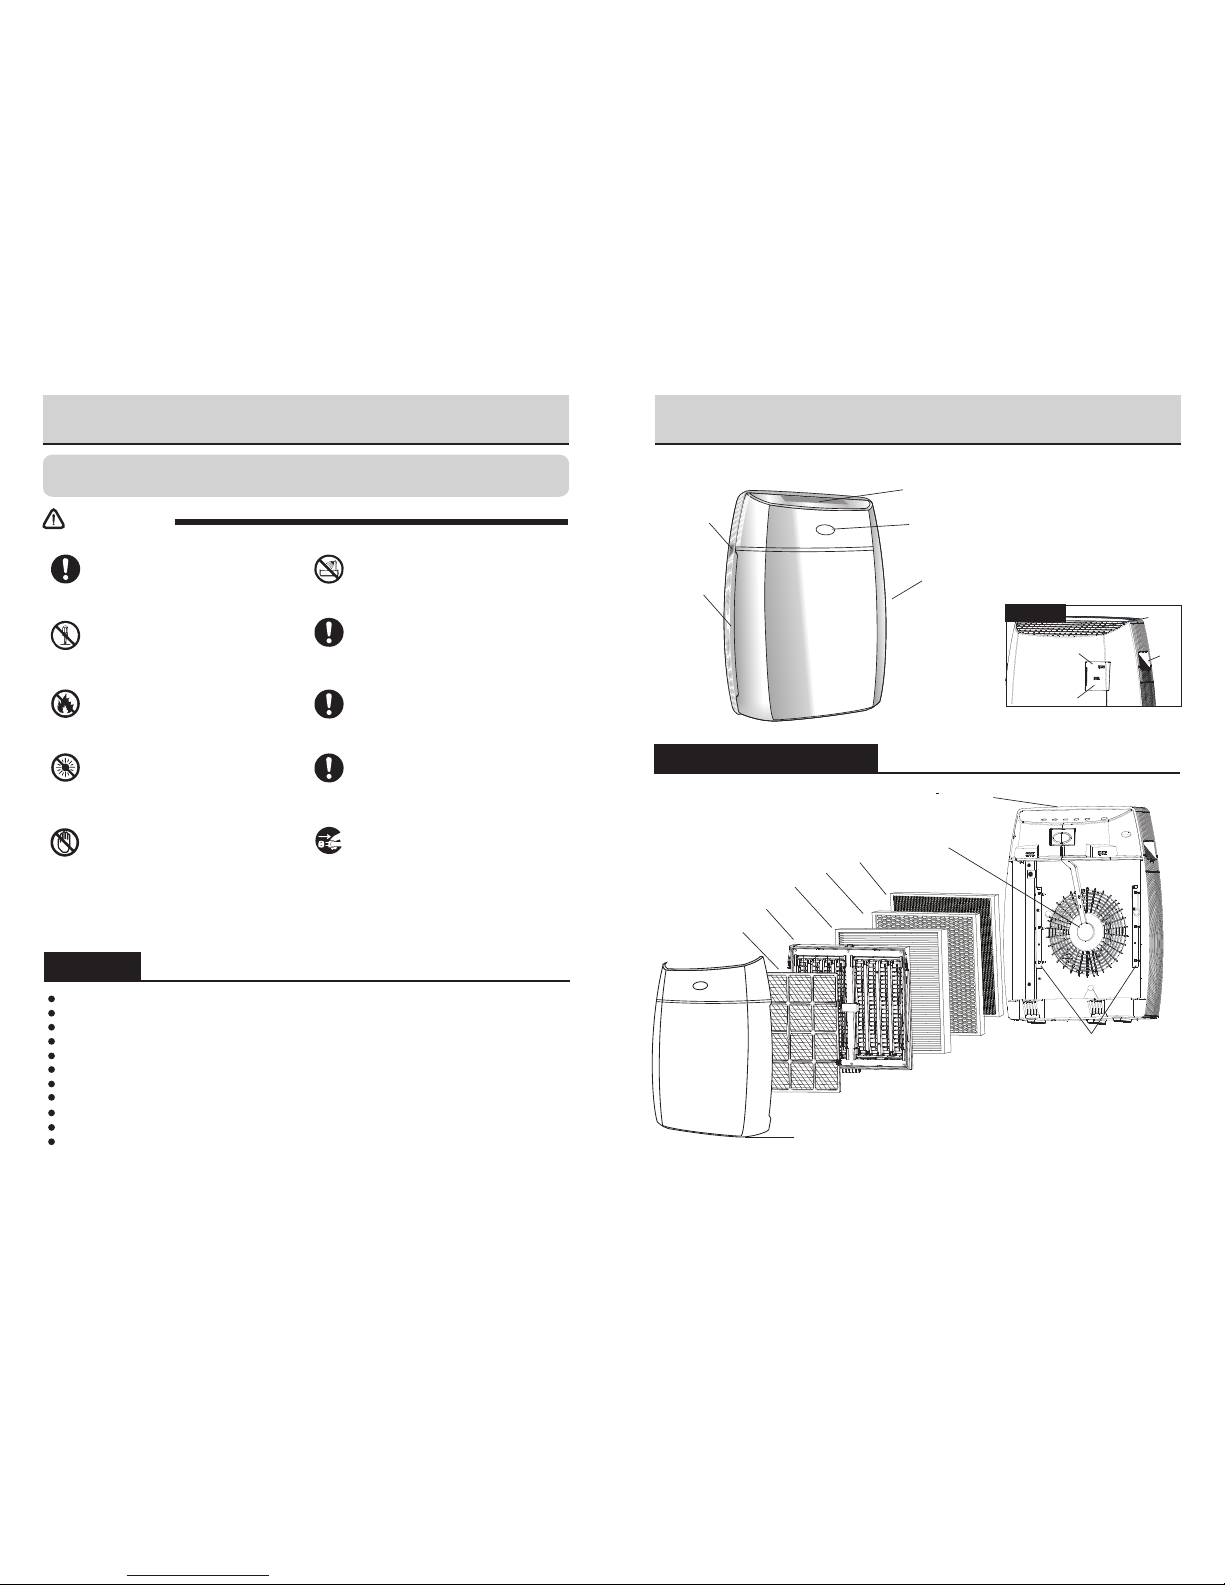
Control panel
Air Inlet
Air Outlet
Back View
Handle
Gas Sensor
Dust Sensor
Dust Collector Cell
DC FAN
UV LED
HEPA Filter
TiO2 Filter
MAJOR COMPONENTS
Air Inlet
Handle
To prevent the possibility of electrical shock
or short-circuiting your air purifier, Do NOT
place the unit in or near the shower, bathtub
or other places where water seep into and
damage the unit.
Pre-filter
Front cover
RATED
VOLTAGE
DO NOT
DISMANTLE
AVOID HEAT
SOURCES
AVOID
DIRECT
SUNLIGHT
DO NOT
TAMPER
KEEP AWAY
FROM WATER
DO NOT
COVER
DO NOT
DISTORTION
DAMAGED
CORD
WHEN TO
UNPLUG
·When cleaning or servicing the air purifier or
replacing filters
·When you will not be using your air purifier for
an extended time period(Traveling)
·When moving the unit from one location to another
When the air purifier or power cord gets heated,
burned smell or weird noise
When thundering or lightening
·
·
Activiated Carbon Filter
Ion Generator

PREPARATIONS BEFORE USE
5
Operation
Locate the unit on a solid surface. Be sure the air inlet/outlet is not blocked by other objects. (At
least 30cm clearance on the sides)
It is best to locate the unit where it will be out of any children's play area.
Before plugging in the unit, please open the windows in the area where you will be using the unit.
Ventilate the area for 2-3 hours if possible. Once the area has been ventilated, close the windows
and plug in the unit.(Figure 1)
Switch on the unit and start to operate under AUTO mode.
Once started, the color of CLEAN SIGN will change alternately for 1 minute (as it memorizes the
existing fresh air condition), and then CLEAN SIGN will indicate current air quality. (Figure 2)
After plugging in, the unit sensor will sample the air and retain a memory of the existing indoor air
condition. (The existing indoor air condition will be input as “Clean Air”).
Note: Whenever the unit is unplugged, all memorized content will be erased.
F1
For initial use or re-operate the unit after unplug, the sensor need to be pre-heated for 3-5
minutes and will not response during this period.
Besides, if the current air quality is not good (such as smoke, cosmetics or alcohol is
presented), please ventilate and freshen the air before closing windows.
Re-operate the unit after long period unused, the sensitivity of the sensor may decrease, it will
revert to normal after 1-2 days operation.
Caution
F2
PREPARATIONS BEFORE USE
4
For initial use or filter replacement, please remove the plastic bag of filter. If the
plastic bag is not removed, the unit may operate noisily.
USES OF FILTERS
The purifying efficiency will decrease if the air purifier operates without filters.
For initial use, new filters may emit a little smell; the smell will dissipate naturally
after operating for more than one day.
Please close the windows or door in the area during operation. For long time use,
please ventilate periodically.
If the smell is heavy in the area(such as cooking), please ventilate the area and
then remove the rest of smell by unit. Otherwise, the purifying efficiency may
decrease and the life span of activated carbon filter will reduce.
ACCESSORY LIST
Pre-filter Dust Collector Cell
Owner's Manual
CLEAN SIGN
Owner's Manual
HEPA+Activiated Carbon Filter(2in1) TiO2 Filter
Brush Remote Control

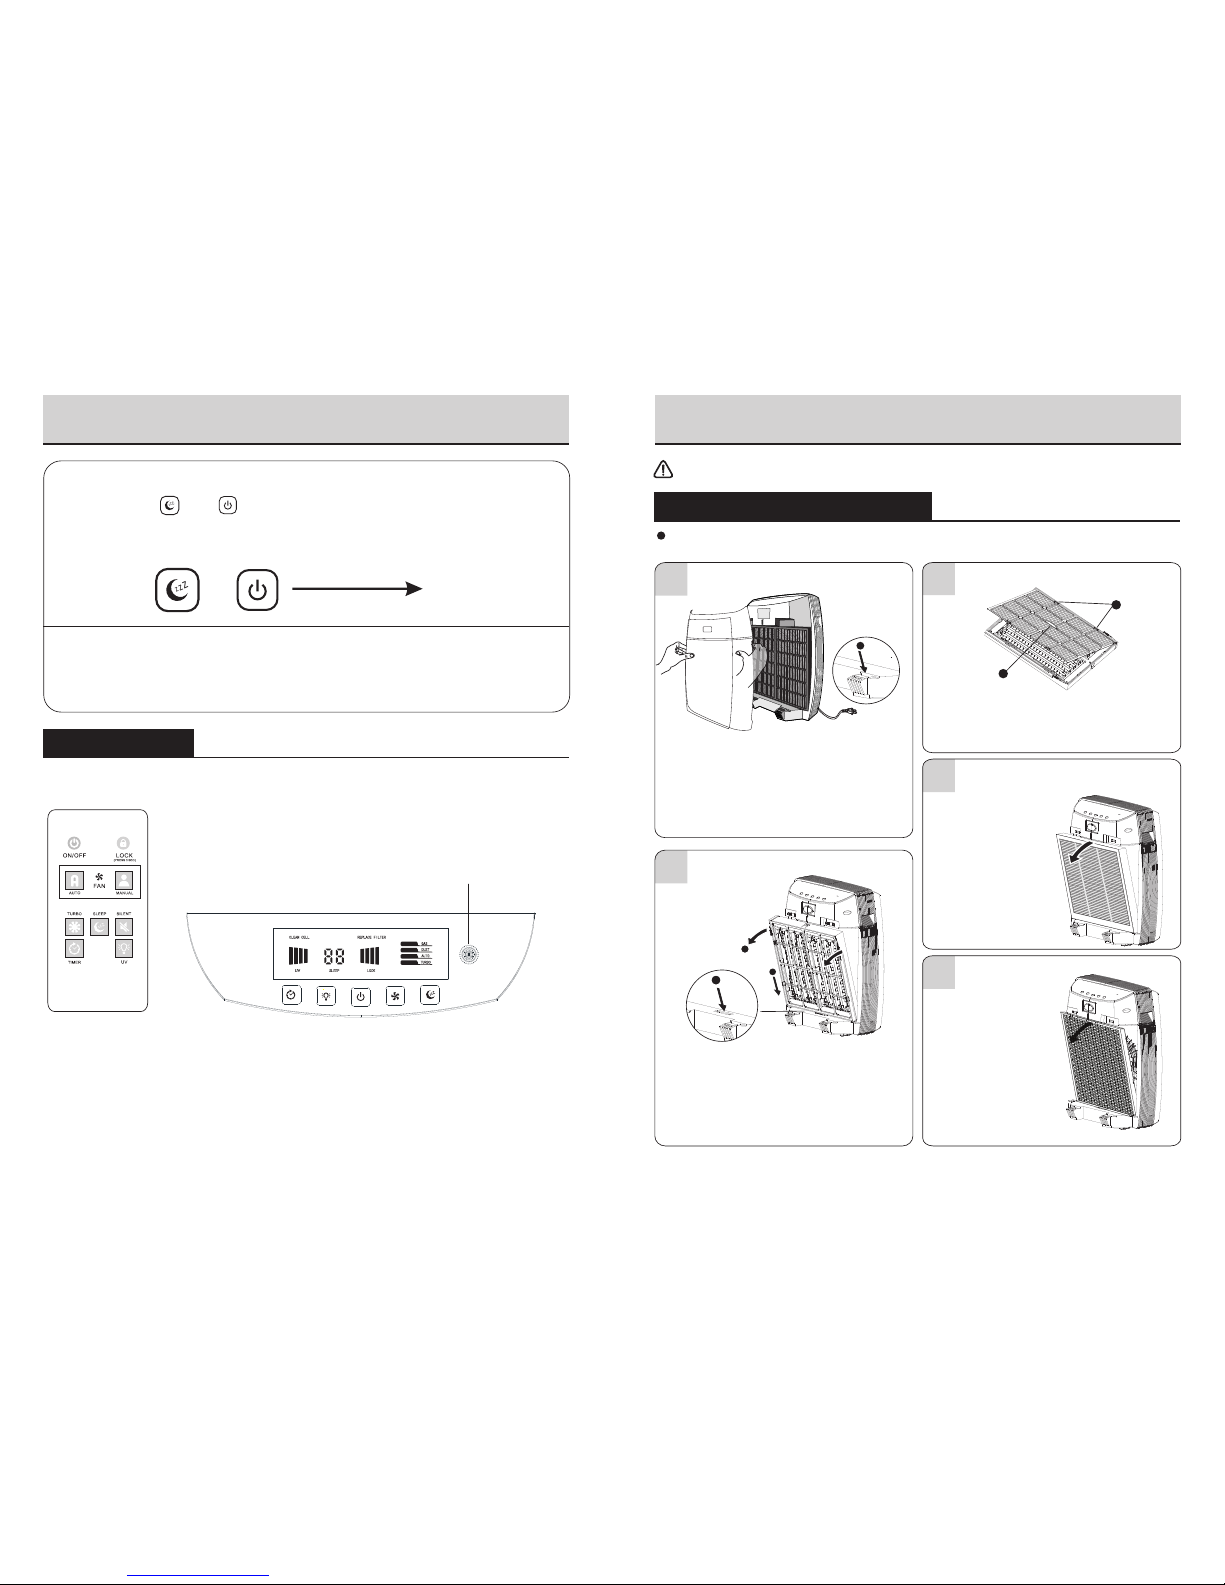
INSTRUCTIONS FOR OPERATING
6 7
F
Control Panel Instructions
A) On/Off Button
By pressing button A once, you can switch the unit on, display screen will illuminate. The
appliance will start to operate under AUTO mode. By pressing it twice, the unit is switched off.
KG
B) Fan Modes
Under automatic operation, unit will automatically switches to the proper fan modes according to the level of
pollution in the air as detected by the sensor. As the air is purified, the unit will automatically switch back to
silent mode. Additionally 4 stages of clean sign, clearly shows your current air condition accordingly:
Green: Clean
Light Orange: Low pollution
Orange: Medium pollution
Red: High pollution
J
D C A B E
IHM L
INSTRUCTIONS FOR OPERATING
AUTO Silent Low Medium High
This unit has six different fan modes to choose from. Please choose a proper level of circulation according to
the indoor air quality and room size. By repeated pressing button B , the fan mode will change according
to following sequence. Symbol K shows which of the six modes you have selected.
C) Operation with photocatalyst(TiO2)
Button C is used for switching the photocatalyst on and off (Symbol “UV” lights up). This
appliance combines advanced photocatalyst technologies to reduce odors and chemical fumes
from glues, solvents, and synthetic materials when air passes through the filter and is activated by
the internal UV LED. If turned off, the appliance will continue to filter particles from the air that
passes through the filter but its odor and VOC capability will be greatly reduced.
E)Sleep mode
By pressing the button E once, the sleep mode is switched on which automatically dims the
display brightness, appliance continue to operate with silence technology. If button E pressed
again, the appliance will no longer be in sleep mode.
F) Cleaning indicator
If red “CLEAN CELL” indicator appears on the display, the appliance should be cleaned as
recommended by the manufacturer. When the dust collector cell is re-installed after cleaning,
switch on the appliance and keep pressing the button E and D at least 3 seconds until
buzzer beeps, “CLEAN CELL” indicator goes out and “CLEAN CELL” timer is reset.
D) Timer
Using button D , the operation time can be set adjustable between 1~9 hours or continuous
operation (circulated ), Symbol J shows the operating period that has been set (1h/2h/3h/4h
/5h/6h/7h/8h/9h/ circulated ). The display will automatically show the current value after a few
seconds.
zzz
zzz
G) Replace indicator
If red “REPLACE FILTER” indicator appears on the display, the filters (HEPA/Activated
carbon/Formaldehyde)should be replaced as recommended by the manufacturer. When the filters
are re-installed after replacement, switch on the appliance and keep pressing the button E and
B at least 3 seconds until buzzer beeps, “REPLACE FILTER” indicator goes out and
“REPLACE FILTER” timer is reset.
zzz
Reset buttons +Reset
pressing for 3 seconds
zzz
Reset buttons +Reset
pressing for 3 seconds
zzz
Turbo
zzz
INSTRUCTIONS FOR OPERATING CLEANING AND MAINTENANCE
9
8
I) Sensor indicator
H) Child lock
Once the sensors detect gas or dust pass through the unit, Symbol “GAS” or “DUST” illuminates on the
display.
zzz
Lock/Unlock Buttons +Lock/Unlock
pressing for 3 seconds
Remote control
The operations of remote control please refer to control panel instructions.
By pressing button E and A for 3 seconds until buzzer beeps, Symbol “LOCK” appears on the
display, child lock function is activated to prevent incorrect operation by children, all buttons are not unable to
operate. Repeat above step to unlock.
zzz
Infrared Receiver
Disassembling the Air Purifier
2
Remove the dust collector cell
Remove the Pre-filter
Remove the Front Cover
1
B
When assembling
1. Insert into position B
2. Firmly reconnect the dust collector cell back to its
original position
1. Push the dust collector cell towards the bottom
of the device
2. Hold the two tabs and pull forward the dust
collector cell
2
Press the front cover by thumbs and gently
pull forward the front cover.
When assembling
1. Insert into Position A
2. Firmly reconnect the front cover back to its
original position
A
3
4Remove the HEPA+Activated
carbon filter(2 in 1)
Hold the Position C and lift up the pre-flter
When assembling
1. Attach the filter to the connecting locations
on the side
2. Fasten the filter on the front connecting locations.
2
C
5
Hold the strap to help
pulling out the filter.
When assembling
Install the filter with exact
front-and-back direction
as indicated on the sides
of the filter. Do not reverse
the front and back of the
filter.
Remove the TiO2 Filter
Hold the strap to help
pulling out the filter
When assembling
Install the filter with exact
front-and-back direction as
indicated on the sides of
the filter.
1
After unplugging, disassemble the unit in sequence of 1 to 5 as shown below. (Put the unit back together in
the reverse 5 to 1 sequence.)
Cleaning the unit while it is plugged in may rusult in electric shock, electric spark and serious
injury.Unplug the unit before cleaning or maintenance.

CLEANING AND MAINTENANCE CLEANING AND MAINTENANCE
10 11
CLEANING AND MAINTENANCE
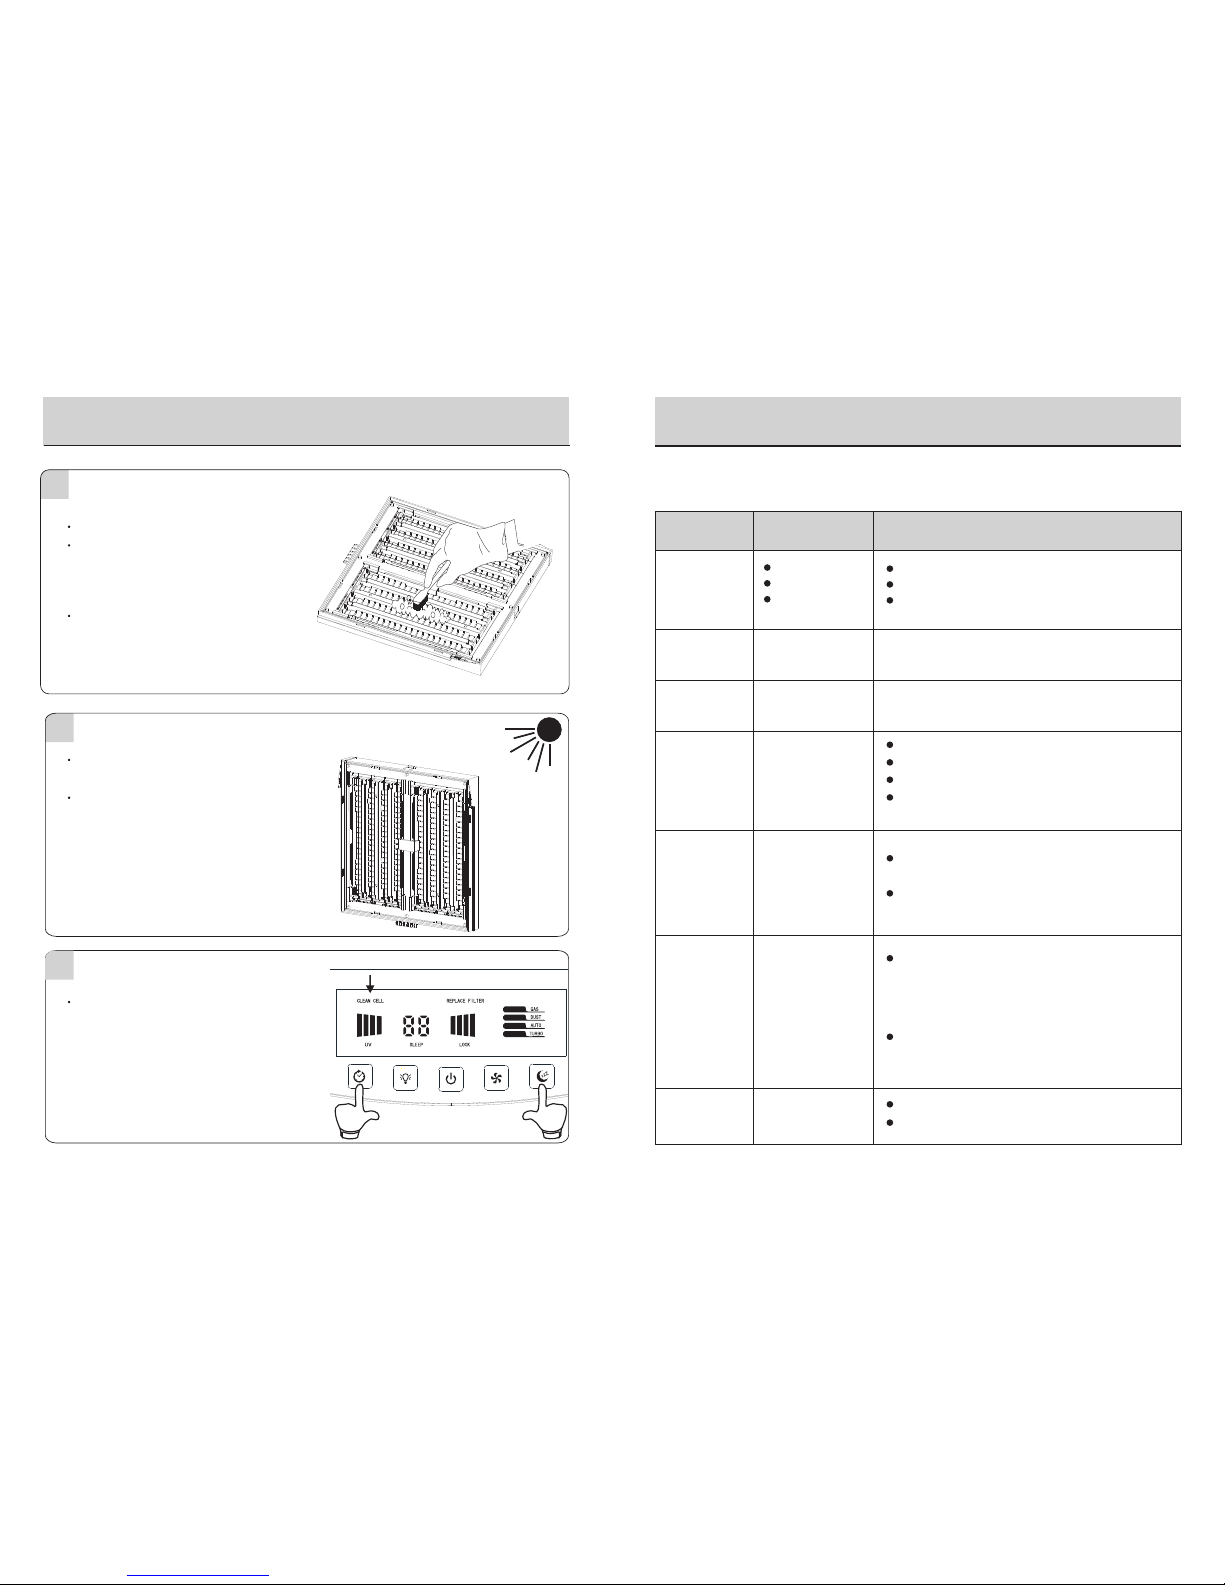
The dust collector cell needs cleaning when:
The dust collector cell may not require cleaning if “arcing” occurs. Arcing is a sharp snapping sound that
occurs when large particles are collected in the dust collector cell or the appliance used in over damp
rooms.
Cleaning the DustCollector Cell
Remove the front cover, dust
collector cell and pre-filter Soak the dust collector cell before
cleaning
12
·Please refer to page 9 for detailed instructions
on the removal of the dust collector cell and
pre-filter.
Caution
① Use mild detergent
Place the dust collector cell in sink, bathtub or
other location where cleaner can cover every
surface.
② Use warm water(below 40℃) only!
Tough residue such as tar from tobacco
smoke does not wash away easily:
“CLEAN CELL” indicator appears or blinks on the screen
The dust collector cell is too dirty or continuous arcing occurs
1 2
4
3
6
5
Clean the Front Cover
·Use a soft and wet cloth to clean, avoid scraping off
the paint on the cover.
·Use provided brush to clean the air inlets and outlets
Clean the Pre-filter
·Suggested cleaning time: 2-4 weeks
·Rinse thoroughly by flowing water and dry
Clean the Dust Collector Cell
·Suggested cleaning time: 4-8 weeks
·Cleaning method please refer to instructions
on page 11
·Suggested cleaning time: 1-2 months
·When sensor gets dirty or blocked by other objects,
use cotton swab to wipe dust off, otherwise the
sensitivity will decrease.
Clean the Unit Body
·When Cleaning, do not get the UV LED wet
·Using wring dry cloth to clean
Replace the filters
Clean the Sensor
Reset the "REPLACE FILTER” indicator
Please refer to instructions on page 7 for resetting after
replacement, otherwise the indicator will remain on screen.
·Suggested cleaning time: 6 months
·When filters is dark grey or “REPLACE FILTER”
indicator appears
· :use a vacuum cleaner to eliminate
dust on the filter.
TiO2 Filter
HEPA+Activiated Carbon Filter
(2 in 1)
TiO2 Filter
CLEANING AND MAINTENANCE
13
TROUBLESHOOTING
Problem Solution
Service problems that appear to be major can often be solved easily. You can be your own troublesho-
oter by reviewing this guide.
All other servicing should be done by a local authorized service center.
Check
Please wash collector cell and reset the timer. Refer to
instructions on page 7&9&11.
Dust collector cell gets too dirty, please clean
Dust collector cell may be damaged
Dust collector is not completely dry after cleaning
Wiring is not assembled well or broken. Contact authorized
service center.
Please replace filters and reset the timer. Refer to
instructions on page 7&9.
Unpleasant smell
in the air outlet
If filter gets too dirty, please replace
If dust collector cell gets too dirty, please clean
Filter & Dust collector cell
Appliance does
not turn ON
Red “REPLACE
FILTER” indicator
has illuminated
Red “CLEAN
CELL” indicator
has illuminated.
Dust collector
cell does not
remove particles
Appliance sparks,
crackles and pops Dust collector cell
Power cord
Power button
Front cover/Dust
collector cell
Plug in power cord
Press the power button.
Make sure the front cover and dust collector cell is
securely closed.
The front and back of the HEPA filter been mistakenly
reversed
The HEPA filter has been saturated with a serious amount
of dust.(Usually dark grey in color). Please replace filter.
HEPA filter does
not remove dust
Sparking or poping noise (arcing) can occur when
a large particle is captured in the collector cell or
appliance is used in over damp rooms. If the
appliance is arcing excessively, the cell may be
dirty. Try cleaning the collector cell.
If excessive arcing continues after proper cleaning,
the collector cell may be damaged. If damaged,
contact authorized service center.
Filters
Dust collector cell
Dust collector cell
HEPA filter
Clean the dust collector cell
3
4
Shake excess water from the dust collector cell to
speed up drying time.
Thoroughly dry the dust collector cell
Please take care not to damage any wiring while
cleaning the dust collector cell, if any wire is broken,
the unit will lose part or all of its dust collecting
capability.
Any broken wire should be thrown away instead
of being left inside the unit. Otherwise, a dangerous
short-circuit or high-voltage sparks may occur. Please
contact authorized service center for maintenance or replacement.
Use provided brush or toothbrush to clean.
12
DO NOT install a damp dust collector cell directly
into the unit may cause dangerous short-circuit or
malfunction.
Please refer to instructions on page 7 for resetting
after cleaning, otherwise the indicator will remain
on screen.
5Reset the "CLEAN CELL” indicator
Note : If the front cover or dust collector cell is not
properly installed after cleaning, the unit will not
operate.

TROUBLESHOOTING
14 15
“CLEAN SIGN” is
always displaying
polluted
Environment
Sensor
Open the window to improve the ventilation
Problem Solution
Check
“CLEAN SIGN” is
always displaying
green
Sensor
Indoor air has been clean the whole time.
The sensor could be too far away from any irritant for it to
detect. Please move the unit closer to your major sources of
pollution.
For testing purpose, dust either caused by a cigarette or a
dusty cloth can be released near the sensor. If the clean sign
color changes, then the appliance should be operating properly.
sensor gets dirty, please clean the senor, refer to
instructions on page 10
Possibly because the room is not really a closed environment
and pollution keeps coming in from the outside. Or because
there has been pollution created indoors (e.g. smoking/pet
boxes etc.) the whole time. It will take some time for the
appliance to achieve a clean environment.
Gas or Dust
sensor does
not work or
indicator is
blinking
Environment
Indoor air quality is very bad, open the window to improve
ventilation
sensor
In the initial set-up of the appliance, the sensor did not get
properly retained. Please refer to page 5 for retaining the
sensor memory.
For initial use or the unit has been unplugged for more than a
week, the sensor will not be as sensitive. After 1-2 days
operation, the sensor will regain its sensitivity.
Sensor gets malfunction, contact authorized service center
“Fan mode”
indicator is blinking
Environment
Appliance
Indoor air quality is very bad, open the window to improve ventilation
Appliance gets malfunction, contact authorized service center
SPECIFICATIONS
AC 110-120V/50-60Hz
≤0.05ppm
20-50 2
m
17.2lbs
61dB(A)
048-GM-48326
16.1×11.3×21.2inches
3
270m /h(158cfm)
31W
Model
Rated Voltage
Power
Activated Oxygen Output
Noise Level
CADR Value
Dimensions
Room Size
Net Weight
Sensor too dirty, refer to instructions on page 10 for cleaning.
Table of contents
Other DELLA Air Cleaner manuals


