manuals.online logo
Brands
  1. Home
  2. •
  3. Brands
  4. •
  5. Toshiba
  6. •
  7. Air Cleaner
  8. •
  9. Toshiba TCB-EAPC1UYHP-E User manual

Toshiba TCB-EAPC1UYHP-E User manual

– 1 – 1-EN
INSTALLATION MANUAL
To Qualified Installer in Installation Work and Service
Air purifier kit
Model: TCB-EAPC1UYHP-E
• Thank you for purchasing Air purifier kit for TOSHIBA air conditioners.
• Read this manual carefully for correct installation of the Air purifier kit before starting
work.
• After the installation is completed, execute a test run to check for normal operation
and explain how to use and maintain the Air purifier kit to the customer according to
the Operation Manual.
Ask the customer to keep this manual with the Operation Manual.
Observe the safety precautions described in the Installation manual supplied with the
ceiling panel and air conditioner (indoor unit).
Accessories
Part Name Q’ty
Wireless receiver kit
1
Wireless remote
controller 1
Remote controller holder
1
Air purifier
1
Option P.C. board 1
Dust sensor 1
Dust sensor cable 1
UART cable
1
Part Name Q’ty
Operation Manual 1
Installation Manual
(this manual) 1
CD-ROM
1
Battery 2
Flat head wood screw
Ø3.1 x 16L 2
Steel screw
Ø4 x 8L 2
Earth screw
Ø4 x 10L 1
Washer 1
Spacer 4
Wire clamp 1
Installation place
If the panel is already installed onto the indoor unit, remove it from the indoor unit.
For more information about removing the panel, refer to the Panel installation manual.
Wireless receiver
Dust sensor
Option P.C. board Air purifier
Settings for the Wireless receiver before installation
Before installing the Wireless receiver, make the following setting referring
to each description.
• To install the wireless remote controller together with wired remote controller,
configure the “Multiple remote controller installation”.
• When ceiling height exceeds the standard height (factory default), refer to the
“Installing indoor unit on high ceiling” on installation manual of the indoor unit.
How to install the Wireless receiver
1. Remove the adjust corner cap at the corner where the Wireless receiver is to be
installed.
• Pull the edge of the adjust corner cap in the direction of arrow.
•
Remove strap from the pin and detach the adjust corner cap from the ceiling panel.
Pull
Adjust corner cap Ceiling panel
Pin
Strap
2. Wiring the wireless receiver connecting cable through to the clamp in the back side
of the ceiling panel.
Clamp Clamp
Wireless receiver cable
3. Attach the Wireless receiver cap to the ceiling panel.
• Hook the strap of the Wireless receiver cap securely to the pin.
• Insert the two claws A of the Wireless receiver cap into the rectangular holes
of the ceiling panel in the direction of arrow.
• Push the Wireless receiver cap so that the two claws B on the back of the cap are
fitted.
Pin
Claws A
Strap
Claws B Wireless receiver cap
Push
CAUTION
Press the two claws B of the adjust corner cap firmly as far as they will go,
and then check that the adjust corner cap is closely attached.
Failure to do so may result in water leakage.
– 2 –
2-EN
How to install the Air purifier
Install Air purifier to indoor unit
1• Match the direction of triangle mark between Air purifier and drain-pan 3 places
before insert slot hole.
• Insert slot hole of Air purifier to pin on the drain-pan of indoor unit 3 place
on the direction of arrow 1.
1
Drain-pan
Pin
2• Push the Air purifier to fitting with upper cabinet of indoor unit on the direction
of arrow 2.
2
Cabinet upper
Air purifier
• Fix steel screw Ø4 x 8L two places.
Screw
3Remove protection sheet by pull out follow arrow direction.
4Fix earth screw Ø4 x 10L for fixed earth cable with upper cabinet.
Earth screw
Earth lead
Washer
Wiring and connecting cable
• Stick wire clamp to upper cabinet by release adhesive paper position nearly
electrical box.
• Wiring the connecting cable through to the clamp.
Stick wire clamp on this area
Electrical box Wire clamp
How to install the Dust sensor
1. Assembly Dust sensor to ceiling panel.
• Connect Dust sensor cable to Dust senser module.
Dust sensor module
Dust sensor cable
• Insert Dust sensor module to ceiling panel in the direction of arrow and push
to fitting with hook of ceiling panel.
Dust sensor
Ceiling panel hook
Ceiling panel
“Click”
“Click” sound is occured when Dust sensor
complete insertion
2. Wiring the Dust sensor cable through to the clamp in the back side
of the ceiling panel.
Dust sensor cable
Dust sensor
Wire clamp
How to install the Option P.C. board
1. Assembly Option P.C. board to electrical box.
• Insert the Spacer to square hole of electrical box 4 pcs.
• Push Option P.C. board to Spacer pin 4 place.
Option P.C. board
Spacer
Square hole
– 3 – 3-EN
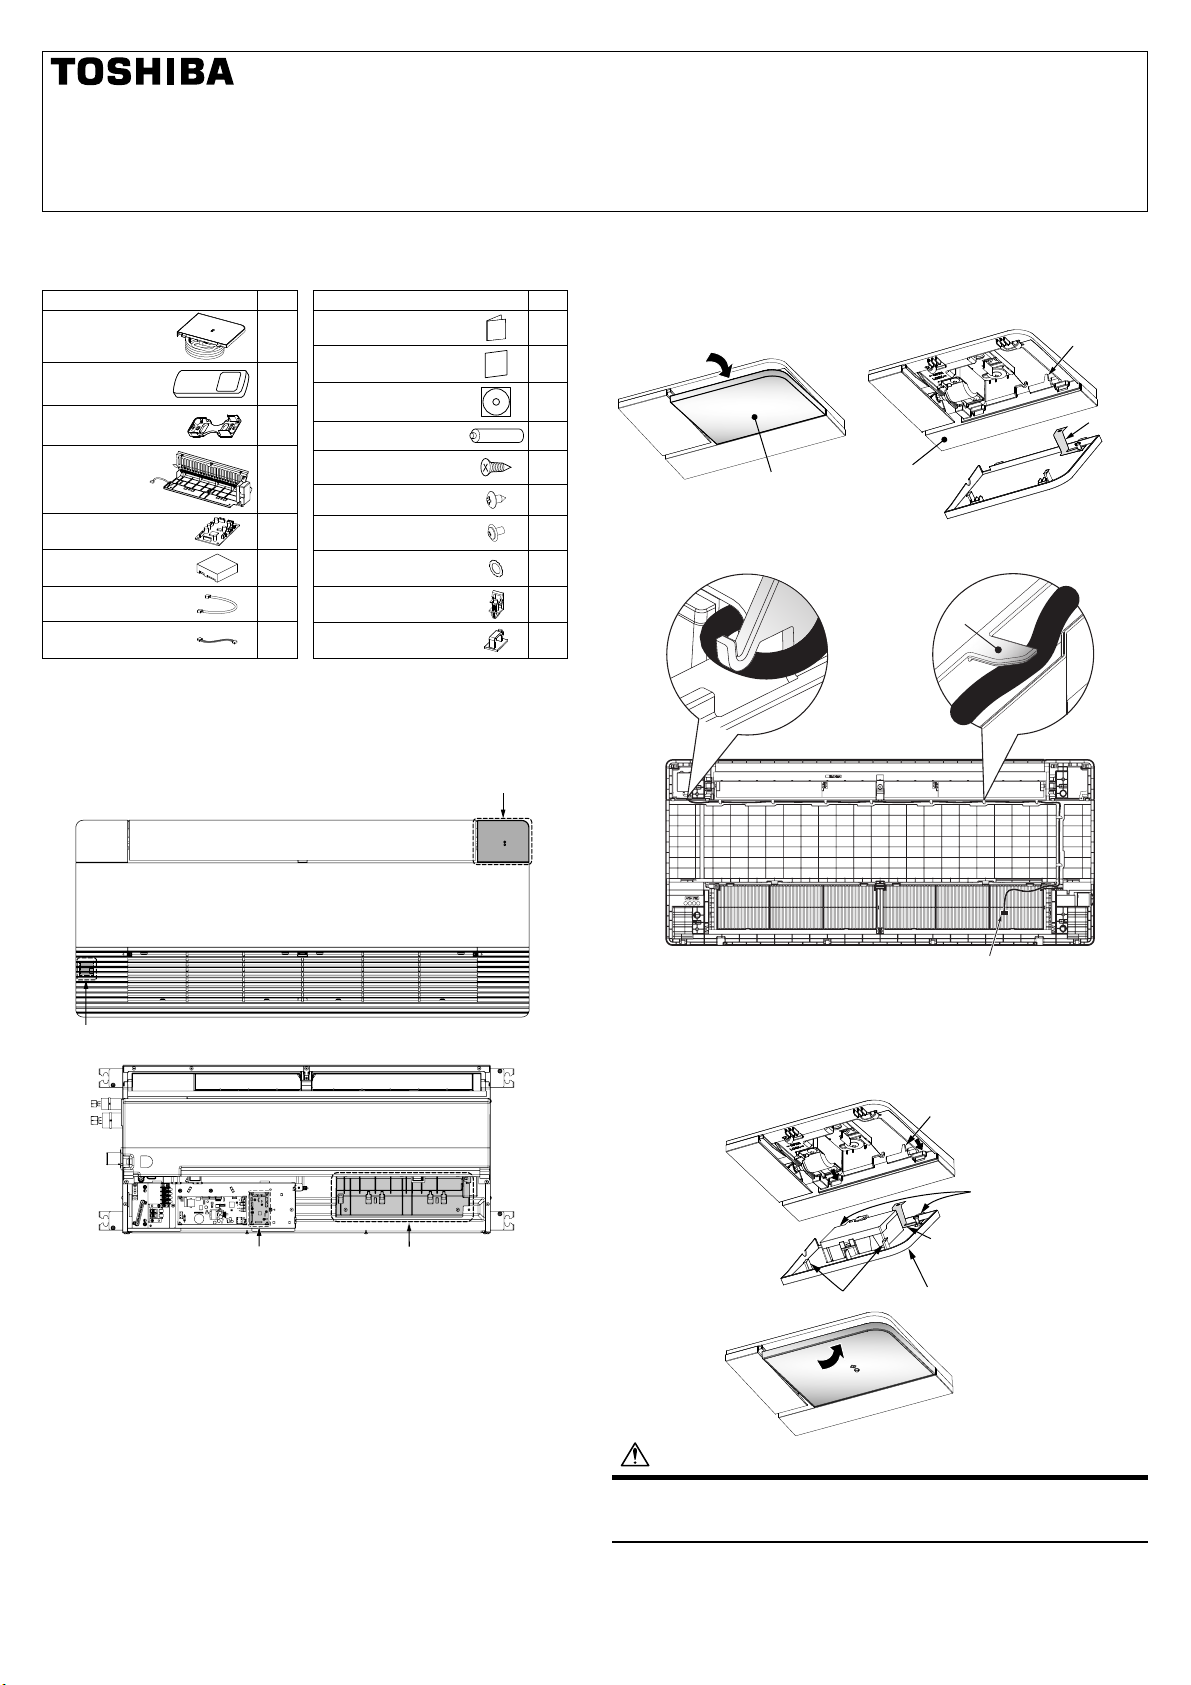
How to connecting cable
• Remove the screw of the electrical control box cover, and detach the electrical
control box cover by slide.
(The electrical control box cover is clamped onto the hinge.)
• Pass the Wireless receiver and Dust sensor cable from the ceiling panel through
the clamper as shown.
• Cut jumper (J09) of main P.C. board of indoor unit to activate option P.C. board.
• Connect the UART cable connector 5 pin to CN521 on the main P.C. board
and CN20 on the option P.C. board of indoor unit.
• Connect the connector 9 pin of Wireless receiver cable to CN214
on the main P.C. board and connect the connector 4 pin of Wireless receiver
cable to CN10 on the option P.C. board of indoor unit.
• Connect the connector 6 pin of Dust sensor cable to CN30 on the option P.C. board
of indoor unit.
• Connect the connector 4 pin of Air purifier cable to CN40 on the option P.C. board
of indoor unit.
* Connect the wire firmly to the connector to ensure operation
of the Wireless receiver, Dust sensor and Air purifier.
• Attach the electrical control box cover by reversing the procedure of detaching.
* Make sure that no wire is caught between the electrical control box
and the cover.
* Make sure that no wire is caught between the indoor unit
and the ceiling panel.
* Note: In case Air purifier kit is removed must change new main P.C. board
too.
CN40 CN10
CN20
CN214J09
CN521
CN30
Electric control
box cover
Screw
Wireless receiver and
Dust sensor cable
Clamper
Cable Pass the cable through
the clamper as illustrated.
Air purifier cable UART cable
Dust sensor cable
Wireless receiver cable
For illustrative purpose the orientation of the indoor unit is not the actual orientation.
Remote controller address (A-B selection) setting
• When two or more wireless receiver are installed in a room, a unique address
can be set for each wireless receiver to prevent interference.
• Address (A-B selection) must be changed on wireless remote controller.
• For the details of address change (A-B selection) on wireless remote controller,
refer to the Operation manual.
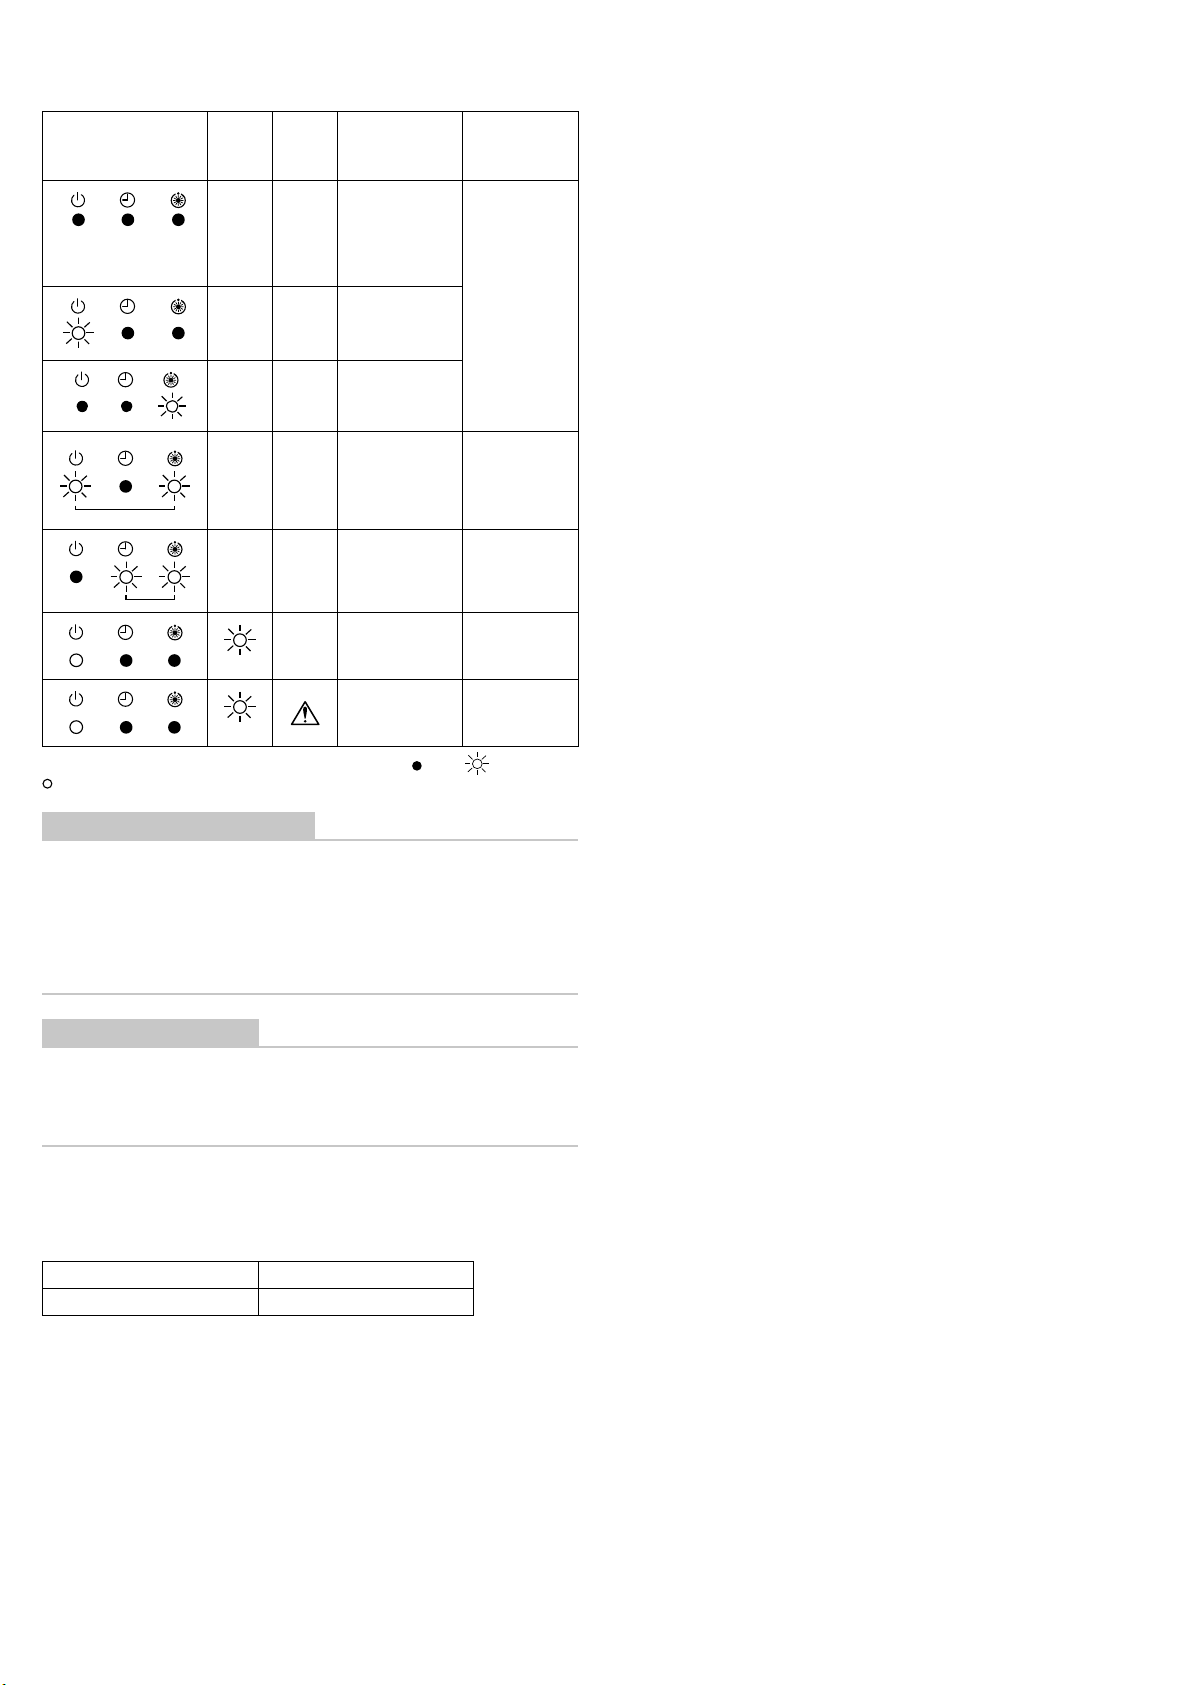
Test run (Forced cooling operation)
Requirement
• Finish the forced cooling operation in a short time because it applies excessive
strength to the air conditioner.
How to perform forced cooling operation
1. When TEMPORARY button is pushed for 10 seconds or more, “Pi!” sound is
heard and the operation changes to a forced cooling operation. After approx.
3 minutes, a cooling operation starts forcedly. Check cool air starts blowing.
If the operation does not start, check wiring again.
2. To stop a test operation, push TEMPORARY button once again (Approx. 1 Sec.).
• Check wiring / piping of the indoor and outdoor unit in forced cooling operation.
TEMPORARY
button
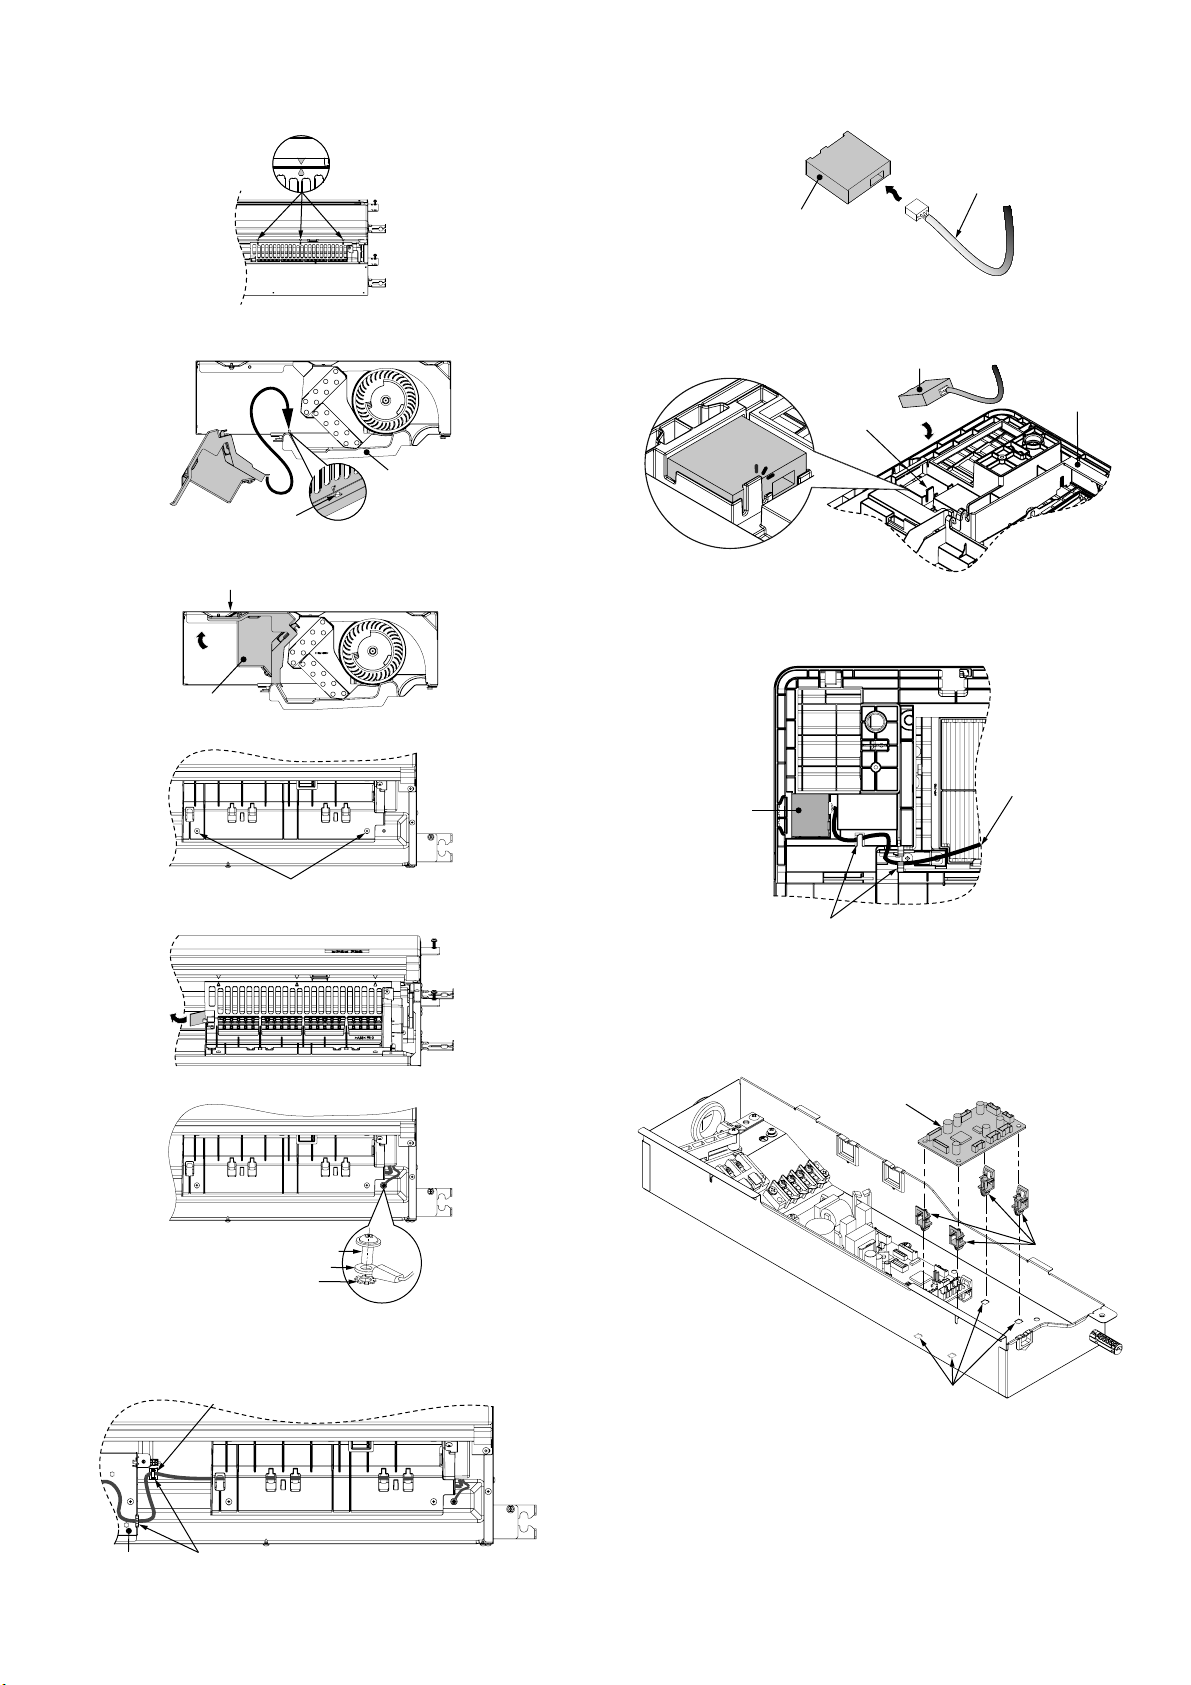
Preparation and check before use
1. Loading Batteries.
• Remove the battery cover.
• Insert 2 new batteries (R03 [AAA])
following the (+) and (-) positions.
2. Removing Batteries.
• Remove the battery cover.
• Remove the 2 used batteries.
Batteries
• To replace the batteries, use two new batteries (R03 [AAA]).
• In normal use, the batteries will last about one year.
• Replace the batteries if there is no receiving beep from the indoor unit
or when the air conditioner cannot be operated using the remote controller.
• To avoid malfunctions by battery leakage, remove the batteries
when not using the remote controller for more than one month.
• Please dispose of the used batteries according to the local regulation.
Installing the remote controller holder
• Before you actually install the remote controller holder on a wall or pillar,
check whether the remote controller signals can be received by the indoor unit.
Remote control holder
Flat head
wood screw
Mounting and removing the remote controller
• To mount the remote controller hold it parallel to the remote controller holder
and push it in fully. To remove the remote controller slide the remote controller
upwards and out from the holder.
– 4 –
4-EN 1127699101
Self-diagnosis function and measures
• The following table shows a few examples. For details of indoor unit errors, refer to
the Installation Manual of the indoor unit.
LED
Dust
indicator
display
Wired
remote
controller
display
Possible cause Measures
These LEDs do not light
or blink even if the remote
controller is operated.
--
- Power is not turned
on.
- Incorrect connection
between signal
receiving unit and
indoor unit
Check connections
and reconnect
wires correctly
if necessary.
- E03
Loose connection
between signal
receiving unit and
indoor unit
- E04
Incorrect or loose
connection between
indoor unit and
outdoor unit
-L03, L08,
L09
- Indoor unit centre
duplicated.
- Indoor unit group/
Address unset.
- Indoor unit capacity
unset.
Check the indoor
unit.
- P10, P12
- Indoor unit overflow
trouble.
- Indoor unit fan
motor trouble.
Check the indoor
unit.
Green
F30 Air purifier trouble. Check air purifier.
Yellow
Dust sensor trouble. Check dust sensor.
LEDs and dust indicator display on the signal receiving unit : OFF : Blinking
: ON.
Notes on installing remote controller
• When using a wireless remote controller in the remote controller holder on a wall,
turn on a fluorescent light and operate the remote controller at the installation
position. Make sure that the air conditioner operates normally and then secure the
remote controller holder on the wall.
• When installing a remote controller that senses room temperature with the sensor,
avoid the following places.
• A place exposed to direct cool air, warm air or direct sunlight.
• A place subject to thermal effects.
Explanation to the customer
•
After the installation work has been completed, execute a test run to check for normal
operation and then hand the customer the Operation Manual and Installation Manual
of the Air purifier kit.
• Explain how to use and maintain the Air purifier kit to the customer according to the
Operation Manual of the Air purifier kit.
List of separately available products that cannot be used with
the Air purifier kit.
The following separately available products cannot be used together with the
Air purifier kit.
Product name Model
Occupancy sensor kit TCB-SIR41UYP-E

Other manuals for TCB-EAPC1UYHP-E

1

Other Toshiba Air Cleaner manuals

Toshiba CAF-X50XPL User manual

Toshiba

Toshiba CAF-X50XPL User manual

Toshiba CAF-X116XPL User manual

Toshiba

Toshiba CAF-X116XPL User manual

Toshiba TCB-EAPC1UYHP-E User manual

Toshiba

Toshiba TCB-EAPC1UYHP-E User manual

Toshiba CAF-Y36PH User manual

Toshiba

Toshiba CAF-Y36PH User manual

Toshiba CAF-W36USW User manual

Toshiba

Toshiba CAF-W36USW User manual

Toshiba CAF-G5IAU User manual

Toshiba

Toshiba CAF-G5IAU User manual

Toshiba CAF-R35 User manual

Toshiba

Toshiba CAF-R35 User manual

Toshiba CAF-Z45FR (K) User manual

Toshiba

Toshiba CAF-Z45FR (K) User manual

Toshiba CAF-X83XPL User manual

Toshiba

Toshiba CAF-X83XPL User manual

Toshiba TCB-EAPC1UHP-E User manual

Toshiba

Toshiba TCB-EAPC1UHP-E User manual

Toshiba CAF-A400HK User manual

Toshiba

Toshiba CAF-A400HK User manual

Toshiba CAF-X33XP User manual

Toshiba

Toshiba CAF-X33XP User manual

Toshiba CAF-G3I User manual

Toshiba

Toshiba CAF-G3I User manual

Popular Air Cleaner manuals by other brands

Soleus Air SA-550 owner's manual

Soleus Air

Soleus Air SA-550 owner's manual

Colzer KJGL01A-500 instruction manual

Colzer

Colzer KJGL01A-500 instruction manual

Philips AC2889 user manual

Philips

Philips AC2889 user manual

Trion IAQ 1400 Installation, operation and instruction manual

Trion

Trion IAQ 1400 Installation, operation and instruction manual

GreenTech pureAir FRIDGE owner's manual

GreenTech

GreenTech pureAir FRIDGE owner's manual

Honeywell HPA-050 Series instructions

Honeywell

Honeywell HPA-050 Series instructions

Nectar HexaDuo Smart user guide

Nectar

Nectar HexaDuo Smart user guide

Electro-Air EAHEPA350 owner's manual

Electro-Air

Electro-Air EAHEPA350 owner's manual

Enviracaire 60000 owner's manual

Enviracaire

Enviracaire 60000 owner's manual

GE GESMARTAIRE 106633 user manual

GE

GE GESMARTAIRE 106633 user manual

Flanders 11255 Series Catalog

Flanders

Flanders 11255 Series Catalog

Winix 2020EU user manual

Winix

Winix 2020EU user manual

Blueair 201DPF user manual

Blueair

Blueair 201DPF user manual

Plasma Ions PS-501TV quick start guide

Plasma Ions

Plasma Ions PS-501TV quick start guide

Honeywell hepaclean HHT-011 series Safety instructions

Honeywell

Honeywell hepaclean HHT-011 series Safety instructions

JenActUV GRU-V 389-0015 product manual

JenActUV

JenActUV GRU-V 389-0015 product manual

Bionaire BAP1225-U Instruction leaflet

Bionaire

Bionaire BAP1225-U Instruction leaflet

Airpura V700 Operating & Filter Replacement Directions

Airpura

Airpura V700 Operating & Filter Replacement Directions

manuals.online logo
manuals.online logoBrands
  • About & Mission
  • Contact us
  • Privacy Policy
  • Terms and Conditions

Copyright 2025 Manuals.Online. All Rights Reserved.