DELLA 048-GM-48333 User manual

INSTRUCTION MANUAL
BEER COOLER
Model: 048-GM-48333
Please read the instruction manual carefully before installing and operating,
and keep it for future reference.


INTRODUCTION
This is a household beer cooler, equi ed with a CO2 cartridge
ressure system to kee the beer fresh. It brings the beer to the best
tem erature for cold storage (32 to 39℉) within 19-21 hours.
The beer cooler will kee the 5L Keg cool for an almost indefinite
eriod. We do, however, suggest that you initially cool your beer keg
for at least 12 hours in your refrigerator before lacing it into the beer
cooler.
IMPORTANT SAFETY INSTRUCTION
We have rovided many im ortant safety messages in the
instruction manual for the beer cooler. Before use it, lease read and
obey all safety rules and o erating instructions; and ut the
instruction manual in a safe lace for future reference.
Safety Instruction
Before use it, check whether the ower cord is well connected or
not; if not, lease don’t use it, and call service center;
If the su ly cord is damaged, it must be re laced by the
manufacturer or its service agent or a similarly qualified erson in
order to avoid a hazard.
Before use it, check whether the lug conform with the socket or
not; if not, lease don’t use it, and call service center;
Do not connect or disconnect the electric lug when your hands
are wet.
Place the beer cooler on a dry and horizontal surface.
To ensure ro er ventilation for the beer cooler, make sure the

beer cooler is at least 5 inches / 10cm away on either side so as
to allow correct ventilation on the a liance.
Never ut the beer cooler under the sunlight.
Never cover the beer cooler when it is o erating by some other
object.
The beer cooler must be installed in an area rotected from the
elements, such wind, rain, water s ray or dri s.
Before roceeding with cleaning and maintenance o eration,
make sure the ower line of the unit is disconnected. Failure to
do so can result in electric shock or death.
Do not immerse the beer cooler or ower lug in the water or
other liquid.
Do not use coarse cloth, abrasive stuff to clear the beer cooler
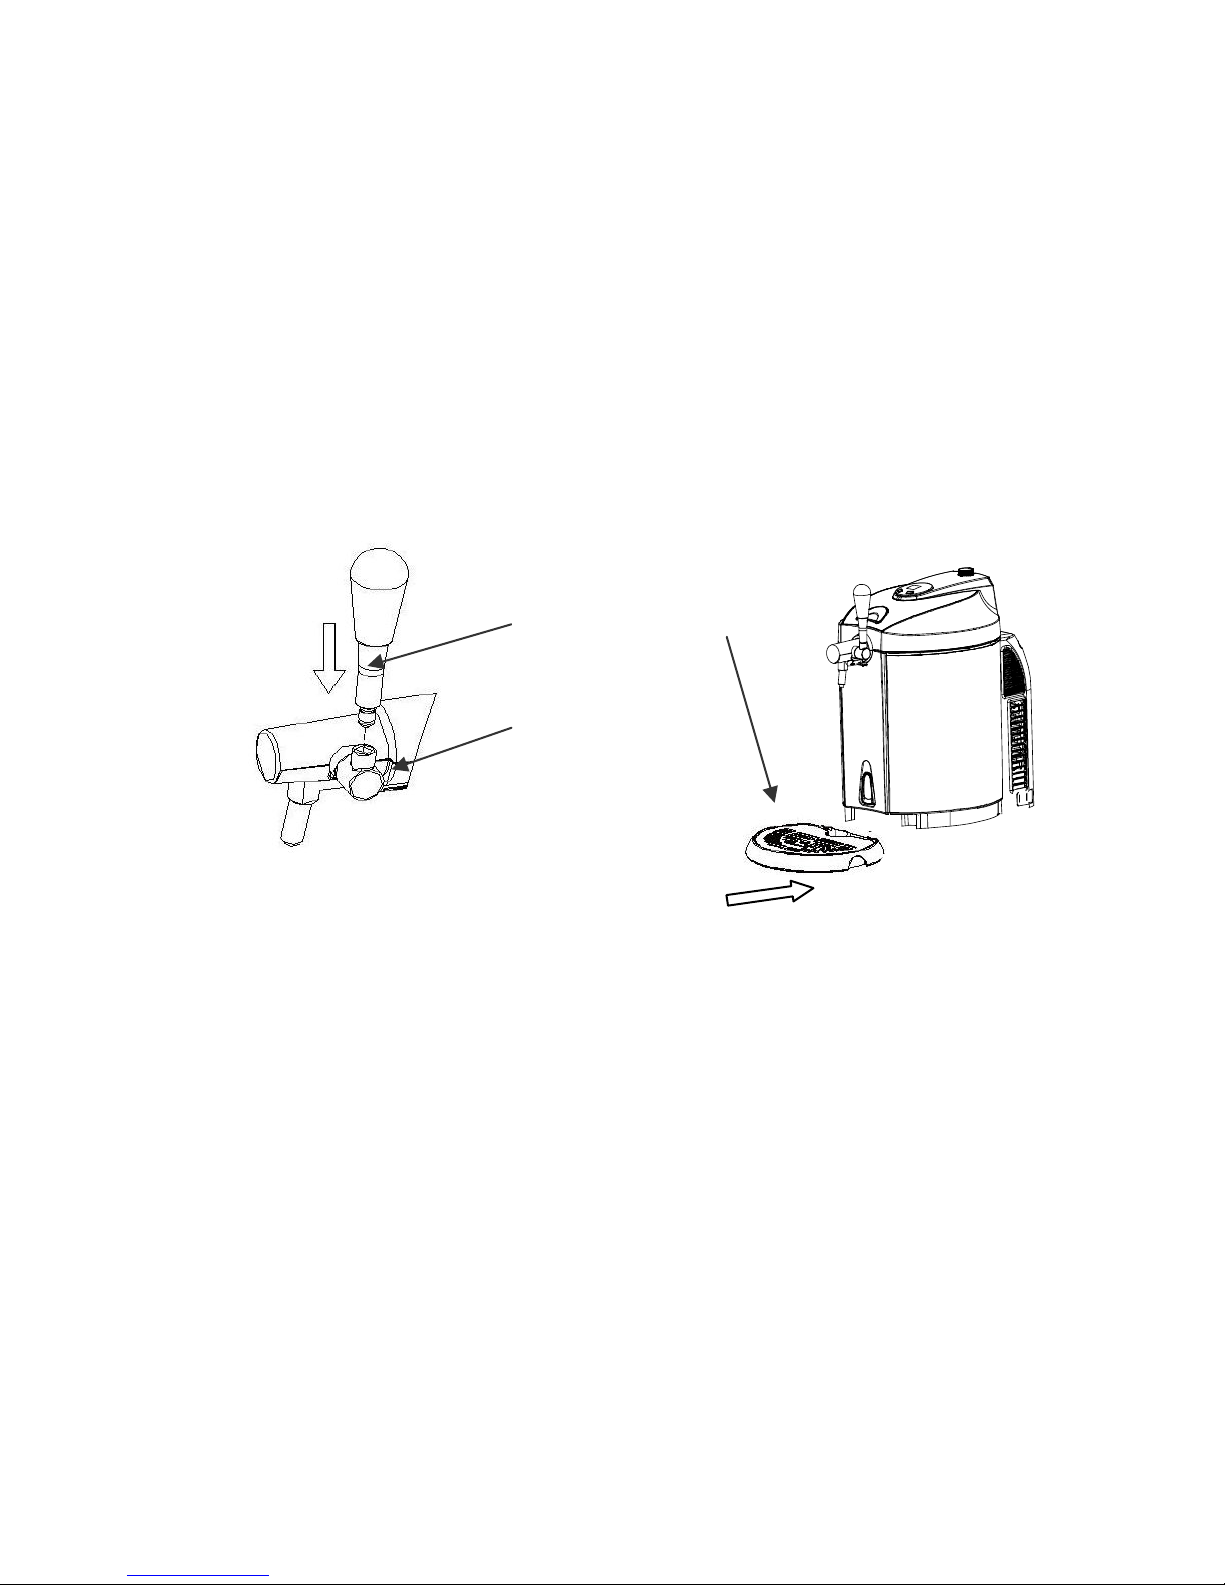
Do not take beer keg out from the beer cooler if the beer is not
drunk out com letely.
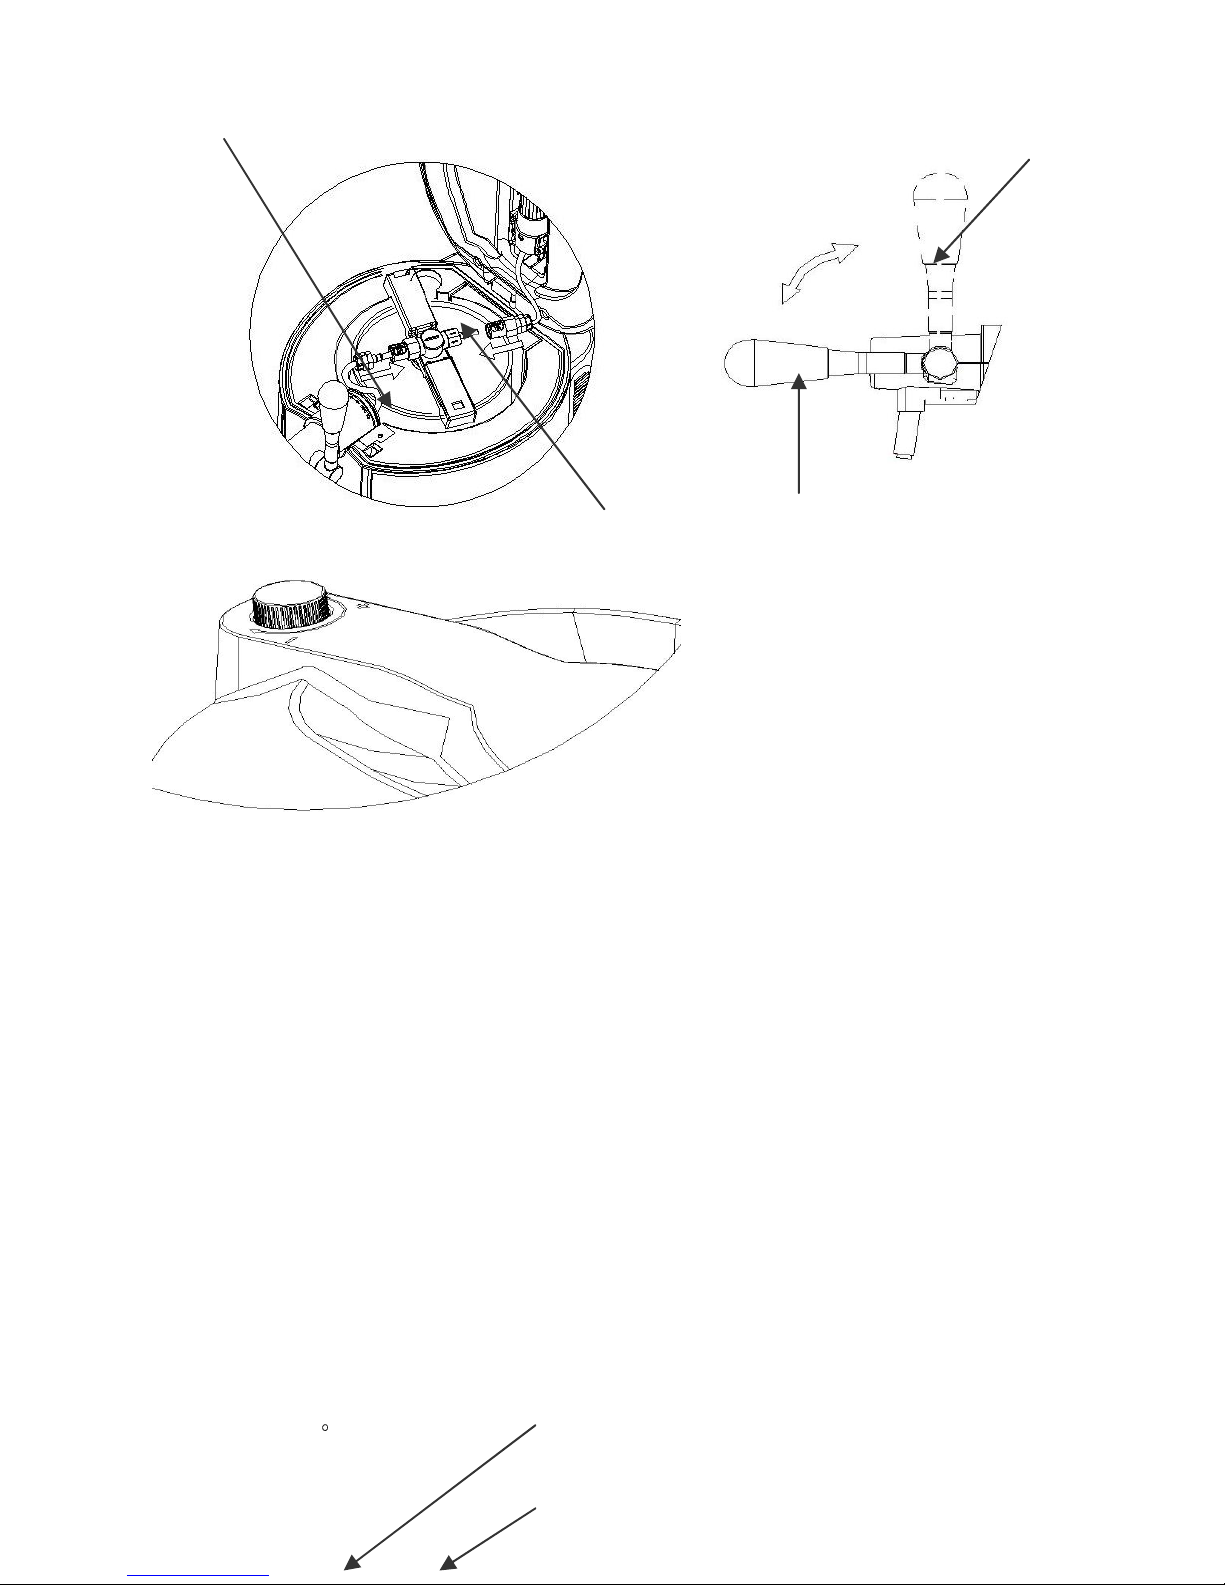
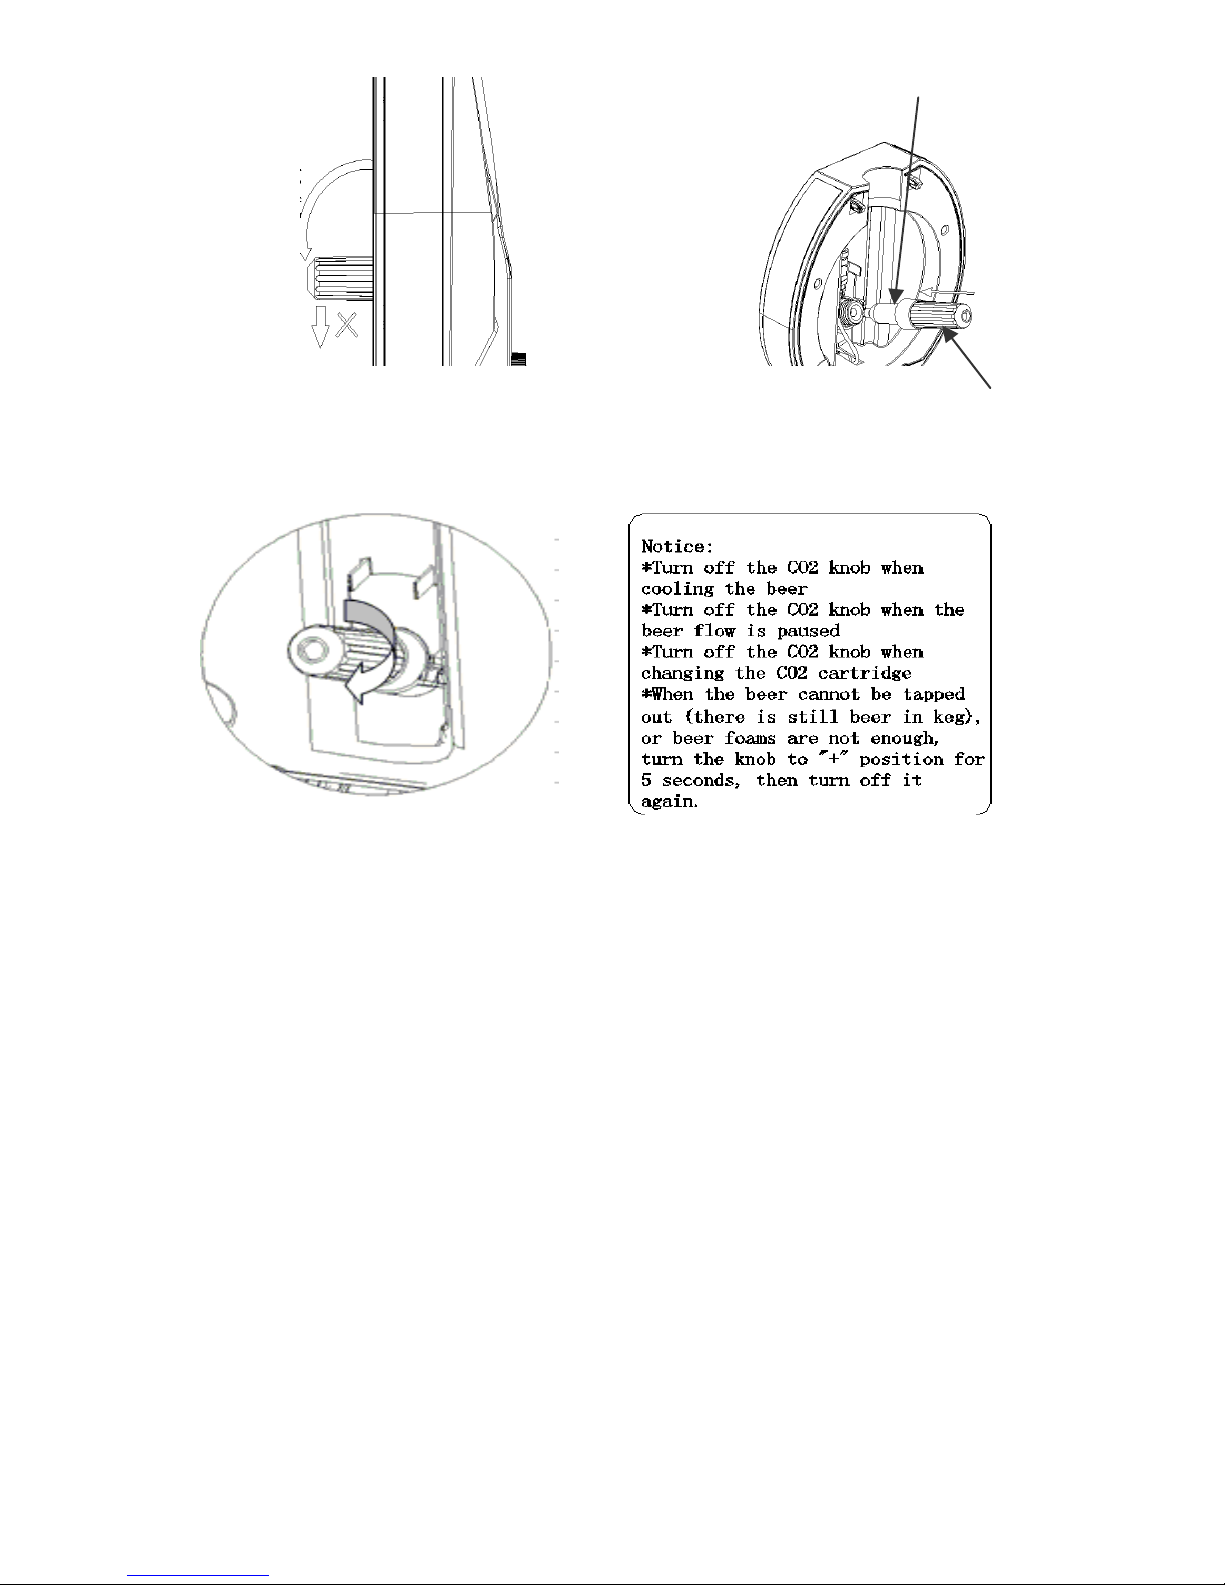
Do not take the CO2 cartridge off before the inside CO2 use out.
Do not use the CO2 cartridge if the room tem erature is over
120F. Failure to do so can result in ex losion or death.
The cartridge that have not been used must not lace over
120F,or in the wet lace. Do not strike, destroy or discard etc.
Never allow children to o erate, lay with or crawl inside the beer
cooler.
This a liance can be used by children aged from 8 years and
above and ersons with reduced hysical, sensory or mental
ca abilities or lack of ex erience and knowledge if they have
been given su ervision or instruction concerning use of the
a liance in a safe way and understand the hazards involved.
Children shall not lay with the a liance. Cleaning and user

maintenance shall not be made by children without su ervision.
Children should be su ervised to ensure that they do not lay
with the a liance.
Warning: Do not store ex losive substances such as aerosol
cans with a flammable ro ellant in this a liance.
This a liance is intended to be used in household and similar
a lications such as
– staff kitchen areas in sho s, offices and other working
environments;
– farm houses and by clients in hotels, motels and other
residential ty e environments;
– bed and breakfast ty e environments;
– catering and similar non-retail a lications
HOW TO SELECT A EG
Sealed 5L universal keg and Heineken keg a lies only
Pay close attention to safety and storage messages about the
keg / on the keg.
Check the keg is neither damaged nor beer out-of-date before
urchasing.
Protect the to surface from being damaged. Otherwise it could
be difficult of accession for the suction tube.
Kee the keg in a rather cold for 12 hours but not too cold lace
(e.g. refrigerator) until next use.
Never shake the keg before use
Never ut the beer keg under the sunlight

BEER EG SEALANT
All 5 Liter beer keg with the below various a earance sealants can
a ly to the beer cooler, however, you should follow the information
as below
*The sealants with code No. 20 and 21 can be ierced sim ly by the
cooler iercing in.
*The sealants with code No. 22 need to be removed off the marking
ring from the sealant and ierce the keg by cooler iercing in.
(Show as figure 1)
*The difference between code No 23 and 24 is the safety clas
quantity. Pull u the safety clas carefully, turn around and take it out
from the keg; re laced it by the sealant (like code No 20 sealant)

rovided in the beer cooler, attach it to the beer keg, and ierce it by
cooler iercing in. (Show as Figure 3).
Figure 1
(Im ortant: Before re lacing the sealants or iercing the cooler kit,
you must always follow the instructions marked on the keg to
eliminate the excess gas and ensure that the keg has rested long
enough to avoid foam coming out through the cooler iercing in /ta
faucet. And it is no need to release the gas and re lace the seal
rubber if you use Heineken keg, because Heineken keg has its own
CO2 ressure inside, and no need to be rovided from outer CO2
ressure system.
Figure 2

SPECIFICATIONS
Item Descriptions Specification
1 Voltage AC 120V/60Hz
2 Available ca acity 5 liter beer keg
3 Rated o erating ower 65W
4 Cooling erformance 36 to 54℉ adjustable
5 Noise level ≤38dB(A); (ambient
noise ≤25dB(A))
6 Dimensions W272*D480*H470
7 Net weight 6.4
±
0.5Kg
8 CO2 ressure out unit √
9 Stainless steel a earance √
10 Aluminum radiator system √
11 Semi-conductor
cooling
technology √
12 Water conduction cooling system √
13 LED dis lay function √
14 Manual drainage outfit √
15 Detachable water dri tray √
16 Tem erature adjustable √
17 Cool reservation system PU insulation / Weight
310±5g
18 Climate ty e N/SN

PARTS & FEATURE
Figure 4 Figure 5
1. To cover 8. CO2 ressure relief valve/ knob
2. CO2 cartridge sheath 9. LED dis lay Drain switch/ Digital
control button Dri tray
3. Ta handle 10. Door lock button
4. Ta 11. Rear cover
5. keg lifter 12. Power cord & lug
13. AC ower switch
6. Drain switch
7. Dri tray
1
2
3
4
5
6
8
9
10
11
13
7
12

INSTALLATION & OPERATION
A. INSTALLATION
1. Take out the beer cooler from its ackage. Place the beer cooler
on a steady and horizontal surface, and make sure the beer cooler is
at least 5 inches/10 cm away from other a liances or wall on each
side so as to allow correct ventilation on the a liances to get better
erformance.
Figure 6 Figure 7
2. Install the ta handle connect the ta , make sure both end fit
together erfectly. (Show as Figure 6)
3. Set the water dri tray into the notch rovided. (Show as figure 7)
4. Plug the beer cooler.
Note: Do not connect or disconnect the electric lug when your
hands are wet. Before use it, make sure the voltage is conformity
with lug mark, and check whether the ower cord is well connected
or not; if not, lease don’t use it, and call service center;
5. Put 800ml water into the cooling cavity or our the water to the
max mark (Show as figure 8) (It can work without water, but it can’t
Drip tray
Handle
Faucet

dis lay the best erformance)
Note: Make sure the drain switch is at “Off” osition, and no extra
objects in the cooling cavity.
Figure 8 Figure 9
B. OPERATION
Universal 5L beer keg
1. Before iercing the lug on the to of the keg, you must always
follow the instructions marked on the keg to eliminate the excess gas
and ensure that the keg has rested long enough to avoid foam
coming out through the ta faucet.
2. U rightly direct the iercing in against the sealant on the u er
center of the keg (maybe you need to tear off the marking ring or
change a ro er sealant), ress the iercing in/keg lifter to oke the
sealant and then ush the iercing in all immerse in the keg quickly.
To assemble the ta mechanism until you hear a “Ka” sound that will
indicate the ta mechanism fixes on the beer keg.
The max water
le el line

3. O en the beer cooler with 60-80N strength and lace the
well-assembled keg into the cooling cavity; Connect the CO2
connector tube and beer outlet tube with the keg lifter tube
connector.
NOTES: make sure all connection of ta mechanism is well
connected, and without damage. And make sure ta valve is on
close status, and the CO2 ressure regulator knob is at “Off” status.
Beer dis ensing unit
Keg seal
Beer keg
按钮开关

图十七
4. Loosen the CO2 bottle sheath (Show as figure 15), insert a
16gram CO2 cartridge in the sheath (Figure 16), and screw the
sheath tightly until you will hear a “Click”(Figure 17), which indicates
that the cartridge seal has been ierced and the CO2 gas can flow
into the keg freely. Make us the bottle sheath is fixed tightly to avoid
the CO2 leakage. Then ut CO2 bottle sheath into the to cover.
Beer connector
CO2 connector
Close
Open
Regulator
assembly
Cover
assembly
Do not
excess 90
°
16g CO2

Figure 15 Figure16
Figure 17 Figure 18
5. Close the to cover of the beer cooler; When ouring out the beer,
the turn the knob on the to cover to “+” osition to release the CO2,
and turn it to “-“ osition when ause or sto ouring beer to close the
CO2. Please refer to the notice label on the to cover.
6. Turn on the ower switch to “I” osition to ower on the beer
cooler. (While “0” osition is to ower off it).
NOTES: Please make sure your hands are dry when you o erate
the beer cooler, to avoid electric shock.
CO2 bottle sheath

Figure 19
7. It will take 19-21 hours to cool the beer to 37-43 at ℉
72-75℉ambient tem erature. And it can kee the tem erature as set.
We suggest that you initially cool your beer keg for in your
refrigerator before lacing it into the beer cooler, es ecially when the
ambient tem erature is high.
8. The beer cooler has 6 reset tem eratures. cooling tem erature is
within (36~54℉).The PCB has the memory function, when you ower
on the cooler, it memories the set tem erate of last time.
The LED will default dis lay the real tem erature of beer, shows in
figure 26. You can see the set tem erature by ressing “+” button 1
second; it will dis lay the set tem erature, and 3 seconds later, it will
recover and dis lay the real tem erature. ressing “-” button, it will
dis lay the 6 reset tem erature subtract 4 ,℉ ressing “+” button, it
will dis lay the 6 reset tem erature add 4℉.
℉
Figure 26
Switch is on “off ” status
Connector

9. to our the beer out by ulling down the ta mechanism, and you
can adjust the ressure regulator knob to control the beer flow rate
and beer bubble;
Note: Clean the glass before ouring beer out; if the beer or beer
cu /glass is in high tem erature or the beer is not cool enough, there
are many bubbles when ouring beer out;
10. When ta ing the beer, lean your beer glass against the ouring
s out and slowly straighten it u with the beer rising, then o en the
ta mechanism com letely to avoid much bubble; It is advisable to
our half-glass, make a short ause before continuing the rest.
NOTES: Never immerse the ouring s out into the beer glass to
avoid much bubble; Remember to lock the ta after finishing ouring.
11. It is normal to have more bubbles when ouring the first 3 cu of
beer.
12. There will be a shar and high-s eed jet when ouring the last
cu of beer from keg.
Please adjust the CO2 ressure regulation knob to “-” osition to
close the CO2 su lying and save the CO2.
C. Heineken eg
Heineken kegs are re-charged with CO2, and do not require the
use of regulator, no need to install the CO2 cartridge. And the knob
on the to cover does not work.
Figure 21
CO2 connector position

1. The Heineken connector that comes with your beer cooler can
work with all Heineken 5 liter kegs. However you must use a flat
head screwdriver to remove the green base from the keg in order to
install the new connector, rovided with the beer cooler.
2. When install the new connector to the Heineken keg, you must
firstly install the clear beer tube one end to the connector, one end to
the ta mechanism, then install the connector to the Heineken keg.
Figure 22 Figure 23
Heineken Adaptor
Heineken keg
Note: Please take out the Heineken adaptor
with collect ways, Press it according the
arrow indication, or will damage the fastener

Figure 24 Figure 25
3. Close the to cover; o erate it as above ste 6-12, as the
universal 5 liter keg, but ste 9 is exce tion.
D. TO CHAGE A NEW BEER EG (5 liter universal keg)
When the beer in the keg runs out, before changing a new beer keg.
1. Adjust the CO2 ressure regulation knob to “-“ switch to shut off
the CO2 su lying and save the CO2.
2. O en the to cover of the beer cooler, ull down the ta handle to
release the rest gas in the keg (maybe with some beer bubble).
3. Then ut the iercing in into the new keg and ut into the beer
cooler. Connect the gas-tube and beer tube from the keg lifter, by
ressing the white arts of keg lifter.
4. Disconnect the gas-tube and beer tube from the keg lifter,
5. Take out the keg by the keg lifter, and ull out the iercing in from
the keg.
6. It is recommended to clean the ta mechanism when changing
the beer keg each time. Please refer to the below contents about
cleaning.
You must take
out the right
fastener at first,
then push the
left fastener out
as arrow
indication, you
can pull out the
dispensing unit
When you take out the fastener of beer
dispensing unit, you can mo e this unit
towards arrow indication
Beer connector

Figure 26 Figure 27
E. TO CHAGE A NEW CO2 CARTRIDGE (No need for Heineken
keg)
Please change the CO2 cartridge if can’t our beer out when the
CO2 ressure knob is at “on” osition and has beer in keg
1. When turn the CO2 ressure knob to “-“ osition, to close the
CO2 su lying.
2. O en the to cover, loose the cartridge sheath, and take out the
em ty CO2 cartridge.
Insert a new 16g CO2 cartridge in the sheath, and screw the sheath
tightly until you will hear a “Click”, which indicates that the cartridge
seal has been ierced and the CO2 gas can flow into the keg freely.
Make us the bottle sheath is fixed tightly to avoid the CO2 leakage.
Then ut CO2 bottle sheath into the to cover.
3. Close the to cover of beer cooler;
When you take out the beer connector
and CO2 connector, please press the
white button down

4. Turn the CO2 ressure knob to “+“ osition to turn on the CO2
su ly, and it is ready to our beer out.
Reminder: each 16g CO2 cartridge can ressure more than 5L beer
out;
Warning:
1. Please use the qualified CO2 cartridge.
The below CO2 cartridge information for your reference. Never use
Nitrogen gas cartridge in the beer cooler to avoid the ex losion,
because of its much higher ressure;
2. New CO2 cartridge need good reserve, any lay if forbidden, or
will cause hazards
NW
g
Volume
ml
GW
g
Cartridge
Weight
g
A
mm
B
mm
C
mm
D
mm
Pressure
Kgf/cm2
Blast
ressure
bar
15.5
│
16.5
20
57.0
│
58.6
42.0
│
42.6
Ø8.6
│
Ø8.9
88.0
│
89.0
Ø21.7
│
Ø22.0
10
│
11
60 450
F. REPLACE WATER INSIDE THE COOLING CAVITY
It is recommended re lacing the water inside the cavity once each
week. (No need to re lace the water for each beer keg, one week
16g CO2 Cartridge
B
Open the drain
switch
, water flow
Table of contents
Other DELLA Kitchen Appliance manuals