Delta Core DMBD TYXAL + User manual
Contenu / Contents / Inhalt /
Contenuto / Contenido / Spis treści
/ Inhoud
1 m mini
2 m mini
Présentation / Presentation / Beschreibung / Presentazione / Presentación / Prezentacja /
Voorstelling
1
Emplacement / Location / Einbauort / Posizionamento / Ubicación / Lokalizacja / Locatie
2
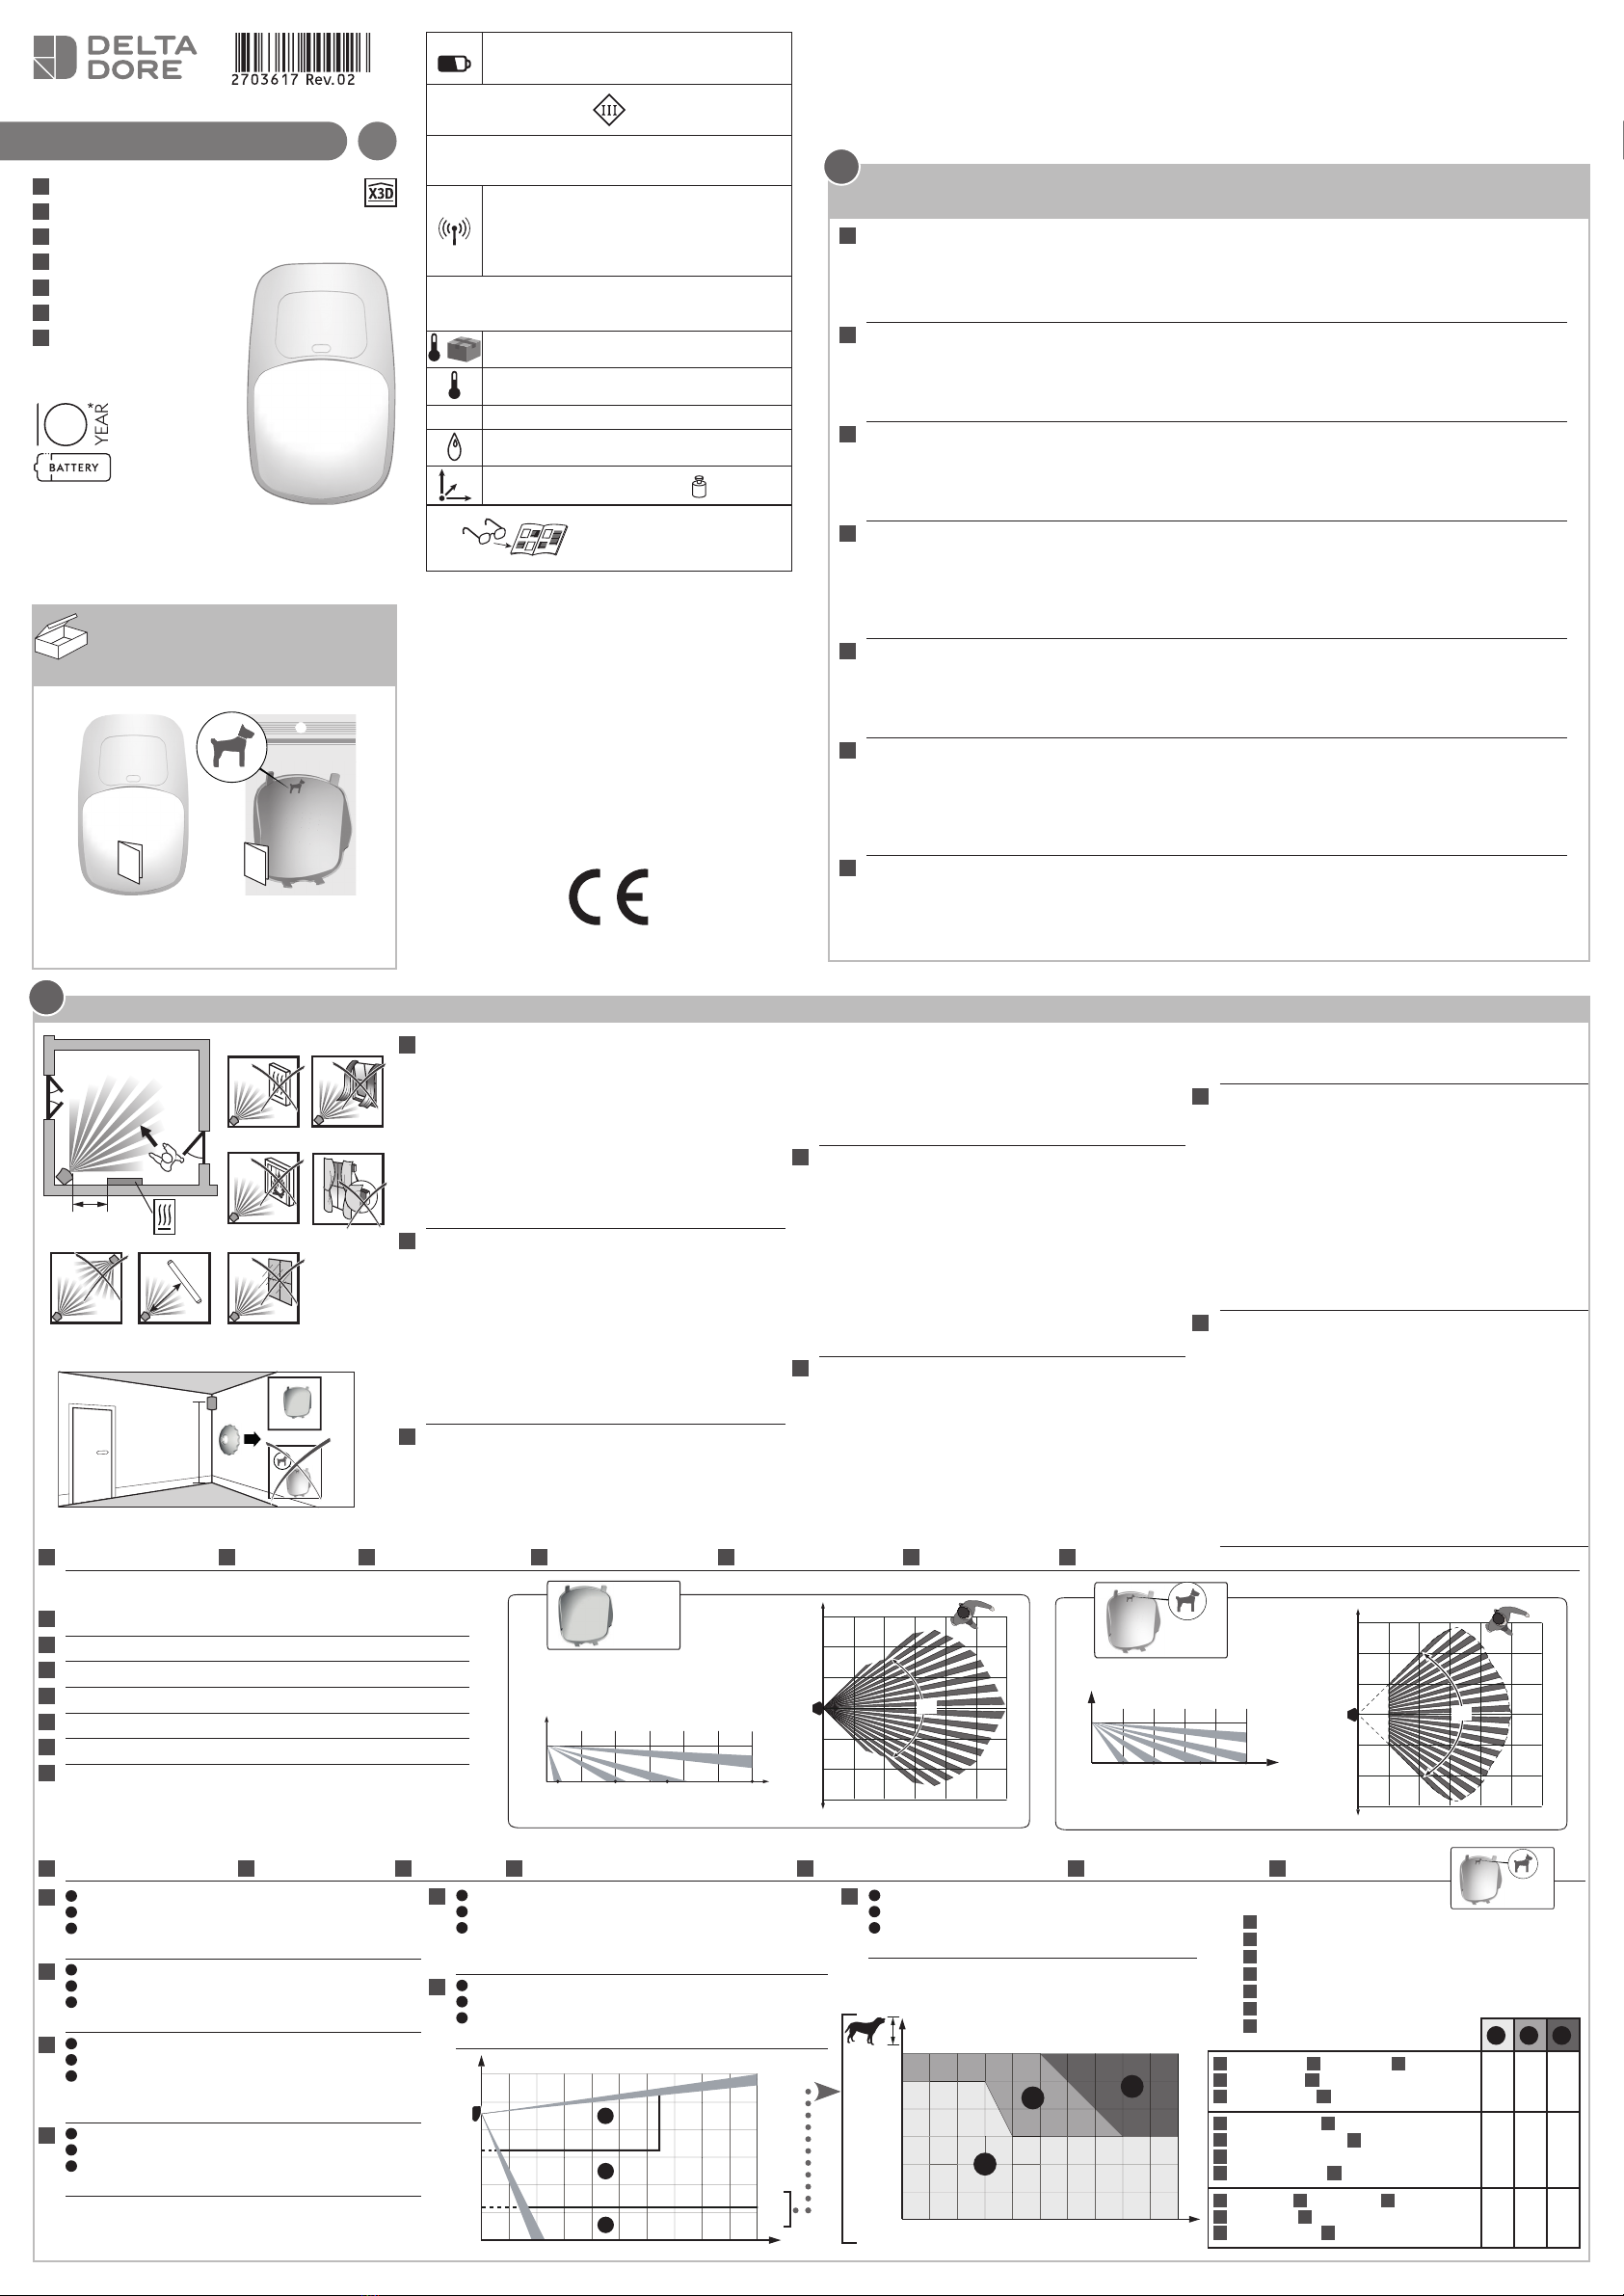
FR Le DMBD TYXAL+ détecte par infra-rouge (chaleur) puis confirme par hyperfréquence (mouvement),
toute présence dans la pièce. Il dispose de 2 lentilles amovibles :
- n°1 : appelée standard (montée sur le produit livré).
- n°2 : appelée immunité animaux (ne détecte pas les animaux jusqu’à un certain gabarit, ou élec-
troménager type aspirateur robot).
EN DMBD TYXAL+ uses infrared (heat) then confirms by microwave frequency (motion), to detect any
moving presence in the room. It has 2 removable lenses:
- no. 1: standard (fitted on the product supplied).
- no. 2: animal immunity (does not detect animals up to a certain size, or household appliances such
as robot vacuum cleaners).
DE DMBD TYXAL+ erkennt per Infrarotstrahlung (Wärme) und signalisiert per Ultrahochfrequenz
(Bewegungen). Er verfügt über 2 herausnehmbare Linsen:
- Nr. 1: Standardlinse (im Lieferumfang enthalten, im Gerät eingebaut).
- Nr. 2: Tierimmune Linse (keine Tiererfassung bis zu einer bestimmten Größe, keine Erfassung von
Haushaltsgeräten wie Staubsauger-Roboter).
IT Il DMBD TYXAL+ rileva attraverso gli infrarossi (calore), poi conferma mediante iperfrequenza
(movimento) qualsiasi presenza in movimento all’interno di una stanza.
Dispone di 2 lenti interscambiabili :
- n° 1 : denominata «classica» (montata sul prodotto al momento dell’acquisto).
- n° 2 : denominata “selettiva animali” (non rileva gli animali di una certa dimensione o gli
elettrodomestici tipo gli aspirapolvere robot.
ES DMBD TYXAL+ detecta a través de infrarrojos (calor) y confirma mediante hiperfrecuencia
(movimiento), toda presencia en movimiento en la sala. Dispone de 2 lentes extraíbles:
- n°1 : denominada estándar (montada en el producto enviado).
- n°2 : denominada de inmunidad a la presencia animal (no detecta animales hasta un cierto punto, o
electrodomésticos como aspiradores robot).
PL Czujnik DMBD TYXAL+ wykrywa za pośrednictwem podczerwieni (ciep³o), a nastêpnie potwierdza za
pomoc¹ hiperczêstotliwości (ruch), ka¿dy ruch w pomieszczeniu.
Wyposa¿ony jest w 2 demontowane soczewki:
- nr 1: zwana standardow¹ (zamontowana w dostarczanym produkcie),
- nr 2: zwana odporn¹ na zwierzêta (nie wykrywa zwierz¹t do pewnej wielkości ani urz¹dzeñ AGD
typu automatyczny odkurzacz).
NL De DMBD TYXAL+ detecteert via infrarood (warmte) en bevestigt vervolgens door microgolf
(beweging) alle bewegingen in een kamer. Deze heeft 2 verwisselbare lenzen:
- 1: standaard (gemonteerd op het geleverde product).
- 2 : exclusief huisdieren (detecteert geen huisdieren, tot een bepaalde grootte, of elektrische
huishoudtoestellen zoals een stofzuigrobot).
FR Ne pas installer DMBD TYXAL+ :
• près ou en face d’une source de chaleur,
• en face d’un autre détecteur,
• en face d’une ouverture extérieure,
• à l’extérieur ou dans un endroit soumis à courants d’air
• près d’un élément pouvant créer un mouvement
(ventilateur, rideau qui vole,...),
• à proximité d’un obstacle (rideau, armoire,...)
• près d’une source électrique (câbles, lampes, néons,...)
Le détecteur doit être installé entre 2,2 m et 2,5 m du sol. Si
installation à une hauteur > 2,5 m, utilisez la rotule RO
DMB, réf. 6416221 (incompatible avec la lentille animaux).
EN Do not install DMBD TYXAL+:
• close to or opposite a heat source,
• opposite another detector,
• opposite an exterior opening,
• outdoors or in a draughty area
• close to a moving element
(fan, curtain blowing in the wind, etc.),
• close to an obstacle (curtain, wardrobe, etc.)
• close to a source of electricity (cables, lights, neon lights, etc.)
The detector must be installed between 2.2 m and 2.5 m from the
floor.If installed higher than 2.5 m, the RO DMB ball joint should
be used, P/N 6416221 (incompatible with the animal lens).
DE DMBD TYXAL+ nicht wie folgt installieren:
• in der Nähe oder gegenüber einer Wärmequelle,
• gegenüber eines anderen Melders,
• gegenüber eines Außenzugangs (Fenster/Tür),
• im Außenbereich oder in Umgebungen mit Durchzug
• in der Nähe von sich bewegenden Elementen
(Ventilator, wehender Vorhang ...),
• in der Nähe von Hindernissen (Vorhänge, Schrank ...)
• in der Nähe einer Stromquelle (Kabel, Lampen,
Neonlampen ...)
Der Melder muss zwischen 2,2 m und 2,5 m Höhe über dem
Boden installiert werden. Bei der Installation in einer höhe
über 2,5 m muss das Gelenk RO DMB (Best.-Nr. 6416221)
verwendet werden. Dieses ist nicht mit der Tierlinse kompatibel.
IT Non installare il DMBD TYXAL+:
• vicino o davanti a una sorgente di calore,
• davanti a un altro sensore,
• davanti a un’apertura esterna,
• all’esterno o in un punto soggetto a correnti d’aria,
• vicino a un elemento che può creare un movimento
(ventilatore, tenda che si muove, ecc.),
• vicino a un ostacolo (tenda, armadio, ecc.),
• vicino a una fonte elettrica (cavi, lampade, neon, ecc.)
Il sensore deve essere installato a un’altezza compresa tra
2,2 m e 2,5 m da terra. In caso di installazione a un’altezza >
2,5 m, utilizzate lo snodo RO DMB, rif. 6416221 (non
compatibile con la lente “animali”).
ES No instale DMBD TYXAL+:
• cerca o frente a una fuente de calor,
• frente a otro detector,
• frente a una apertura exterior,
• en exteriores o entornos en los que se producen
corrientes de aire
• cerca de un elemento que pueda generar movimiento
(ventilador, vuelos de cortinas, etc.),
• cerca de obstáculos (cortina, armario, etc.)
• cerca de una fuente de electricidad (cables, lámparas,
neones, etc.)
El detector debe colocarse entre 2,20 y 2,5 m del suelo. Si se
coloca a una altura > 2,5 m, utilice la rótula RO DMB, ref.
6416221 (incompatible con la lente para animales).
PL Czujnika DMBD TYXAL+ nie nale¿y montowaæ:
• w pobli¿u lub naprzeciwko źród³a ciep³a,
• naprzeciwko innego czujnika,
• naprzeciw otworu prowadz¹cego na zewn¹trz,
• na zewn¹trz ani w miejscu, w którym wystêpuj¹ przeci¹gi
• w pobli¿u elementów, które mog¹ wywo³ywaæ ruch
(wentylator, poruszaj¹ca siê zas³ona itp.),
• w pobli¿u przeszkody (zas³ona, szafa itp.)
• w pobli¿u źród³a energii elektrycznej (przewody, lampy,
neony itp.)
Czujnik powinien byæ zamontowany na wysokości od 2,2 m
do 2,5 m od pod³ogi. Na wysokości ponad 2,5 m, u¿yæ
przegubu kulistego RO DMB nr kat. 6416221 (niekompatybil-
ny z soczewkami dla zwierz¹t).
NL De DMBD TYXAL+ mag niet worden geïnstalleerd:
• dichtbij of voor een warmtebron,
• voor een andere detector,
• voor een opening naar buiten,
• buiten of in een plaats die onderhevig is aan tocht,
• in de buurt van een voorwerp dat beweging kan creëren
(ventilator, gordijnen,...),
• in de buurt van een obstakel (gordijn, kast,...)
• in de buurt van een stroombron (kabels, lampen,
neonverlichting, ...)
De detector moet tussen 2,2 en 2,5 m boven de grond
geplaatst worden. Indien geïnstalleerd op een hoogte > 2,5
m, moet u de kogel RO DMB, ref. 6416221 gebruiken (niet
verenigbaar met de lens voor dieren).
FR T° = 19°C + personne de corpulence moyenne.
EN T° = 19°C + person of average body size.
DE T° = 19°C + Person von mittlerer Statur.
IT T° = 19 °C + persona di corporatura media.
ES T° = 19°C + persona de corpulencia media.
PL T° = 19°C + osoba redniej postury.
NL T° = 19°C + persoon met gemiddelde lichaamsbouw.
FR Champ de détection / EN Detection field / DE Erfassungsbereich / IT Campo di rilevazione / ES Campo de detección / PL Pole wykrywania / NL Detectieveld
FR Immunité aux animaux / EN Animal immunity / DE Tierimmun / IT Immune alla presenza degli animali / ES Inmunidad a la presencia animal / PL Odpornośæ na zwierzêta / NL Exclusief huisdieren
2m 4 m 7 m 10 m
2,30m
H
!
10 m8 m6 m4 m2 m0 m
0 m
2 m
4 m
6 m
8 m
2 m
4 m
6 m
8 m
90°
A
B
30 kg20 kg10 kg0 kg
0 cm
10 cm
20 cm
30 cm
40 cm
50 cm
60 cm
40 kg 50 kg
A1
A2 A3
C
10 m8 m6 m4 m2 m0 m
0,60 m
1,60 m
2,30 m
A
B
C
2m 4 m 7 m 10 m
2,30m
H
!
10 m8 m6 m4 m2 m0 m
0 m
2 m
4 m
6 m
8 m
2 m
4 m
6 m
8 m
90°
A
B
30 kg20 kg10 kg0 kg
0 cm
10 cm
20 cm
30 cm
40 cm
50 cm
60 cm
40 kg 50 kg
A1
A2 A3
C
10 m8 m6 m4 m2 m0 m
0,60 m
1,60 m
2,30 m
A
B
C
A1 A2 A3
FR Poils longs / EN Long hair / DE Langhaar /
IT Pelo lungo / ES Pelo largo /
PL Sierśæ d³uga / NL Langharig
✔
✔
✔
FR
Poils mi-longs
/ EN
Medium-length hair
/
DE Mittellanges Haar / IT Pelo medio-lungo /
ES Pelo de longitud media /
PL Sierśæ średnia / NL Halflangharig
✔ ✔ -
FR Poils ras / EN Short hair / DE Kurzhaar /
IT Pelo raso / ES Pelo corto /
PL Sierśæ krótka / NL Korte vacht
✔
- -
FR Pelage autorisé zone A
EN Fur authorised zone A
DE Zulässiges Fell Zone A
IT Pelo autorizzato zona A
ES Pelaje autorizado en zona A
PL Sierśæ dozwolona w strefi e A
NL Vacht toegelaten zone A
ES
A
Zona autorizada para animales (ver detalles A1, A2, A3)
B
Zona autorizada para animales de hasta 10 Kg
C
Zona no autorizada para animales
Si existen varios animales, realice la suma de sus masas
corporales.
PL
A
Strefa dozwolona dla zwierz¹t (patrz szczegó³y A1, A2, A3)
B
Strefa dozwolona dla zwierz¹t ≤ 10 kg
C
Strefa niedozwolona dla zwierz¹t
W przypadku kilku zwierz¹t nale¿y zsumowaæ ich masy.
NL
A
Toegestane zone voor huisdieren (zie A1, A2, A3)
B
Toegestane zone voor huisdieren ≤10 Kg
C
Niet-toegestande zone voor huisdieren
Indien meerdere dieren, tel hun lichaamsgewicht op.
FR
A
Zone autorisée aux animaux (voir détails A1, A2, A3)
B
Zone autorisée aux animaux ≤à 10 Kg
C
Zone non autorisée aux animaux
Si plusieurs animaux, faire la somme de leurs masses.
EN
A
Zone authorised for animals (see A1, A2, A3)
B
Zone authorised for animals ≤10 kg
C
Zone prohibited for animals
If there are several animals, add together their weights.
DE
A
Zone zulässig für Tiere (siehe Details A1, A2, A3)
B
Zone zulässig für Tiere ≤10 kg
C
Zone nicht zulässig für Tiere
Bei mehreren Tieren müssen die Gewichte der Tiere
summiert werden.
IT
A
Zona autorizzata agli animali(vedi dettagli A1,A2,A3)
B
Zona autorizzata agli animali ≤a 10 Kg
C
Zona non autorizzata agli animali
Se sono presenti più animali, sommare la loro massa.
0,5m 4 m 7 m 12 m
2,30m
H
12 m10 m8 m6 m4 m2 m0 m
0 m
2 m
4 m
6 m
2 m
4 m
6 m
90°
N°1
2m 4 m 7 m 10 m
2,30m
H
10 m8 m6 m4 m2 m0 m
0 m
2 m
4 m
6 m
2 m
4 m
6 m
90°
N°2
N°2
2,20 2,50 m
✔
✔
> 2,50 m
RO DMB
✔
!
DMBD TYXAL +
FR Noce d’installaon
EN Installaon guide
DE Installationsanleitung
IT Guida di installazione
ES Manual de instalación
PL Instrukcja instalacji
NL Installaehandleiding
2xLS14500 – 3,6V - 5,2Ah- Lithium
Consumption stand-by : 15 µA
Consumption : 26 mA
X3D alarme : [868 – 868.6] MHz
et [868.7 – 869.2] MHz
100 m Ý300m
24 GHz (EN 300440)
Maximum power radio < 10 mW,
receiver category: 2
-10°C / +70°C
-10°C / +40°C
IP IP 30 / IK 04
75%
67,6 x 110,8 x 54,3 mm 150 g
Important product information
(Ì)
www.deltadore.com
Instructions
Important
Product
Informations
Instructions
Important
Product
Informations
* Jusqu’à 10 ans, valable dans les conditions d’utilisation précisées dans les notices
d’installation et les Conditions générales de Vente
* Up to 10 years valid under the conditions of use specifi ed in the installation instructions and
the General Conditions of Sale
*Hasta 10 años siempre y cuando se respeten las condiciones de uso especifi cadas en el
manual de instalación y en la Condiciones Generales de Venta
*Fino a 10 anni, in base alle condizioni di utilizzo precisate nelle istruzioni di installazione e
nelle Condizioni Generali di Vendita
*Bis zu 10 Jahren unter den in der Bedienungsanleitung und den AGB angegebenen
Nutzungsbedingungen
*Tot 10 jaar, geldig onder de gebruiksvoorwaarden gespecifi ceerd in de installatie-
handleidingen en de algemene verkoopsvoorwaarden
*aż do 10 lat, przy użytkowaniu zgodnym z opisem w instrukcji instalowania oraz Generalnymi
warunkami Sprzedaży

ABCD
V7
V9
V10
V2
V3
V4
V6
V8
V1
V5
V7
V9
V2
V4
15
3
6
24
n°1
n°2
Ê
Ë
Ì
123
A
A
Ø max = 3 mm
V1
V2
V3
V4
V5
V6
V7
V8
V9
V11
V10
Fixation / Mounting / Montage / Fissaggio / Fijación / Mocowanie / Bevestigen
3
Changement de la lentille / Changing the lens / Linse austauschen / Sostituzione della lente / Cambio de la lente / Wymiana soczewki / Lens vervangen
4
Mise en service / Activation / Inbetriebnahme / Attivazione / Activación / Uruchamianie / Inbedrijfstelling
5
Fonctionnement avec un système d’alarme / Operation with an alarm system / Betrieb mit einer Alarmanlage / Funzionamento con un sistema d’allarme / Funcionamiento con el sistema de alarma
/ Działanie z systemem alarmowym / Werking met een alarmsysteem
6
Changement de la pile / Changing the batteries / Batterien ersetzen / Sostituzione delle batterie / Cambiar las pilas / Wymiana baterii / De batterijen vervangen
7
!
123
45
Ø max = 3 mm
FR Séparez les 2 parties du boîtier
EN Separate the 2 parts of the unit
DE Öffnen Sie das Gehäuse, indem Sie die zwei Gehäuseteile trennen
IT Separare le 2 parti del prodotto
ES Separe las 2 partes de la carcasa
PL Oddziel obie czêści obudowy
NL Scheid de twee delen van de behuizing
FR Tracez et percez les trous en fonction de l’emplacement du détecteur
(voir ci-dessous
A
,
B
,
C
ou
D
)
EN Mark and drill the holes according to the location of the detector (see
below
A
,
B
,
C
or
D
)
DE Bohrstellen markieren und Löcher bohren, je nach Einbauort des
Melders (s. u.
A
,
B
,
C
oder
D
)
IT Tracciare dei segni e fare dei fori in base al posizionamento del
sensore. (vedi sotto
A
,
B
,
C
o
D
)
ES Señale y perfore los orificios en función de la ubicación del detector
(ver a continuación
A
,
B
,
C
o
D
)
PL Zaznacz i wywieræ otwory w zale¿ności od lokalizacji czujnika (patrz
poni¿ej
A
,
B
,
C
lub
D
)
NL Markeer en boor de gaten afhankelijk van de locatie van de detector
(zie hieronder
A
,
B
,
C
of
D
)
FR Fixez au mur
EN Mount it on the wall
DE An der Wand befestigen
IT Fissare al muro
ES Fíjelo a la pared
PL Zamocuj do ściany
NL Bevestig aan de muur
FR Connectez le bloc pile.
EN Connect the battery pack.
DE Verbinden Sie den Batterieblock.
IT Collegate il blocco-pile.
ES Conecte el bloque de pilas.
PL Pod³¹czyæ zestaw baterii.
NL Sluit de accu aan.
FR Le voyant clignote à chaque détection, la pile est usée.
Le DMBD TYXAL+ utilise un bloc-pile spécifique DELTA DORE. Contactez votre installateur.
Si une centrale d’alarme est associée, passez-la en mode maintenance avant d’ouvrir le produit (voir notice d’installation système).
EN The LED flashes each time movement is detected. The battery is dead.
DMBD TYXAL+ uses a special DELTA DORE battery pack. Contact your installer.
If an alarm control unit is associated, set it to maintenance mode before opening the product (refer to system installation guide).
DE Kontrollleuchte blinkt bei jeder Erfassung, die Batterie ist leer.
Der DMBD TYXAL+ verwendet einen spezifischen DELTA DORE-Batterieblock. Wenden Sie sich an Ihren Installateur.
Bei Kombination mit einer Alarmzentrale muss sich diese beim Öffnen des Geräts im Wartungsmodus befinden (siehe Installationsanleitung System).
IT Il LED lampeggia ad ogni rilevazione, le batterie sono esaurite.
Il DMBD TYXAL+ utilizza un blocco-pile specifico DELTA DORE. Contattate il vostro installatore.
Se il sensore è associato ad una centrale d’allarme, metterla in modalità manutenzione prima di aprire il prodotto. (Vedi le istruzioni di installazione “Sistema”)
ES Si el indicador parpadea al detectar elementos es que la pila se ha acabado.
El DMBD TYXAL+ requiere un bloque de pilas específico de DELTA DORE. Póngase en contacto con su instalador.
Si se asocia una central de alarma, póngala en modo de mantenimiento antes de abrir el producto (ver manual de instalación del sistema).
PL Lampka miga przy ka¿dym wykryciu – bateria jest roz³adowana.
Czujnik DMBD TYXAL+ wykorzystuje specjalny zestaw baterii DELTA DORE. Skontaktowaæ siê z instalatorem.
Je¿eli powi¹zana jest centrala alarmowa, przed otwarciem urz¹dzenia przejdź w tryb konserwacji (patrz instrukcja instalacji systemu).
NL Als het lampje bij elke detectie knippert, dan is de batterij bijna leeg.
De DMBD TYXAL+ maakt gebruik van een specifieke DELTA DORE-accu. Neem contact op met uw installateur.
Als een alarmcentrale is verbonden, ga dan naar de modus Onderhoud voordat u het product opent (zie de installatiehandleiding).
FR V3,V8,V9 = Autoprotection à l’arrachement.
EN V3,V8,V9 = Tamper alarm on opening.
DE V3,V8,V9 = Sabotageschutz beim gewaltsamen Entfernen.
IT V3,V8,V9= Autoprotezione allo strappo.
ES V3,V8,V9 = Autoprotección contra arrancamiento.
PL V3,V8,V9 = Automatyczna ochrona przed urwaniem.
NL V3,V8,V9 = zelfbescherming opstelling.
FR • Association avec un système d’alarme
• Choix du mode de déclenchement
• Test
• Retour à la configuration usine
IT • Associazione con un sistema d’allarme
• Scelta della modalità di funzionamento
• Test
• Ritorno alla configurazione di fabbrica
PL • Powi¹zanie z systemem alarmowym
• Wybór sposobu wyzwalania
• Test
• Przywrócenie konfiguracji fabrycznej
EN • Association with an alarm system
• Selection of triggering mode
• Test
• Restoring factory settings
ES • Asociación con el sistema de alarma
• Selección del modo de activación
• Prueba
• Volver a la configuración de serie
NL • Koppelen aan een alarmsysteem
• Activeringsmodus selecteren
• Test
• Fabrieksinstellingen herstellen
DE • Verbindung mit einer Alarmanlage
• Wahl des Auslösungsmodus
• Test
• Rückkehr zur Werkseinstellung
Voir notice
d’intallation
système
Vedi le
istruzioni
“Sistema”
Patrz
instrukcja
instalacji
systemu
Refer to
system
installation
guide
Ver manual
de instalación
del sistema
Zie installatie-
handleiding
systeem
Siehe
Installations-
anleitung
System
!FR Ne pas toucher le capteur
EN Do not touch the sensor
DE Melder nicht anfassen
IT Non toccare il sensore
ES No toque el sensor
PL Nie dotykaj czujnika
NL Raak de sensor niet aan
Ref : 6416227
Lithium 3,6 V / 5,2 Ah
2 x LS14500
This manual suits for next models
1


