- 14 - - 15 -
IT
Caratteristiche tecnicheSpie del TYDOM 1.0 87
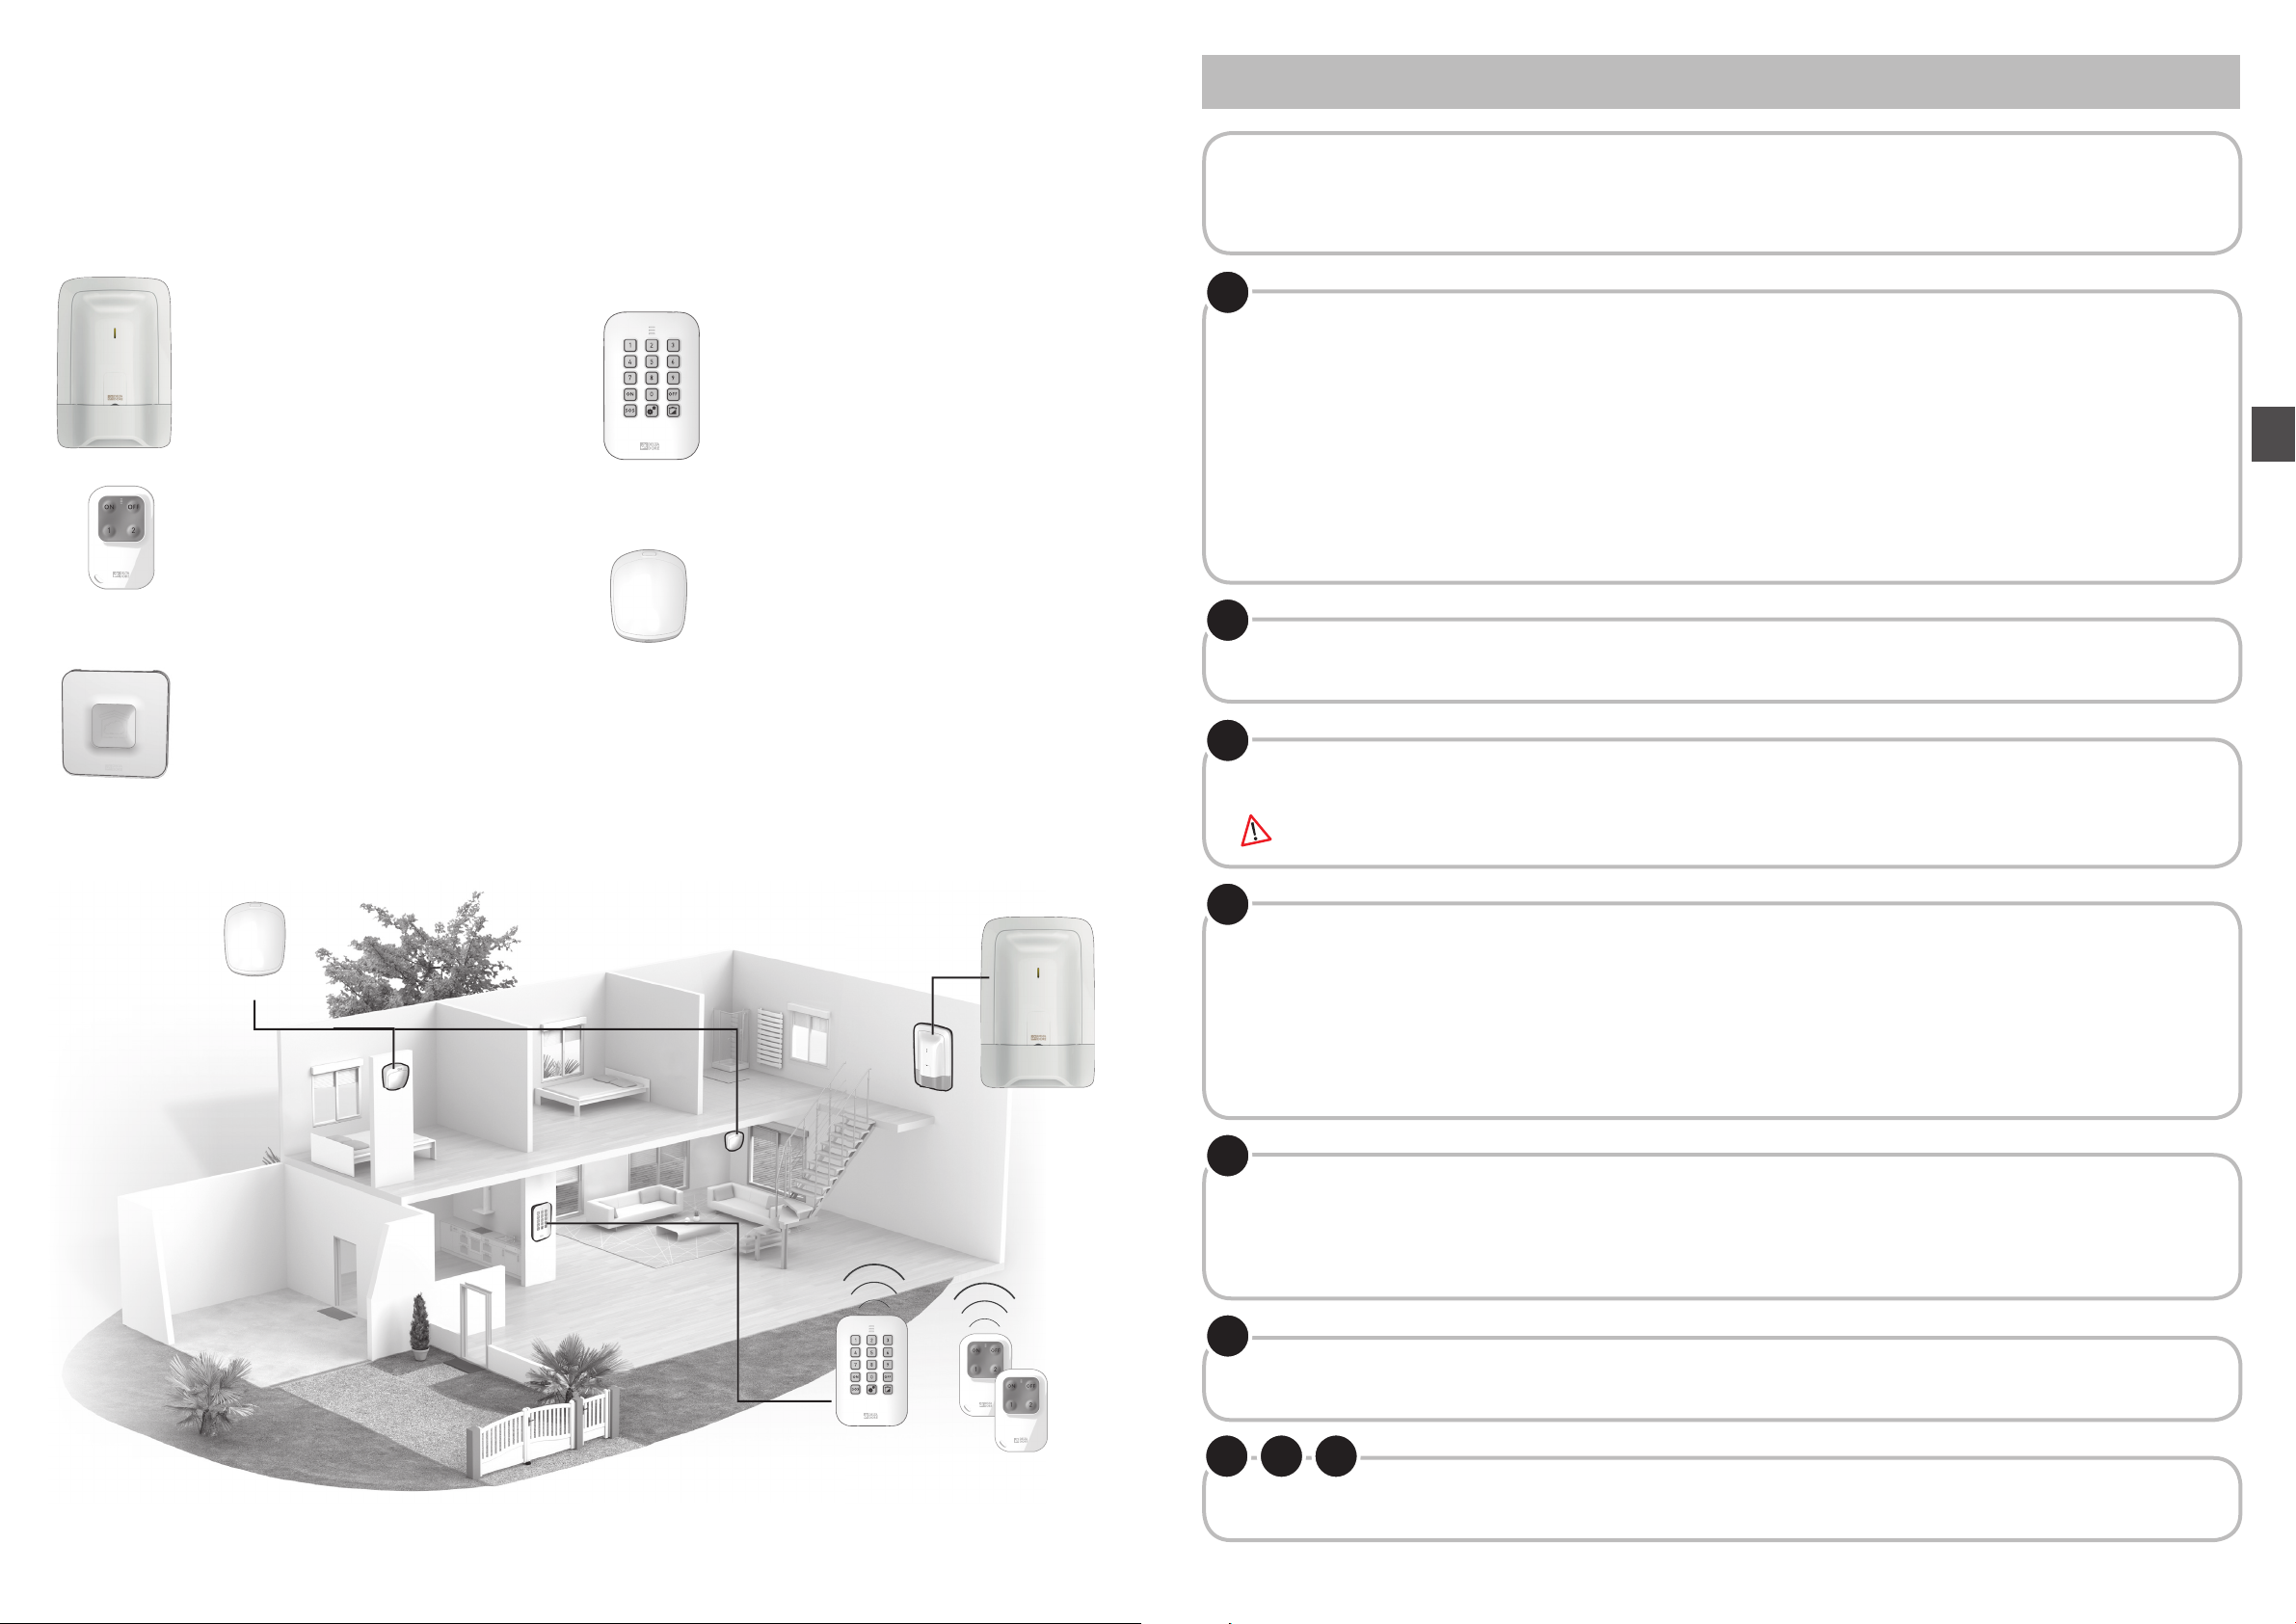
Centrale sirena CS 2000 TYXAL+
- Alimentazione: Blocco-pile Litio 3,6V / 26 Ah
- Isolamento classe III
- Consumo in modalità stand-by 10 μA max. / Consumo medio in
modalità emissione 25 mA max. / Consumo medio in modalità allarme
1,4 A max.
- Autonomia di 10 anni in base all'utilizzo. Tensione delle pile bassa: < 2,7
V
- Frequenze radio 868,95 MHz e 868,30 MHz (Norma EN 300 220)
- Equipaggiamento hertziano di Classe 1 (può essere immesso sul
mercato e messo in servizio senza restrizioni)
- Portata radio da 100 a 300 metri in campo libero, variabile in base alle
apparecchiature associate (portata che può essere alterata in base alle
condizioni di installazione e dell'ambiente elettromagnetico)
- Equipaggiamento di allarme radio
- Classe ambientale I
- 1.000.000 di codici possibili
- Numero di prodotti max. associati: 16
- Numero di eventi registrati: 1250
- Potenza acustica a 1 m: 109 dBA +/-2
- Autoprotezione contro l’apertura e gli atti di vandalismo
- Utilizzo esclusivamente in ambienti interni
- Indice di protezione: IP40 - IK06
- Temperatura di funzionamento da +5 °C a +40 °C
- Temperatura di immagazzinaggio: da -10 °C a +70 °C
- Intervallo di umidità: 75%
- Dimensioni: 176 x 268,5 x 59,5 mm
- Peso (con pile): 900 g
Tastiera semplice CLS 8000 TYXAL+
- Alimentazione: Pila Litio - LS 14500 - 1 x 3,6V / 2,6 Ah
- Isolamento classe III
- Consumo in stand-by 3 μA max.
- Consumo medio in modalità emissione 25 mA max.
- Autonomia di 10 anni in base all'utilizzo
- Frequenze radio 868,95 MHz e 868,30 MHz (Norma EN 300 220)
- Equipaggiamento hertziano di Classe 1 (può essere immesso sul
mercato e messo in servizio senza restrizioni)
- Portata radio da 100 a 300 metri in campo libero, variabile in base alle
apparecchiature associate (portata che può essere alterata in base alle
condizioni di installazione e dell'ambiente elettromagnetico)
- Equipaggiamento di allarme radio
- Classe ambientale 1
- Autoprotezione contro l’apertura e gli atti di vandalismo
- Utilizzo esclusivamente in ambienti interni
- Indice di protezione: IP30 - IK06
- Temperatura di funzionamento da +5 °C a +40 °C
- Temperatura di immagazzinaggio: da -10 °C a +70 °C
- Intervallo di umidità: 75%
- Dimensioni: 83 x 127 x 22 mm
- Peso (con pile): 120 g.
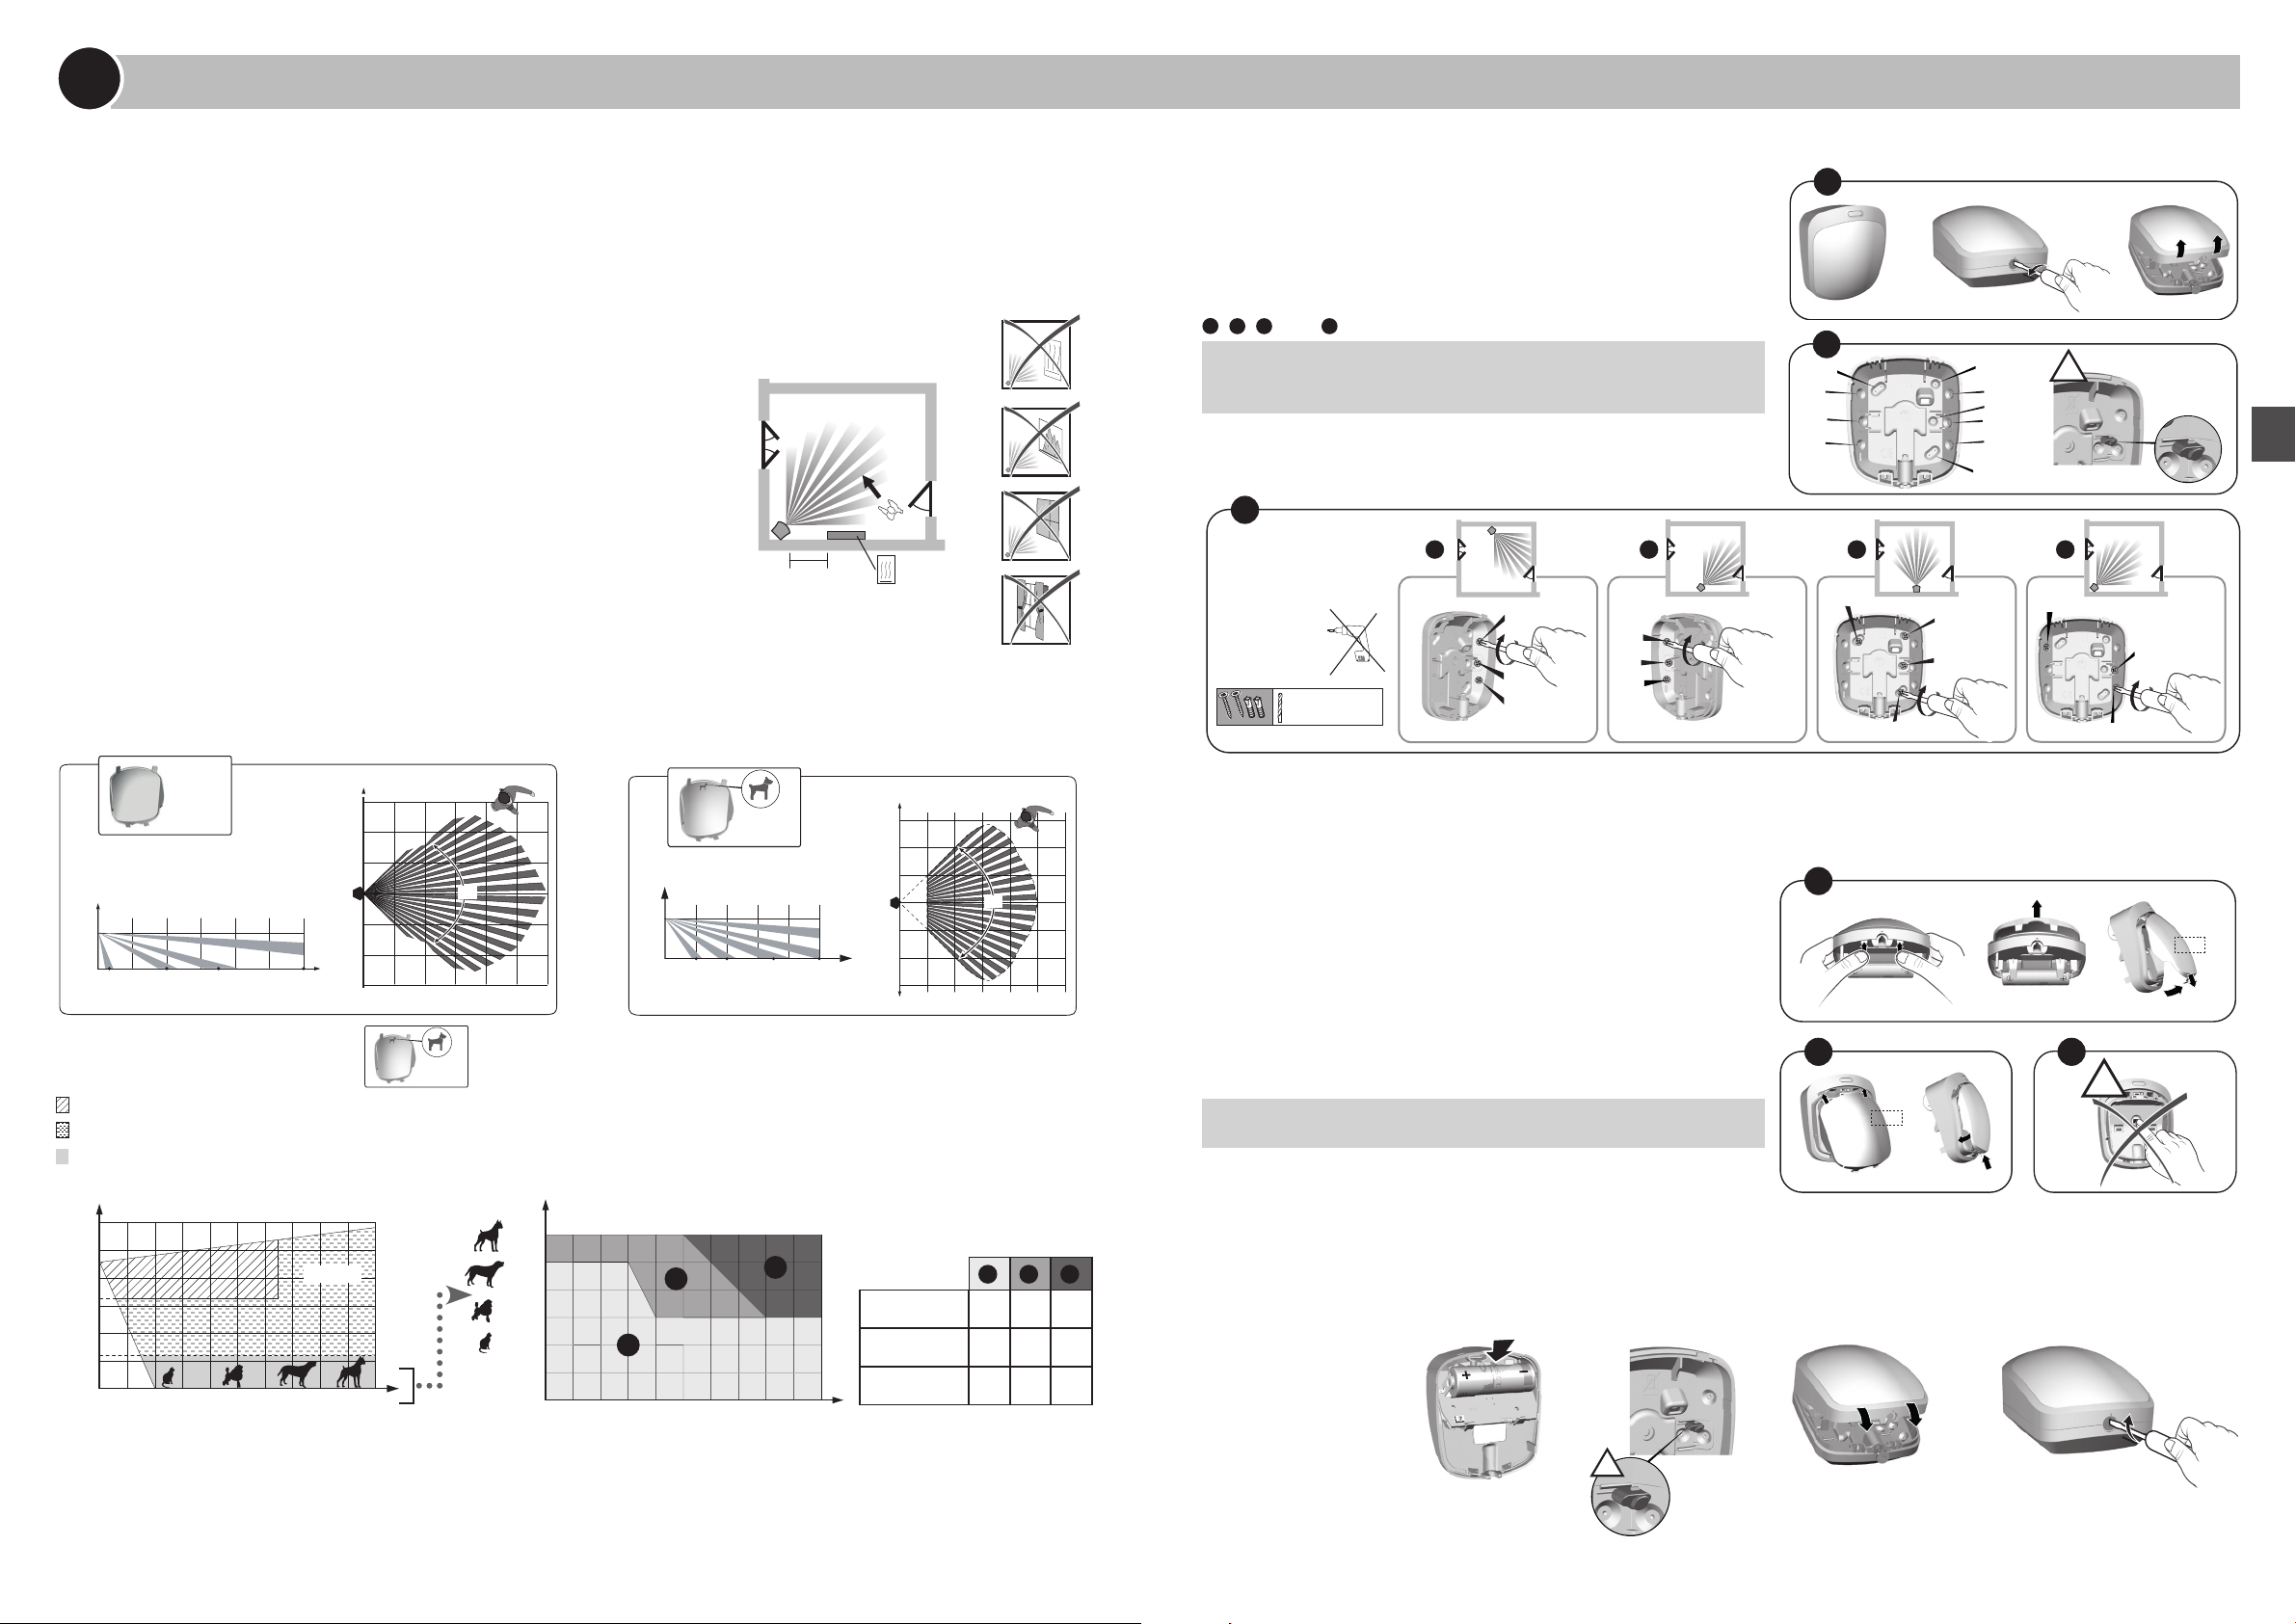
Rilevatore di movimento DMB TYXAL+
- Alimentazione: pila Litio - LS 17500 - 3,6V
- Isolamento classe III
- Consumo in stand-by 5 μA max.
- Consumo medio in modalità emissione 26 mA. max.
- Autonomia di 10 anni in base all'utilizzo (vedere Capitolo "Sostituzione
delle pile")
- Frequenze radio 868,95 MHz e 868,30 MHz (Norma EN 300 220)
- Equipaggiamento hertziano di Classe 1 (può essere immesso sul
mercato e messo in servizio senza restrizioni)
- Portata radio da 100 a 300 metri in campo libero, variabile in base alle
apparecchiature associate (portata che può essere alterata in base alle
condizioni di installazione e dell'ambiente elettromagnetico)
- Equipaggiamento di allarme radio
- Classe ambientale 2
- Autoprotezione contro l’apertura e gli atti di vandalismo
- Indice di protezione: IP30 - IK04
- Temperatura di funzionamento da -10°C a +55°C
- Temperatura di immagazzinaggio: da -10 °C a +70 °C
- Intervallo di umidità: 75%
- Dimensioni: 67,8 x 77,3 x 45,3 mm
- Peso (con pile): 90 g.
Telecomando TL 2000 TYXAL+
- Alimentazione: pila Litio - CR2430 - 3V
- Isolamento classe III
- Consumo in stand-by 0,6 μA max. / Consumo medio in modalità
emissione 23 mA max.
- Autonomia di 10 anni in base all'utilizzo
- Frequenze radio 868,95 MHz e 868,30 MHz (Norma EN 300 220)
- Equipaggiamento hertziano di Classe 1 (può essere immesso sul
mercato e messo in servizio senza restrizioni)
- Portata radio da 100 a 300 metri in campo libero, variabile in base alle
apparecchiature associate (portata che può essere alterata in base alle
condizioni di installazione e dell'ambiente elettromagnetico)
- Equipaggiamento di allarme radio
- Classe ambientale 2
- Indice di protezione: IP32
- Temperatura di funzionamento da -10°C a +55°C
- Temperatura di immagazzinaggio: da -10 °C a +70 °C
- Intervallo di umidità: 75%
- Dimensioni: 42 x 65 x 8 mm
- Peso (con pile): 25 g.
TYDOM 1.0 (Web server domotico)
- Alimentazione mediante adattatore: Ingresso 100-240V~, 50-60 Hz, 0,3
A;
Uscita 5V=, 1A
- Isolamento classe II
- Consumo:
- Frequenza radio 868,95 MHz (Norma EN 300 220)
- Equipaggiamento hertziano di Classe 1 (può essere immesso sul
mercato e messo in servizio senza restrizioni)
- Portata radio da 100 a 300 metri in campo libero, variabile in base alle
apparecchiature associate (portata che può essere alterata in base alle
condizioni di installazione e dell'ambiente elettromagnetico)
- Indice di protezione: IP30 - IK04
- Temperatura di funzionamento da -10°C a +40°C
- Temperatura di immagazzinaggio: da -20°C a +70 °C
- Dimensioni: 100 x 100 x 30 mm
- Peso (con pile): 472 g.
Informazioni e assistenza
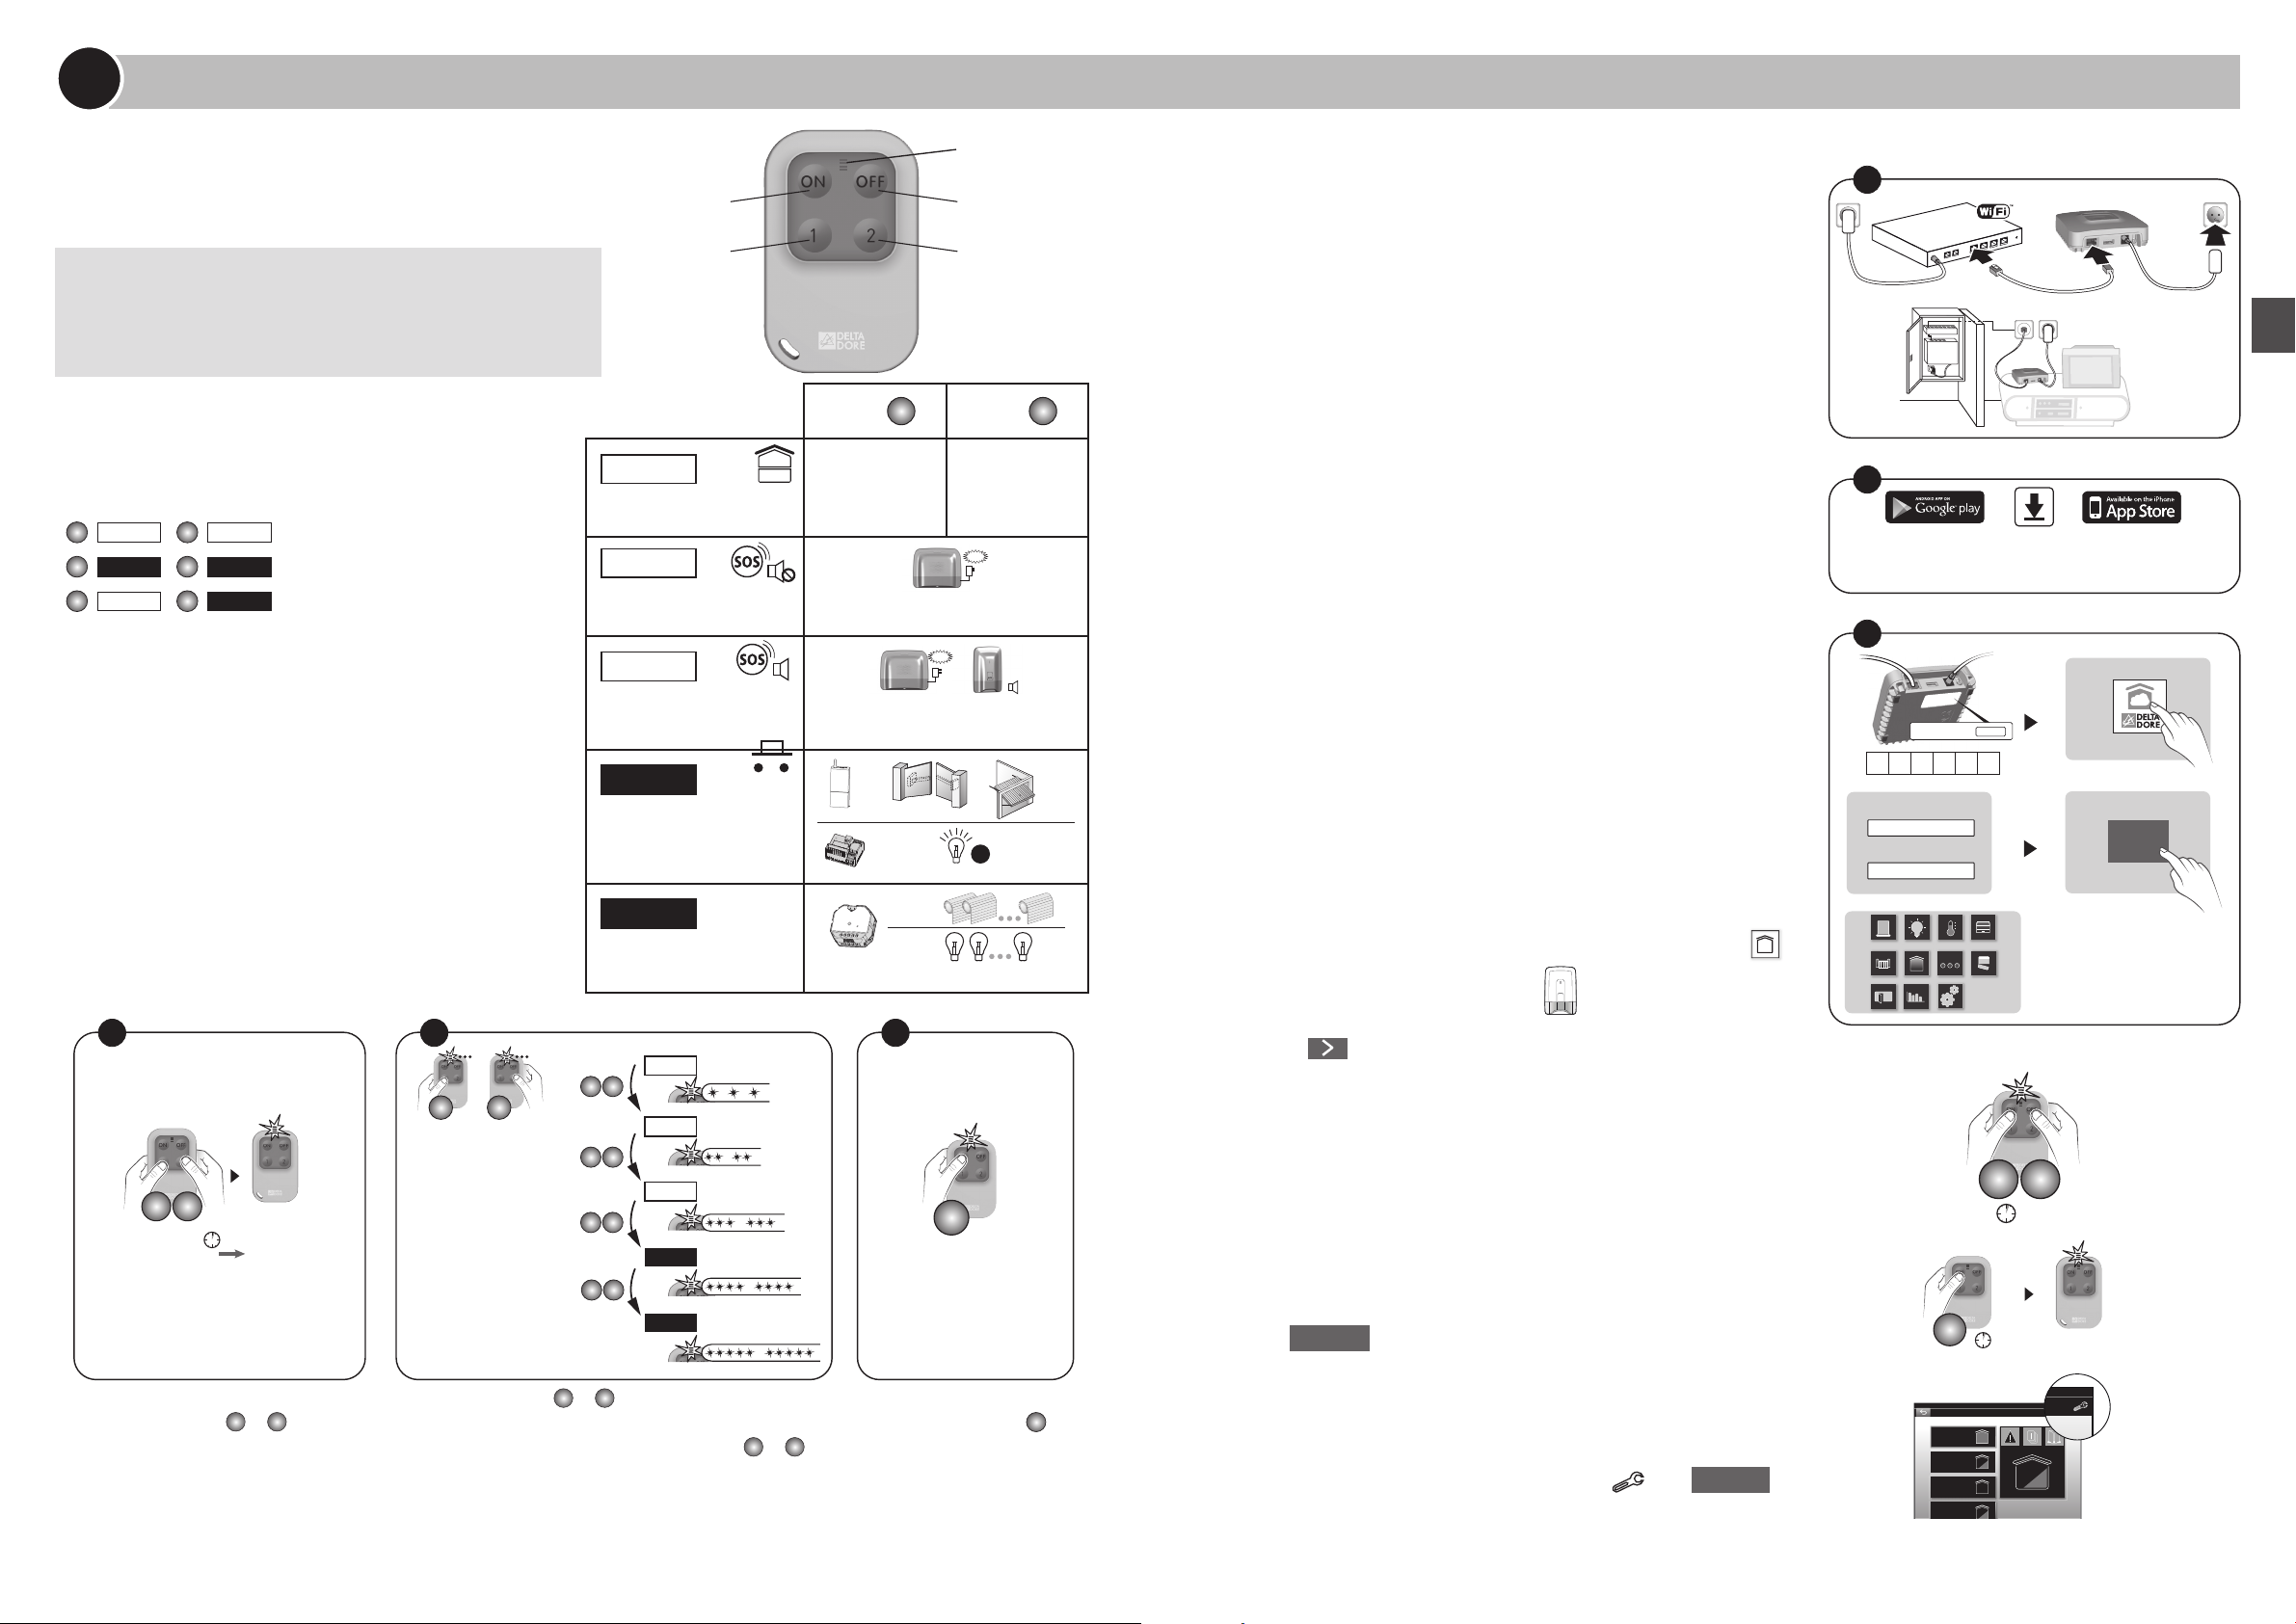
Spia Stato del sistema
Lampeggiamento
verde
Sistema accessibile in modalità locale e a
distanza, utente connesso
Verde fissa Sistema accessibile in modalità locale e a
distanza
Lampeggiamento
arancione
Sistema accessibile in modalità locale, utente
connesso
Arancione fissa Sistema accessibile in modalità locale
Rosso fissa Nessun indirizzo IP attribuito
Funzione diagnosi
Premete brevemente il tasto
(visualizzazione della spia per 10 secondi)
Giallo lampeg-
giante IP fisso OK
Blu lampeggiante DHCP OK / Upnp OK
Blu lampeggiante
(2x) DHCP OK / Upnp Errore
Verificate l'attivazione dell’Upnp sul modem
Blu lampeggiante
(3x)
DHCP in corso
Verificate l'attivazione del DHCP sul modem
Rosso
lampeggiante
Nessuna connessione di rete
Verificate il collegamento Ethernet
Funzioni avanzate
DHCP / IP fisso
Premete almeno per 3 secondi il tasto
Spia Azione
Magenta
lampeggiante
(lento)
Rilasciate il tasto
(entro di 15 secondi)
Utilizzate preferibilmente l'applicazione TYDOM per accedere a questa
funzione.
Cancellare password
Premete almeno per 15 secondi il tasto
Spia Azione
Magenta
lampeggiante
(veloce)
Rilasciate il tasto
(entro 30 secondi)
RESET
Premete almeno per 30 secondi il tasto
Spia Azione
Stato del sistema
Rilasciate il tasto
- Utilizzo DHCP
- Cancellazione password
- Cancellazione delle associazioni