DELTA DORE CS 2000 TYXAL+ User manual

CS 2000 TYXAL+
www.deltadore.com
Alarm system
User guide

- 2 -
We recommend you read this user guide carefully before any use.
• The battery life specified is for normal use.
Warnings
Glossary
PSTN: Public Switched Telephone Network.
A PSTN telephone transmitter is connected to the tele-
phone line of your home.
GSM: Global System for Mobile communications.
A GSM telephone transmitter is connected to a wireless
phone network.
Tamper alarm: the products are protected against
being opened or dislodged.
If a burglar tries to open or dislodge one of the products,
a message is sent to the alarm control unit which trig-
gers its indoor siren, and the system's sirens (indoor or
outdoor siren, telephone transmitter).
The tamper alarm is permanently activated even if the
system is off. It only generates the external siren noise if
the system is on.
Discreet SOS: the "discreet SOS" function needs a tele-
phone transmitter.
It can warn the outside of any aggressor by a discreet
call.
SOS with siren: the "SOS with siren" function immedi-
ately warns the neighbours by triggering both a phone
call via a transmitter as well as the sound of the associat-
ed sirens.
Maintenance mode: the Maintenance mode is reserved
for the installer. It is used to perform the activation, main-
tenance and diagnostic operations.
The system must be off to access this mode.
The alarm control unit is switched to Maintenance mode
with a keypad (touch screen or simple), a remote control
or a badge reader.
To open the products without triggering the alarm, you
must set the alarm control unit to maintenance mode.
Restricted code: a user code can be of the restricted
type, that is to say that it only gives access to the On and
Off commands of the zones with which it is associated
(e.g. maintenance personnel, delivery, etc.).
Problem beeps: They report that an action is rejected
by a series of beeps.You must consult the events on the
touch screen keypad (Info menu) to determine the nature
of the problem.
Warning beeps: They report that an alarm or automatic
operation is imminent through a series of beeps at inter-
vals. After the warning period, the alarm control unit siren
can be set off.

- 3 -
EN
Contents
1. How does your alarm system work?................................................................................................. 5
1.1 Presentation ...............................................................................................................................................................5
1.2 Operation by independent zone..................................................................................................................................6
1.3 Exit timer.....................................................................................................................................................................6
1.4 Entry timer ..................................................................................................................................................................6
1.5 Intruder alarm procedure............................................................................................................................................7
1.6 Home automation functions........................................................................................................................................7
2. Use with the remote control............................................................................................................... 8
2.1 Configuring buttons 1 and 2........................................................................................................................................8
2.2 Activating the system..................................................................................................................................................9
2.3 Deactivating the system..............................................................................................................................................9
2.4 Manual override........................................................................................................................................................10
2.5 Triggering of a discreet SOS alarm...........................................................................................................................10
2.6 Triggering of an SOS with siren................................................................................................................................10
2.7 Clearing defects........................................................................................................................................................11
2.8 Controlling a control system .....................................................................................................................................11
3. Use with your simple keypad........................................................................................................... 12
3.1 Activating the system................................................................................................................................................12
3.2 Deactivating the system............................................................................................................................................12
3.3 Manual override........................................................................................................................................................13
3.4 Triggering a discreet SOS (shutdown under duress)................................................................................................13
3.5 Triggering of an SOS with siren................................................................................................................................14
3.6 Clearing defects........................................................................................................................................................14
3.7 Disabling audible beeps for the button......................................................................................................................14
3.8 Changing your access code .....................................................................................................................................15
4. Use with the badge reader ............................................................................................................... 16
4.1 Configuring buttons 1 and 2......................................................................................................................................16
4.2 Activating the system................................................................................................................................................16
4.3 Deactivating the system............................................................................................................................................17
4.4 Manual override........................................................................................................................................................17
4.5 Triggering of a discreet SOS alarm...........................................................................................................................18
4.6 Triggering of an SOS with siren................................................................................................................................18
4.7 Clearing defects........................................................................................................................................................18
5. Use with your outdoor keypad......................................................................................................... 19
5.1 Activating the system................................................................................................................................................19
5.2 Deactivating the system............................................................................................................................................19
5.3 Manual override........................................................................................................................................................20
5.4 Triggering a discreet SOS (shutdown under duress)................................................................................................20
5.5 Controlling a control system .....................................................................................................................................21
6. Use with your touch screen keypad................................................................................................ 22
6.1 Description................................................................................................................................................................22
6.2 Info menu..................................................................................................................................................................23
6.3 Clearing defects........................................................................................................................................................23
6.4 Activating the system................................................................................................................................................24
6.5 Deactivating the system............................................................................................................................................24
6.6 Manual override........................................................................................................................................................25
6.7 Triggering a discreet SOS (shutdown under duress)................................................................................................25
6.8 Triggering of an SOS with siren................................................................................................................................25

- 4 -
Contents
7. Personalising the products with your touch screen keypad ........................................................ 26
7.1 Setting the clock .......................................................................................................................................................26
7.2 Language selection ..................................................................................................................................................26
7.3 Download..................................................................................................................................................................26
7.4 Weekly programming................................................................................................................................................27
7.5 Name the products ...................................................................................................................................................29
7.6 Button lighting...........................................................................................................................................................30
7.7 Button beeps ............................................................................................................................................................30
7.8 Screen brightness.....................................................................................................................................................30
7.9 Sound levels .............................................................................................................................................................31
7.10 Call numbers.............................................................................................................................................................32
7.11 Incoming calls..........................................................................................................................................................33
7.12 Auto attendant ..........................................................................................................................................................33
7.13 SMS alert to relatives (only with a GSM transmitter)................................................................................................34
7.14 SIM card (only with a GSM transmitter)....................................................................................................................34
7.15 Zone management ...................................................................................................................................................35
7.16 Door chime function..................................................................................................................................................35
7.17 Changing your access code .....................................................................................................................................36
8. Testing your installation................................................................................................................... 37
8.1 Test under operating conditions................................................................................................................................37
8.2 Test on a specific product .........................................................................................................................................38
9. Activating/Deactivating a product ................................................................................................... 39
9.1 Using your touch screen keypad...............................................................................................................................39
9.2 Using your telephone transmitter..............................................................................................................................39
10. LEDs and audible signalling ............................................................................................................ 40
10.1 Operation of the front panel LED..............................................................................................................................40
10.2 Audible signals..........................................................................................................................................................40
11. Signalling of dead batteries ............................................................................................................. 41
12. Troubleshooting ................................................................................................................................ 42

- 5 -
EN
1. How does your alarm system work?
1.1 Presentation
The alarm system is used to monitor a home by means of intrusion detectors (infrared, dual technology or door/window
magnetic contacts, etc.) and technical defect detectors (smoke, water, mains power failure, etc.)
The system is activated or deactivated by means of a remote control, a keypad or badge reader, a telephone transmitter
or according to the weekly programming of a touch screen keypad, smartphone or tablet via the TYDOM application.
The alarm is signalled:
- by the internal siren of the control unit,
- and/or by an associated siren (indoor or outdoor),
- and/or using an associated transmitter, to another telephone or a remote monitoring operator,
The system is fully battery operated. The battery life is 10 years.
Your alarm and home automation system can be controlled remotely (up to 5 control systems, 4 scenarios, 1 heating
channel) from a telephone transmitter or the TYDOM application (see transmitter guide).
Application TYDOM
TYDOM 1000
1
Volets
Alarme
Autres
Eclairages
Garage
Scénarios
Chauffage
Portail
Pièces
Detect
Centralise
Alert/report
Control
Intrusion detectors
Alarm control unit
Technical detectors
Remote controls and keypads
Sirens
Transmitters
The CS 2000 TYXAL + alarm control unit is not compatible with the TYDOM 2.0 and the DMBV TYXAL +.

- 6 -
1. How does your alarm system work?
ON
45''
Beep...beep...
beep...
Beep
Exit timer (up to 90 seconds)
Pre-alarm zone
Zone 2
Ground floor
Zone 1
floor
1.2 Operation by independent
zone
The CS 2000 alarm control unit authorises the monitoring of 2
zones.
The zones are used to protect part of the home.
The management of these zones is fully separate.
One or more zones can be on at the same time.
• Restricted access code
If you want to give access to a part of your home while you are
away (example: maintenance personnel), ask your installer to cre-
ate a restricted access code.
• Use in the residential sector
You can, for example, protect the floor during the day when you are
in the ground floor zone.
Likewise, at night, the ground floor is protected when you are on
the first floor.
You can also use a zone outside of your home to protect your yard
or garden, for example. This zone is called "pre-alarm zone".
1.3 Exit timer
You are leaving the home.
When the system is activated, you have an exit timer (up to 90
seconds).
After this time, the alarm control unit emits a beep to signal
that the system is on.
Any intrusion will thus be signalled.
1.4 Entry timer
You are entering a zone monitored by a motion
detector.You have an entrance timer to deactivate
the system. This time can be set up to 45 seconds.
Beyond this time, the control unit will set off a siren.
During this period, the control unit emits a series of beeps to
warn you that the siren will be set off imminently.

- 7 -
EN
1.5 Intruder alarm procedure
In the event of an intruder detection, the alarm control unit will trigger an alarm cycle.
• For an error that appears then disappears, the alarm control unit siren will sound for
90 seconds.
• For a persistent defect, the alarm control unit will trigger an alarm cycle:
- the siren sounds three times for 90 seconds, at 20 second intervals.
If you have a telephone transmitter on the installation, a call cycle will run the pro-
grammed numbers (see transmitter guide).
1.6 Home automation functions
The home automation functions are used to combine the "Alarm" application with oth-
er "Heating and Cooling" or "Control system" applications.
Examples
• You want to switch off the heating if a window is opened:
The door/window magnetic contacts can be associated, for example, with an energy
manager
• You want to delay the alarms, status of the system or the operations for activat-
ing or deactivating the system via an offset lighting:
You can associate a receiver for control systems.
• You want to control the opening of motorised roller shutters if smoke is detect-
ed
or you want the roller shutters to close automatically when the alarm system is
activated:
You can associate roller shutter receivers or a wireless motor.
1. How does your alarm system work?
Scénarios
Réglages
11.5°C Lun.23 Septembre
18:28
Autres
Conso Thermique
Volets
Ou
vr
a
n
t
31
Calendrier
Eau chaude
Energy manager
Roller shutter motors
Control system
receiver

- 8 -
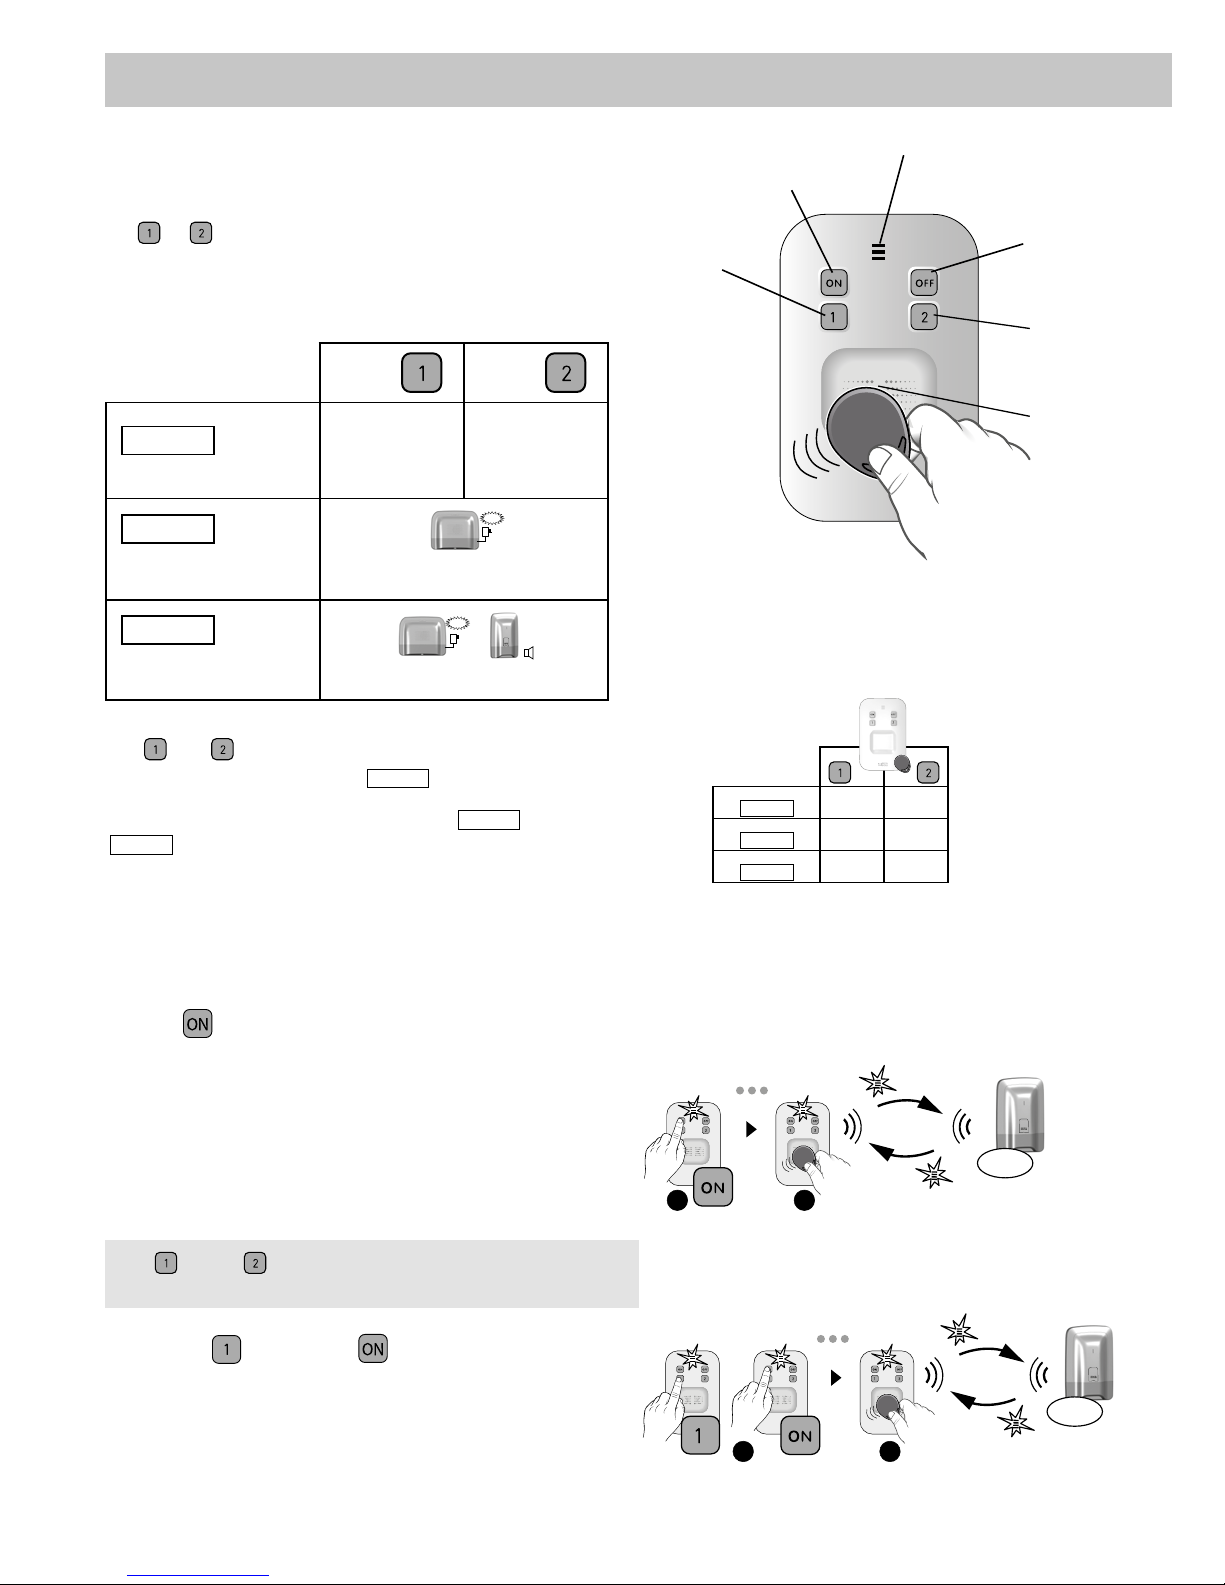
2. Use with the remote control
You can activate or deactivate the alarm system with the remote
control. Depending on the configuration defined with your install-
er, only the 1and 2buttons can be programmed and have
different functions.
2.1 Configuring buttons 1 and 2
Button 1Button 2
Mode A
Alarm control by zone
ON/OFF zone 1
(e.g. Floor)
ON/OFF zone 2
(e.g. Ground floor)
Mode B
Triggering of a
discreet SOS
SOS
Transmitter call
without audible signalling
Mode C
Triggering of an
SOS with siren
+
SOS
Transmitter call + audible alert
Mode D
Pulse control of a control
system or lighting x1
Mode E ON/OFF
ON/OFF control for lighting or
roller shutters
Buttons 1and 2can be programmed separately
(Mode A by default).
There are 5 modes A, B, C, D or E.
Only 2 of them can be combined, (e.g. Mode A with Mode D ,
refer to the table opposite).
Ask your installer for the appropriate equipment
if you want openings to be controlled.
1
2
2
Mode A X
Mode B
Mode C
Mode D X
Mode E
Button 2
programmable
Shutdown
.
LED
Button 1
(programmable)
Shutdown
.

- 9 -
EN
2. Use with the remote control
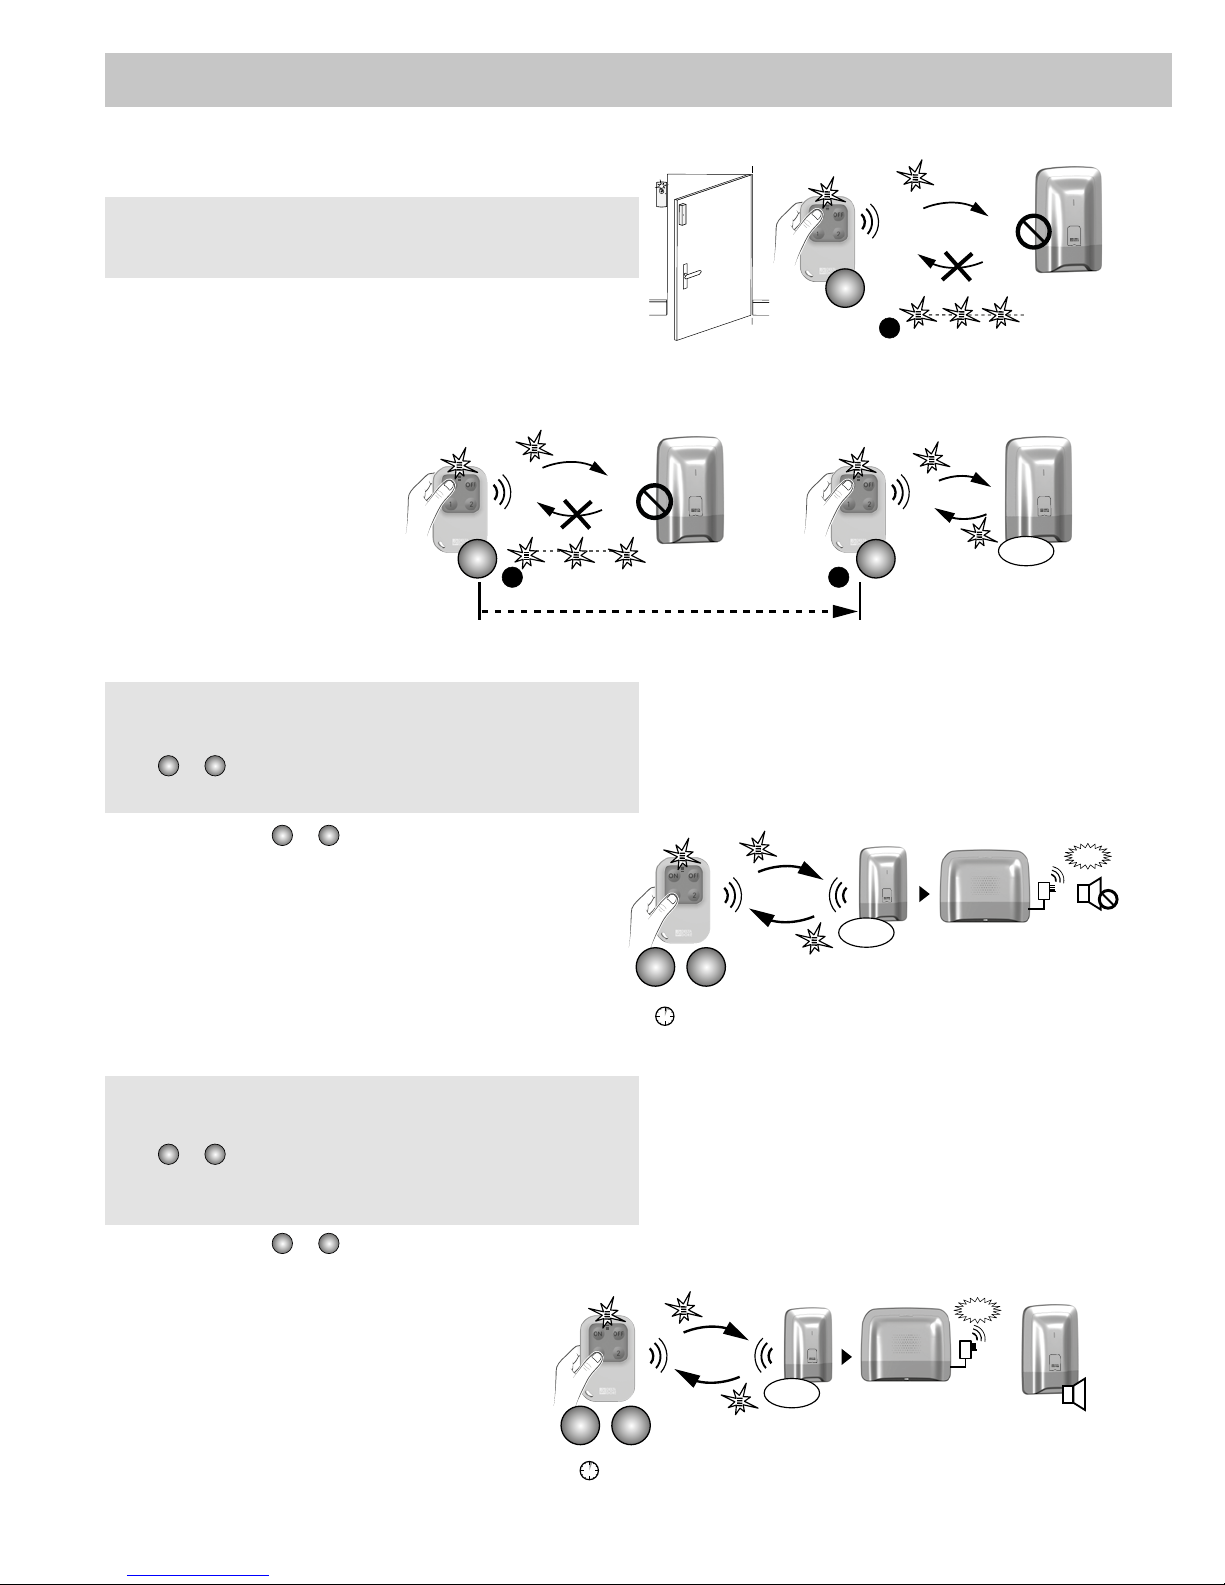
2.2 Activating the system
• Complete activation
Press ON .
The LED changes from red to green to confirm the action.
• Operation by zone (1 or 2)
Example: zone 1 (floor)
Press the 1button then ON .
The LED changes from red to green to confirm the action.
2.3 Deactivating the system
• Complete shutdown
Press OFF .
The LED changes from red to green to confirm the action.
• Shutdown by zone (1 or 2)
Example: zone 1 (floor)
Press the 1button then OFF .
The LED changes from red to green to confirm the action.
OK
ON
OK
ON1
Beep
Beep
OK
OK
1
OFF
OFF
Depending on the installation settings, the alarm control unit
will or will not beep to confirm the activation or deactivation
actions.
The 1and/or 2buttons must be configured in Mode A
(see table, § 3.1).
The 1and/or 2buttons must be configured in Mode A
(see table, § 3.1).
- 10 -
OK
1 2
ou
>2s
SOS
+
1 2
ou
>2s
SOS
OK
2.4 Manual override
.
ÊThe alarm control unit denies the activation.
It emits a series of beeps to warn the user.
On the remote control, the LED flashes red.
ËConfirm a second time by pressing ON within 5 seconds after first pressing the
button.
The LED changes from red to
green to confirm the action.
The alarm control unit emits
a BEEP.
2.5 Triggering of a discreet SOS alarm
Press and hold the 1or 2button for 2 seconds.
The LED changes from red to green to confirm the action.
- press OFF (deactivates the system).
The telephone transmitter calls from the
3rd number programmed. The 1st and 2nd numbers are not
called for the discreet SOS.
2.6 Triggering of an SOS with siren
Press and hold the 1or 2button for 2 seconds
to trigger:
- a call cycle from the transmitter to the programmed
numbers (starting with the 1st number).
- an audible signal from an associated siren.
The LED changes from red to green
to confirm the action.
Press OFF to stop an emergency alarm with siren
in progress.
ON
1
Activation denied (e.g.
open entry)
Beep, beep, beep
ON ON
< 5s
OK
12
2. Use with the remote control
For example, this function is used to activate the system even
if an entry remains open or if a product shows a defect (dead
battery, etc.).
This function is used to trigger a discreet alarm with your
telephone transmitter, without any aggressor being aware of it
(no audible signal) whether the system is on or off.
The 1or 2buttons must be configured in Mode B (see
table, § 3.1).
This function is used to start a call with the telephone trans-
mitter to warn relatives that you are in a situation of distress.
It also sets off the sirens with a specific tone.
The 1or 2buttons must be configured in Mode C (see
table, § 3.1).
Beep, beep, beep

- 11 -
EN
2.7 Clearing defects
Each time the system is activated or deactivated, the alarm
control unit will inform you that an event (or defect) is stored by
using a series of beeps or a refusal to switch on.
These events (intruder detection, product defect, open entry,
etc.) can be cleared so as not to be signalled by the control unit.
The system must be off.
If you do not have a touch screen keypad, you can
clear defects by using the remote control:
Press and hold the OFF button for 5 seconds.
The LED changes from red to green to confirm the action.
The alarm control unit emits a series of beeps, stops, then emits
one more beep.
2.8 Controlling a control system
Mode D: Pulse control
Press the 1or 2button.
The LED changes from red to green.
Mode E: On/Off control
Press the 1or 2button then ON
OFF
or
ON
OFF .
The LED changes from red to green.
2. Use with the remote control
OFF
>5s
The 1or 2buttons must be configured in Mode D or E
(see table § 3.1).
or
1 2
or
ON
On
Off
OFF
1 2
or
1 2
or
< 2s
< 2s
Example
Example
Beep.Beep.Beep..... Beep
- 12 -
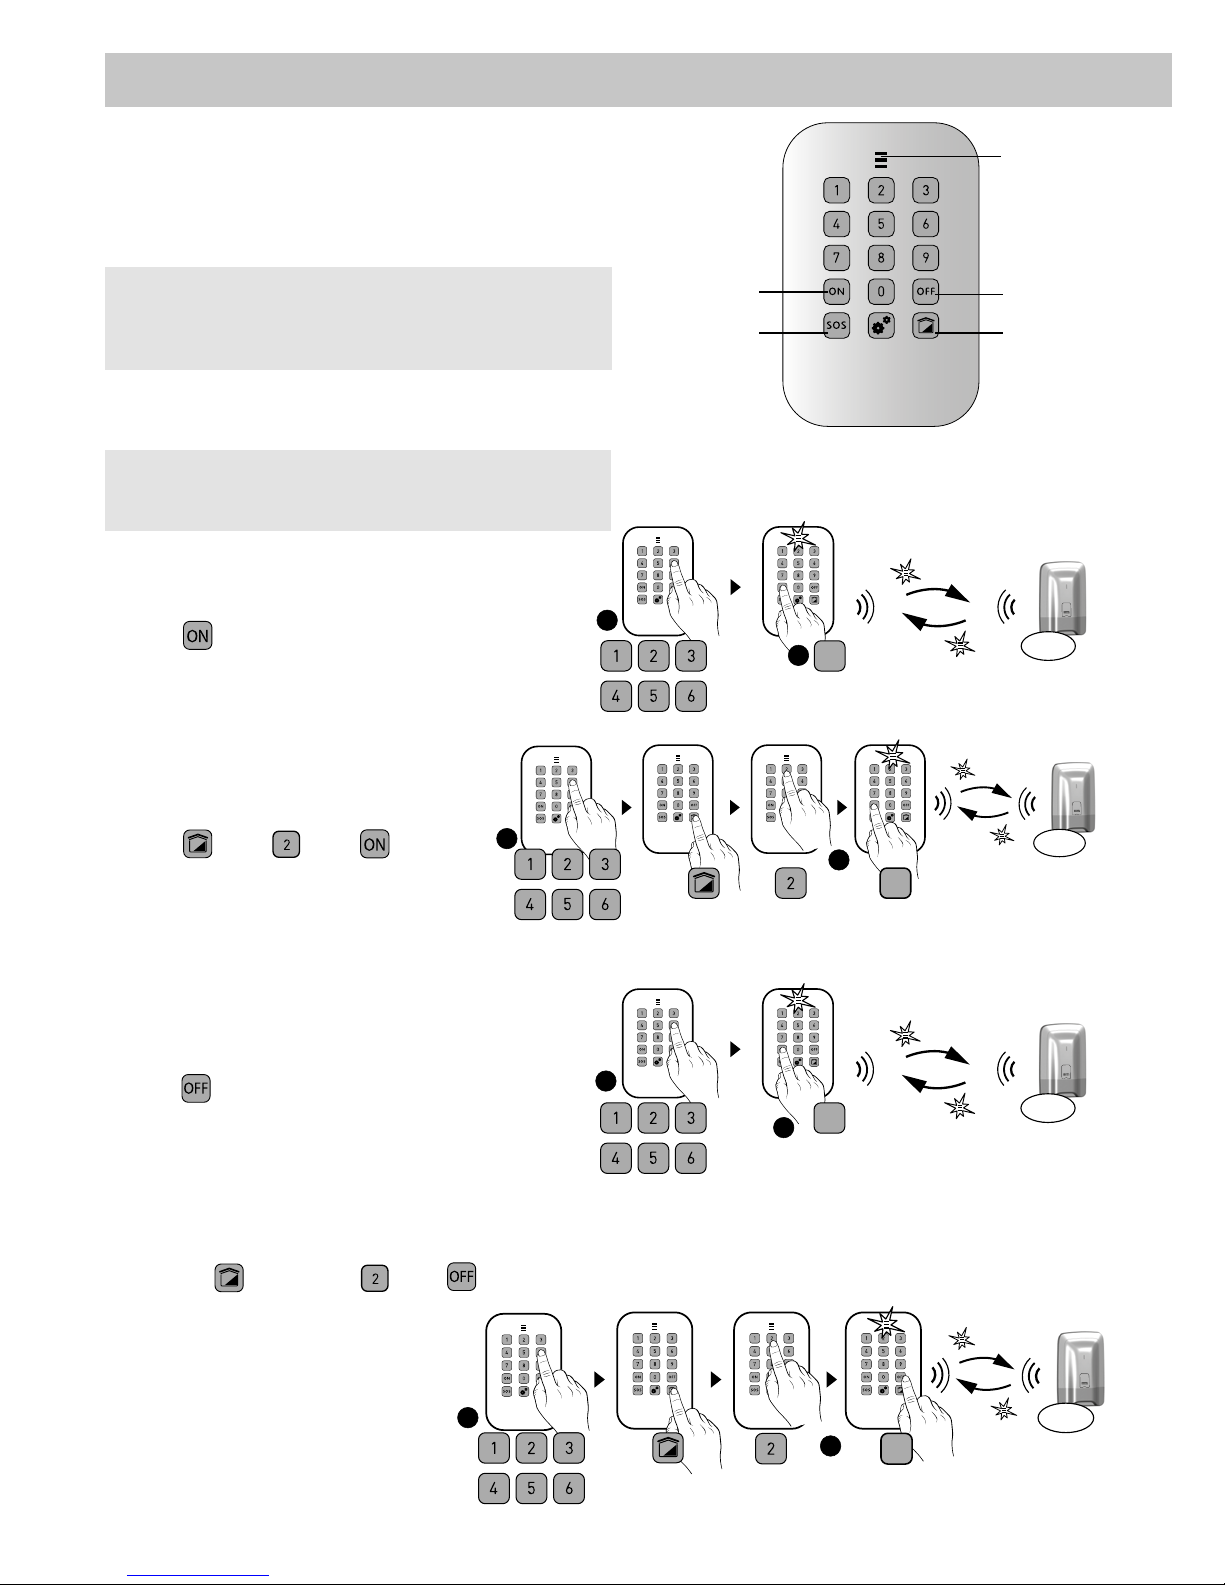
3. Use with your simple keypad
The keypad is used to activate or deactivate your system
fully or by zone via an access code.
You also have a direct access SOS button to warn relatives
that you are in danger.
3.1 Activating the system
• Complete activation
ÊEnter your access code (6 digits).
ËPress .
The LED changes from red to green to confirm the action.
• Operation by zone (1 or 2)
Example: zone 2
ÊEnter your access code (6 digits).
ËPress , then , then .
The LED changes from red to green to
confirm the action.
3.2 Deactivating the system
• Complete shutdown
ÊEnter your access code.
ËPress .
The LED changes from red to green to confirm the action.
• Shutdown by zone
Example: zone 2
ÊEnter your access code.
ËPress the button, then , then .
The LED changes from red to green to
confirm the action.
OK
ON
1
2
OK
ON
12
LED
Activation
SOS with
siren
button
Shutdown
Zone
button
OK
OFF
1
2
OK
OFF
1
2
Wrong code entered: The keypad is locked for 90 sec-
onds after five attempts with the wrong code.
If there are many attempts to enter a wrong code (21
attempts), an alarm cycle will be triggered.
Depending on the installation settings, the alarm control
unit will or will not emit beeps to confirm the activation or
deactivation actions.
- 13 -
EN
3. Use with your simple keypad
3.3 Manual override
ÊThe alarm control unit denies the activation.
It emits a series of beeps to warn the user.
On the keypad, the LED flashes red.
ËEnter your access code a second time then press
ON within 5 seconds after first pressing the button.
The LED changes from red to green to confirm the action.
The alarm control unit emits a BEEP.
3.4 Triggering a discreet SOS (shut-
down under duress)
To do this, add 1 to the 1st digit of the access code.
Example:
- access code "123456", duress code "223456",
- or access code "923456", duress code "023456",
The LED changes from red to green to confirm the action.
The alarm control unit emits a BEEP.
The telephone transmitter calls from the
3rd number programmed.
The 1st and 2nd numbers are not called for the discreet SOS.
ON
1
< 5s
ON ON
12
OK
SOS
+1
+1
Access code
Access code
Duress code
Duress
code
For example, this function is used to activate the system even
if an entry remains open or if a product shows a defect (dead
battery, etc.).
This function is used to let any
aggressor believe you have entered the right access code
while triggering a discreet alarm (no audible signal) with your
telephone transmitter, whether the system is shutdown or
activated.
Beep, beep, beep
Activation denied (e.g.
open entry)
Beep, beep, beep
- 14 -
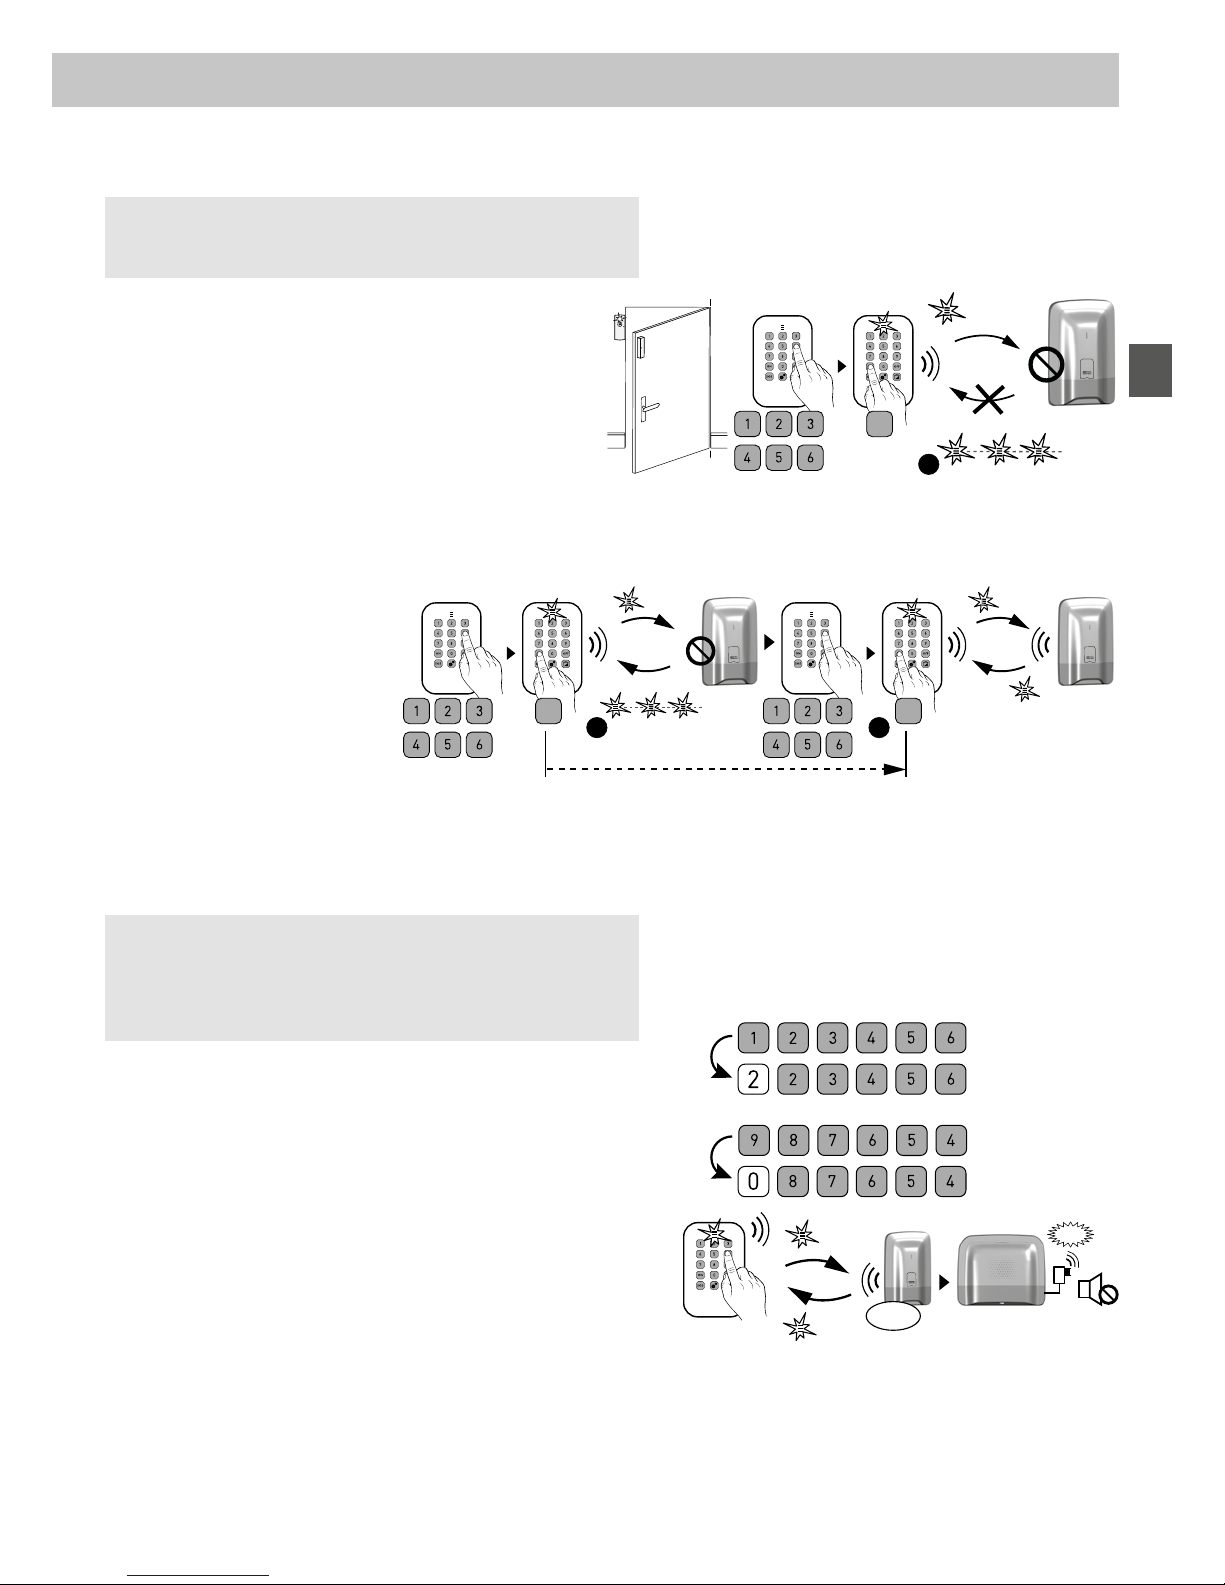
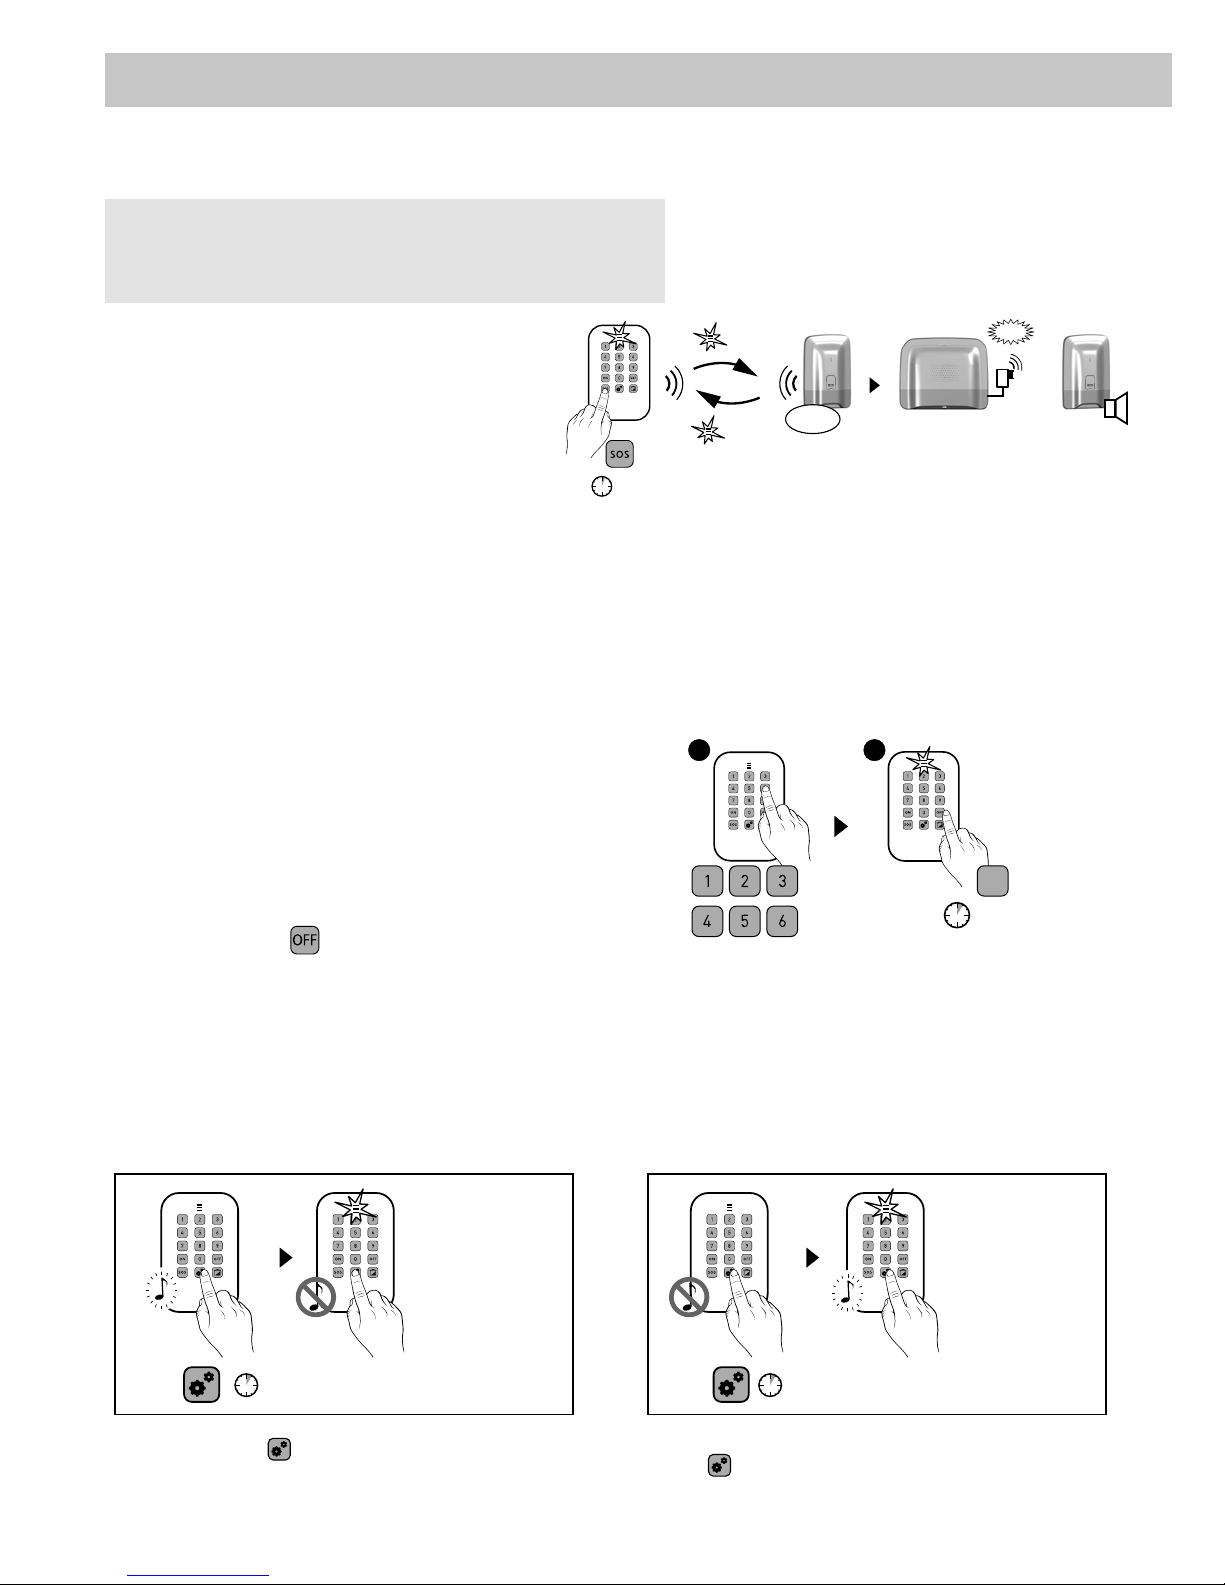
3.5 Triggering of an SOS with siren
Press and hold the SOS button for 2 seconds.
The LED changes from red to green to confirm the
action.
The alarm control unit emits a BEEP.
The SOS with siren triggers:
- a call cycle from the transmitter to the programmed
numbers (starting with the 1st number).
- an audible signal from an associated siren.
To stop an active emergency alarm with siren, enter the access code then
press OFF.
3.6 Clearing defects
Each time the system is activated or deactivated, the alarm control unit will
inform you that an event (or defect) is stored by using a series of beeps or a
refusal to switch on. These events (intruder detection, product de-
fect, open entry, etc.) can be cleared so as not to be signalled by the
control unit.
The system must be off.
If you do not have a touch screen keypad, you can
clear defects by using the simple keypad:
ÊEnter your access code.
ËPress and hold the button for 5 seconds.
The LED changes from red to green to confirm the action.
The alarm control unit emits a series of beeps, stops, then emits
one more beep.
3.7 Disabling audible beeps for the button
Press and hold the button for 5 seconds until
the green LED comes on.
>2s
OK
SOS
+
12
>5s
OFF
To enable the beeps again, press
the button for 5 seconds.
>5s >5s
3. Use with your simple keypad
This function is used to trigger a call with your
telephone transmitter to warn relatives that you are in a situation
of distress. It also sets off the sirens with a specific tone.
- 15 -
EN
3. Use with your simple keypad
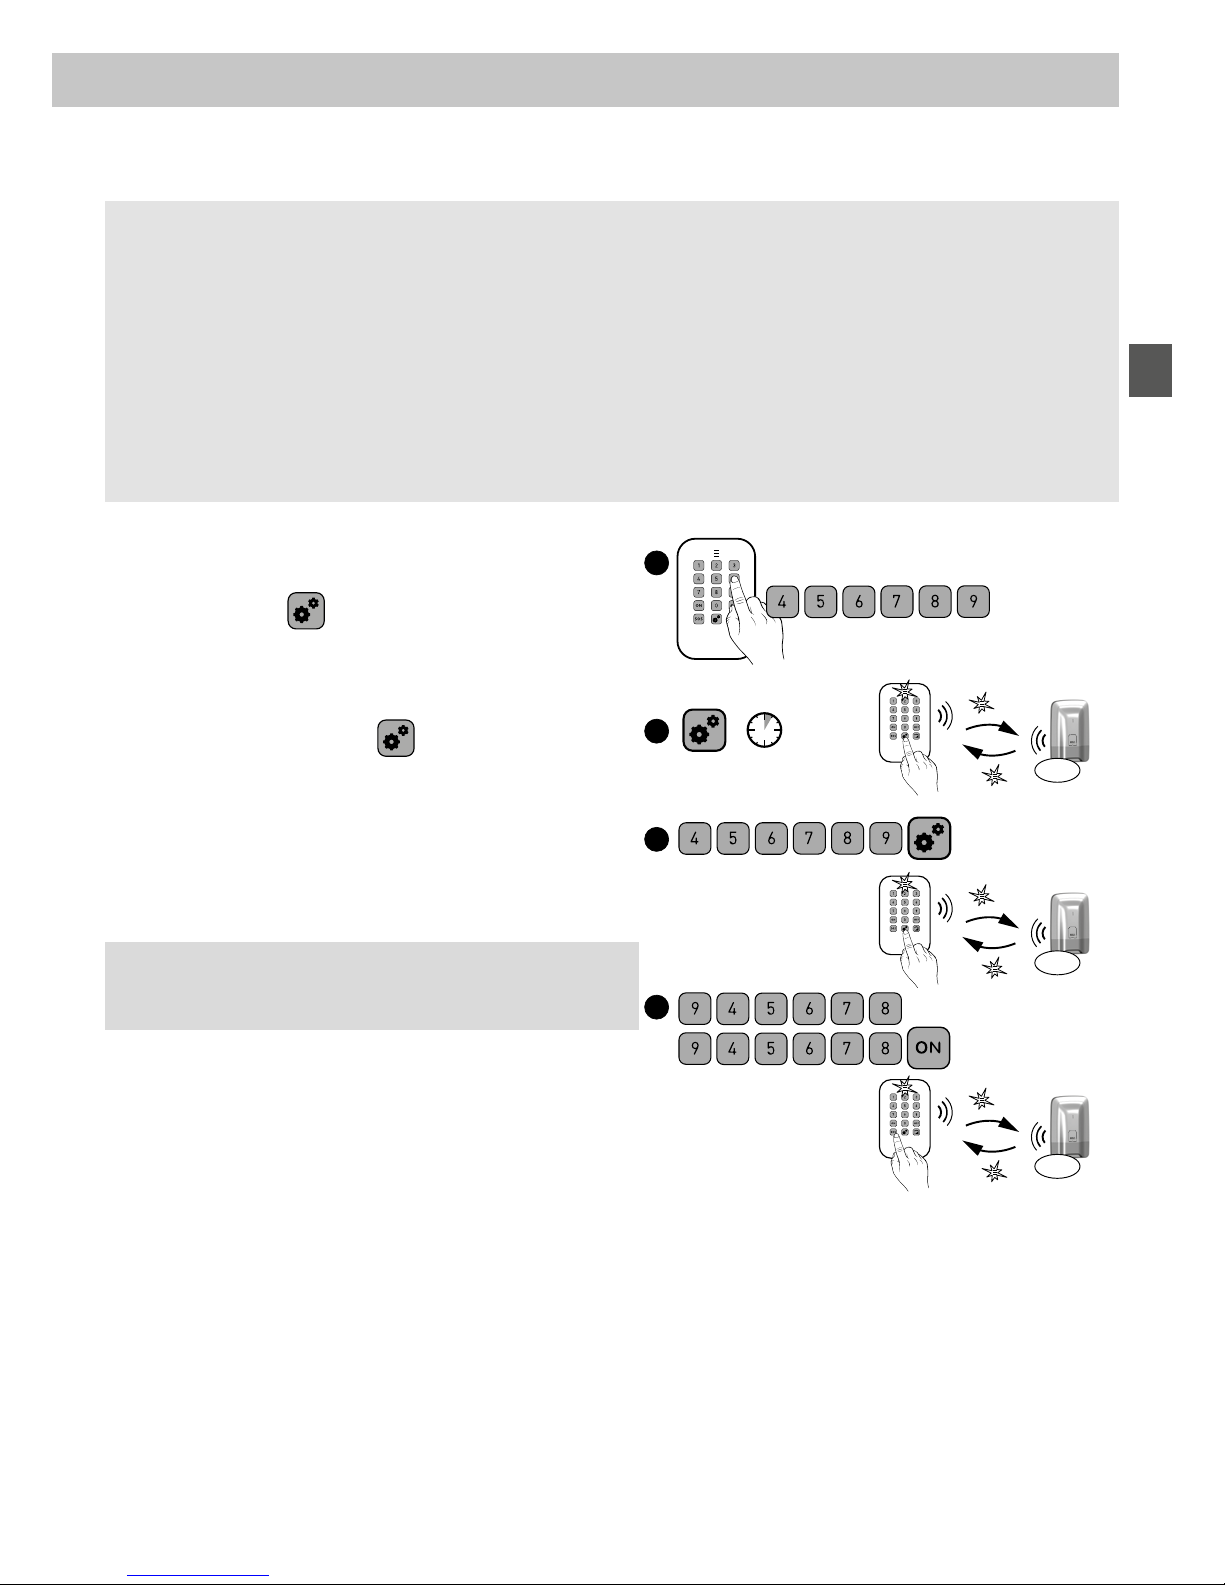
3.8 Changing your access code
ÊEnter your user code (e.g. 456789).
ËPress and hold the button for 5 seconds.
The LED changes from red to green to confirm the action.
ÌEnter the access code to change
(e.g. 456789), then press the button.
The LED changes from red to green to confirm
the action.
ÍEnter the new code twice (within 10 seconds),
then press the ON button.
The LED changes from red to green to confirm the action.
We recommend that you keep the access codes confidential (6 digits). Avoid codes such as "date of birth" or series of
easy to reproduce digits "222222", "234567", etc.
You have 10 "user" or "restricted" codes (6 digits).
• The user code enables the control actions and a few configuration actions.
You can change it.
• Restricted code: you can restrict access to your home by a code that gives access only to the
ON and OFF controls of the zones with which it is associated (e.g. maintenance personnel, delivery, etc.).
• The access codes (6 digits) are recorded in the alarm control unit. You configure the access codes once with the
touch screen keypad and the other products (keypads or transmitters) recognise these codes
automatically. You do not need to configure the codes on each product.
Wrong code entered: The keypad is locked for 90 seconds after five attempts with the wrong code.
If there are many attempts to enter a wrong code (21 attempts), an alarm cycle will be triggered.
>5s
1
2
3
OK
OK
4
OK
Important: the new code must be entered within 10 seconds
after entering the old one, otherwise the code remains the
same.
- 16 -
4. Use with the badge reader
You can activate or deactivate the alarm system with the badge
reader.
Depending on the configuration defined with your installer, only
the or buttons can be programmed and have different
functions.
4.1 Configuring buttons 1 and 2
Button Button
Mode A
Alarm control by zone
ON/OFF zone 1 ON/OFF zone 2
Mode B
Triggering of an emergen-
cy alarm with siren
SOS
Transmitter call
without audible signalling
Mode C
Triggering of an SOS with
siren
+
SOS
Transmitter call + audible alert
The and buttons can be programmed separately
There are 3 modes A, B, or C ( Mode A by default).
It is only possible to mix two of them, (e.g. Mode A with
Mode B , see table opposite).
4.2 Activating the system
• Complete activation
ÊPress ,
The red LED switches on,
ËPlace your badge on the detection zone before 5 seconds,
The LED changes from red to green to confirm the action.
The alarm control unit emits a BEEP.
• Operation by zone (1 or 2)
Example: zone 1 (floor)
ÊPress the button, then ,
The red LED switches on,
ËPlace your badge on the detection zone before 5 seconds.
The LED changes from red to green to confirm the action.
The alarm control unit emits a BEEP.
OK
< 5s
< 5s
OK
12
12
Badge
detection zone
Mode A X
Mode B X
Mode C
The and/or buttons must be configured in Mode A
(see table, § 4.1).
Button 2
(programmable)
Activation
.
LED
Shutdown
.
Button 1
(programma-
ble)

- 17 -
EN
4.3 Deactivating the system
• Complete shutdown
ÊPress ,
The red LED switches on,
ËPlace your badge on the detection zone before 5 seconds.
The LED changes from red to green to confirm the action.
• Shutdown by zone (1 or 2)
Example: zone 1 (floor)
ÊPress the button, then ,
The red LED switches on,
ËPlace your badge on the detection zone before 5 seconds.
The LED changes from red to green to confirm the action.
4.4 Manual override
ÊThe alarm control unit denies the activation.
It emits a series of beeps to warn the user.
On the badge reader, the LED flashes red.
ËConfirm a second time by pressing ON + badge within
5 seconds after first pressing the button.
The LED changes from red to green to confirm the action.
OK
< 5s
< 5s
OK
12
12
ON
1
< 5s
ON ON
12
4. Use with the badge reader
Depending on the installation settings, the alarm control unit
will or will not emit beeps to confirm the activation or deacti-
vation actions.
The and/or buttons must be configured in Mode A
(see table, § 4.1).
For example, this function is used to activate the system even
if an entry remains open or if a product shows a defect (dead
battery, etc.).
Beep, beep, beep
Activation denied (e.g.
open entry)
Beep, beep, beep

- 18 -
4.5 Triggering of a discreet SOS alarm
Press and hold the or button for 2 seconds.
The LED changes from red to green to confirm the action.
The telephone transmitter calls from the
3rd number programmed. The 1st and 2nd numbers are
not called for the discreet SOS.
4.6 Triggering of an SOS with siren
Press and hold the or button for 2 seconds
to trigger:
- a call cycle from the transmitter to the programmed
numbers (starting with the 1st number).
- an audible signal from an associated siren.
The LED changes from red to green to confirm the action.
Press OFF to stop an active emergency alarm with siren,
then swipe the badge.
4.7 Clearing defects
Each time the system is activated or deactivated, the alarm control
unit will inform you that an event (or defect) is stored by using a
series of beeps or a refusal to switch on.
These events (intruder detection, product defect, open entry, etc.)
can be cleared so as not to be signalled by the control unit.
The system must be off.
If you do not have a touch screen keypad, you can
clear defects by using the badge reader:
Press the button for 5 seconds, then place the badge on the
detection zone.
The LED changes from red to green to confirm the action.
The alarm control unit emits a series of beeps, stops, then emits
one more beep.
OK
>2s
SOS
OU
OK
>2s
SOS
OU
+
>5s
Beep, beep, beep .......
Beep
This function is used to trigger a discreet alarm with your tele-
phone transmitter, without any aggressor being aware of it (no
audible signal).
The or buttons must be configured in Mode B (see table
§ 4.1).
4. Use with the badge reader
This function is used to trigger a call with your
telephone transmitter to warn relatives that you are in a situation
of distress. It also sets off the sirens with a specific tone.
The or buttons must be configured in Mode C (see table
§ 4.1).

- 19 -
EN
5. Use with your outdoor keypad
The keypad is used to activate or deactivate your system
fully or by zone via an access code.
5.1 Activating the system
• Complete activation
ÊEnter your access code (6 digits).
ËPress (ON).
The LED changes from red to green to confirm the action.
• Operation by zone (1 or 2)
Example: zone 2
ÊEnter your access code (6 digits).
ËPress , then (ON).
The LED changes from red to green to
confirm the action.
5.2 Deactivating the system
• Complete shutdown
ÊEnter your access code.
ËPress (OFF).
The LED changes from red to green to confirm the action.
• Shutdown by zone
Example: zone 2
ÊEnter your access code.
ËPress , then (OFF).
The LED changes from red to green to
confirm the action.
OK
1
2
OK
123
Activate (ON) Shutdown
(OFF)
LED
OK
1
2
OK
123
Wrong code entered: The keypad is locked for 90 seconds
after five attempts with the wrong code.
If there are many attempts to enter a wrong code (21
attempts), an alarm cycle will be triggered.
Depending on the installation settings, the alarm control
unit will or will not emit beeps to confirm the activation or
deactivation actions.

- 20 -
5.3 Manual override
ÊThe alarm control unit denies the activation.
It emits a series of beeps to warn the user.
On the keypad, the LED flashes red.
ËEnter your access code a second time then press
(ON) within 5 seconds after first pressing the button.
The LED changes from red to green to confirm the action.
The alarm control unit emits a BEEP.
5.4 Triggering a discreet SOS (shut-
down under duress)
To do this, add 1 to the 1st digit of the access code.
Example:
- access code "123456", duress code "223456",
- or access code "923456", duress code "023456",
The LED changes from red to green to confirm the action.
The alarm control unit emits a BEEP.
The telephone transmitter calls from the
3rd number programmed.
The 1st and 2nd numbers are not called for the discreet SOS.
1
2
< 5s
1
2
3
4
OK
SOS
+1
+1
For example, this function is used to activate the
system even if an entry remains open or if a product
shows a defect (dead battery, etc.).
5. Use with your outdoor keypad
This function is used to let any
aggressor believe you have entered the right access code
while triggering a discreet alarm (no audible signal) with your
telephone transmitter, whether the system is shutdown or
activated.
Duress
code
Access code
Duress code
Access code
Beep, beep, beep
Activation denied (e.g.
open entry)
Beep, beep, beep
Table of contents
Other DELTA DORE Security System manuals

DELTA DORE
DELTA DORE Si TYXAL + User manual

DELTA DORE
DELTA DORE TYXAL MDO User manual

DELTA DORE
DELTA DORE CS 8000 TYXAL + User manual

DELTA DORE
DELTA DORE Pack TYXAL+ Access User manual

DELTA DORE
DELTA DORE CS 8000 TYXAL+ User manual

DELTA DORE
DELTA DORE CS 8000 TYXAL+ User manual

DELTA DORE
DELTA DORE Pack TYXAL+ Access User manual

DELTA DORE
DELTA DORE Pack TYXAL+ Compact User manual


