Demco 1722 User manual

OPERATOR’S MANUAL
DEMCO GRAIN CART
WITH
LANDFLEX TRACKS
AND
EARTHFORM SUSPENSION
TM
TM

iiiOPERATOR’S MANUAL
Contents
1
2
3
4
1-1
2-1
3-1
4-1
5-1
6-1
5
6
7 7-1
8 8-1
9 9-1
10
SPECIFICATIONS
ABREVIATIONS AND SYMBOLS
TERMINOLOGY
SAFETY
BREAK-IN AND BELT CARE/CONDITIONING
ROADING
BELT WEAR PATTERNS
RECOMMENDED MAINTENANCE SCHEDULE
CHARGING HYDRAULIC SUSPENSION AND TENSION SYSTEMS
BELT ALIGNMENT PROCEDURE
INDEX
10-1
1111-1

1-1 OPERATOR’S MANUAL
1 SPECIFICATIONS
TORQUE SPECIFICATIONS FOR HARDWARE
BOLT
SIZE BOLT TYPE BOLT
GRADE
DRY
FT-LB (N-m)
WET
FT-LB (N-m) LOCATION QTY PER
MODULE
M10 Hex Head Bolt 10.9 16 (21.7)12 (16.3)Wheel Hub Caps 60
M14 Hex Head Bolt 10.9 147 (200)110(149)(6)Cylinder Pins,(2)Belt Alignment Pins
(5)Trail Arm Pins,(12)Bogie Roll Retainer 25
M20 Hex Head Bolt 10.9 400 (542) 300 (407) (40) Idler Wheels, (5)Belt Support Base
(6) Oscillation Pivot Cap Retainer 51
3/8"Hex Head Bolt 844(59.6)33(44.7(2) Belt Support Spindle 12
1/2"Hex Head Bolt 587(117)65 (88)(12) Belt Support Wheels 2
M24 Hex Head Bolt 10.9 733 (994)550(745)(2) Belt Alignment Arm, (1)Tension Arm 3
TORQUE SPECIFICATIONS FOR JIC 37°
CONNECTORS
TORQUE TOLERANCE
SAE DASH SIZE THREAD SIZE FT-LB N-m FT-LB N-M FFFT
-6 9/16 -18 21 28 +/- 1 +/- 1 1 1/4
TORQUE SPECIFICATIONS FOR O-RING BOSS
CONNECTORS
TORQUE TOLERANCE
SAE DASH SIZE THREAD SIZE FT-LB N-M FT-LB N-m
-6 9/16 -18 27 37 +/- 2 +/- 3
-8 3/4 -16 48 65 +/- 2 +/- 3
LUBRICATION CAPACITIES
AMBIENT TEMPERATURE RANGE
20°F (7°C) to 100°F (38°C)
LUBRICATION SYSTEM
Bogie Wheel Hub
Idler Wheel Hub
METHOD OF LUBRICATION
Oil Bath
Oil Bath
TYPE OF LUBRICATION
SAE 15W40 Motor Oil
SAE 15W40 Motor Oil
CAPACITY
10 oz. (296mL)
24oz. (710mL)
HYDRAULIC SYSTEMS SETTINGS BEARING PRELOAD
SUB SYSTEM CHARGED WITH SETTING LOCATION PRELOAD
Tension Cyl. Accumulator Nitrogen
1750 psi (12.1 MPa)
Bogie Wheel Hubs 1.5 Tangs
Tension Cyl. Hydraulic Mobilfluid 424 Hydraulic Oil 550 psi (3.80 MPa) Idler Wheel Hubs 1 Tang
Front Suspension Cyl.
Accumulator
Rear Suspension Cyl.
Accumulator
Nitrogen
Nitrogen 250 psi (1.72 MPa)
Rear Suspension Cyl.
Hydraulics Mobilfluid 424 Hydraulic Oil 23" Pin to Pin
300 psi (2.07 MPa)
Bushings Grease Mobilith SHC 220 Grease

1-2OPERATOR’S MANUAL
Figure 1-1 LandFlex Tracks with EarthForm Suspension

2-1 OPERATOR’S MANUAL
2 ABBREVIATIONS AND SYMBOLS
Indicates possible hazardous situation that, if not avoided, may cause minor
or moderate personal injury. This may also be used to indicate possible equip-
ment damage, if not avoided.
Indicates a prohibitive situation, DO NOT PERFORM
Indicates possible hazardous situation that, if not avoided, may cause death or
serious personal injury.
LH or RH Left / Right Hand Side of Track Module

3-1OPERATOR’S MANUAL
3 TERMINOLOGY
1. FRONT FRAME
2. REAR FRAME
3. RUBBER TRACK BELT
4. OSCILLATION PIVOT
5. SUSPENSION CYLINDERS
6. HYDRAULIC TENSION CYLINDER
7. IDLER WHEELS
8. BOGIE WHEELS
9. BELT SUPPORT WHEELS
Figure 3-1 LandFlex Tracks with EarthForm Suspension Components

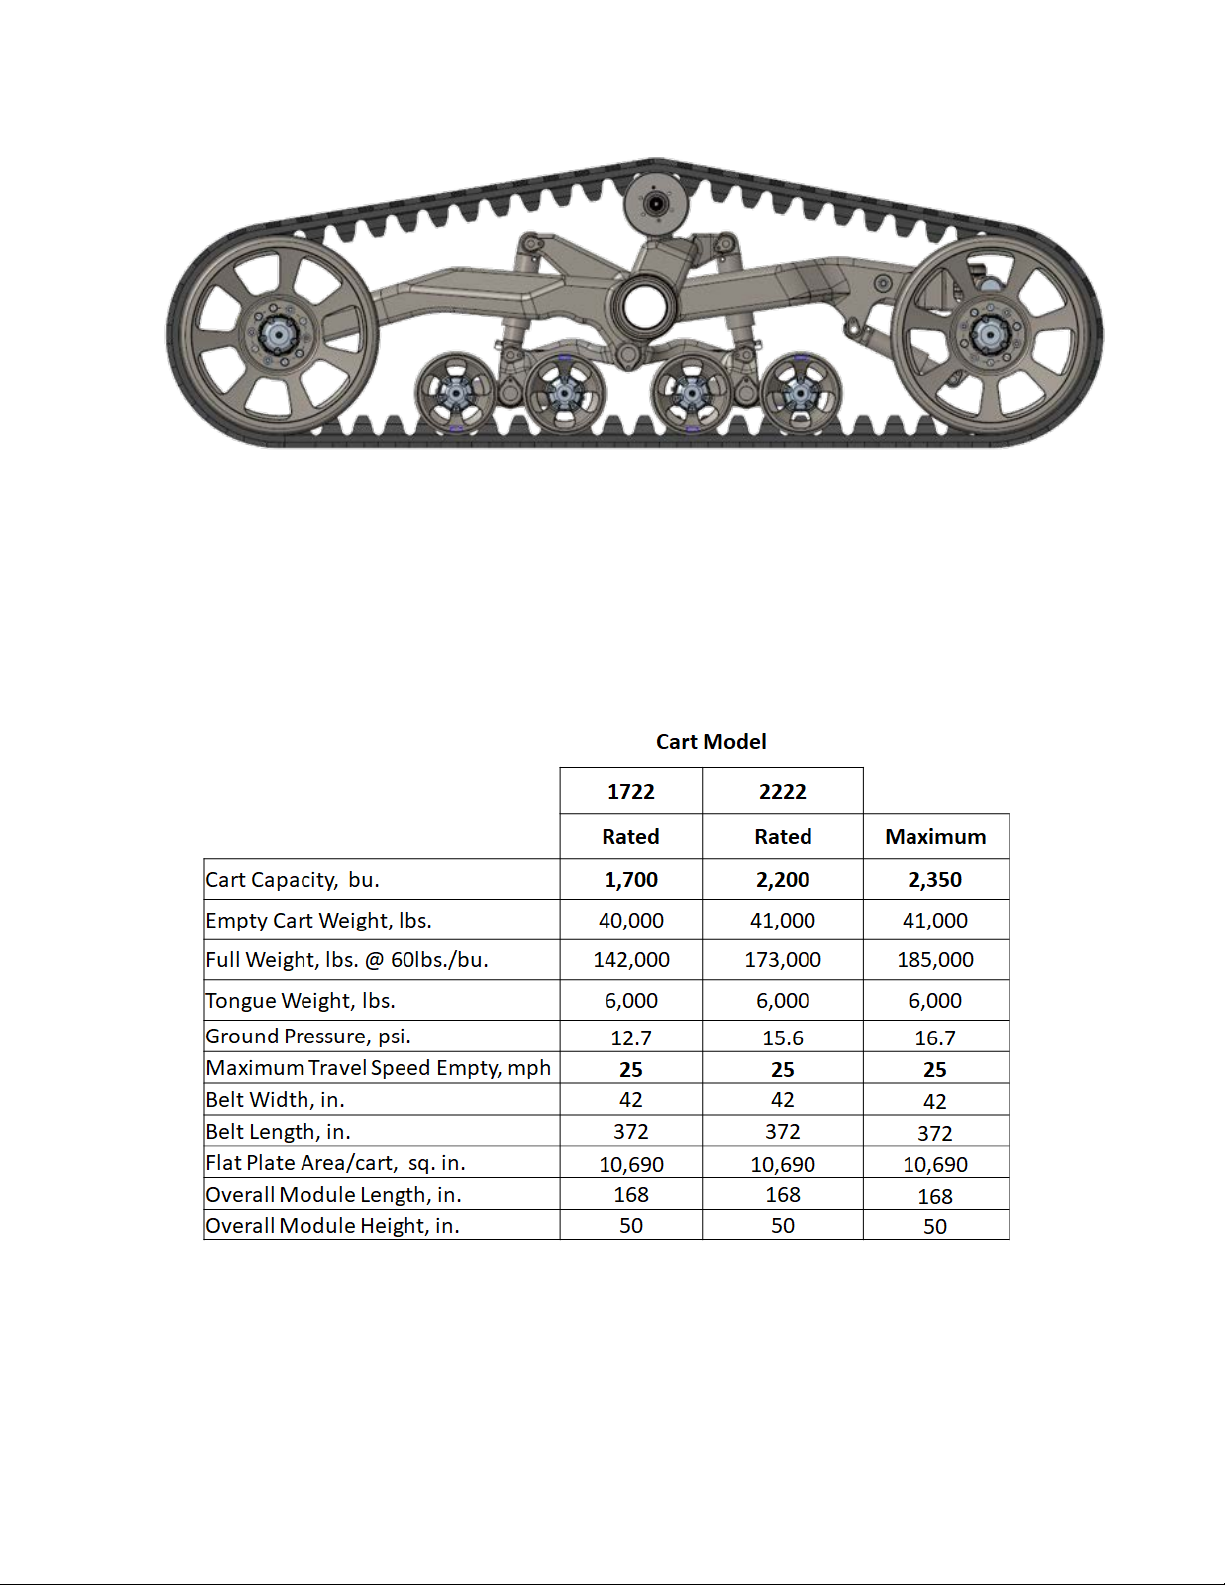
4-1 OPERATOR’S MANUAL
4 SAFETY
Improper operation of this equipment can cause death or serious injury. Before using this
equipment, make certain that every operator:
• Is instructed in safe and proper use of machine.
• Reads and understands the manual(s) pertaining to the machine.
• Reads and understands all safety decals on the machine.
• Clears area of other persons.
• Learns and practices safe use of machine controls in a safe, clear area before operating this machine.
Personal Protective Equipment (PPE) is required when working with this equipment. Wear
the appropriate protective shoes, eye and face protection, hearing protection, and any other PPE appropriate for the
work being conducted. Failure to comply could result in death or serious injury.
Crushing hazard. Follow lifting procedures for the grain cart and track module. Use
proper capacity lifting equipment and suitable jack stands to support the grain cart Failure to comply could result in
death or serious injury.
Never install, do maintenance, or repairs on the track system unless the machine on which
it is mounted is turned off and the key is in the possession of the person doing the work.
Maintain travel speeds such that complete control and stability is practiced at all times.
Reducing the speed when turning, crossing slopes and on rough, slick or muddy terrain will aid in controlling and
stabilizing the vehicle.
Stay off slopes too steep for safe operation.
DO NOT pull the cart with hard mud or debris lodged inside the module against rubber surfaces.
After operating in muddy conditions clear the frame and wheels of mud and debris build up.
Never use tracks or frame as a step or standing platform to access or work on the
grain cart or equipment. Failure to comply could result in death or serious injury.
Before starting vehicle, walk around to check for other people, tools, loose parts, etc.
Keep everyone clear of the track modules when the tractor and grain cart are moving. Be aware of those persons
working in the vicinity of the vehicle. Failure to comply could result in death or serious injury.

5-1
OPERATOR’S MANUAL
5 BREAK-IN AND BELT CARE/CONDITIONING
5.1 The following is the break-in procedure for the track system after installation of a new track system on a
grain cart, or installation of a new belt on an existing track module.
5.2 Pull cart forward and back for 100 ft. before initial belt alignment check.
5.3 Measure distance from front idler hub to same position on rear idler hub on both inside and outside idler hubs. If inside
and outside dimensions not the same, adjust the alignment bolt to rotate the rear idler axle so both dimensions are the
same using the belt alignment procedure in Section 10. Repeat for other module.
5.4 Talc belts by placing a generous amount of talc on the guide lugs and inside of front and rear idler guide faces. Move
the cart forward/rearward several times to insure most guide lugs have talc. If talc is not available, cat litter, oil dry or
loose soil are good alternative materials.
5.5 Pull the cart for 1-2 miles at 10 mph, then check belt alignment and belt temperatures on guide lug faces, inside of idler
guide surfaces and traction lug surfaces.
5.6 If guide lug end face temperatures inside vs. outside differ by more than more than 10 degrees F or belt guide
surfaces are smearing or feel tacky, make undercarriage adjustments per Section 10, to realign belt to center guide
lugs between idlers.
5.7 Add talc again to belt guide lugs and idler wheel guide surfaces.
Figure 5-1 Belt Alignment Measuring
6 ROADING
Pull cart at 20-25 mph for 3-4 miles and check temperatures again and re-align if necessary. Belts will not always run
exactly in the center of the idler guide surfaces but that is ok as long as the temperatures are not elevated and inside
and outside are approximately the same temperatures.
The grain cart tank must be empty for all roading operation.
5.8
6.1

7-1
7 BELT WEAR PATTERNS
This section is meant to aid the Track Module owner in attaining maximum belt life. Certain working
environments can cause accelerated belt wear. This section will describe common types of belt wear, common
causes of this wear, and recommended action to ensure maximum belt life.
Pattern 1 Normal Wear
Figure 7-1 Normal Wear
Characteristics: This pattern is characterized by uniform scuffing on both sides of the guide lugs. The outer
portions of the traction lug will exhibit more wear than the inner section of the traction lugs.
Cause(s): Normal Wear. The outer portions of the traction lugs may wear slightly faster than the center of the
traction lugs due to operating on crowned roads.
Recommended Action: None
Pattern 2 Guide Lug End Erosion
Figure 7-2 Guide Lug End Lug Erosion
Characteristics: Tearing / erosion of the side of the guide lug.
Cause(s): Excessive sharp turning under heavy loads, belt not properly aligned, or
operating continuously transverse to a steep slope.
Recommended Action: Avoid excessive sharp turns, especially under heavy loads, re-align belt, try to
operate the grain cart perpendicular to the base of the grade (straight up and down the hill).
This type of wear is not covered by warranty.
OPERATOR’S MANUAL
Wear/Tearing
of the end of
the guide lug
7.1
7.2
7.3
7.4
7.5
7.6
7.77.7

7-2
OPERATOR’S MANUAL
Pattern 3 Stubble Damage
Figure 7-3 Stubble Damage
Characteristics: Pitting on the outside of the belt, typically found on the leading edge of the traction lugs
and the areas between traction lugs.
Cause(s): Stubble damage due to operating on row crops. Note: Stubble damage to belts is never
covered by warranty.
Recommended Action: When operating in corn or other rigid stalk crops, install stalk stompers to prevent
stubble damage.
Figure 8-1 Wheel Hub Oil Weep
After extended storage a small amount of oil may
weep out of the wheel hub seals. This does not
indicate a bad seal. If this occurs, wipe up any oil, run
the equipment for 5 minutes at normal field speeds,
and then check that the oil level in the hub is full to the
bottom of the oil fill plug.
8 RECOMMENDED MAINTENANCE
8.3
8.4
8.5
8.6
8.7
7.8
7.9
7.10
Daily clean debris from inside track module. Clean wheel surfaces and any debris between wheels and frame.
Daily check hub oil levels visually through transparent caps
Visually check belt alignment by inspecting ends of guide lugs and inside belt surfaces. A well broken in surface
will be smooth with no evidence of rubber roughness.
Visually check suspension cylinder rod length so cylinder pin to cylinder pin is 23 ± 1/8 inches with empty grain cart.
Visually check tension cylinder rod length so part of cylinder rod is exposed
Annually grease belt support wheel hubs.
At 2,000 hours change oil in idler and bogie wheel hubs.
8.2
8.1

9-1
9 CHARGING HYDRAULIC SUSPENSION AND TENSION SYSTEMS
9.1 Charge the suspension and tension hydraulic
systems with the Hydraulic Charge Unit (T0086)
and a hydraulic source such as a port-a-power, or
air/hydraulic pump. The hydraulic source must be
capable of a minimum of 1500 psi (10342 kPa) a
max of 3000 psi (20684 kPa). The optional T0042
Complete Charge Kit with 12 Volt pump and
reservoir is also available for purchase.
9.2 Connect the charge unit to the hydraulic oil source.
Before connecting the charge unit to the track
module, bleed the air from the hose and charge
unit.
9.3 Place the bleeder hose into a bucket. Open the
bleeder valve on the charge unit and cycle the
pump to purge any air from the system. Close the
bleeder valve.
Do not exceed 3000 psi (20684 kPa) while charging the hydraulic systems.
NOTE: The suspension system must be charged with the grain cart empty
and connected to the towing tractor
Gauge
Bleeder Valve
Bleeder Hose Check Valve
1/4” NPT
Charge Port
Connection for Hydraulic pressure source
Figure 9-2 T0086 Hydraulic Charge Unit
Figure 9-1 Hydraulic Charging Ports and Dimensions

9-2
9.4
9.5
9.6
9.7
9.8
9.9
9.10
9.11
9.12
9.13
The suspension charge port is located near the
top of the rear suspension cylinder. Connect the
charge kit and pump hydraulic oil into the system
until the rear suspension cylinder is 23.0 ± 1/8”
from pin center to pin center.
Place the bleeder hose into a bucket. Open the
bleeder valve on the charge kit to purge any air
from the system. Close the bleeder valve, and
charge the rear cylinder back to 23 ± 1/8” from
pin to pin.
Repeat charging and bleeding the rear cylinder
until no air bubbles are visible in the bleeder
hose. Charge the system until the rear
suspension cylinder is 23.0 ± 1/8” from pin to pin.
Remove the charge kit from the suspension
system.
Use the charge kit to charge the tension cylinder.
The charge port is located on top of the tension
cylinder. Connect the charge kit and pump
hydraulic oil into the system until the pressure
reaches 550 psi (3,792 kPa).
Open the bleeder valve on the charge kit to
purge any air from the system. Close the
bleeder valve, and charge the cylinder back to
550 psi (3,792 kPa).
Repeat charging and bleeding the cylinder until
no air bubbles are visible in the bleeder
hose. Charge the tension cylinder back to
550 psi (3,792 kPa).
Remove the charge kit from the tension system.
Check the rear suspension cylinder length. If it
has changed more than 1/8 in. from the 23.0"
setting connect the charge kit to the suspension
system to adjust the length of the rear
suspension cylinder back to 23.0” from pin to pin.
Remove the charge kit.
Use the charge kit to verify the tension cylinder
pressure. Adjust the pressure back to 550 psi
(3,792 kPa) if necessary.
Figure 9-3 T0042 Complete Charge Kit

10-1 OPERATOR’S MANUAL
10 BELT ALIGNMENT PROCEDURE
SCALE 0.175
SCALE 0.175
10.1 Measure the distance from front idler hub to same position on rear idler hub on both inside and outside idler hubs.
If the inside and outside dimensions not the same or if the belt is rubbing hard against one side of the guide wheel
surfaces, adjust the alignment bolt.
Loosen the alignment bolt 1/2 turn on the opposite side of the rear frame where the belt is rubbing hard, i.e. if
the belt is rubbing on the right end of the guide lugs, loosen the bolt on the left side of the track module 1/2
revolution.
Then tighten the opposite alignment bolt to 550 ft.lbs. torque (wet).). Note: Idler hub center to center distances,
inboard to outboard, may vary slightly to achieve optimum track alignment.
Pull the grain cart for up to 1 mile and recheck the belt running position. Belts will not always run exactly in the
center of the idler guide surfaces but that is ok as long as the temperatures are not elevated and inside and
outside are approximately the same temperatures.
Recheck torque on belt alignment bolts to make sure they are at 550 ft. llbs.(wet).
10.2
10.3
10.4
10.5
Figure 10-1 Belt Alignment Adjustment Mechanism

23-1OPERATOR’S MANUAL
11 INDEX
Index
1-2
3-1
5-1
Figure 1-1 LandFlex Tracks with EarthForm Suspension
Figure 1-2 LandFlex Tracks with EarthForm Suspension Components
Figure 5-1 Belt Alignment Mea
Alis
Figure 7-1 Normal Wear
Figure 7-2 Guide Lug End Erosion
Figure 7-3 Stubble Damage
Figure 8-1 Wheel Hub Oil Weep
Figure 9-1 Hydraulic Charging Ports and Dimensions
Figure 9-2 T0086 Hydraulic Charge Unit
Figure 9-3 T0042 Complete Charge Kit
Figure 10-1 Belt Alignment Adjustment Mechanism
7-1
7-1
7-2
7-2
9-1
9-1
9-2
10-1
suring
This manual suits for next models
1
Table of contents
Other Demco Outdoor Cart manuals
Popular Outdoor Cart manuals by other brands

Crosley Furniture
Crosley Furniture CF3008 Assembly instructions

Spectrum Industries
Spectrum Industries 55465 owner's manual

Rieber
Rieber ZUB-1 Compact operating instructions

YTL
YTL YTL-010-757 Instructions & assembly

Luxor/H.Wilson
Luxor/H.Wilson Endura LP27CE-B instructions

Link
Link FC50 Assembly instructions and parts list

DECK DOLLY
DECK DOLLY JD4 5 Series Assembly instructions

Tennsco
Tennsco CK18 Assembly Instructions/Parts Manual

Cornwell Tools
Cornwell Tools Pro CTBMM500 Series Assembly instructions

Sea Eagle
Sea Eagle EZ Cart Instruction & owner's manual

Winther
Winther 408 Assembly instruction

Rapid Racking
Rapid Racking TCT2 Assembly guide