Den-Mat PeriOptix Installation guide
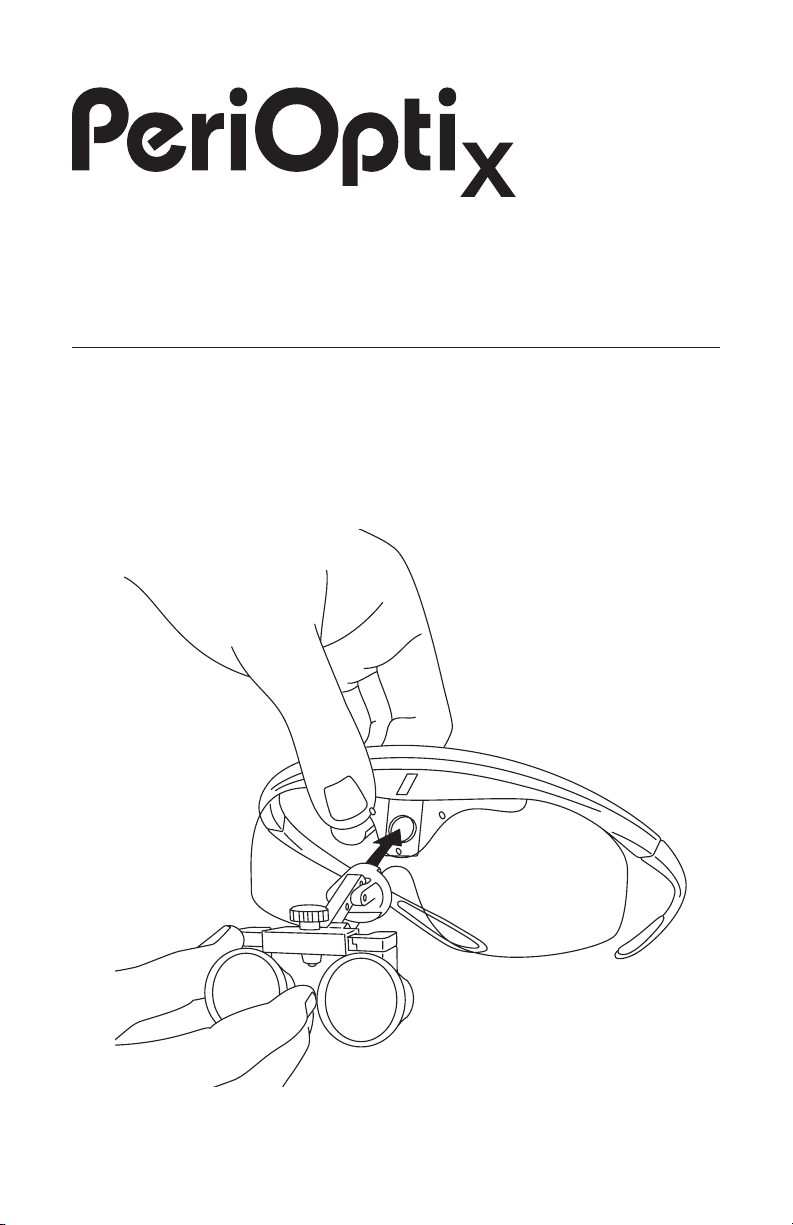
solutions in magnication
and portable LED illumination
Instructions, warranty and cleaning for
PeriOptix loupe optics and HogiesTM frame.
PeriOptixTM and Set and ForgetTM are trademarks of PeriOptix, Inc. Hogies is a trademark of Martin Hogan, Pty Ltd.
If you have questions, please call customer service at 1-888-360-0033.
If you have questions, please call customer service at 1-888-360-0033.
Thank you for purchasing your loupe system from PeriOptix. To ensure the
optimal performance of your optics, please follow the set up directions below.
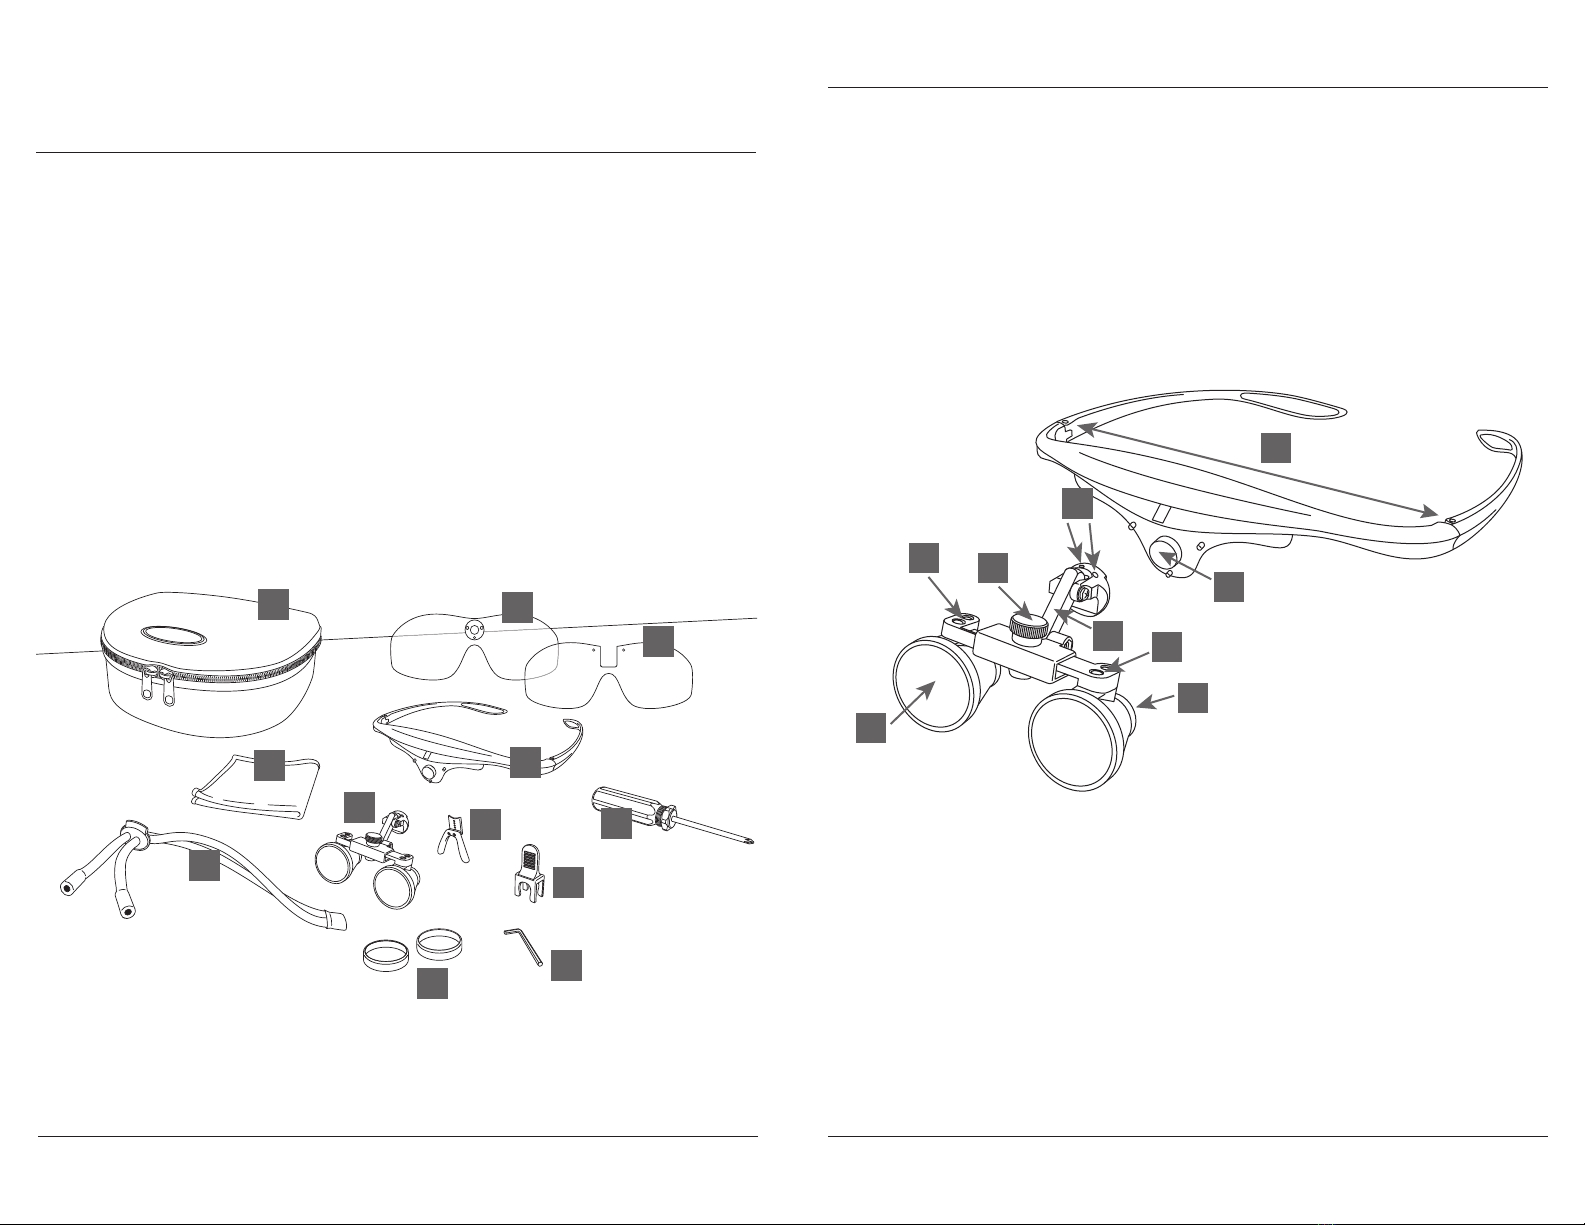
1. Contents
Inspect contents. If any item is missing, contact PeriOptix customer support.
A. Loupe Frame
B. Loupe Optics and Magnetic Hinge
C. Safety Shield
D. Magnetic Safety Shield
E. Nose pad
F. Headstrap
G. Phillips Screwdriver
H. Microfiber Cleaning Cloth
I. Flip Paddle
J. Lens Covers
K. Carrying Case
L. Allen Wrench
A
G
I
H
K
JL
E
F
C
D
B
2. Loupe Glossary
A. Frame Temple
B. Frame Magnet
C. Loupe Hinge With Upper and Lower Pivot Joints
D. Hinge Set Screws on Magnetic Hinge
E. Interpupillary Adjustment Knob
F. Convergence Adjustment Screws
G. Ocular Lens
H. Objective Lens
A
H
G
B
C
D
E
F
F
If you have questions, please call customer service at 1-888-360-0033.
If you have questions, please call customer service at 1-888-360-0033.
A
B
C
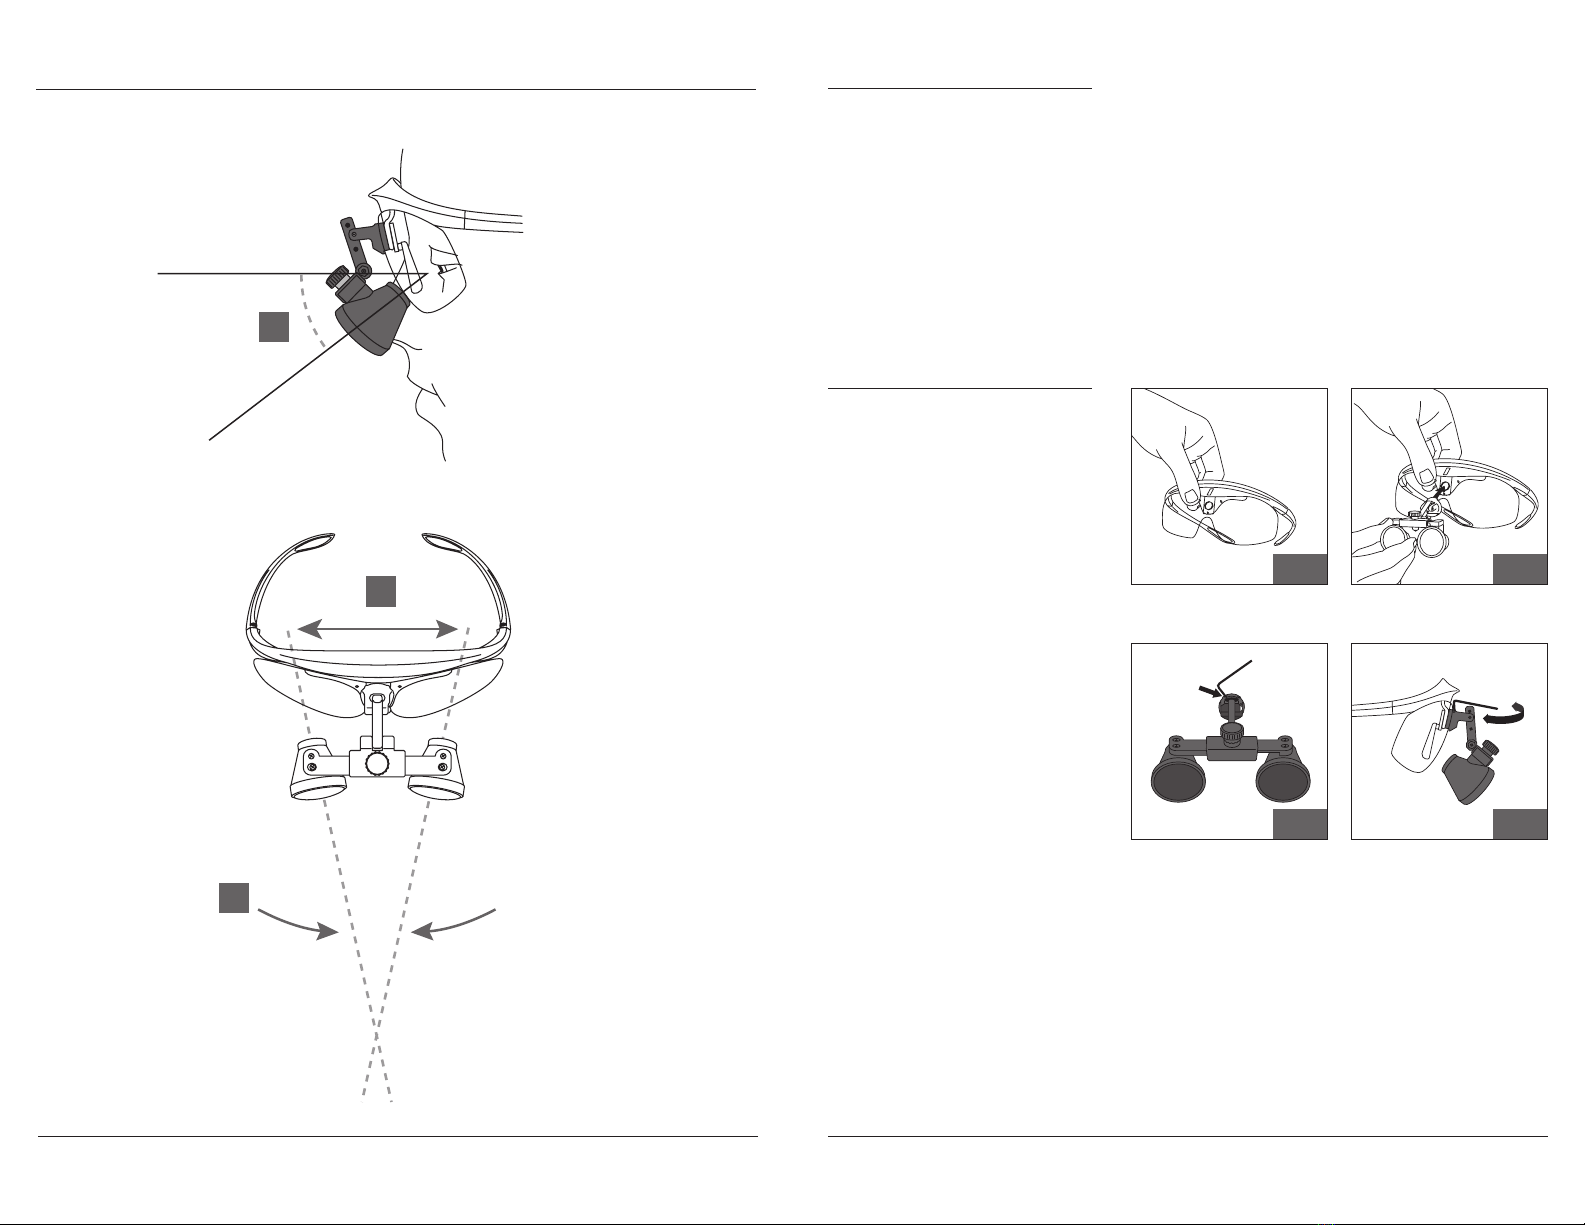
3. Loupe Adjustments
A. Declination angle
B. Convergence angle
C. Interpupillary Distance
(distance between the pupils)
4. Disassembly
Your Hogies loupe system comes
assembled with the magnetic hinge
securely attached to the magnet by
two set screws. To remove the loupe
optics from the magnet, first loosen
the set screw(s) closest to the frame.
(Do not loosen the set screw further
from the frame. Refer to illustrations
5.2a and 5.2b). These are located at
the 10 and 2 0’ Clock position on the
magnetic hinge.
5. Assembly
5.0 Place safety shield on loupe
frame by aligning two pilot holes
with pins on frame. Shield should
snap over pin. Note: shield will not
remain in place without magnetic
hinge. Hold in place with thumb
and forefinger while attaching loupe
optics.
5.1 Attach magnetic hinge. Be sure
shield and hinge seat completely
onto the frame.
5.2a The loupe optics should be
securely locked to the frame with the
supplied allen wrench.
5.2b Once the loupe optics are
attached, use the short leg of the
allen wrench to tighten the set
screw(s) on the hinge closest to the
frame. Tighten the set screw until
initial resistance is felt and then
tighten for another 1/3 of a turn.
5.15.0
5.2b5.2a
If you have questions, please call customer service at 1-888-360-0033.
If you have questions, please call customer service at 1-888-360-0033.
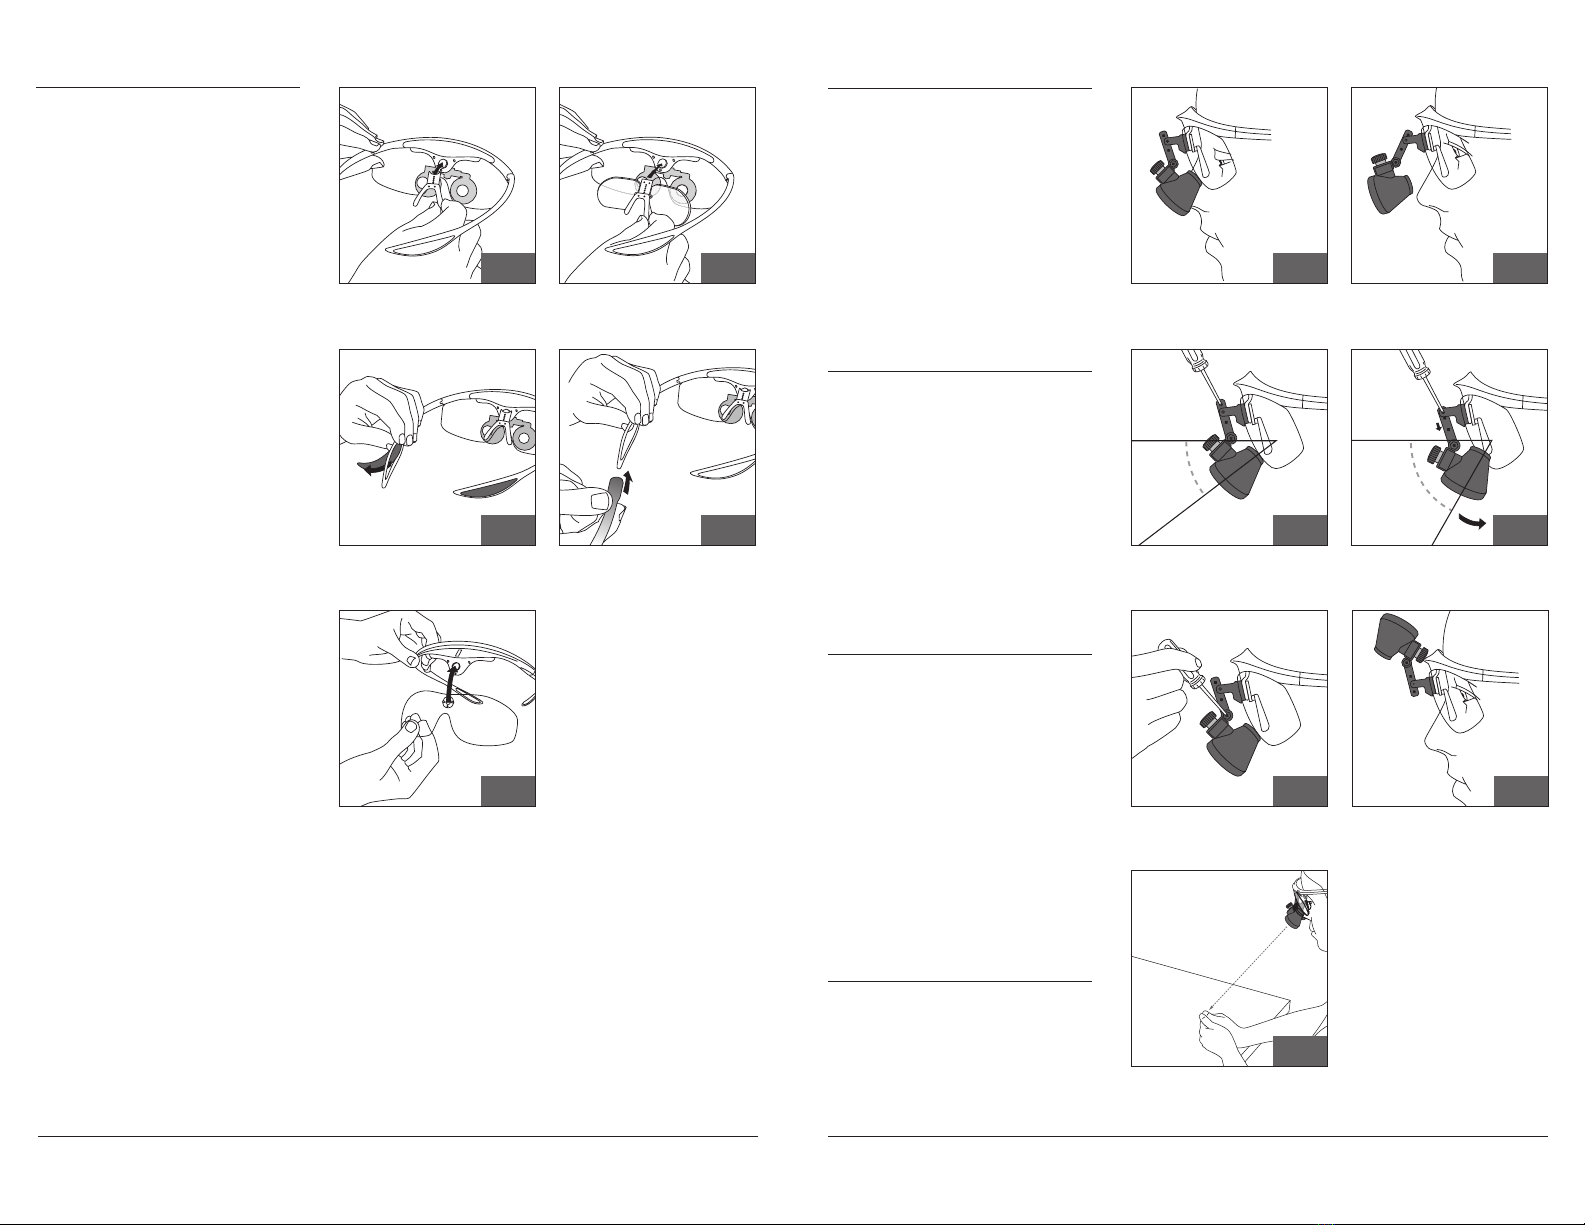
5. Assembly (continued)
5.3 Attach nosepiece ensuring the
center pin engages center hole of
nosepiece.
5.4 If the optional prescription insert
is used, attach it to the frame, ensur-
ing the positioning hole securely
engages the pin below the frame
magnet.
5.5 If a headstrap is desired,
attach it to loupe frame temples.
Note: the headstrap is recom-
mended.
5.5a First, remove rubber inserts.
5.5b Second, squeeze together each
side of loupe frame and slip head-
strap ends over end of each side of
frame.
5.6 To use Hogies as a safety frame,
attach the magnetic safety shield.
5.6
5.5a 5.5b
5.3 5.4
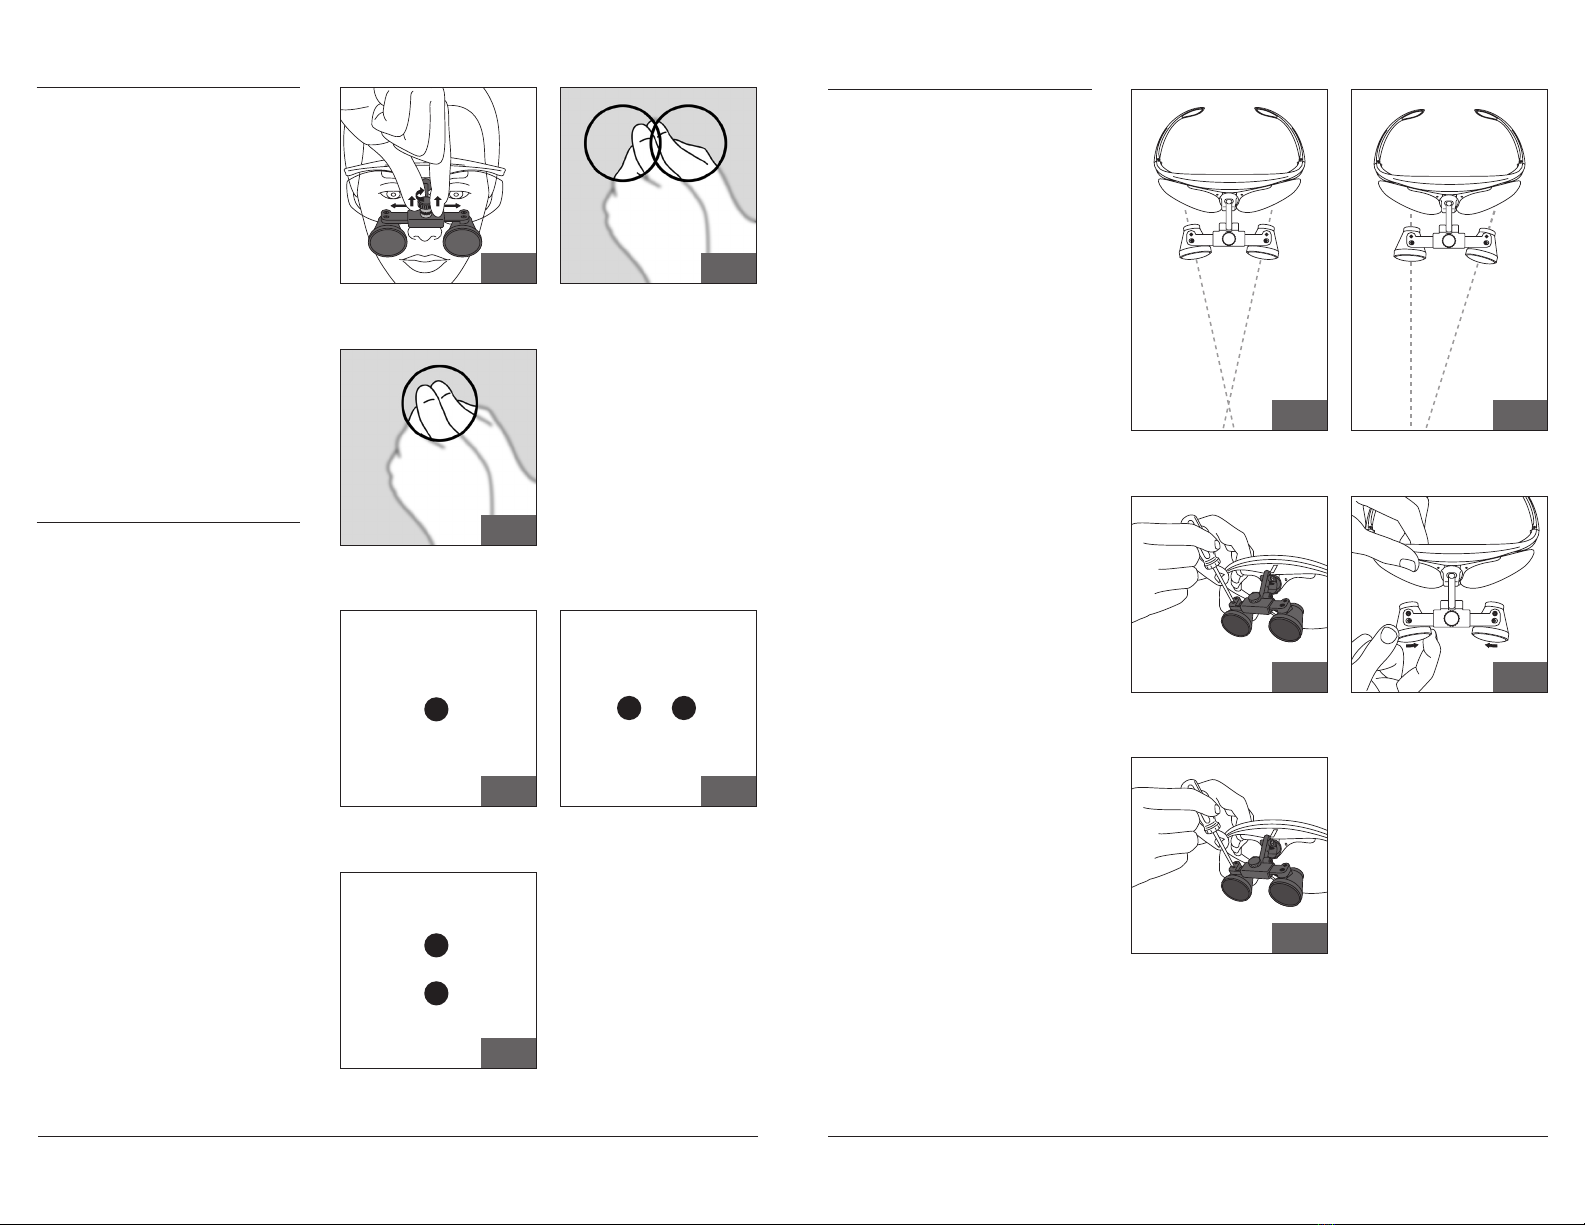
6. Properly Wearing Loupes
6.0 The loupe optics should be worn
as close as possible to your eyes to
achieve the greatest field of view and
declination angle. When adjusting,
the ocular lens should be against
or close to the eyeshield with the
loupes between a 45˚ and 60˚ angle.
6.1 Incorrect loupe position decreases
field of view and declination angle.
7. Adjusting Declination Angle
7.0 To increase the declincation
angle of your loupes, lower the upper
pivot point on the straight link. To
do so, remove the screw from the
middle pivot point with the Phillips
screwdriver.
7.1 Reset the pivot point to the upper
hole on the straight link and tighten
screw with the Phillips screwdriver.
8. Securing Declination Angle
Securing the declination angle will al-
low you to flip-up your loupe optics so
that they pivot only on the upper joint.
8.0 To do so, securely tighten the
lower hinge joint with a Phillips
screwdriver. Increase or decrease the
tension by tightening or loosening
the upper screw.
8.1 Declination angle will be secured
when optics are flipped up.
9. Focusing
9.0 Loupe optics have a preset focal
distance. An easy way to determine
the working distance of your loupe
optics is to view your thumbs while
moving them in and out of focus.
60˚
6.16.0
45˚
7.17.0
9.0
8.0
Correct loupe position. Incorrect loupe position.
Determine focal distance.
8.1
If you have questions, please call customer service at 1-888-360-0033.
If you have questions, please call customer service at 1-888-360-0033.
12. Adjusting Convergence Angle
Before adjusting the convergence
angle, set the IPD (see step 10).
Then, follow the instructions in step
11.0. If you still see two horizontal
dots, your optics have convergence
error and you need to rotate the lens
barrels to eliminate the horizontal
convergence error.
12.0 To adjust the horizontal conver-
gence angle, first look downward at
the loupe optics from the top to see
if the barrels are equally angled.
12.1 Barrels out of alignment will
appear asymmetrical.
12.2 If a barrel seems out of align-
ment, loosen both convergence
adjustment screws with a Phillips
screwdriver.
12.3 Adjust one or both barrels so
they are pointing slightly and equally
inward (this will give you a rough
alignment).
12.4 Slightly tighten both screws
to keep them in alignment. Focus
on the dot from Step 11. If you still
see two dots, repeat steps 10.0
- 12.4 until you see one dot and both
barrels are pointing inward equally.
Once set, tighten both convergence
screws on each barrel.
12.112.0
12.312.2
12.4
Barrels out of alignment.Barrels in alignment.
10. Adjusting IPD
10.0 With the Perioptix “Set and
Forget” feature, the only adjustment
that is usually needed is to set the
IPD (Interpupillary Distance). While
focusing on an object, pull up on the
Interpupillary Adjustment Knob and
rotate, moving the optics apart and
together. You should look at the out-
side rings of the field of view when
you are adjusting the IPD.
10.1 Focus on an object with the
optics far apart.
10.2 Bring the optics together until
you see a single circle. Once you see
a single circle, your IPD is set.
11. Convergence Angle Test
The convergence angle of your loupe
optics is preset according to your
working distance.
11.0 To test the convergence angle,
draw a single dot on a piece of paper.
Focus on the dot with your loupe op-
tics at the proper working distance.
Unless you are seeing two dots, your
convergence settings should not
require adjustment.
11.1 Two horizontal dots indicate
horizontal misalignment. Proceed
to step 12 to correct the conver-
gence angle.
11.2 In the rare case that two verti-
cal dots indicate a vertical misalign-
ment, your loupes may need to be
returned to PeriOptix for adjustment.
Call customer service at 1-888-
360-0033 to arrange for a return
authorization number.
10.110.0
10.2
Before IPD is adjusted.
After IPD is adjusted.
11.1
Horizontal misalignment.
11.2
Vertical misalignment.
11.0
Normal.

If you have questions, please call customer service at 1-888-360-0033.
If you have questions, please call customer service at 1-888-360-0033.
13. Warranty
Prior to returning product to PeriOptix for any reason, please call 1-888-360-0033 to request a
Return Authorization (RA) number.
PeriOptix, Inc. warrants its products to be free of original defects in material and workmanship and to
perform in accordance with specifications for the following terms:
Limited Lifetime Warranty:
All working parts of the loupe hinge mechanism and light attachment mechanism.
Three-Year Limited Warranty:
Optics, frames and nosepieces.
One Year Limited Warranty:
LED lamp head, cables, headband, chargers and battery packs.
Limitations of Warranty:
• Breakage or failure due to tampering, misuse, neglect, accidents, modification or shipping
• If the instrument is not used in accordance with manufacturer’s recommendations or instructions
• If repaired or serviced by other than PeriOptix or a PeriOptix authorized representative
PeriOptix offers complimentary replacement side shields, headstraps and flip paddles for the life of
their loupes.
Prompt inspection and reporting of missing or damaged product should be reported to shipping
carrier and PeriOptix with 3 days of receipt.
If PeriOptix products or any component thereof is found to be defective or at variance with the
manufacturer’s specifications during the warranty period, PeriOptix will repair or replace the
instrument or component(s) at no cost to the purchaser. This warranty only applies to products
purchased new from PeriOptix or its authorized distributors or representatives.
The purchaser must return the product directly to PeriOptix or an authorized distributor or
representative and bear the costs of shipping.
14. Cleaning and Disinfecting Lenses and Shields
Use the supplied cloth to clean the optical lenses and shields. A lightly moistened cloth with alcohol
or eyeglass lens cleaner can also be used. DO NOT WET OR IMMERSE THE OPTICAL LENSES IN
WATER OR LIQUID. For all other components such as the frames, nosepad and hinges, clean with an
alcohol or disinfectant wipe. It is recommended that lens covers are used on the front of the loupes.
These can then be removed, cleaned thoroughly, dried, and then replaced on the loupes.
15. Contact Information
Address:
1201 Puerta del Sol, Suite 305
San Clemente, CA 92673
Telephone:
888.360.0033
1.949.366.3333 (outside the US)
Fax:
949.366.0033
www.perioptix.com

www.perioptix.com
This manual suits for next models
1
Other Den-Mat Magnifier manuals


