DENAGO City 1.0 User manual

Your monitor comes with the HMI (Human
Machine Interface and all cables ready to be
installed. You will also need to check your
settings once you have installed the unit
Tools you will need-
YOUR DENAGO Multi Tool-3mm Allen key
Please let us know if you have any comments and/or follow up questions!
MONITOR-Removal, Replacement and Settings
The following instructions will outline how to remove, replace
and adjust your settings on your Denago City 1.0 eBike
REMOVING STEP 1
UNPLUG the wiring harness to the monitor.
You can follow the cable about 12” where you
will find 3 connectors. Unplug the one with the
GREEN INTERNAL. (it is okay if you unplug the
wrong one just plug it back in) Remove this
cable from the clip holding the cables together.
REMOVAL STEP 3-
Removing the MONITOR
The monitor is
connected with 2
brackets on the handle
bar. Remove both Allen
bolts using your 3mm
Allen Key. The brackets
have a hinge. Remove
monitor.
You are now ready to install your new monitor!
REMOVAL STEP 2-Removing the HMI
This item has a direct cable to the monitor, and
you must remove this item to be able to
replace the monitor. YOU MIGHT HAVE to
loosen up the brake lever (4mm Allen bolt on
top and bottom of lever bracket) to get a clear
path to the bolts and clamp that hold the HMI
in place. Remove both (2) bolts on the HMI
bracket using your 3mm Allen key.

Your monitor comes with the HMI (Human
Machine Interface and all cables ready to be
installed. You will also need to check your
settings once you have installed the unit
Tools you will need-
YOUR DENAGO Multi Tool-3mm Allen key
Please let us know if you have any comments and/or follow up questions!
MONITOR-INSTALLATION
The following instructions will outline how to remove, replace
and adjust your settings on your Denago City 1.0 eBike
INSTALLATION STEP 1 MONITOR
Take monitor and place brackets on
either side of the stem. Using the
3mm Allen Key tighten and secure
both bolts
You are almost done. Let's check your settings now
INSTALLATION STEP 2 HMI
Place HMI unit on left side of
handlebar-NOTE the BACK
BRACKET has a cut out for the cable
this goes on the bottom. Connect
HMI and Bracket with 2 bolts.
Using 3mm Allen key
IF YOU LOOSEND the brake lever
please tighten and secure for safety
INSTALLATION STEP 3 CABLE
CONNECTION
Take the cable with the GREEN
internals and connect to the open
cable with matching colors. Align
the notch and press together.

As you know the monitor is connected in a number
of ways to your eBike. It interfaces with the HMI to
adjust your PAS levels, advises if you have a
problem with your brakes and also tracks a number
of great features. Like speed, distance, MAX speed,
battery level etc. The following will show you how
to confirm and make needed adjustments
MONITOR-SETTINGS
The following instructions will outline how to confirm and
make changes to your settings on your Denago City 1.0 eBike
Please perform a safety check and make sure to adjust your
MAX speed to a comfortable and confident speed. Enjoy the Ride
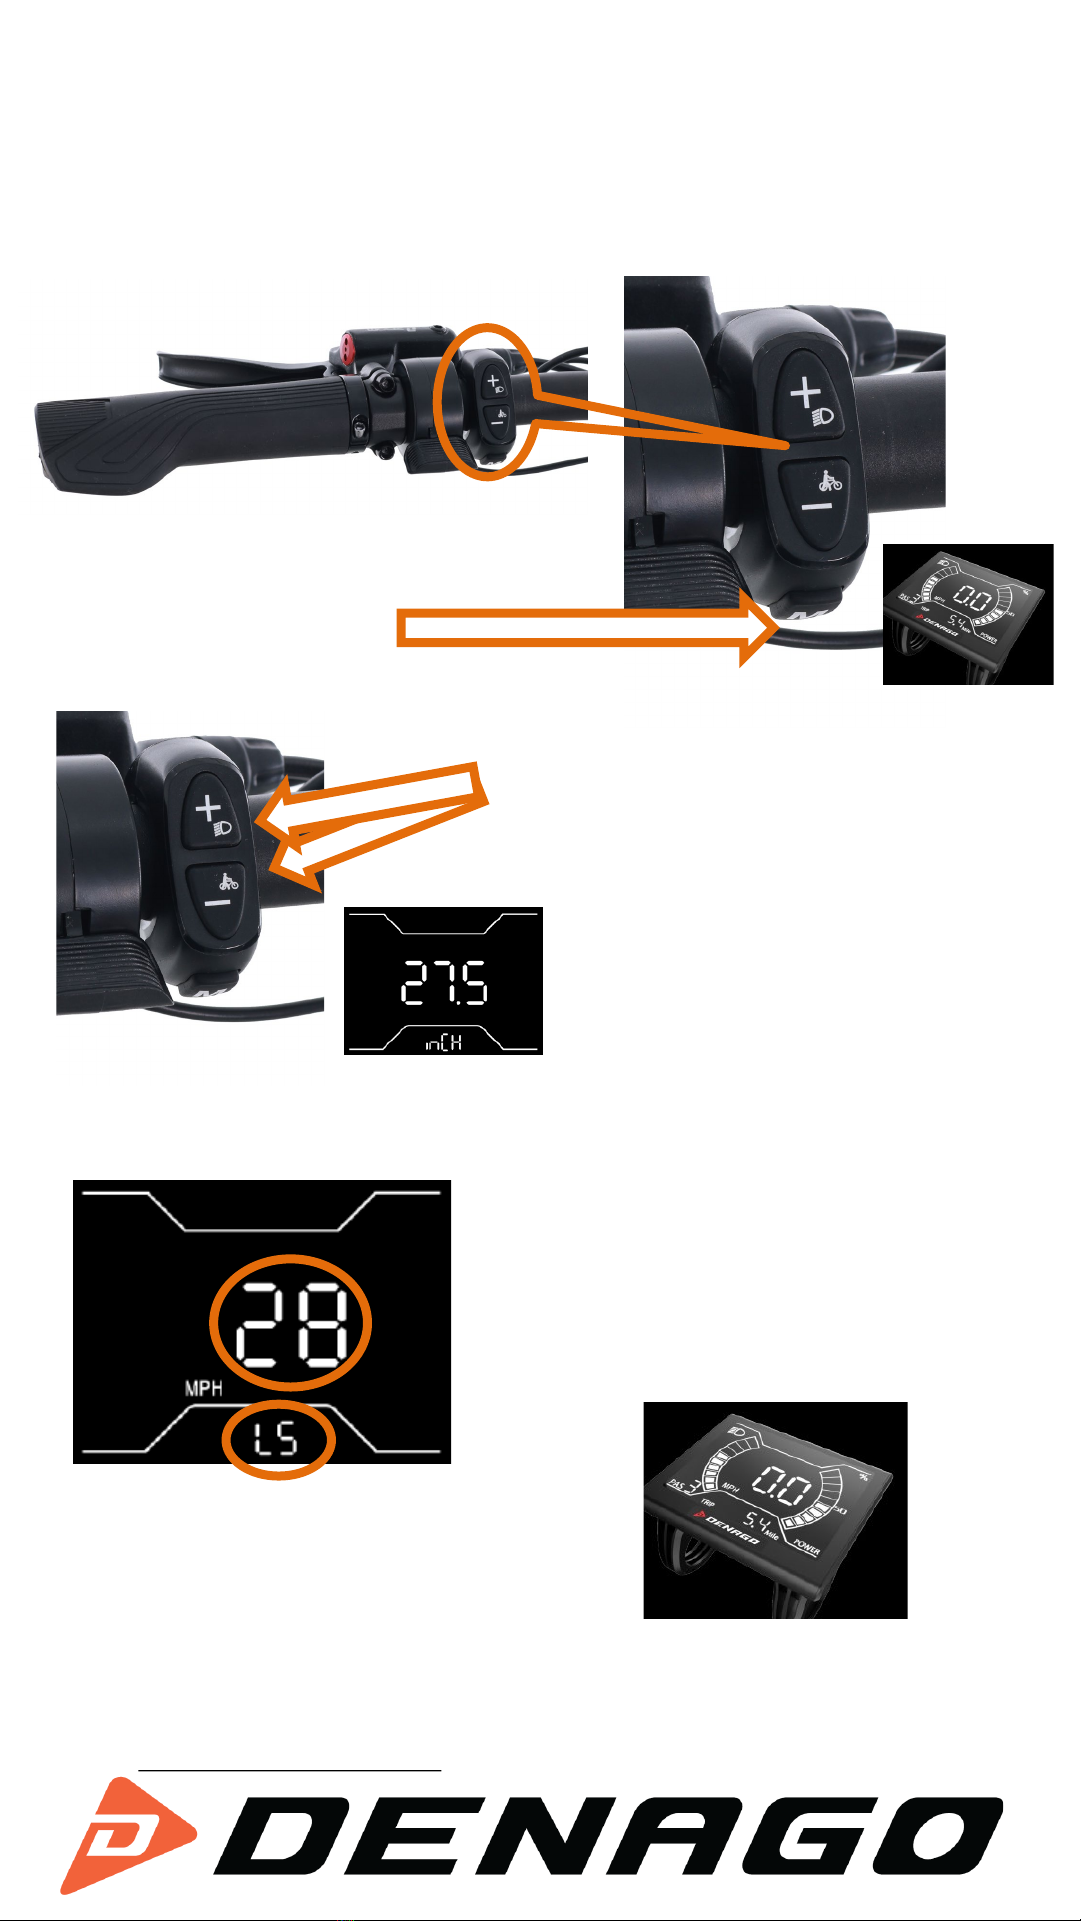
STEP 1 –Press and hold M
(MODE) Button until screen turns
to either MAX speed or AVE speed
STEP 2Press and hold + -(UP/Down)
Simultaneously for 2-4 seconds until screen
flashes and goes to setting interface. You
have 4 settings
Use the + - to toggle thru each screen and the
Mto move to the next setting
1-inCH-wheel
size setting-Your
Denago City 1.0
is 27.5
2-LS-Limited
Speed. This is
your max speed
setting. See
Following Page.
3- bl –this is
screen
brightness.
You have 3
levels
4- unit –this is
the speed and
distance
setting MPH or
KPH
Please let us know if you have any comments and/or follow up questions!
Please let us know if you have any comments and/or follow up questions!
Pedal Assist Speed Adjustments
The following instructions will outline how you set the MAX
Speed in Pedal Assist (PAS) level 5. Once this is set it will
adjust each of the other levels by a preset percentage
STEP 1 Press MODE Button
to engage screen
STEP 0 Locate the HMI-
Human Machine Interface
STEP 2Press + -(UP/Down)
Simultaneously for 2-4 seconds
until screen flashes and goes to
setting interface
STEP 3-First screen to pop
up is wheel size-PRESS
MODE to go to next screen
STEP 4-LIMIT SPEED mode- (LS) this is
where you can adjust MAX speed-Use the
+ -(UP/Down) to adjust MAX limit-
Your range is 28 –11 mph as the Lowest Limit
STEP 5-Press M (MODE) for 2seconds
to return to main screen.
You are ready to ride
Denago City 1.0 PAS (Pedal Assist System) comes with the
ability to set your MAX speed while also adjusting your PAS
level speeds.
1. Custom Pedal Assist Settings-The rider is able to
adjust the MAX speed setting with 18 micro
adjustments
•28mph MAX down to 11mph
•With adjustment it will proportional adjust each of the
other PAS levels accordingly (chart included)
•Adjustment made with 4 easy steps
•Easy to do anywhere
•Allows for better rider comfort, control, confidence, and
safety
•Assist in better pedal engagement when rider preferred
settings are achieved
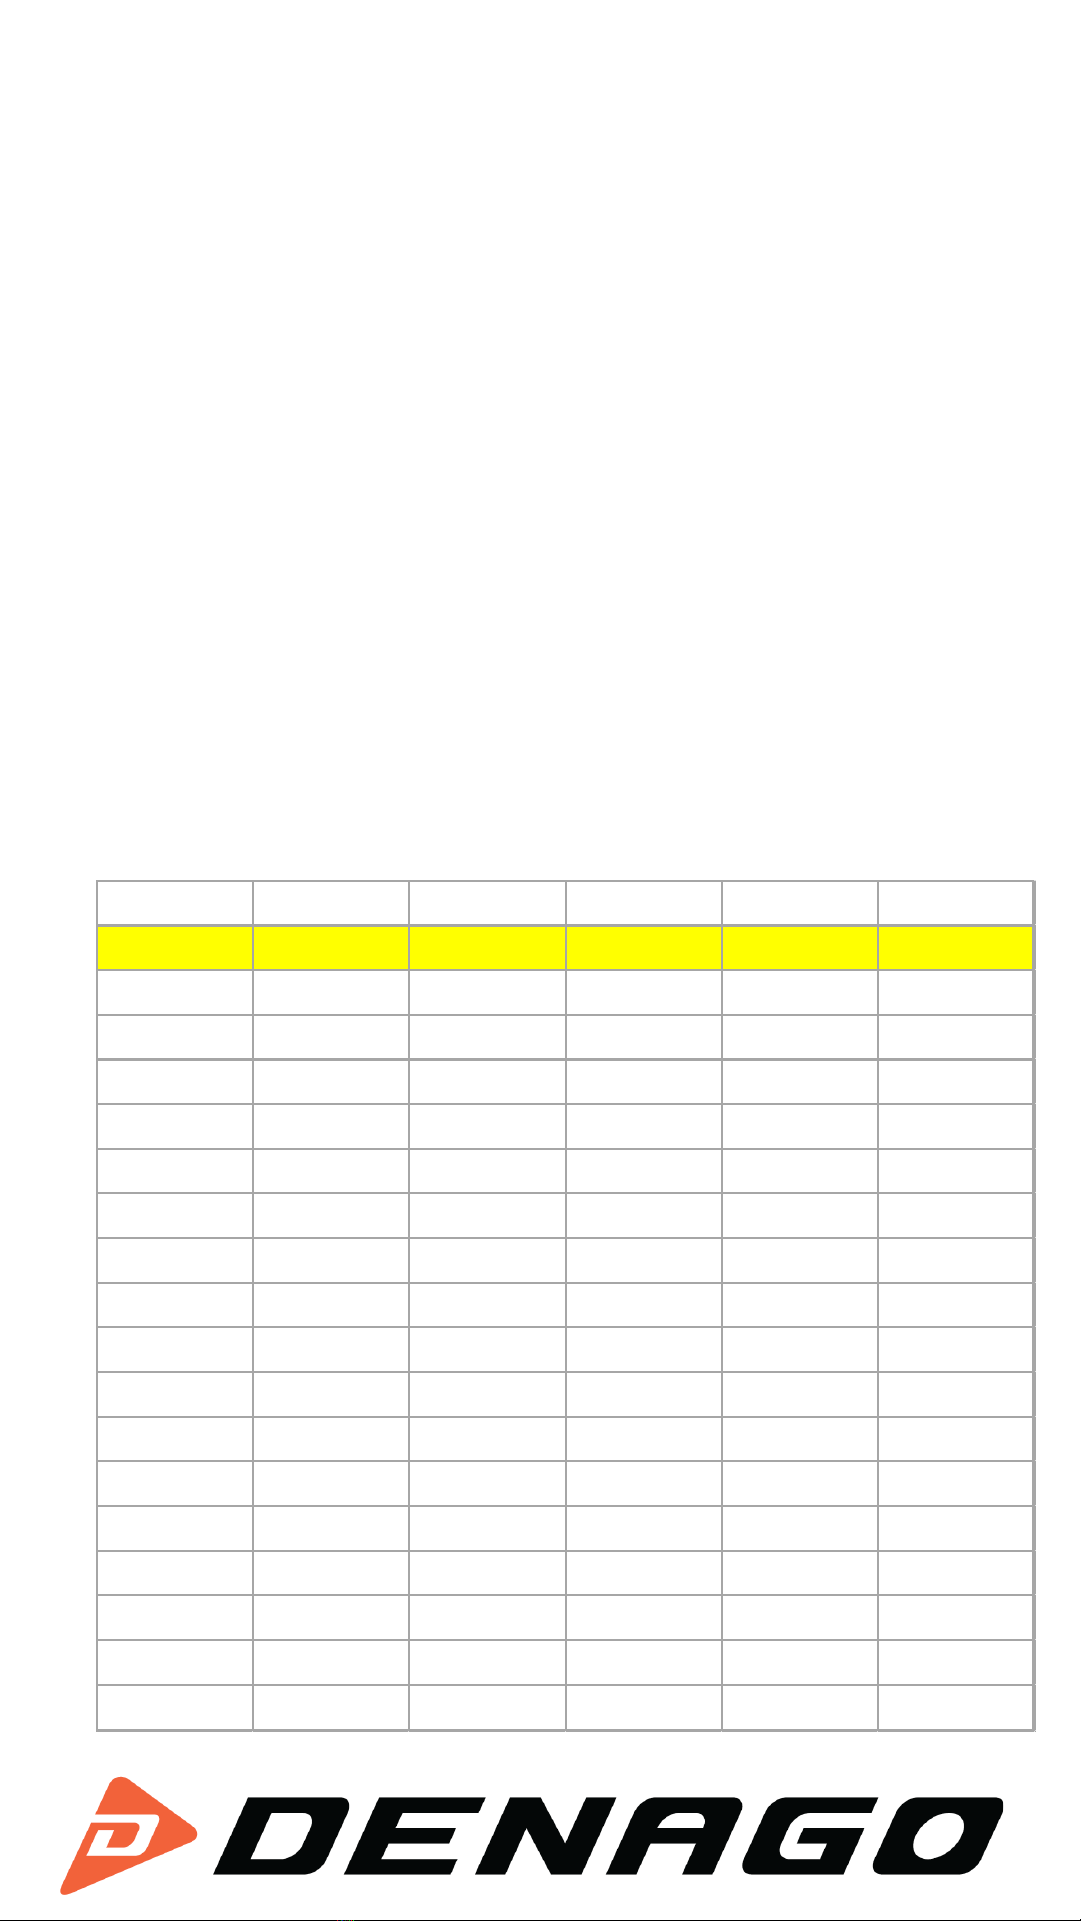
PAS and SPEED Chart
Pedal Assist Speed Adjustments
MPH PAS1 PAS2 PAS3 PAS4 PAS5
28 16.8 19.6 22.4 25.2 28
27 16.2 18.9 21.6 24.3 27
26 15.6 18.2 20.8 23.4 26
25 15 17.5 20 22.5 25
24 14.4 16.8 19.2 21.6 24
23 13.8 16.1 18.4 20.7 23
22 13.2 15.4 17.6 19.8 22
21 12.6 14.7 16.8 18.9 21
20 12 14 16 18 20
19 11.4 13.3 15.2 17.1 19
18 10.8 12.6 14.4 16.2 18
17 10.2 11.9 13.6 15.3 17
16 9.6 11.2 12.8 14.4 16
15 9.1 10.5 12 13.5 15
14 8.4 9.8 11.2 12.6 14
13 7.8 9.1 10.4 11.7 13
12 7.2 8.4 9.6 10.8 12
11 6.6 7.7 8.8 9.9 11
Table of contents
Other DENAGO Scooter manuals


