DesignNest PowerCooker Multi-Use User manual
DesignNest BVKeulschevaart 19 321MX BreukelenThe Netherlands[email protected]Made in Chinawww.DesignNest.com
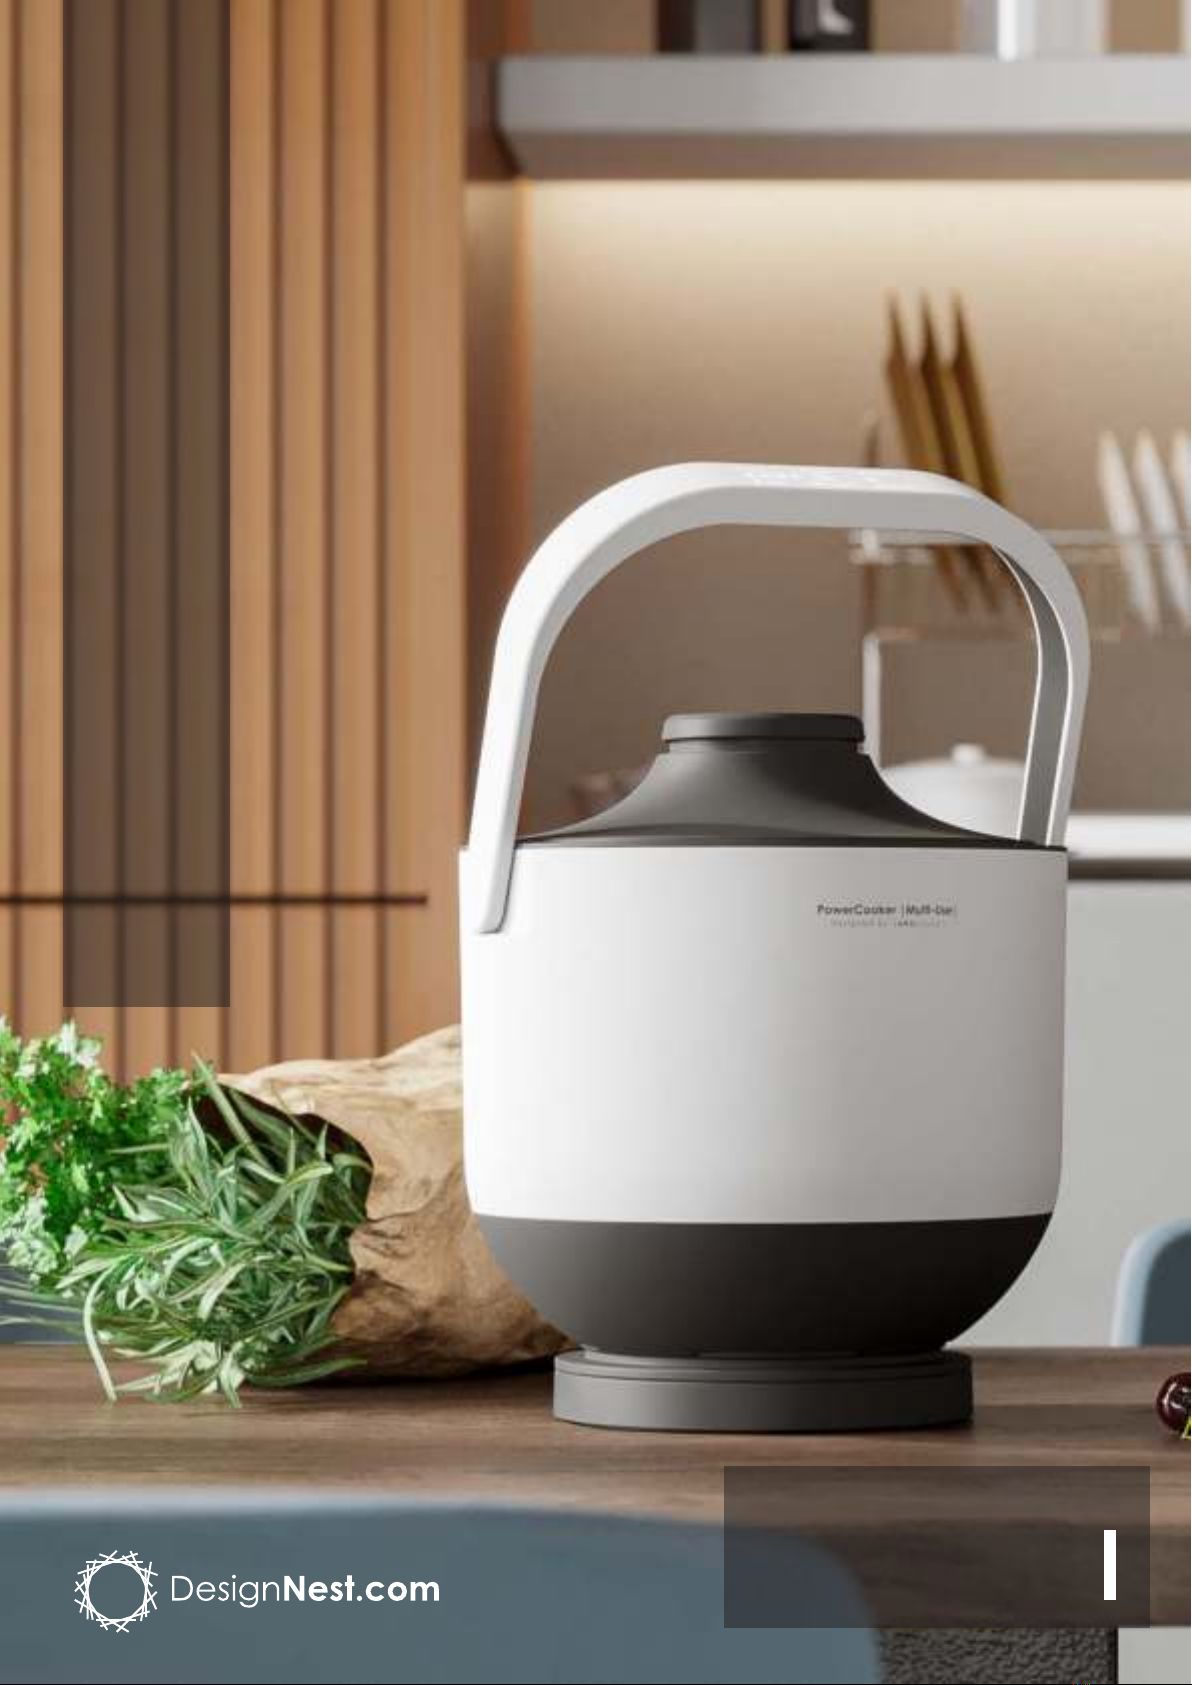
MN03024PowerCooker |Multi-Use|INSTRUCTION MANUAL

PowerCooker | Multi-Use |TABLE OF CONTENTSINSTRUCTION MANUALIMPORTANT SAFEGUARDSPRODUCT DESCRIPTIONINSTRUCTIONS FOR USECOOKING MODE GUIDELINESHOW DO DIFFERENT MODES WORK?HOW TO CLEAN THE LID AND UNCLOG THE STEAM VENTTROUBLESHOOT1.2.3.4.5.6.7.2 / 153445566RECIPESBOILED RICEVEGETABLE SOUPBEEF SHANK & MEATBALL SOUPBOUILLABAISSE (FRENCH FISH STEW)SLOW COOKED LAMB SHANK IN WINECHICKEN RISOTTOCHESTNUT CHICKEN STEWCARROT BANANA CAKE WITH LEMON ICING1.2.3.4.5.6.7.8.89101112131415

PowerCooker | Multi-Use |IMPORTANT SAFEGUARDSREAD ALL INSTRUCTIONS IN ADVANCEDo NOT touch hot surfaces. Only use the handle to carry or to move the PowerCooker.Do NOT place the appliance on or in proximity to a hot gas or electric burner or heated oven; heat from an external source will damage the appliance.Do NOT place the PowerCooker in a heated oven.Do NOT immerse the power cord, plugs or appliance in any liquid to prevent an electric shock.Do NOT place the PowerCooker on an unstable surface.Do NOT use the appliance for anything else other than its intended use.Do NOT ll the PowerCooker more than 2/3rd of its total volume.When cooking food that expands during the cooking process (such as rice, dried vegetables, etc.), do NOT ll the PowerCooker more than half of its total volume. Overlling may cause a risk of clogging the steam vent and will develop excess pressure.Do NOT cover or obstruct the steam vent with any cloth or other objects. Obstructing the steam vent affects the safety and may cause injury.Be aware that certain foods, such as applesauce, cranberries, pearl barley, oatmeal or other cereals, split peas, noodles, macaroni, rhubarb, and spaghetti, can foam, froth, sputter, and clog the pressure release device (steam vent). Recipes usingthese items must be followed carefully to avoid problems.To reduce the risk of injury, do NOT use a non-dedicated inner pot or a deformed inner pot.Do NOT use any attachments or utensils that were not recommended or supplied by the manufacturer. The use of attachments not recommended for use by the manufacturer may cause serious hazardous situations including personal injury.Do NOT let the power cord touch hot surfaces and do not let it hang over the edge of a table/counter to prevent knocking over the PowerCooker.When in operation the Power Cooker requires sufcient air space on all sides including top and bottom. Never operate the unit near any ammable materials such as dish towels, paper towels, curtains, paper plates, etc.Do NOT operate any appliance with a damaged cord or plug or after the appliance malfunctions or has been damaged in anymanner. Return appliance to the nearest authorized service facility for examination, repair, or adjustment.Do NOT move or shake the PowerCooker while in use.When not in use, remember to turn off the power and unplug the power cord.Unplug the PowerCooker when not in use or before cleaning. Allow PowerCooker to cool down before adding or removing parts and prior to cleaning or storing it.Do NOT use hard objects such as a steel sponge to clean the inner pot. Please use a soft cloth for cleaning.The normal working range of the product is between 0-2000 meters in altitude.Before each use, check if the steam vent is unclogged and if the air outlet is aligned.Close supervision is necessary when PowerCooker is used near children.During use, please align the arrow above the air vent of the lid with the arrow on the pot to avoid blowing air/steam to the handle from the sides of the lid.Always attach plug to appliance rst, then plug cord into the wall outlet. To disconnect, set any control to ”Off”, then remove plug from wall outlet.If this unit falls or accidentally becomes immersed in water, unplug it from the wall outlet immediately. Do NOT reach into the water!When the product is abnormal or malfunctions, stop using it immediately and unplug the power cord. Do NOT use or attempt to repair a malfunctioning appliance!It is necessary to wait until the PowerCooker has cooled down before trying to removing the inner pot.Do NOT use PowerCooker for deep-frying or pressure frying with oil.Do NOT tamper with any safety mechanisms.The Power Cooker generates extreme heat and steam in its operation. All necessary precautions must be taken to avoid re,burns and other personal injury during its operation.CAUTION: Extreme care must be taken when moving the PowerCooker containing hot liquid, the liquid might overow and cause burns.Anyone who has not fully read and understood all operating and safety instructions contained in this manual is not qualied to operate or clean this appliance.If the electrical circuit is overloaded with other appliances, your appliance may not operate properly. It should be operated on a dedicated electrical circuit.BEFORE FIRST USEFor best results, clean the lid, the silicon inner cover and the inner pot before rst use(SEE WEIGHTED LID AND REMOVABLE INNER COVER WITH SILICON SEAL). You can also clean the pot by using the ‘RICE’ mode and boiling water in the PowerCooker 2 to 3 times which can effectively clean the inner pot and reduce the odor.3 / 151.2.3.4.5.6.7.8.9.10.11.12.13.14.15.16.17.18.19.20.21.22.23.24.25.26.27.28.29.30.31.

PowerCooker | Multi-Use |PRODUCT DESCRIPTIONINSTRUCTIONS FOR USEPower On, Operate and ShutdownPlug in the cable and place the PowerCooker on its base. The glowing power button will indicate that the PowerCooker is in standby mode.Press and hold the power button to switch ON the PowerCooker. You will see all indications light up on the display panel(handle).Different cooking modesWhen all of the indicators light up on the display, you are able to select one of the 6 different cooking modes by pressing the power button to navigate through them. The 6 different cooking modes are as follows:• Rice • Soup • Steam• Cake • Yogurt • 3 hours (keep warm)Delay Timer (Optional)You can postpone the cooking process by pressing the clock symbol immediately after switching ON the PowerCooker.Each press on the clock symbol equals +5 minutes on the timer, maximum upto 24 hours on the timer. Pressing the power button lets you navigate through the cooking modes.Optionally you can change the cooking time for the selected mode by pressing the clock symbol again.After you have selected the preferred cooking mode and optionally changed the cooking time, wait for 5 seconds and the PowerCooker will start automatically.NOTE: The PowerCooker will store the manual cooking time you set for next use.Standby, shutdown (and unplug)When you nish cooking, remove the PowerCooker from its base.When the PowerCooker is on its base, it will be on stand-by. NOTE: Stand-by doesn’t keep the PowerCooker warm.Turn off the PowerCooker completely by unplugging the power cord.The PowerCooker has a memory mode. For example, The Soup mode has a default time setting of 70 minutes. If you added +20 minutes on the cooking mode by pressing the clock symbol, the next time you choose the Soup mode, the PowerCooker will remember your default time setting on Soup mode to be 90 minutes.Air outletLid position indicatorRemovable inner silicone coverWater indicatorInner potOuter potBuilt-in temperature sensorHeating baseAir outletHandle with integrated touch control1.2.•••••••TIP:4 / 15

5 / 15PowerCooker | Multi-Use |COOKING MODE GUIDELINES1. RiceSelect the ‘RICE’ mode for cooking rice. The cooking time is automatically adjusted according to the amount of rice in the PowerCooker (more the rice, longer the cooking process) and the last 10 minutes of remaining cooking time will count down on the display.2. Soup porridgeSelect the ‘SOUP’ mode for cooking soups, stews or porridge. The default cooking time is set to 70 minutes. You can change the cooking time by pressing the clock symbol button to adjust the time.3. SteamSelect the ‘STEAM’ mode for cooking vegetables, meats or other large meals. The default cooking time is set to 2 hours and 20 minutes. You can change the cooking time by pressing the clock symbol to adjust the time.4. CakeSelect the ‘CAKE’ mode to bake a cake or any baking item. The default cooking time is set to 70minutes. You can change the cooking time by pressing the clock symbol button to adjust the time.5. YogurtSelect the ‘YOGURT’ mode to make your own yogurt. Add milk and yogurt starter to the PowerCooker and let the PowerCooker prepare fresh yogurt for you. The default cooking time is set to 10 hours and 50 minutes. You can change the cooking time by pressing the clock symbol button to adjust the time.6. 3 hours (keep warm)Select the ‘3 HOURS’ mode to keep the contents(food) in the PowerCooker warm. The default cooking time is set to 3 hours. You can change the cooking time by pressing the clock symbol button to adjust the time.HOW DO THE DIFFERENT MODES WORK?Rice5 seconds after selecting the ‘RICE’ mode, the PowerCooker switches to full power at 400W heating the pot to 65-70°C and stops heating during which the rice absorbs the water. The PowerCooker then starts heating again to 95-105°C and stops heating again. After this stage, the remaining water is evaporated inside the PowerCooker by keeping the temperature inside the pot at 100°C with an average power of 200W. When water has been completely dried out, the PowerCooker stops heating and enters the 10 minute countdown stage. At the end of the 10 minutes, your rice is ready to be served.Soup5 seconds after selecting the ‘SOUP’ mode, the PowerCooker switches to full power at 400W heating the pot gradually to 92-100°C and continues to keep the temperature inside the pot at 100°C until preset timer.Steam5 seconds after selecting the ‘STEAM’ mode, the PowerCooker switches to full power at 400W heating the pot to 100°C and continues to keep the temperature inside the pot at 100°C until preset timer.Cake5 seconds after selecting the ‘CAKE’ mode, the PowerCooker switches to full power at 400W heating the pot in equal intervals at 120°C. On entering the 10 minute countdown towards the end, the pot is heated at 125°C and continues to stay at 125°C until the end of 10 minutes.Yogurt5 seconds after selecting the ‘YOGURT’ mode, the PowerCooker switches to full power at 400W heating the pot to 35°C and continues to keep the temperature inside the pot at 35°C until preset timer.3 Hours (keep warm)5 seconds after selecting the ‘3 HOURS’ mode, the PowerCooker maintains the temperature inside the pot at 65-70°C until preset timer.1.2.3.4.5.6.

PowerCooker | Multi-Use |HOW TO CLEAN THE LID AND UNCLOG THE STEAM VENTInner lid removal Hold the outer lid with one hand and with the other hand pull the inner cover in the opposite direction by its silicon handle to remove the inner cover.Now every part of the lid can be washed and cleaned separately.Inner lid reassemblyPlace the inner cover back in the outer lid by matching the arrow above the air vent with the small arrow on the edge of the outer lid.Press the silicon inner cover rmly back into the lid to lock it in place.WARNINGIt is important to align the air outlet with the air vent properly to prevent any over-pressurization and damage to the PowerCooker.Weighted lid and removableinner cover with silicon sealTROUBLESHOOTHave an odor during cookingPossible reason could be that the inner lid assembly leaves the food or stagnant water from the previous meal cooked.Possible reason could be that the inner cover seal has an odor. Clean thoroughly before use.To prevent a strong odor while cooking, clean the lid, the silicon inner cover and the inner pot before rst use.You can also clean the pot by using the ‘RICE’ mode and boiling water in the PowerCooker 2 to 3 times which can effectively clean the inner pot and reduce the odor. Best to be done before rst use.Insulation hardening or odorPossible reason could be that:The PowerCooker has been kept warm or has been heating for more than 12 hours.There is foreign object/food residue around the inner part of the inner pot or/and on the sensor.Cooking rice/porridge overowPossible reason could be that:The ratio of the water to rice is not accurate (the water added is excessive).There is foreign object/food residue around the top or bottom surface or/and around the inner part of the inner pot or/and on the sensor.1.2.1.2.1.2.3.4.1.2.1.2.6 / 15

DesignNest BVKeulschevaart 19 321MX BreukelenThe Netherlands[email protected]Made in Chinawww.DesignNest.com
MN03024
PowerCooker |Multi-Use|RECIPE BOOK | EDITION 1

PowerCooker | Multi-Use |METHODRemove the bowl from the PowerCooker and pour 1 cup of rice into the bowl.Wash the rice gently and drain the water repeatedly until the water runs clear when you wash it. This could take around 4 to 5 times or more.Dry the outsides of the bowl and place it back into the PowerCooker. Pour in approximately 2 cups of water making sure all the grains are off the sides of the bowl and in the water. *For perfect ratio of rice to water, dip the tip of your nger straight down into the pot until your ngertip just touches the rice, and water until it reaches the rst joint(knuckle) of your nger.Close the lid and press and hold the POWER button to switch on the PowerCooker. Tap on the POWER button again to navigate to RICE mode, wait until the panel stops blinking and the RICE mode is activated. The PowerCooker will automatically adjust the timer according to the amount of rice in it (more the rice, longer the cooking process) and the last 10 minutes of remaining cooking time will count down on the display. You can also open the lid while the rice is being cooked to check on the status of your rice.Open the lid of the PowerCooker and uff up the rice, even at the bottom of the bowl, before serving. Your rice is now ready to be served.NOTEIt is important to align the air outlet with the air vent properly to prevent any over-pressurization and damage to the PowerCooker.After the rice is ready hold the POWER button to switch on standby mode OR you could switch to 3HOUR mode which keeps the rice warm at 65-70°C until preset timer.Unplug the PowerCooker from its power source and use the handle of the PowerCooker to carry it to the dining table. DO NOT try to pull out the HOT bowl soon after the rice is cooked.Brown rice needs more water to cook in than white rice, so adjust the proportion of water accordingly (usually 2 cups of water for every cup of rice).1.2.3.4.5.1.2.3.4.8 / 15BOILED RICECOOKING TIME20-30 minutesINGREDIENTSLong-grain white riceWaterSaltPREPARATION TIME5 minutesQUANTITY1 cup (200gms approx.)approximately 2 cups (400ml approx.)*as per tasteSERVING2-3 portions

PowerCooker | Multi-Use |METHODAdd the chopped potatoes, onions, carrots, tofu, chilli pepper and zucchini to the PowerCooker.Pour 1.5 litres of water into the PowerCooker, along with 2 table spoons of soybean paste, 1 table spoon of pepper paste, minced garlic and lightly stir.Close the lid and press and hold the POWER button to switch on the PowerCooker, tap on the POWER button again to navigate and select SOUP mode. Press the CLOCK symbol to adjust the timer to 3:00 (3 hours/180 minutes) if 3 hours is not set by default. Each tap on the CLOCK symbol adds +5 minutes to the timer. Wait until the panel stops blinking and the SOUP mode is activated.Open the lid of the PowerCooker to timely check on your soup in intervals, give it a stir, put the lid back on and let it cook until the set timer.Your soup is ready to be served. After your soup is ready hold the POWER button to switch on standby mode OR you could switch to 3HOUR mode which keeps the soup warm at 65-70°C until preset timer.NOTEIt is important to align the air outlet with the air vent properly to prevent any over-pressurization and damage to the PowerCooker.Unplug the PowerCooker from its power source and use the handle of the PowerCooker to carry it to the dining table. DO NOT try to pull out the HOT bowl soon after the food is cooked.1.2.3.4.5.1.2.9 / 15COOKING TIME180 minutesINGREDIENTSPotatoesWhite OnionsZucchiniCarrotsChilli Pepper (green or red)TofuGarlicSoybean pastePepper pasteWaterPREPARATION TIME10 minutesQUANTITY3 medium size, peeled and medium diced1 medium size, chopped1/4 medium size, chopped1 1/2 medium size, peeled and chopped1 medium size, chopped150gms, cut into chunks1 clove, minced2 tbsp1 tbsp1.5 litresVEGETABLE SOUPSERVING3-4 portions

PowerCooker | Multi-Use |METHODAdd the beef shank, beef meatballs, chopped mushrooms, carrots, potatoes, white onions, ginger, white radish and spring onion to the PowerCooker.Pour 1 litre of boiling water into the PowerCooker, along with salt and black pepper and lightly stir.Close the lid and press and hold the POWER button to switch on the PowerCooker, tap on the POWER button again to navigate and select SOUP mode. Press the CLOCK symbol to adjust the timer to 1:45 (1 hour and 45 minutes). Each tap on the CLOCK symbol adds +5 minutes to the timer. Wait until the panel stops blinking and the SOUP mode is activated.Open the lid of the PowerCooker to timely check on your soup in intervals, give it a stir and put the lid back on.Once the timer is set to 00:00, add the spinach, stir the soup and let it settle for a few minutes. Your soup is ready to be served. You can now hold the POWER button to switch on standby mode OR you could switch to 3HOUR mode which keeps the soup warm at 65-70°C until preset timer.NOTEIt is important to align the air outlet with the air vent properly to prevent any over-pressurization and damage to the PowerCooker.Unplug the PowerCooker from its power source and use the handle of the PowerCooker to carry it to the dining table. DO NOT try to pull out the HOT bowl soon after the food is cooked.1.2.3.4.5.1.2.10 / 15COOKING TIME105 minutesINGREDIENTSBeef ShankBeef MeatballsMushroomsCarrotsPotatoesWhite OnionsGingerWhite RadishSpring OnionSpinachWaterBlack PepperSaltPREPARATION TIME15 minutesQUANTITY300gms100gms, small size100gms, chopped2 medium size, peeled and chopped1 medium, chopped1/2 medium size, chopped2 tbsp, grated or minced50gms, chopped1 medium size, chopped50gms, chopped1 litre, boilingas per taste, crushed or powderedas per tasteBEEF SHANK & MEATBALL SOUPSERVING3-4 portionsNeed video instructions? Watch the recipe video here:https://bit.ly/396qhaC

PowerCooker | Multi-Use |METHODAdd 50gms of butter to the PowerCooker and press and hold the POWER button to switch on the PowerCooker, tap on the POWER button again to navigate to RICE mode and wait until the panel stops blinking and the RICE mode is activated. The PowerCooker will start heating and melting the butter.Once the butter has melted, add the scallops, codsh, prawns and a pinch of salt as per taste to the PowerCooker. Close the lid and let the ingredients cook for 3-4 minutes.Open the lid and stir the seared ingredients. Pour the lobster soup(bisque) into the PowerCooker along with mussels, craysh, clams, shallot and garlic. Stir carefully.Close the lid and let the ingredients cook for 10 minutes.Open the lid and add sour cream, parsley, pepper and salt as per taste, stir the soup and let it settle for a few minutes. Your soup is ready to be served. You can now hold the POWER button to switch on standby mode OR you could switch to 3HOUR mode which keeps the soup warm at 65-70°C until preset timer.NOTEIt is important to align the air outlet with the air vent properly to prevent any over-pressurization and damage to the PowerCooker.Unplug the PowerCooker from its power source and use the handle of the PowerCooker to carry it to the dining table. DO NOT try to pull out the HOT bowl soon after the food is cooked.RICE mode cooks on the highest heat intensity and maintains the high heat at all time after activation, hence this recipe uses the RICE mode function. The timer may display 00:00 but the PowerCooker is still heating. You may have to check on the time manually while following this recipe. You may choose to use SOUP mode for this recipe too, but the cooking time will be considerably longer as the SOUP mode cooks on a lower heat intensity.1.2.3.4.5.1.2.3.11 / 15COOKING TIME25 minutesINGREDIENTSLobster Soup(Bisque)ClamsScallopsPrawnsCodshMusselsCrayshShallotSour CreamButterParsleyGarlicBlack PepperSaltPREPARATION TIME20 minutesQUANTITY500ml200gms, medium size4 medium size3 large size, peeled if preferred90gms, skinned and cut into chunks6 medium size, unshelled 70gms, unshelled and cut into chunks1 medium size, chopped50gms50gms, choppedfor garnish, chopped3 cloves, mincedas per taste, crushed or powderedas per tasteBOUILLABAISSE (FRENCH FISH STEW)SERVING3-4 portionsNeed video instructions? Watch the recipe video here:https://bit.ly/3qN8xHA

PowerCooker | Multi-Use |METHODBring the lamb shanks to room temperature in case cold or frozen. Season the lamb shanks with salt and pepper and let it rest for about 30 minutes.Add 50gms of butter to the PowerCooker and press and hold the POWER button to switch on the PowerCooker, tap on the POWER button again to navigate to RICE mode and wait until the panel stops blinking and the RICE mode is activated. The PowerCooker will start heating and melting the butter.Once the butter has melted, add the crushed cloves of garlic to the PowerCooker and stir the garlic in butter until the fragrance of raw garlic has faded.Add the pieces of seasoned lamb shanks along with the herbs, onions, carrots and leek. Pour the 3-4 tbsp of olive oil and 250ml of white wine into the PowerCooker with a pinch of salt and pepper as per taste.Close the lid and tap on the POWER button again to navigate and select SOUP mode. Press the CLOCK symbol to adjust the timer to 3:00 (3 hours or 180 minutes) if 3 hours is not set by default. Each tap on the CLOCK symbol adds +5 minutes to the timer. Wait until the panel stops blinking and the SOUP mode is activated.Open the lid of the PowerCooker to timely check on your lamb in intervals, give the ingredients a stir and put the lid back on.Your soup is ready to be served. You can now hold the POWER button to switch on standby mode OR you could switch to 3HOUR mode which keeps the soup warm at 65-70°C until preset timer.NOTEIt is important to align the air outlet with the air vent properly to prevent any over-pressurization and damage to the PowerCooker.Unplug the PowerCooker from its power source and use the handle of the PowerCooker to carry it to the dining table. DO NOT try to pull out the HOT bowl soon after the food is cooked.The SOUP mode cooks on a lower heat intensity making it a perfect option to slow cook red meat. This recipe chooses 3:00 as a default timer for lamb shanks but the cooking time may differ based on the toughness of your lamb shanks. It is advised to timely check on the lamb shanks while following this recipe to prevent undercooked meat while serving.1.2.3.4.5.6.7.1.2.3.12 / 15COOKING TIME185 minutesINGREDIENTSLamb ShanksYellow OnionsCarrotsLeekWhite WineButterThymeSage LeavesRosemaryExtra Virgin Olive OilGarlicBlack PepperSaltPREPARATION TIME30 minutesQUANTITY600gms, 2 pieces1 medium size, sliced2 medium size, sliced1/2 medium size, sliced250ml, glass full50gms 4 twigs (optional)10 fresh leaves (optional)2 twigs3-4 tbsp8 cloves, crushed and cut into halvesas per taste, crushed or powderedas per tasteSLOW COOKED LAMB SHANK IN WINESERVING3-4 portionsNeed video instructions? Watch the recipe video here:https://bit.ly/39c0j5Q

PowerCooker | Multi-Use |METHODBring the chicken pieces to room temperature in case cold or frozen. Season the chicken with 3tbsp oil and spice mix and let it rest for about 10 minutes.Pour 2 tbsp of oil into the PowerCooker and press and hold the POWER button to switch on the PowerCooker, tap on the POWER button again to navigate to RICE mode and wait until the panel stops blinking and the RICE mode is activated. The PowerCooker will start heating.Add the seasoned chicken pieces to the PowerCooker and stir the chicken pieces with the oil. Close the lid of the PowerCooker and let the chicken cook for about 10-15 minutes.Open the lid and add the zucchini, mushrooms, herbs mix and risotto rice. Stir the ingredients well and pour the 500ml of boiling water into the PowerCooker.Close the lid and let the mixture cook for about 15-20 minutes until most of the water is absorbed into the rice.Open the lid of the PowerCooker to timely check on your risotto in intervals, give the ingredients a stir and put the lid back on.Your risotto is ready to be served. You can now hold the POWER button to switch on standby mode OR you could switch to 3HOUR mode which keeps the soup warm at 65-70°C until preset timer.NOTEIt is important to align the air outlet with the air vent properly to prevent any over-pressurization and damage to the PowerCooker.Unplug the PowerCooker from its power source and use the handle of the PowerCooker to carry it to the dining table. DO NOT try to pull out the HOT bowl soon after the food is cooked.1.2.3.4.5.6.7.1.2.13 / 15COOKING TIME30 minutesINGREDIENTSBoneless ChickenRisotto RiceMushroomZucchiniCooking OilBoiling WaterRisotto Herbs MixChicken Seasoning Spice MixPREPARATION TIME15 minutesQUANTITY350gms, cut into chunks200gms250gms, sliced1 medium size, diced5 tbsp500ml as per taste/instructions on packas per taste/instrucions on packCHICKEN RISOTTOSERVING3-4 portionsNeed video instructions? Watch the recipe video here:https://bit.ly/39UjLmM

PowerCooker | Multi-Use |METHODBring the chicken pieces to room temperature in case cold or frozen. Add the chicken pieces to the PowerCooker along with soy sauce, oyster sauce, sugar, ginger, scallions, boiling water and cooking wine.Close the lid and press and hold the POWER button to switch on the PowerCooker, tap on the POWER button again to navigate to RICE mode and wait until the panel stops blinking and the RICE mode is activated. The PowerCooker will start heating. Let all the ingredients in the PowerCooker heat for about an hour (60 minutes).Open the lid of the PowerCooker to timely check on your stew in intervals, give the ingredients a stir and put the lid back on.Open the lid and add the chestnuts. Stir the ingredients well, close the lid and let the stew cook for another 30 minutes.Open the lid of the PowerCooker to timely check on your stew in intervals, give the ingredients a stir and put the lid back on.Your stew is ready to be served. You can now hold the POWER button to switch on standby mode OR you could switch to 3HOUR mode which keeps the soup warm at 65-70°C until preset timer.NOTEIt is important to align the air outlet with the air vent properly to prevent any over-pressurization and damage to the PowerCooker.Unplug the PowerCooker from its power source and use the handle of the PowerCooker to carry it to the dining table. DO NOT try to pull out the HOT bowl soon after the food is cooked.1.2.3.4.5.6.1.2.14 / 15COOKING TIME90 minutesINGREDIENTSWhole ChickenChestnutsGingerScallionsSugarSoy SauceCooking WineOyster SauceBoiling WaterPREPARATION TIME5-10 minutesQUANTITY1000gms, cut into pieces20, removed from their shell5gms, sliced5gms10gms4 tbsp 2 tbsp1 tbsp200mlCHESTNUT CHICKEN STEWSERVING3-4 portionsNeed video instructions? Watch the recipe video here:https://bit.ly/2M2zZSD

PowerCooker | Multi-Use |METHODPeel and mash the bananas in a large bowl. Add eggs, grated carrot, sunower oil, sugar, cinnamon powder, ginger powder, cardamom powder(optional) and salt to the large bowl and mix until well blended.Sift the our into the mixture along with baking soda and mix well until the our has blended well with the mixture.Open the lid of the PowerCooker, remove the pot and sprinkle our around the surface of the pot, bottom and sides.Transfer the cake mixture from the large bowl to the pot and place the pot back into the PowerCooker. Close the lid and tap on the POWER button again to navigate and select BAKE mode. Press the CLOCK symbol to adjust the timer to 1:00 (1 hour or 60 minutes) if 1 hour is not set by default. Each tap on the CLOCK symbol adds +5 minutes to the timer. Wait until the panel stops blinking and the BAKE mode is activated.For icing, pour cream cheese into a bowl, adding icing sugar and lemon zest and mix well until smooth. Place this icing mixture in the fridge for at least an hour.In order to double check if the cake is ready you can open the lid of the PowerCooker, prick a toothpick into the middle of the cake. If the toothpick comes out dry, your cake is ready.CAREFULLY take the pot(EXTREMELY HOT) out of PowerCooker WITH THE HELP OF MITTENS, turn it upside down onto a plate to get the cake out. Let the cake rest for a while and slice it in half horizontally (between bottom to top). Bring out the icing from the fridge and spread it onto the bottom half, place the other half on top and add the rest of the icing to the cake.NOTEIt is important to align the air outlet with the air vent properly to prevent any over-pressurization and damage to the PowerCooker.Unplug the PowerCooker from its power source and use the handle of the PowerCooker to carry it to the dining table. DO NOT try to pull out the HOT bowl soon after the food is cooked.1.2.3.4.5.6.7.8.1.2.15 / 15COOKING TIME60 minutesINGREDIENTSBananasEggsCarrotsSunower OilSugarCinnamon PowderGinger PowderSaltAll-Purpose FlourBaking SodaCardamom PowderCream CheeseIcing SugarLemon ZestPREPARATION TIME15 minutesQUANTITY1 1/2 medium size2 medium size150gms, grated 75ml100gms1 tsp 1 tsp1/2 tsp125gms1 1/2 tsp1 tsp (optional)200gms100gms1 tspCARROT BANANA CAKE WITH LEMON ICINGSERVING3-4 portionsNeed video instructions? Watch the recipe video here:https://bit.ly/3sWD8nA
Table of contents


