Detlone HA-04A-S User manual
Roaster
Instruction Manual
Model: HA-04A-S

IMPORTANT SAFEGUARD
Read all instructions before using
When using an electrical appliance, basic safety precautions should always be followed,
including the following:
1. Read all instructions before using appliance.
2. Do not touch hot surface
3. Before use, check your local voltage corresponds with the specifications showing on the
appliance name plate located under the appliance.
4. To protect against electric shock, do not immerse cord, or this appliance in water or other
liquid.
5. Close supervision is necessary when any appliance is used by children or near children.
6. When not in use, always keep the unit is “OFF” and unplug from the mains power supply
7. The unit should be operated on separate electrical circuit from other operating appliance. If the
electric circuit is overloaded with other appliances, this appliance may not work properly.
8. Must use extreme caution when moving a cooking pot containing hot food.
9. Do not let the cord hang over the edge of the table, counter, or touch any hot surface.
10. Place the appliance securely in the center of the counter or work space.
11. Do not touch hot surface. Use handles to lift or move.
12. Do not allow children to sue this appliance.
13. Close adult supervision must be provided when this appliance is used near children.
14. The use of accessory attachments not recommended by the appliance manufacturer may
cause injuries.
15. Do not operate on a non-heat resistant glass, wood cooking surface, or a table cloth. It is
imperative that a heat resistant cooking surface with heat finish be placed beneath this unit.
16. Do not operate this or any appliance with a damaged cord or plug or after the appliance
malfunctions, or has been damaged in any may.
17. When not in use, and before cleaning, unplug the appliance from the mains power supply.
Before putting on or taking off parts, allow the unit to cool first.
18. Do not use outdoors.
19. Do not place near hot gas or electric burner, or in a heated oven.
20. To reduce the risk of potential shock, if the plug does not fit, contact a qualified electrician for
assistance. Do not attempt to defeat or modify the plug in any way.
21. Do not clean the unit with metal scouring pads. Pieces can break off the pad and short-circuit
electrical parts, creating a possibility of an electrical shock and damaging the unit.
22. To protect against electrical shock, do not immerse plug, power cable or the base of the
air-fryer in water or any other liquid.
23. ATTENTION: To protect against electric shock, cook only in the non-stick cooking pot
included.
24. The air-fryer is for indoor, household use only.
25. Do not use the appliance for anything other than its intended purpose.
26. Save these instructions.
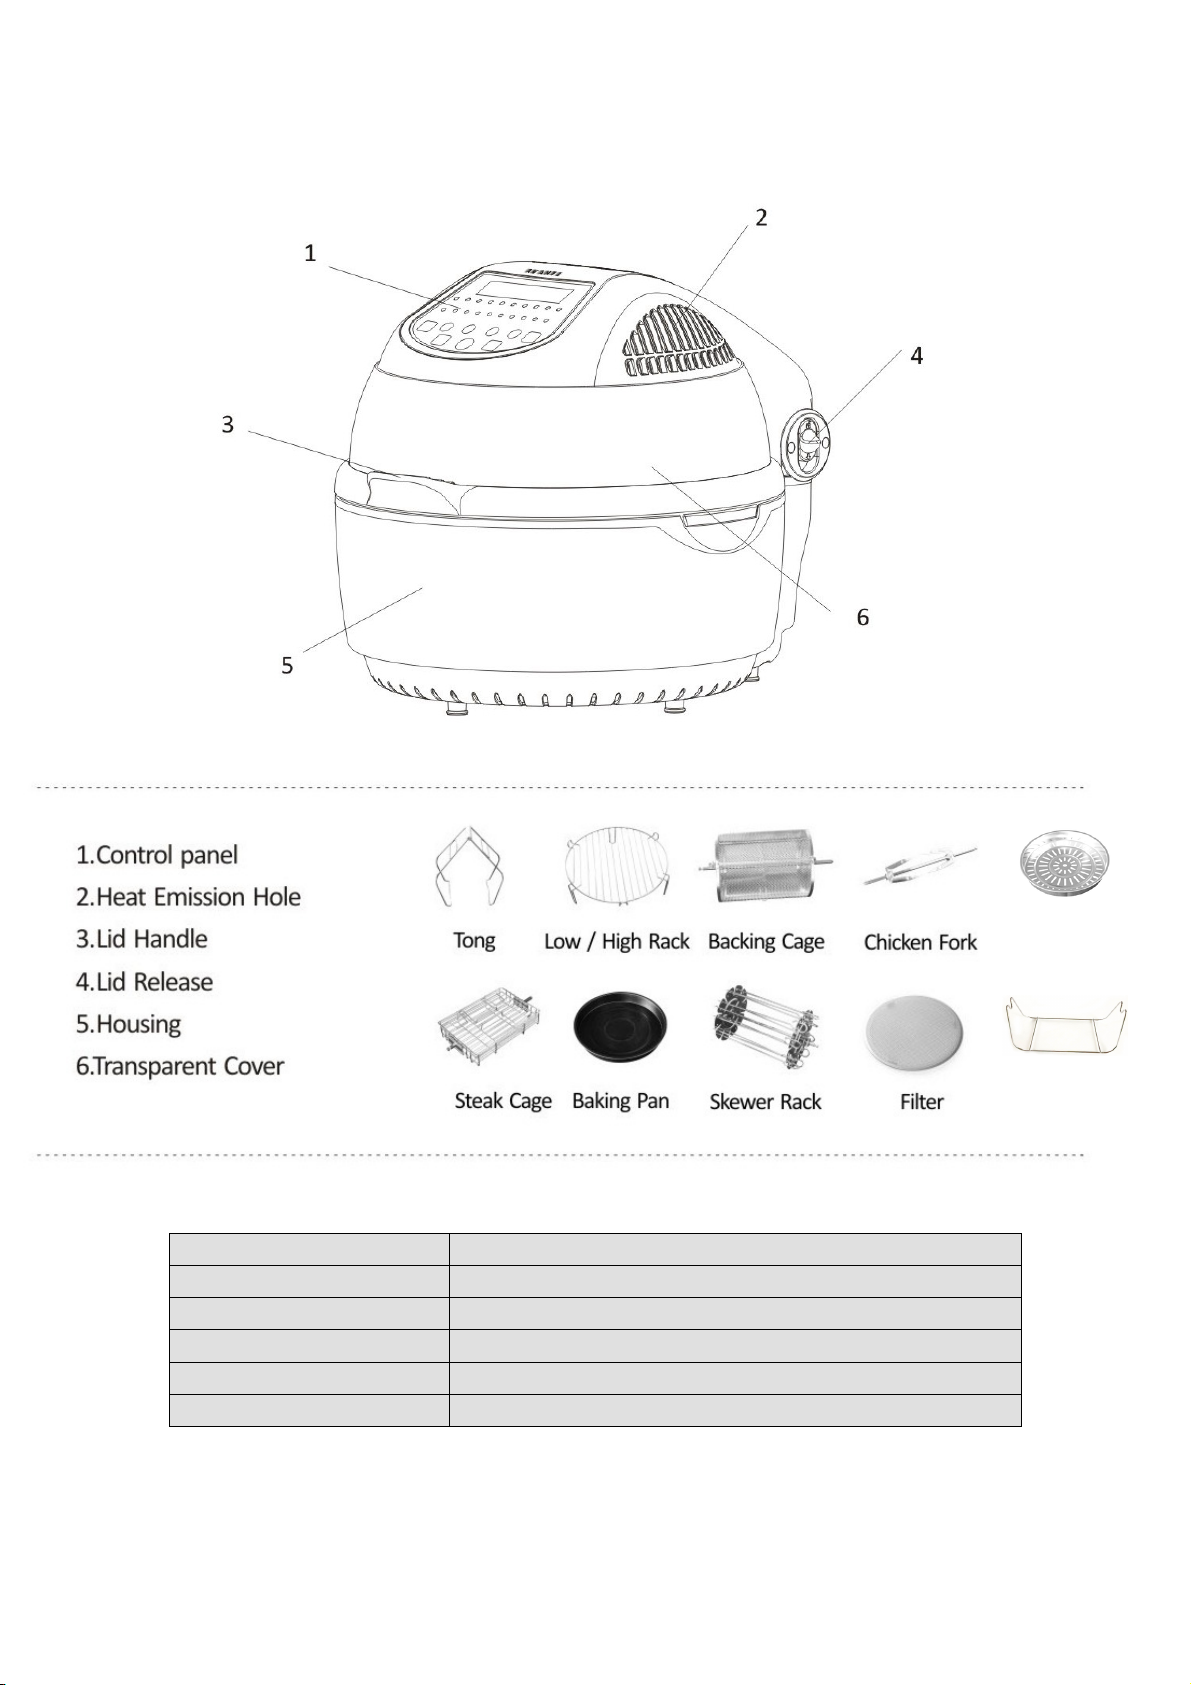
PRODUCT AND PARTS OUTLINE
SPECIFICATION:
POWER 110-120V, 60Hz, 1200-1400W
CAPACITY 10L
COOKING POT Non-stick coating
TEMPERATURE RAGE 30℃to 250℃
TIME SETTING 1-60mins
Holder
Steamer
BASIC PROCEDURES
1. Pull up the lid to the designated angle by holding the lid handle.
2. Put in the cooking port and the accessories (if required) and the food to be cooked.
If the dual rack or steamer is used, please add suitable amount of water into the pot
If rotation is available for the chosen mode, please make sure that the fork has been
connected properly.
Do not stack the food close to the heating element or the food may get charred.
3. Switch the lid release to unlock position and pull down the lid to close.
4. Connect the product to the power supply.
5. Press the Start key once, and the product enters stand-by mode.
6. Press the Start key to select appropriate mode, the corresponding default time and
temperature will be shown on the LED display screen.
7. The time and temperature may be set to the individual need.
(If no mode setting is assigned, the product still can operate if the time and temperature setting
is made.)
8. Press the start key and the machine starts operation.
9. When a certain temperature is reached, the heating element may pause. The heating element
will restart after the temperature has dropped. The process repeats until the set time is reached.
10. If other food is to be added during cooking, switch the lid release and pull up the lid, the
product will stop heating immediately (but the rotation continues). Close the lid after the food is
added and the process will continue.
11. When the set time is reached, the product will give an indicating sound. Remove the plug and
take out the food. Handle the hot items with care to avoid scald. Place the hot lid and pot one an
insulating pad to avoid causing damage to the table top.
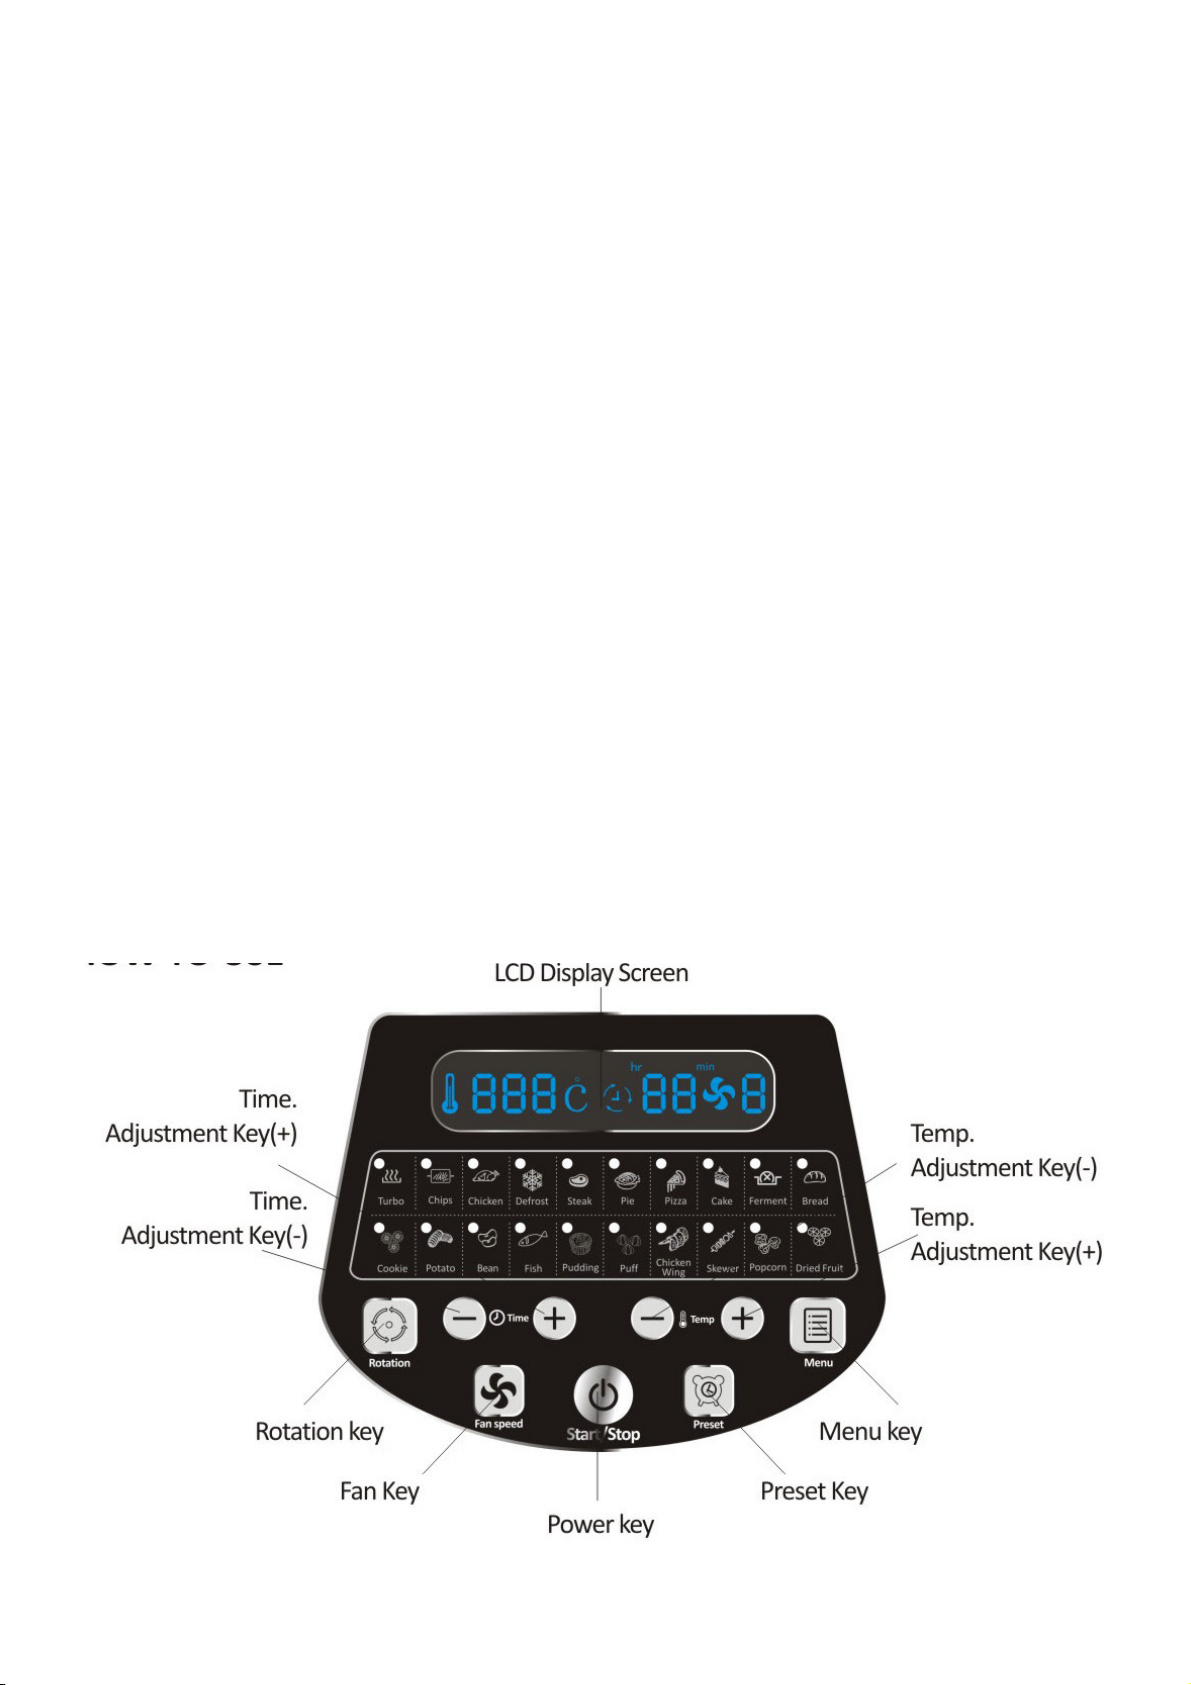
HOW TO USE
It is recommended that the total weight of food should not exceed 5kg.
All modes are operated with rotation in default setting. Press Rotation key once to cancel.
SUGGESTED USAGE OF THE ACCESSORIES
Low/High rack, steamer, frying pan, tong
1. Put the rack into the cooking pot. Place the food on the rack direct. Or place the steamer or
frying pan onto the rack, put the food inside, then choose the function, start it.
2. Select the function you need. Press “START”.
Remark:
①The tong is helpful to move the accessories and food.
②In order to heat the food completely, please do not put the food on the cooking pot direct.

Chicken fork
1. Insert the spindle to a fork. Fix them tightly with a screw.
2. Insert a chicken from another side. Use another fork to lock it tightly.
3. Insert the spindle to the hole of the cooking pot
4. Select “Roast” function. Press “START”..
Remark:
The tong is helpful to move the accessories and food.
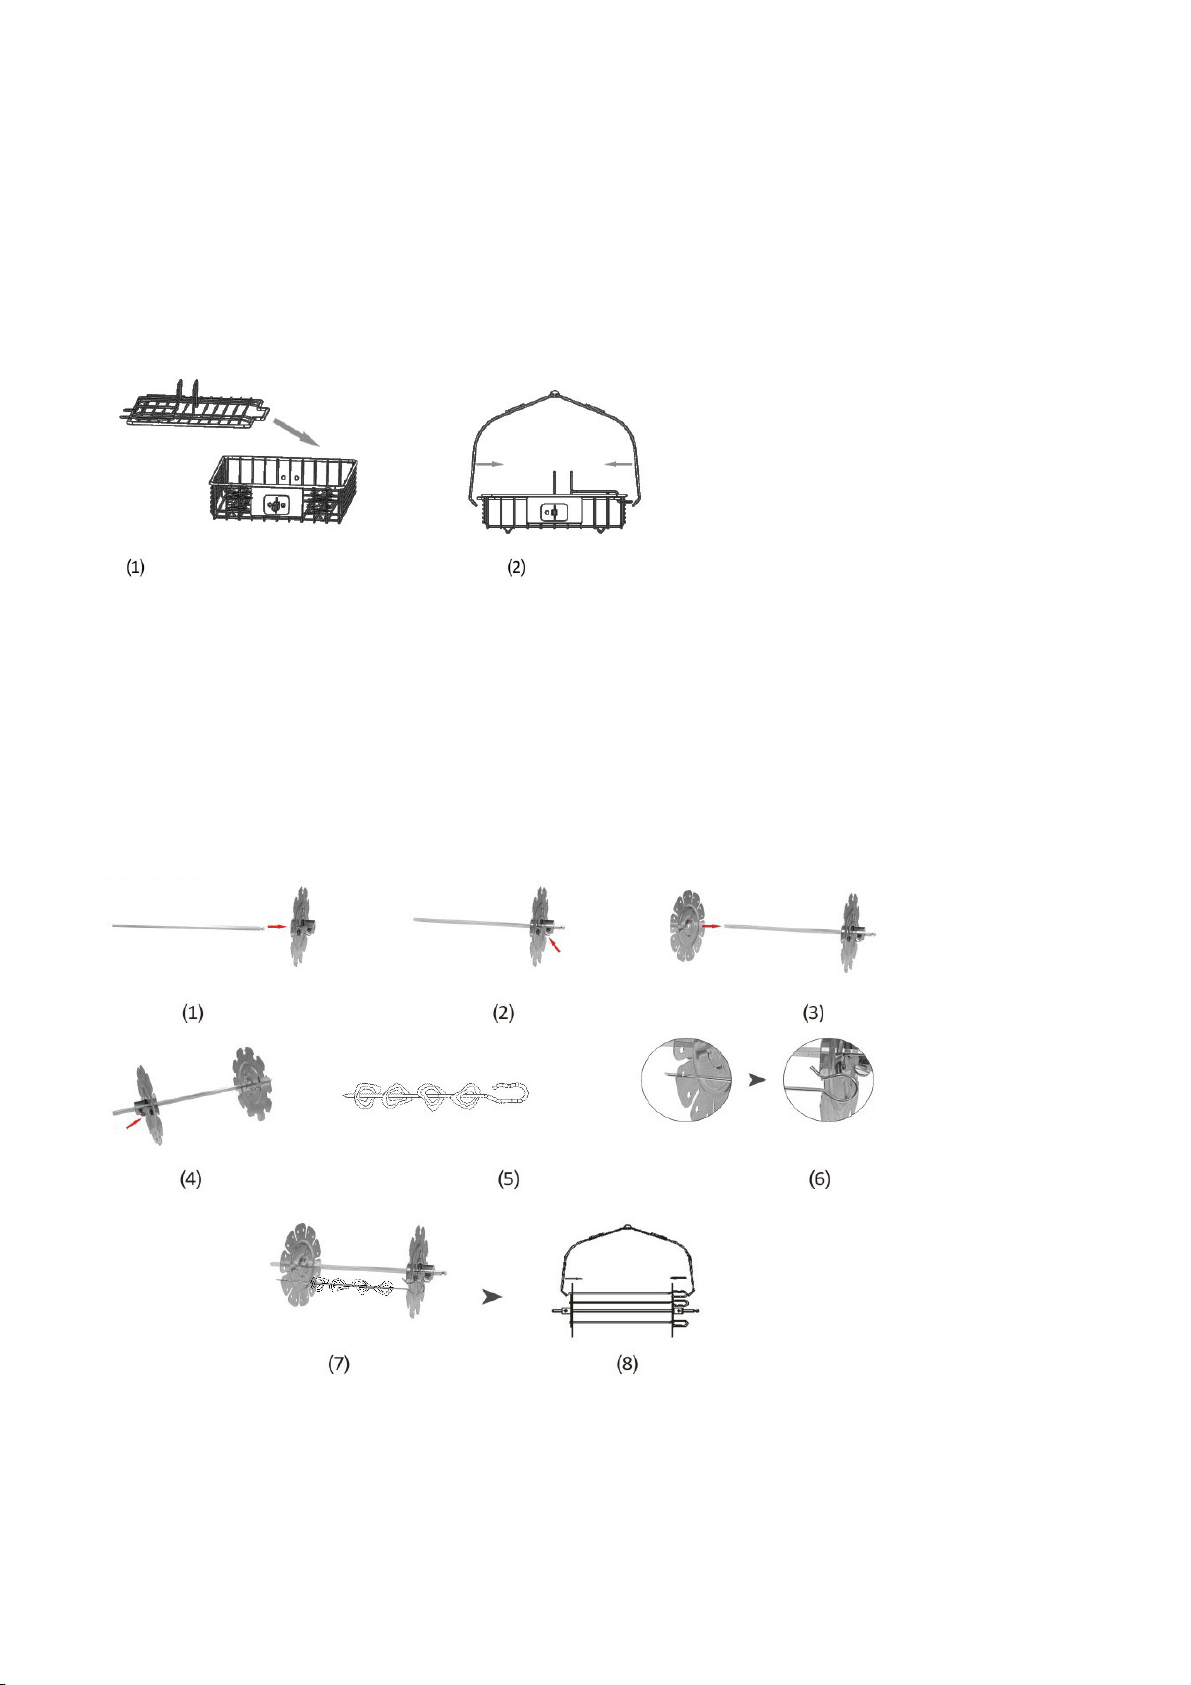
Baking cage
1. Insert the spindle into the cage. Use a screw to fix them tightly.
2. Open the cover of the cage.
3. Pour the food into the cage, close the cover.
4. Insert the spindle to the hole of the cooking pot.
5. Select “Deep fry” function. Press “START”.
Remark:
The tong is helpful to move the accessories and food.
Steak cage
1. Take the cover out
2. Place the food into the cage, close the cover.
3. Insert the spindle of the steak cage to the cooking pot.
4. Select the desired function. Press “START”.
Remark:
The tong is helpful to move the accessories and food.
Skewer rack
1. Insert the spindle to a sheet. Lock it with a screw. Do the same way for another sheet.
2. Insert the food to the needles. Install the needles through the holes of the sheet.
3. Fix the skewer rack to the cooking pot.
4. Select the desired function. Press “START”.
Remark:
The tong is helpful to move the accessories and food.
Filter
1. Before cooking any food which contains fats, it is recommended to use the stainless steel
grease filter to be fixed onto the heat shield, to prevent the accumulation of grease inside the
heater.
2. Place the filter under the heat shield, rotate clockwise.

3. Clean and dry the stainless steel filter after every cooking.
Holder
To hold the baking cage, steak cage or skewer rack.
How to clean
Please let the body cool down before cleaning to prevent scald.
Please remove the plug from the power outlet before cleaning
The housing of the machine can be cleaned with a mildly damp cloth
Inner pot , tong, chicken fork, backing cage, dual rack can be washed and cleaned water with
mild detergent
Do not immerse the machine in water
Please make sure the accessories are dry before using it again.
Caution: The user is cautioned that changes or modifications not expressly approved by the
party responsible for compliance could void the user's authority to operate the equipment.
This device complies with Part 15 of the FCC Rules. Operation is subject to the following two
conditions: (1) this device may not cause harmful interference, and (2) this device must accept
any interference received, including interference that may cause undesired operation.
NOTE: This equipment has been tested and found to comply with the limits for a Class B digital
device, pursuant to Part 15 of the FCC Rules. These limits are designed to provide reasonable
protection against harmful interference in a residential installation. This equipment generates,
uses and can radiate radio frequency energy and, if not installed and used in accordance with
the instructions, may cause harmful interference to radio communications. However, there is no
guarantee that interference will not occur in a particular installation.
If this equipment does cause harmful interference to radio or television reception, which can be
determined by turning the equipment off and on, the user is encouraged to try to correct the
interference by one or more of the following measures:
-- Reorient or relocate the receiving antenna.
-- Increase the separation between the equipment and receiver.
-- Connect the equipment into an outlet on a circuit different from that to which the receiver is
connected.
-- Consult the dealer or an experienced radio/TV technician for help.

This equipment complies with FCC radiation exposure limits set forth for an uncontrolled
environment. This equipment should be installed and operated with a minimum distance of 20cm
between the radiator and your body.
This transmitter must not be co-located or operating in conjunction with any other antenna or
transmitter.
RECIPES FOR REFERENCE
Fillet steak in red wine sauce
Ingredients
Fillet Steak 1 pc

Ingredients for red wine sauce
Onion 1pc
Butter 10pc
Olive oil 1pc
Flour 1/2 tlbs
Red wine 150g
Beef stock 300g
Recommended Accessory:
Steak cage
Procedures
1. Place a cooking pan on a low fire, add olive oil and butter in it. Stir the onion until soft, and add flour to cook
for half a minute.
2. Add red wine and beef stock into (1) to cook until a thick texture is obtained.
3. Place the steak into the steak cage. Connect the steak cage to the machine through the joints on the interior.
4. Do the setting as the following: Mode - Steak; Time- 12 minutes
Remove the steak and spread red wine sauce on it.
TURBO- Baked shrimp in salt
Ingredients
Prawn 10 pc
Coarse Salt 4 tlbs
Zedoary powder 2 tsp
Recommended Accessory:
Dual rack or baking cage
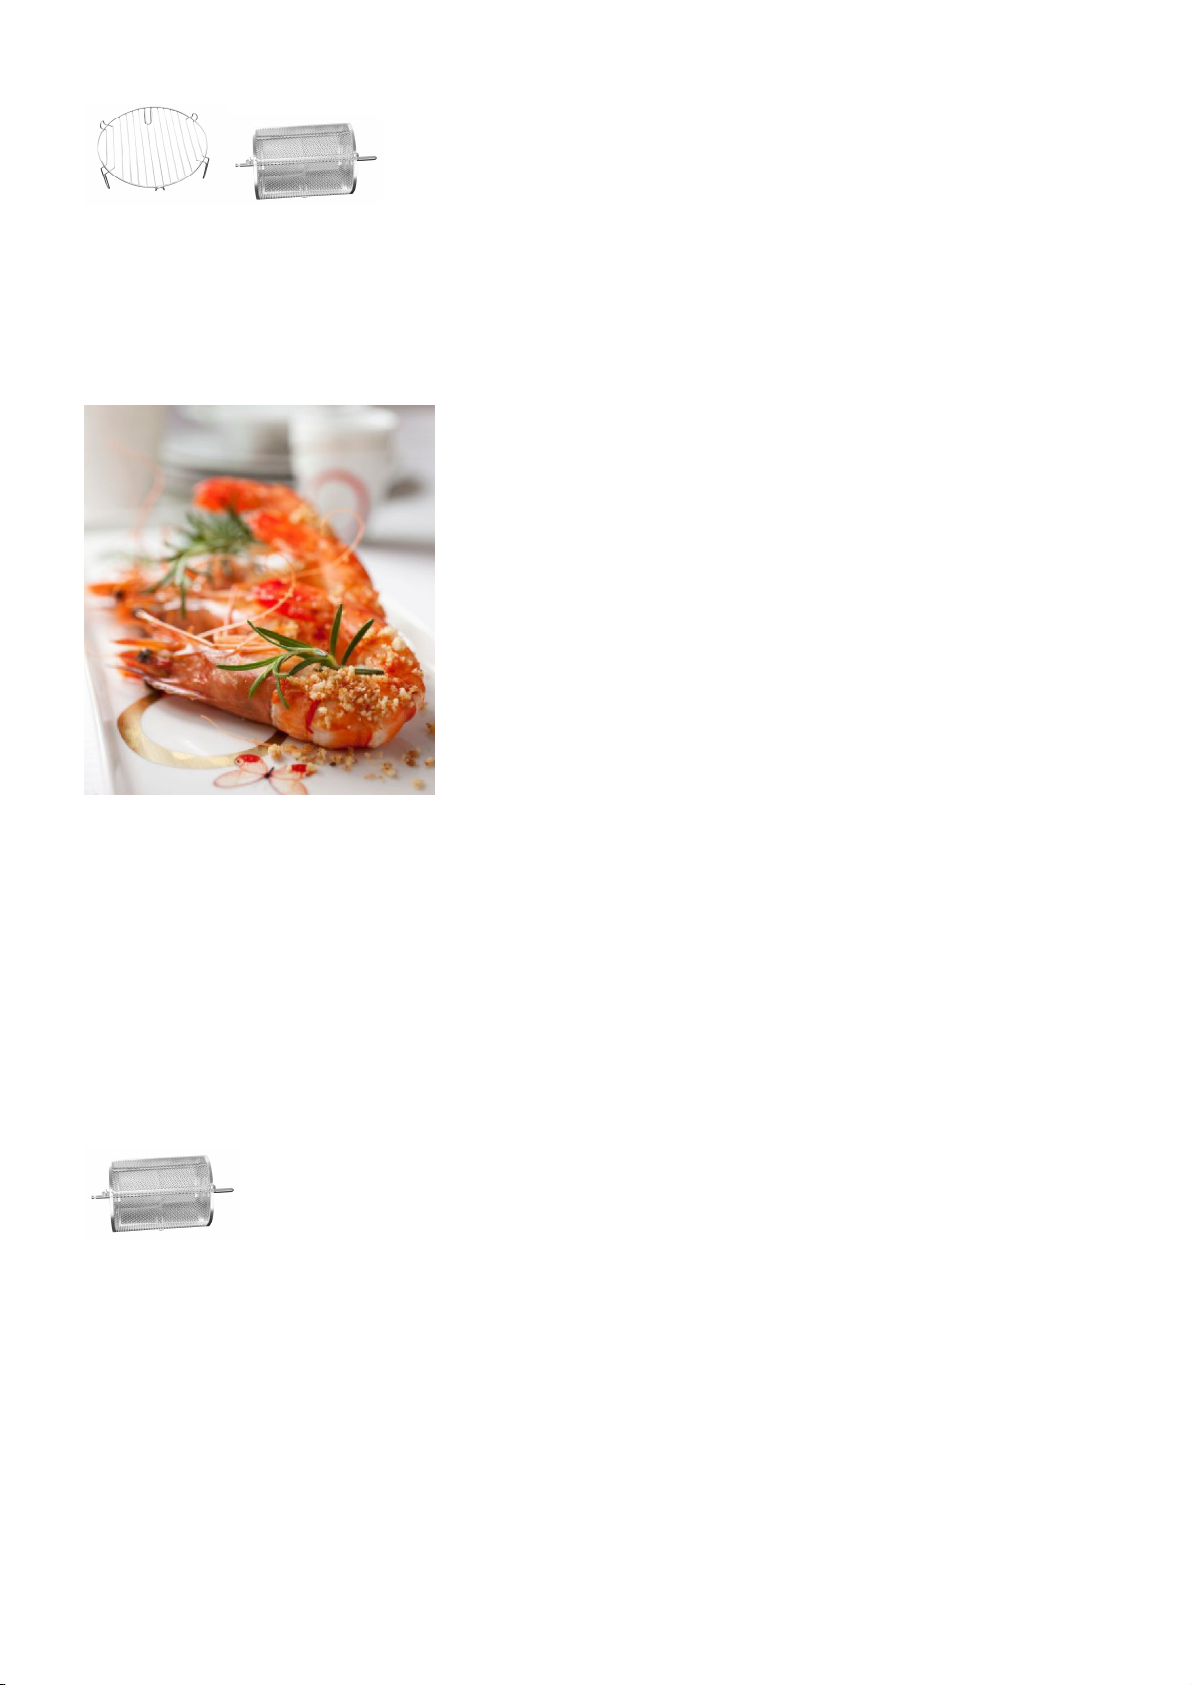
Procedures
1. Clean the shrimps and remove the intestines. Wipe dry.
2. Place the dual rack (high side) into the cooking pot and lay a piece of aluminum foil on it.
3. Lay the shrimps on top and spread the coarse salt and zedoary powder onto the shrimps.
4. Do the setting as the following: Mode – Turbo. Adjust the time from 5 minutes to 15 minutes.
CHIPS- French fries
Ingredients
Frozen Fries 1 pack
Salt q.s.
Recommended Accessory:
Baking cage
Procedures
1. Pour a pack of fries into the Baking cage.
2. Connect the Baking cage to the inner pot through the connection pole.
3. Do the setting as the following: Mode – Chips; Time – 25 minutes
4. Pour out the fries after cooking, spread salt on fries before served.

COOKIES - Chocolate chips biscuits
Ingredients
Soft Flour 175g
Butter 150g
Brown Suger 120g
Almond Powder 60g
Baking Powder 1/2tsp
Salt 1/2tsp
Egg 1pcs
Vanila Essence 1tsp
Chocolate chips 60g
Recommended Accessory:
Dual rack and frying pan
Procedures
1. Well mix butter and brown sugar, add egg and vanilla essence into the mixture.
2. Sift cake flour, baking powder, salt and almond powder.
3. Add the powder into the butter mixture and stir until smooth. Add in chocolate chips.
4. Freeze the dough for 30minutes.
5. Divide the dough into small pieces and press it to form shapes.
6. Place the dual rack (low side) into the cooking pot and lay a piece of aluminum foil on it. Place the biscuits
on top.
7. Do the setting as the following: Mode - Cookies. Time – 25 minutes.

PIZZA - Ham pizza with cheese (Amount for 2 pieces of pizza)
Ingredients
Ingredients for pasta
Soft flour 110g
Strong flour 50g
Salt 1/4
Water 100g
Milk powder 10g
Sugar 10g
Yeast 10g
Butter 10g
Ingredients for stuffing
Ham 50g
Cheese 100g
Tomato 2pcs
Butter 10g
Tomato sauce 2tlbs
Garlic 2pcs
Sugar 1/2 tsp
Salt q.s.
Pepper Powder q.s.
Recommended Accessory:
Dual rack and frying pan
Procedures
1. Mix all the ingredients together and knead a dough is form. Leave it still in a warm place to raise to about
double in size.
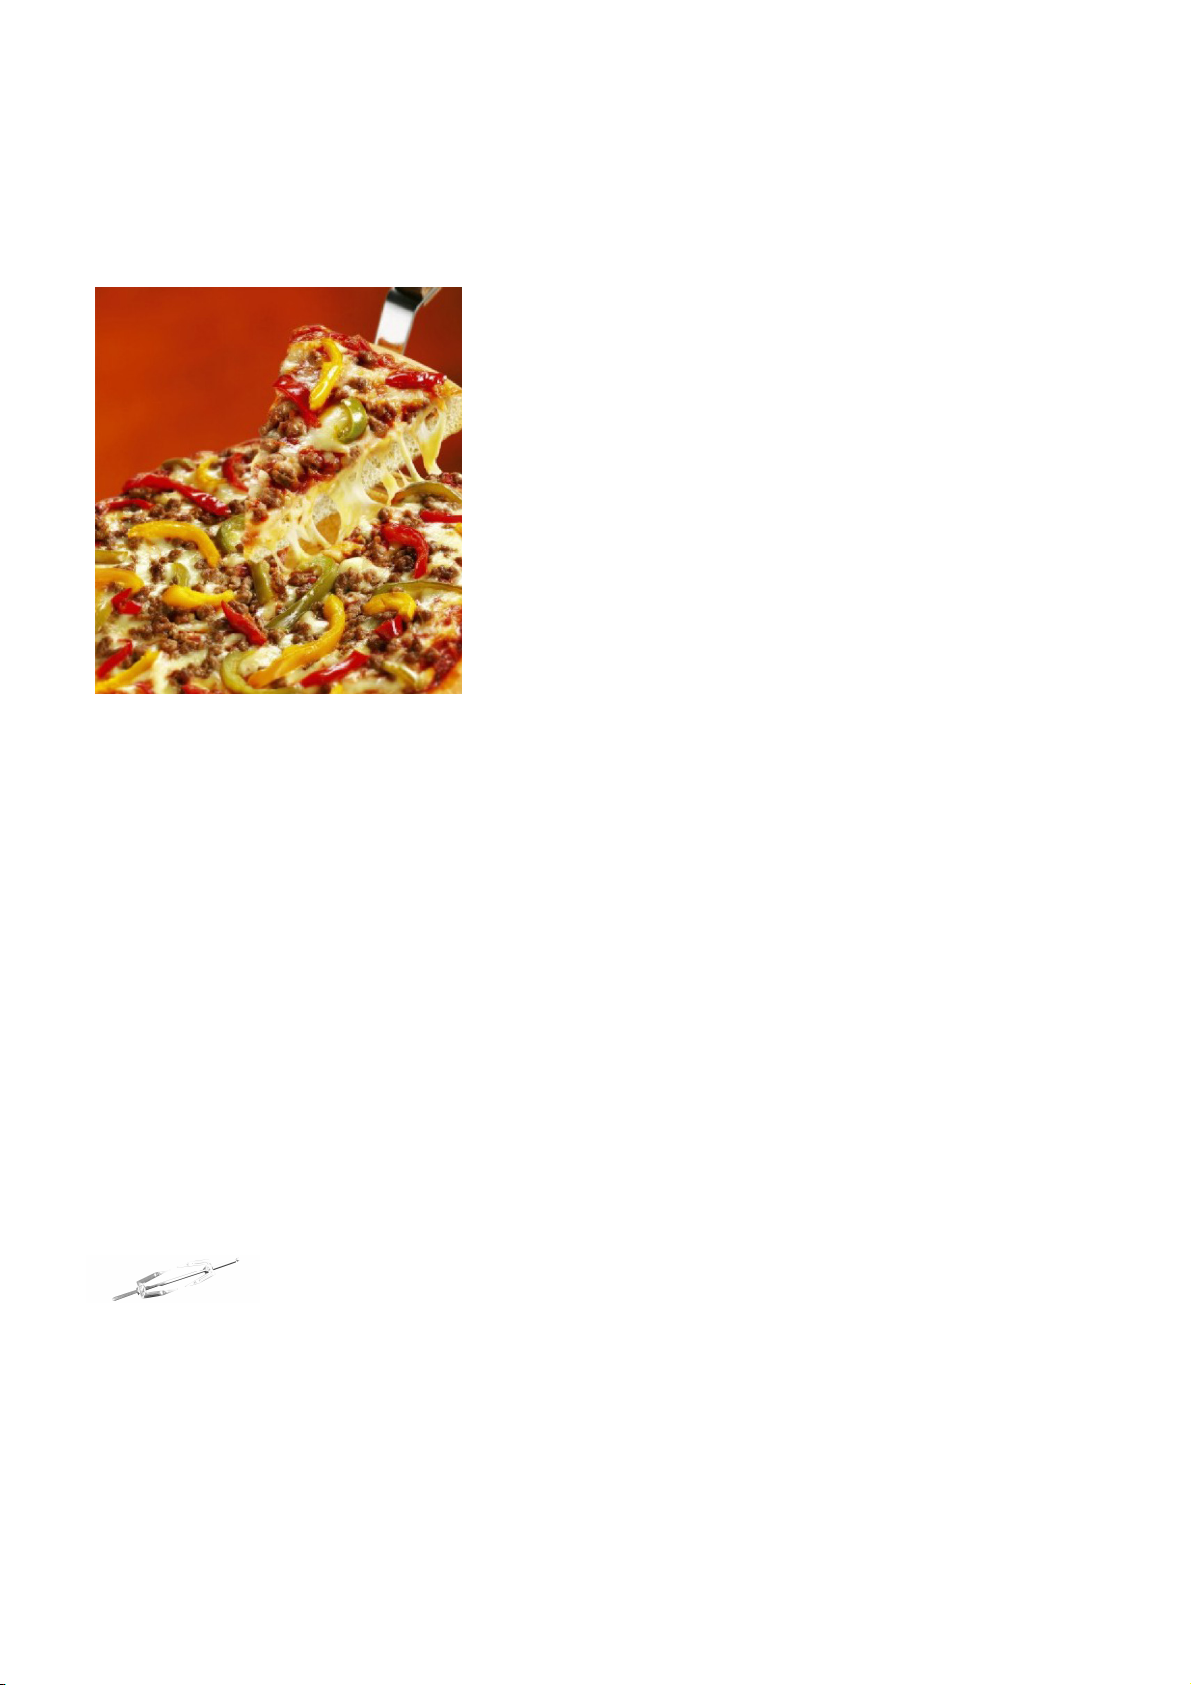
2. Divide the dough into 2 equal portions, and shape each of them into a thin pizza pasta.
3. Place the dual rack (low side) into the cooking pot. Brush a suitable amount of oil on your pan, and lay the
pasta on it. Then, put the pan with the pasta on rack.
4. Apply the tomato sauce and lay a desirable amount of all ingredients on the pasta, and finally spread the
cheese on top.
5. Do the setting as the following: Mode - Pizza; Time – 12 minutes
CHICKEN - Roast Chicken
Ingredients:
Chicken
Light coy sauce
Barbecue paste
Green Chinese onion
Black pepper powder
Rattan chilli oil
Ginger
Garlic
Salt
Recommended Accessory:
Chicken fork
Procedures
1. Clean the chicken, use all kinds of materials to make the marinade, put the chicken in the marinade, pickle
for a day.
2. String the chicken on the chicken fork, fill the chicken belly with green Chinese onion and seasoning, and tie
it with toothpicks.
3. Select “Chicken” function of the air-fryer; Time: 30 minutes.

Table of contents


